Android Studio: Add jar as library?
Asked Answered
I

35

1078

I'm trying to use the new Android Studio but I can't seem to get it working correctly.

I'm using the Gson library to serialize/deserialize JSON-objects. But the library somehow isn't included in the build.

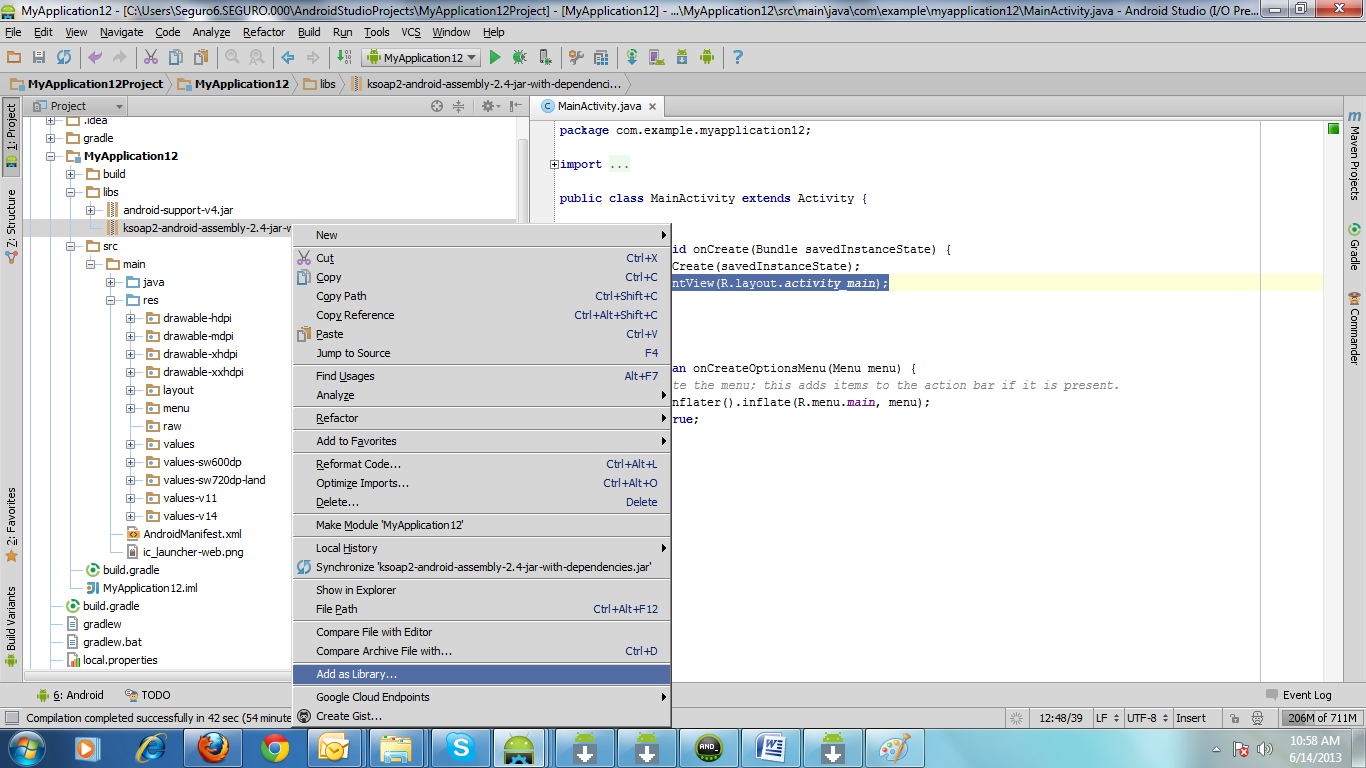
I had created a new project with just a MainActivity. Copied gson-2.2.3.jar in the /libs folder and added it as a library dependancy(right click->Add as library). This includes the jar in android studio so it can be referenced from the source files.

When I try to run the project it cannot compile so I added:

compile files('libs/gson-2.2.3.jar')

to the dependencies in de .gradle file. After that it compiles correctly but when running the application I get a ClassDefNotFoundException.

Does anyone know what I'm doing wrong?

Ixtle answered 17/5, 2013 at 11:41 Comment(2)
Refer : https://mcmap.net/q/49059/-how-can-i-use-external-jars-in-an-android-projectDenudation
Although this doesn't solve the problem, just wanna point that "compile" was deprecated in favor of "implementation".County
S
1560

I've been struggling with the same thing for many hours, trying to get the Gson jar to work no less. I finally cracked it – here are the steps I took:

  1. Put the Gson jar (in my case, gson-2.2.4.jar) into the libs folder
  2. Right click it and hit 'Add as library'
  3. Ensure that compile files('libs/gson-2.2.4.jar') is in your build.gradle file (or compile fileTree(dir: 'libs', include: '*.jar') if you are using many jar files)

    Edit : Use implementation files('libs/gson-2.2.4.jar') (or implementation fileTree(dir: 'libs', include: '*.jar')) in Android Studio 3.0+

  4. Do a clean build (you can probably do this fine in Android Studio, but to make sure I navigated in a terminal to the root folder of my app and typed gradlew clean. I'm on Mac OS X, the command might be different on your system

After I did the above four, it started working fine. I think the 'Add as library' step was the one I'd previously missed, and it didn't work until I cleaned it either.

[Edit - added the build.gradle step which is also necessary as others have pointed out]

Sommersommers answered 18/5, 2013 at 20:8 Comment(17)
You are my hero! Ran gradlew.bat clean on both directories in my project with a build.gradle file, and it worked!Fishhook
Glad it sorted it. I just tried adding another jar and had the same issue - definitely need the compile files in build.gradle in there and need to clean with gradlew. Rebuild Project from Android Studio doesn't seem to do the clean properly.Sommersommers
I tried this way. In terminal on Windows 7 project builds perfectly but when try Run in Android Studio - have same problem...Antrorse
@Antrorse Try restarting Android Studio. Certainly when using external Jars in Maven it doesn't seem to pick stuff up properly until restarted. Luckily it loads pretty fast compared with Eclipse!Sommersommers
gradlew clean didn't solve the problem alone for me, I had to also do as @Ixtle suggested and add the .jar to my build.gradle located in MyProject/MyProject-MyProject/build.gradle. Inside this file mine now looks like dependencies { compile files('libs/android-support-v4.jar') compile files('libs/myextlib.jar')} Thanks!Lychnis
Maybe @DavidJeffrey could edit the answer so it includes that step.Ixtle
deleting all the folder in the build folder manually aslo works.Holbrook
If you don't want to have to explicitly add a line for each jar file: compile fileTree(dir: 'libs', include: '*.jar')Tiphani
I would recommend taking advantage of gradle's transient dependency management and download gson from mavenCentral() (if requiring an internet connection is acceptable. Simply add repositories { mavenCentral() } and replace your compile files(...) line with compile 'com.google.code.gson:gson:2.2.4' and gradle will automatically download and manage the jar file for you. This allows SCM to track only source code files and not libraries.Eavesdrop
@TheAppChaps i do all steps that you saied but i have a compile error: "Gradle: A problem occurred evaluating root project 'Test'. > Could not find method compile() for arguments [file collection] on root project 'Test'.". when i use "gradlew clean" i get an error: "FAILURE: Build failed with an exception. * What wen A problem occurred evaluating root project 'Test'. > Could not find method compile() for arguments [directory 'libs'] on root project 'Test'."Niblick
Solved: I should added dependencies to build.gradle in the App folder not build.gradle in the root!Niblick
I don't get the Add as Library option in step 2.Animal
In Android Studio 1.0.2, steps 2 and 3 are not needed because this line is already in the default build.gradle: compile fileTree(dir: 'libs', include: ['*.jar'])Complement
Can't find libs folder, or where to add libs folder? Check this link. Why made it this way... https://mcmap.net/q/49060/-how-to-add-39-libs-39-folder-in-android-studioHerisau
As soon as I do the right-click "Add Library", the compile command is automatically added as a dependency to the app's build.gradle, not the root's build.gradle (where it actually says in a comment don't put lib dependencies here :-)). Build works without further ado.Bicolor
Add below line to add jar as library into project. Open build.gradle file of your application module. then paste this line... compile fileTree(dir: 'libs', include: '*.jar')Britain
@Bicolor so adding that line in build.gradle is equivalent to clicking the "Add as a library button?"Birdsall
U
279

Here are the instructions for adding a local jar file as a library to a module:

  1. Create a 'libs' folder in the top level of the module directory (the same directory that contains the 'src' directory)

  2. In the build.gradle file add the following so that your dependencies closure has:

    dependencies {
        // ... other dependencies
        compile files('libs/<your jar's name here>')
    }
    
  3. Android Studio should have already setup a gradlew wrapper. From the command line, navigate to the top level of your project (the directory that has a gradlew file).

    Run ./gradlew assemble. This should compile the project with the library. You may need to fix errors in your build.gradle file as necessary.

  4. In order to have Android Studio recognize the local jar files as libraries for support while coding in the IDE, you need to take a few more steps:

    4.1. Right click on the module in the left hand panel and choose Open Library Settings.

    4.2. On the left panel of the dialog, choose Libraries.

    4.3. Click the + sign above the panel second from the left -> Java

    Menu

    4.4. Select your local jar and add it to the project.

  5. You may need to run the above ./gradlew command one more time

Unweighed answered 19/8, 2013 at 19:50 Comment(3)
This worked for me. I have Android Studio version 1.2 Build 141.1890965, on Ubuntu. Why do you say "as of Android Studio 2.5"? Is it a different version on Windows/Mac? (1a) Finding this was hard. Combo box is at top left of project structure area. Need to select "Project" as opposed to the "Android" and expand the "app". (1b) No "add" option came up, but "Paste" worked. (2) I had a line "compile fileTree(dir: 'libs', include: ['*.jar'])", but still had to add your explicit single line. (4, 5) not needed once (3) done successfully. Thanks!Slagle
"the left hand panel"? Do you mean the project panel? Could be anywhere... With Android Studio 2.3.3 I can't find Library Settings but adding the jar to Dependencies in Module Settings seems to be the same...Baptist
for mac, if you haven't gradle: $ brew install gradle if you get "./gradlew: Permission denied" , you need to run $ chmod 755 gradlew Then you can run $ ./gradlew assembleCritter
B
113

In the project right click

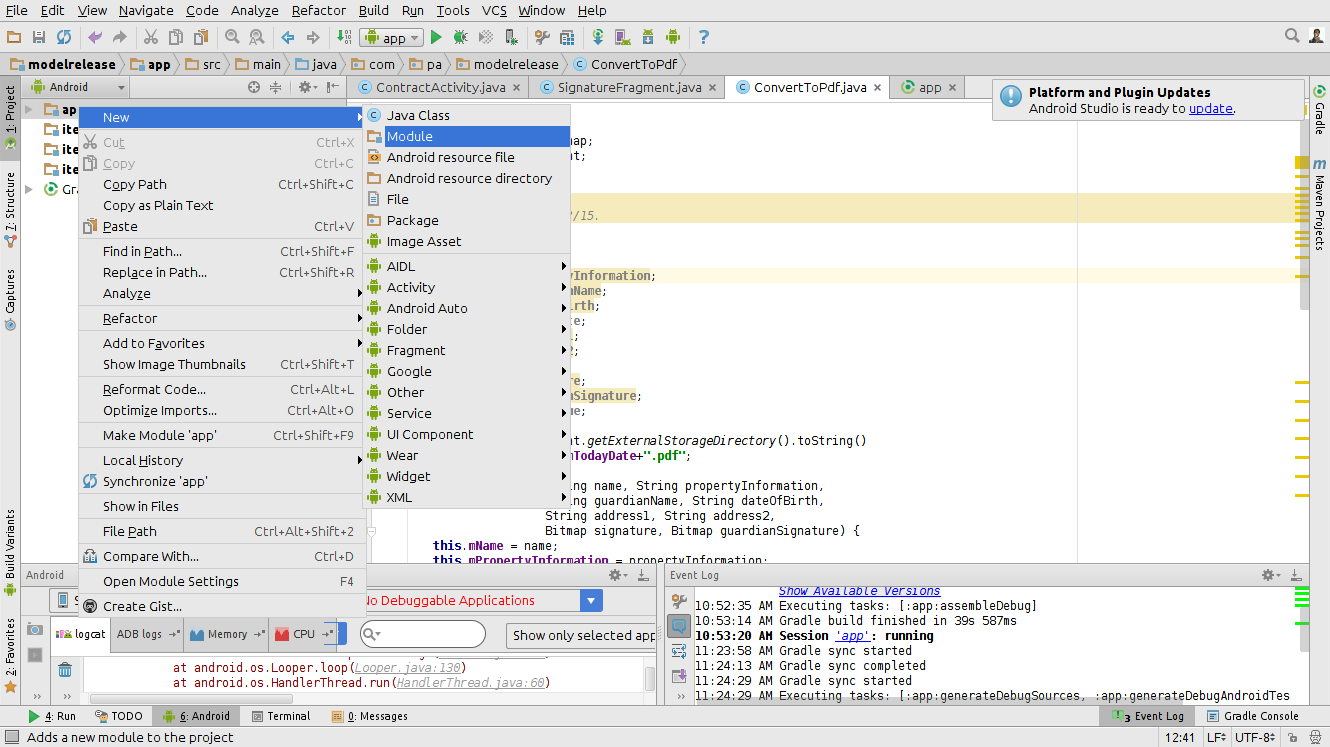
-> new -> module
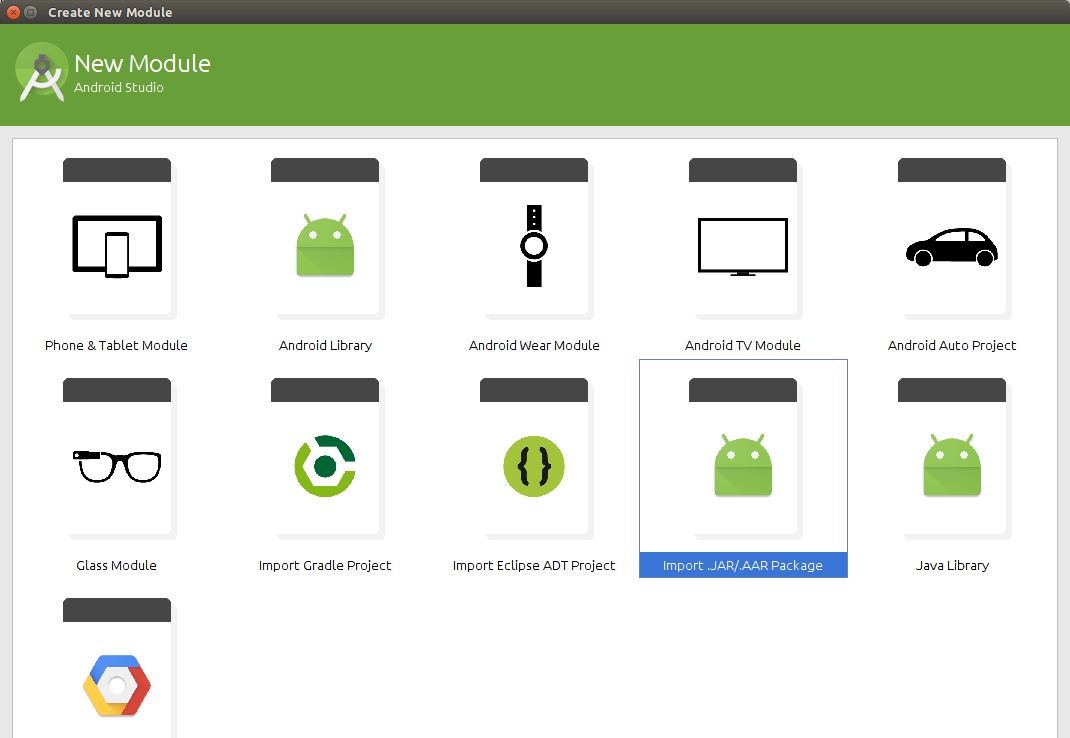
-> import jar/AAR package
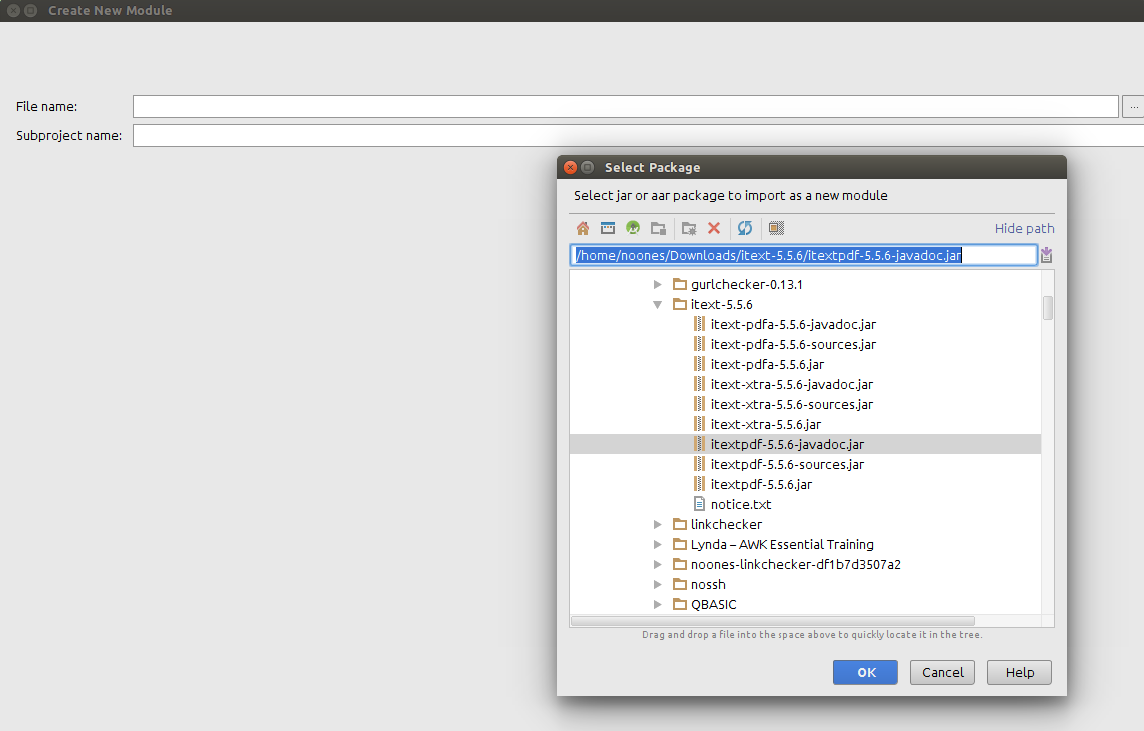
-> import select the jar file to import
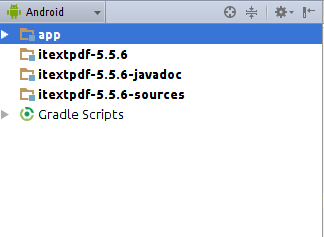
-> click ok -> done

Follow the screenshots below:

1:

Step 1

2:

enter image description here

3:

enter image description here

You will see this:

enter image description here

Botulism answered 19/8, 2015 at 5:50 Comment(8)
@CamConnor i also think so.. Other answers are outdatedBotulism
This's THE answerVincennes
But it is not recognized as libraray. For example, andriod studio editor: try to import a package in the imported jar, not recognized.Declaratory
Could not find a way to remove the imported module in this way.Declaratory
Why should I use this method of adding external jar and not the other answers of "copy-jar-to-libs" folder method?Monandry
Works like a charm!Taxidermy
how delete this wtf?))Keepsake
Where is this option to import jar/aab on Android Studio 4.2 Beta 5?Milly
P
49

IIRC, simply using "Add as library" isn't enough for it to compile with the project.

Check Intellij's help about adding libraries to a project

The part that should interest you the most is this:

(In File > Project Structure) Open the module settings and select the Dependencies tab.

On the Dependencies tab, click add and select Library.

In the Choose Libraries dialog, select one or more libraries and click Add Selected.

If the library doesn't show up in the dialog, add it in the Libraries settings, right below Modules.

You shouldn't need to add compile files() anymore, and the library should be properly added to your project.

Penrod answered 17/5, 2013 at 13:13 Comment(4)
Add as library already add's the jar in the same way. So i think the result is the same. I'll try it later.Ixtle
Add as library does do this successfully - I'm in the same boat as you Ozzie - EXACT same problem.Fishhook
Alright, I thought Add as library only added it to the library list and did not add it as to module dependencies.Penrod
When I tried this, I found it did add the compile files() lines to my build.gradle file, but it seemed to use absolute paths to the libraries (/libs/foo.jar). I change these to relative paths (libs/foo.jar), which fixed the problem for me.Rainbow
N
49

In Android Stuido, I like use Gradle to manage Gson lib.

Add below dependency in your build.gradle file.

repositories {mavenCentral()}

dependencies {compile 'com.google.code.gson:gson:2.2.4'}

Everything is OK.

You can also see this post. The best way to integrate third party library in Android studio

Needlecraft answered 15/9, 2014 at 23:25 Comment(2)
This method is the best because it's using maven.Kerry
Just remember to update the version number to the latest :) As of now that is 2.3.1, but check linkHocus
N
42

All these solutions are outdated. It's really easy now in Android Studio:

File > New Module...

The next screen looks weird, like you are selecting some widget or something but keep it on the first picture and below scroll and find "Import JAR or .AAR Package"

Then take Project Structure from File menu.Select app from the opened window then select dependencies ,then press green plus button ,select module dependency then select module you imported then press OK

Norword answered 21/2, 2015 at 4:20 Comment(2)
I think using maven would still be the better solution especially for large scale projects, that is, provided by saneryee.Kerry
Even this seems to be outdated. Simply put your .jar file in your "libs" directory and it will auto-magically be compiled to your project. There is already a default rule setup in Android Studio 1.4 to include all *.jar files from the "libs" dir.Eyler
D
37

Easy steps to add external library in Android Studio

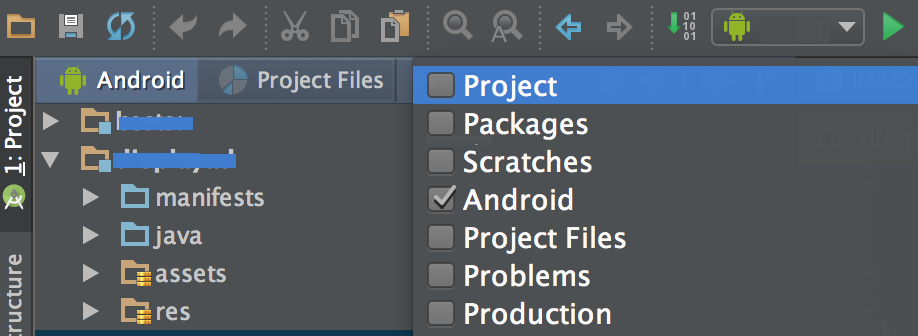
  1. If you are in Android View in project explorer, change it to Project view as below

enter image description here

  1. Right click the desired module where you would like to add the external library, then select New > Directroy and name it as 'libs'
  2. Now copy the blah_blah.jar into the 'libs' folder
  3. Right click the blah_blah.jar, Then select 'Add as Library..'. This will automatically add and entry in build.gradle as compile files('libs/blah_blah.jar') and sync the gradle. And you are done

Please Note : If you are using 3rd party libraries then it is better to use dependencies where Gradle script automatically downloads the JAR and the dependency JAR when gradle script run.

Ex : compile 'com.google.android.gms:play-services-ads:9.4.0'

Read more about Gradle Dependency Mangement

Denudation answered 26/8, 2016 at 18:48 Comment(0)
L
36

'compile files...' used to work for me, but not any more. after much pain, I found that using this instead works:

compile fileTree(dir: 'libs', include: '*.jar')

I have no idea why that made a difference, but, at least the damn thing is working now.

Leonorleonora answered 11/10, 2013 at 20:49 Comment(2)
This works for me however recently found sometimes AS doesn't pick up new/updated jars until you do a gradle sync.Henbit
Just remember that, "compile" was deprecated in favor of "implementation".County
F
19
  1. Download Library file from website
  2. Copy from windows explore
  3. Paste to lib folder from Project Explorer
  4. Ctrl+Alt+Shift+S open Project Structure
  5. Select Dependencies Tab, add the file by using +
  6. Tool bar Sync project with gradle file by using button

That solved my problem. Try, if anyone want more details let me know.

Falco answered 2/10, 2014 at 9:6 Comment(0)
M
19

I made it work by just adding one line to build.gradle:

dependencies {
    implementation fileTree(dir: 'libs', include: ['*.jar']) ----> AS creates this
    implementation 'com.google.code.gson:gson:2.3.1'   ----------> I added this one
}

Do not forget to click Sync now in the top right corner.

I'm using Android Studio 1.0.1.

Millenary answered 3/1, 2015 at 18:51 Comment(0)
D
15

I found Dependency Manager of Android Studio quite handy and powerful for managing 3rd party dependencies (like gson mentioned here). Providing step by step guide which worked for me (NOTE: These steps are tested for Android Studio 1.6 and onward versions on Windows platform).

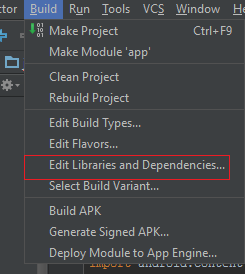
Step-1: Goto "Build > Edit Libraries and Dependencies..." it would open up the dialog "Project Structure"

enter image description here

Step-2: Select "app" and then select "Dependencies" tab. Then select "Add > 1 Library dependency"

enter image description here

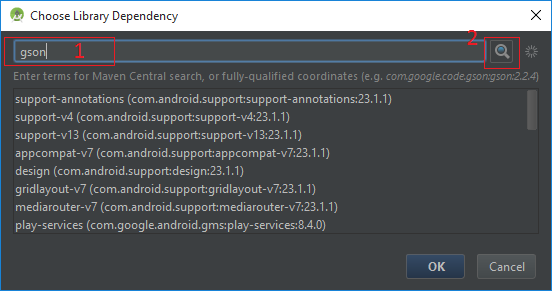
Step-3: "Choose Library Dependency" dialog would be shown, specify "gson" in search and press the "search button"

enter image description here

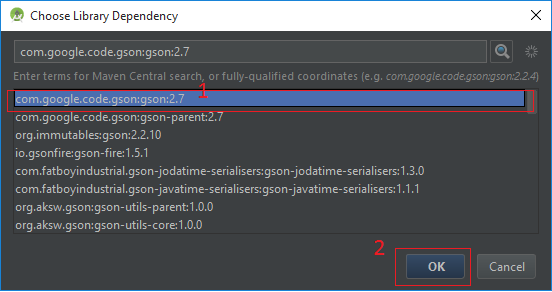
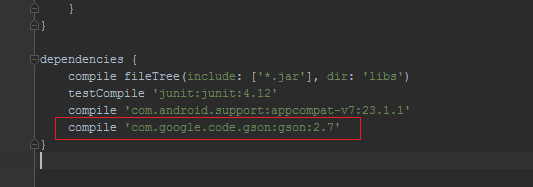
Step-4: The desired dependency would be shown in search list, select com.google.code.gson:gson:2.7 (this is the latest version at the time when I wrote the answer), press OK

enter image description here

Press OK on "Project Structure" dialog. Gradle would update your build scripts accordingly.

enter image description here

Hope this would help :)

Demarche answered 23/7, 2016 at 13:32 Comment(2)
I have found some issue with this approach, have been working on app which uses commons-io-2.5. When uploaded the app to Google Developer Console, it shows 0 devices supported for the signed apk. After exhaustive investigation, I figured out that I have to place the jar file under app/libs/commons-io-2.5.jar and update dependencies in gralde like this 'compile files('libs/commons-io-2.5.jar')', not sure what I have been doing wrong here and why documentation doesn't cover this.Demarche
This is the way it works. All other answers didn't work. Android Studio 2.3.3La
G
13

1. Put the jar (in my case, gson-2.2.4.jar) into the libs folder.

2. Ensure that compile files (libs/gson-2.2.4.jar) is in your build.gradle file.

3. Now Click on the "Sync Project with Gradle files"(Left to AVD manager Button on the topbar).

After I did the above three, it started working fine.

Geanticlinal answered 7/4, 2014 at 9:58 Comment(0)
K
11

You can do this with two options.

first simple way.

Copy the .jar file to clipboard then add it to libs folder. To see libs folder in the project, choose the project from combobox above the folders.

then right click on the .jar file and click add as a library then choose a module then ok. You can see the .jar file in build.gradle file within dependencies block.

 dependencies {
        implementation fileTree(dir: 'libs', include: ['*.jar'])
        implementation 'com.android.support:appcompat-v7:21.0.3'
        implementation project(':okhttp-2.0.0')
        implementation 'com.google.code.gson:gson:2.3.1'
    }

Second way is that: We can add a .jar file to a module by importing this .jar file as a .jar module then add this module to any module we want.

import module ---> choose your .jar file --> than import as a .jar -- enter image description here

Then CTRL+ALT+SHIFT+S --> project sturure -->choose the module you want ato add a jar -->Dependencendies --> Module Dependency. build.gradle of the module will updated automatically. enter image description here

Khanna answered 20/1, 2015 at 12:51 Comment(1)
Nice. one edit - It's "New module" now (Android Studio 1.0.1). "Import module" sends you to a different wizard..Tenuous
A
11

Download & Copy Your .jar file in libs folder then adding these line to build.gradle:

dependencies {
    implementation fileTree(dir: 'libs', include: ['*.jar'])
    implementation 'com.google.code.gson:gson:2.3.1'
}

Do not forget to click "Sync now"

Alive answered 23/3, 2015 at 6:11 Comment(0)
G
8

Unlike Eclipse we don't need to download jar and put it in /libs folder. Gradle handles these things we only need to add Gradle dependencies, Gradle downloads it and puts in gradle cache.

We need to add dependencies as:

dependencies {implementation 'com.google.code.gson:gson:2.2.4'}

thats it However we can also download jar & add that as library but the best practice is to add Gradle dependencies.

Glaab answered 23/6, 2015 at 6:36 Comment(0)
S
8

Put the .jar files in libs folder of the Android project.

Then add this line of code in the app's gradle file:

    compile fileTree(dir: 'libs', include: ['*.jar'])

For Android gradle plugin 3.0 and later, it is better to use this instead:

    implementation fileTree(dir: 'libs', include: ['*.jar'])
Shakira answered 23/7, 2015 at 5:31 Comment(0)
A
8

Ive done above 3 steps and its work charm for me.

(I am using Android Studio 2.1.2)

enter image description here

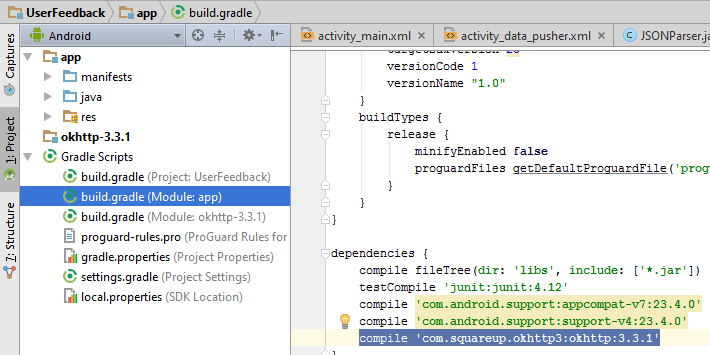
Step 1

  • Add your jar package name (as an example compile 'com.squareup.okhttp3:okhttp:3.3.1') into gradle build script under build.gradle(Module:app).

enter image description here

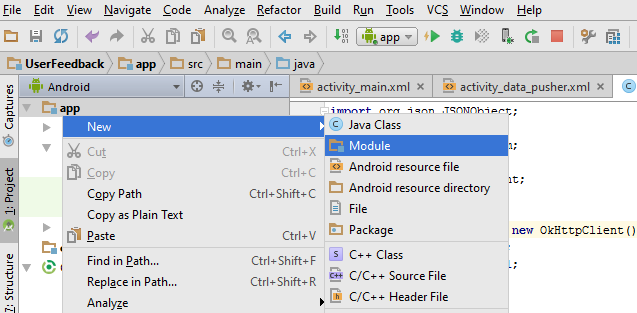
Step 2: Right click on app folder -> New -> Module

enter image description here

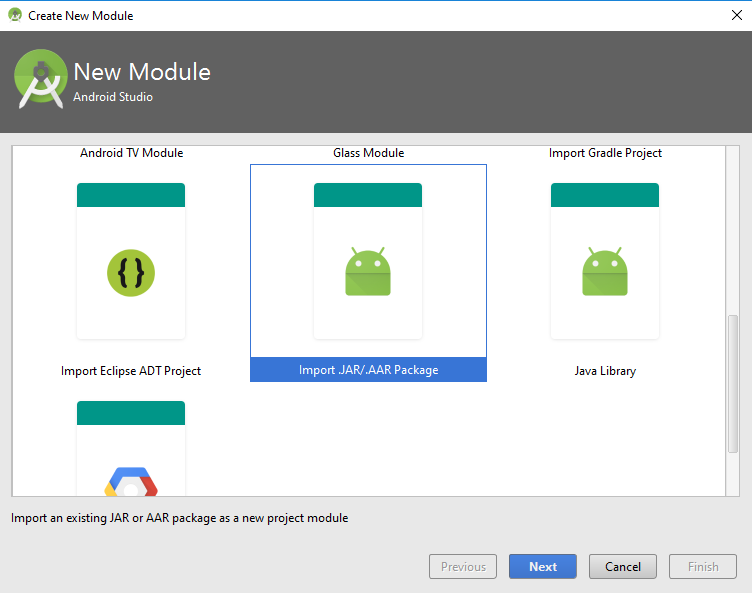
Step 3: Click Import JAR/.AAR Package Then browse your package. as an example: OkHttp.jar

enter image description here

Almatadema answered 19/6, 2016 at 9:22 Comment(0)
T
8

With Android Studio 3+:

You should just be able to simply copy the jar file to the libs folder right under the app folder.

... myproject\app\libs\myfile.jar

Then select Project Files from the drop-down on the Projects window, right click on the project, select Synchronize to see the file in Project Files. It will automatically add the dependencies in the gradle file (Module:app).

dependencies {
...
    implementation files('libs/myfile.jar')

Here is another solution:

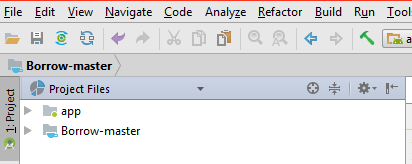
Go to the Project Files view (select Project Files from the dropdown).

enter image description here

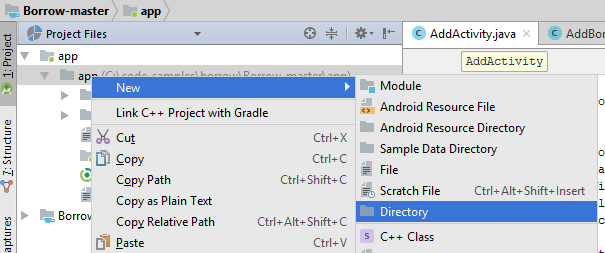
Select New... Directory, create a folder named libs right under app.

enter image description here

Open up File Explorer, copy and paste your jar file into the libs folder.

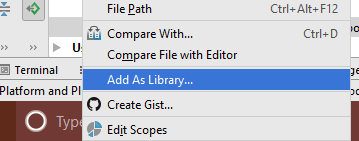
In Android Studio, right click on the jar file, and select Add as a Library... from the popup menu.

enter image description here

You should see the file listed in the dependencies list in the gradle file:

dependencies {
...
    implementation files('libs/myfile.jar')
}

Open up your java file, and add the import statement there:

import com.xxx.xxx;
Trifocals answered 23/12, 2017 at 18:43 Comment(0)
S
6
menu File -> project struct -> module select "app" -> dependencies tab -> + button 
-> File dependency -> PATH/myfile.jar
Soissons answered 30/1, 2015 at 8:51 Comment(0)
H
5

Step 1 : Now under your app folder you should see libs, if you don't see it, then create it .

Step 2 : Drag & Drop the .jar file here, you may be get a prompt "This file does not belong to the project", just click OK Button .

Step 3 : Now you should see the jar file under libs folder, right click on the jar file and select "Add as library", Click OK for prompt "Create Library"

Step 4 : Now this jar has been added.

enter image description here

Hawn answered 2/12, 2015 at 9:10 Comment(0)
S
5

I have read all the answers here and they all seem to cover old versions of Android Studio!

With a project created with Android Studio 2.2.3 I just needed to create a libs directory under app and place my jar there. I did that with my file manager, no need to click or edit anything in Android Studio.

Why it works? Open Build / Edit Libraries and Dependencies and you will see:

{include=[*.jar], dir=libs}
Sholem answered 15/1, 2017 at 18:50 Comment(0)
R
4

In your project-name/app folder, find the libs folder. If there is no libs folder, create one. Add your .jar file. Right-click on it and you will find add .jar as a dependency. You can find the dependencies added to your build.gradle file.

Rosina answered 30/12, 2014 at 13:41 Comment(0)
T
4

1) create an 'your_libs' folder inside the Project/app/src folder.

2) Copy your jar file into this 'your_libs' folder

3) In Android Studio, go to File -> Project Structure -> Dependencies -> Add -> File Dependency and navigate to your jar file, which should be under 'src/your_libs'

3) Select your jar file and click 'Ok'

and then you can see on your build.gradle like this : compile files('src/your_libs/your.jar')

Tronna answered 13/7, 2015 at 6:43 Comment(0)
R
4

In android Studio 1.1.0 . I solved this question by following steps:

1: Put jar file into libs directory. (in Finder)

2: Open module settings , go to Dependencies ,at left-bottom corner there is a plus button. Click plus button then choose "File Dependency" .Here you can see you jar file. Select it and it's resolved.

Rogerson answered 13/7, 2015 at 11:33 Comment(0)
L
4

In Android Studio 2.1 I follow the this way,

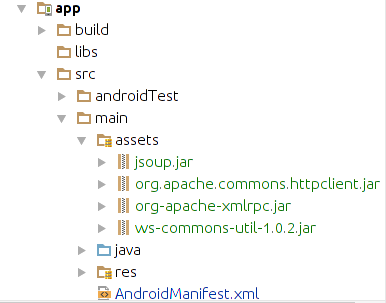
Goto app -> src-> main -> assets folder (If not available create it) -> put your JAR files

enter image description here

In your build.gradle add dependency like this,

implementation files('src/main/assets/jsoup.jar')
implementation files('src/main/assets/org-apache-xmlrpc.jar')
implementation files('src/main/assets/org.apache.commons.httpclient.jar')
implementation files('src/main/assets/ws-commons-util-1.0.2.jar')

Sync now. Now your JAR files ready to use.

Learning answered 11/5, 2016 at 11:54 Comment(3)
Why you not use libs directory?Raynard
@ErdeniErdyneev I give another approach for storing jar files. why I am not use assets? any issues in my approach? I am ready to correct mistakes if I am wrongLearning
@Learning I think the Jar files will be included in the APK and make it unnecessarily larger.Riggall
I
3

On Mac OS X:

  1. Add jar as library (drag jar to libs, right click add as lib)

  2. Add compile statement to build.grade

  3. Install gradle v1.6 (use homebrew)

    • brew install gradle
    • gradle -v
    • if not v1.6, upgrade homebrew
  4. gradle clean (rebuild android did not work)

This sorted me out.

Isthmian answered 11/7, 2013 at 15:12 Comment(0)
S
3

My answer is basically gathering some of the right but incomplete answers provided above.

  1. Open build.gradle
  2. Add the following:

    dependencies {
    compile 'com.android.support:appcompat-v7:19.+'
    compile fileTree(dir: 'libs', include: ['*.jar'])
    compile 'com.google.code.gson:gson:2.3'
    }
    

    This will allow support for two different ways of adding dependencies. The compile fileTree(dir: 'libs', include: ['*.jar']) (as @Binod mentioned) tells the compiler to look under the folder libs for ANY jar. It is a good practice to create such a folder 'libs' which will contain the jar packages that our application needs to use.

But this will also allow support for Maven dependency. The compile 'com.google.code.gson:gson:2.3' (as mentioned by @saneryee) it is another recommended way to add dependencies that are in a central remote repository and not in our /libs "local repository". It is basically telling gradle to look for that version of that package and it's telling the compiler to consider it when compiling the project (having it in the classpath)

PS: I use both

Seismology answered 25/9, 2014 at 4:0 Comment(0)
S
3

Like many before pointed out you shall add

compile files('libs/gson-2.2.3.jar') 

to your build.gradle file.

However I have a project in Android Studio that was migrated from Eclipse and in this case the "libs" folder is named "lib" so for me removing the "s" solved the problem.

Spiniferous answered 27/12, 2014 at 19:22 Comment(0)
P
3

For newer Android 1.0.2 the following is already there in your build.gradle file

implementation fileTree(include: ['*.jar'], dir: 'libs')

Add the library jar to your libs folder -> right click the library -> click add as a library -> it asks you for the project to add it for -> select your project-> click ok The following line is automatically added to build.gradle

implementation files('libs/android-query.jar')

That did it for me. nothing more was required. i have shown this for android aquery another third party library for android.

Pademelon answered 1/2, 2015 at 15:54 Comment(0)
O
3
  1. Added the libs folder at the level of app.
  2. Added all the jars in this project.
  3. Next, selected all the jars, in the libs folder,
  4. right click on the selected items, and say add library
  5. then you will find the jars expansion option, within the project explorer itself.

I observed CTRL + ALT + SHIFT + S --> project structure --> app-module -->Dependencies" already had an entry as (dir: 'libs', include: '*.jar') under compile-option, initially. And after adding the jar's as per the steps stated above, the build.gradle got the entries for the new added jar's, itself.

Osteitis answered 8/6, 2015 at 10:38 Comment(0)
I
1

compile fileTree(dir: 'libs', include: '*.jar') works fine but not compile files(...) have tested with Studio Beta 0.8.1

Igal answered 8/7, 2014 at 11:16 Comment(0)
R
1

Here are various ways to do this in Kotlin DSL (build.gradle.kts).
We assume that the library files are in project/app/libs/ directory.

  • Method 1

    implementation(
        files(
            "libs/library-1.jar",
            "libs/library-2.jar",
            "$rootDir/foo/my-common-library.jar"
        )
    )
    
  • Method 2

    implementation(
        fileTree("libs/") {
            // You can add as many include or exclude calls as you want
            include("*.jar")
            include("another-library.aar") // aar is similar to jar
            exclude("bad-library.jar")
        }
    )
    
  • Method 3

    implementation(
        fileTree(
            // Here, instead of repeating include or exclude, assign a list
            "dir" to "libs/",
            "include" to "*.jar",
            "exclude" to listOf("bad-library-1.jar", "bad-library-2.jar")
        )
    )
    
  • Method 4

    repositories {
        flatDir {
            dirs("libs/", "lib/")
        }
    }
    
    dependencies {
        // Could also write implementation(":jsoup:1.4.13")
        implementation("org.jsoup:jsoup:1.4.13")
        // NOTE: Add @aar suffix for AAR files
        implementation("ir.mahozad.android:pie-chart:0.7.0@aar")
    }
    

You can use Ant patterns in include and exclude calls as shown above.

See Gradle documentations for more information about this.

Thanks to this post and this post for providing helpful answers.

Riggall answered 25/1, 2022 at 13:30 Comment(0)
S
0

DO this :

Create libs folder under the application folder. Add .jar files to libs folder. Then add .jar files to app's build.gradle dependency. Finally Sync project with Gradle files.

Sylas answered 29/5, 2014 at 7:57 Comment(0)
A
0

In my case the added library missed some dependencies, but unfortunately Android Studio (0.8.14) has kept this as a secret.

There was no need to manually configure anything! I just added the missing libraries and used the default dependency configuration in the app build.gradle file, like this

dependencies {
    compile 'com.google.code.gson:gson:2.+'
    compile fileTree(dir: 'libs', include: ['*.jar'])
}
Astraea answered 3/11, 2014 at 0:51 Comment(0)
A
0

I don' know why but my Android Studio 0.8.14 goes crazy when I try to implement these solutions using Gradle. I admit my poor knowledge of this great build tool but what does Studio mutilate my project for? I manage to get it working this way: put android-support-v13.jar into 'libs' directory, then F4 on my project and add File dependency where I pointed android-support-v13.jar.

Alvinaalvine answered 3/12, 2014 at 16:7 Comment(0)

© 2022 - 2024 — McMap. All rights reserved.