Android: Align Parent Bottom + Bottom margin
Asked Answered
C

11

74

I've used a relative layout and I want to set the button at bottom of the screen, However this puts it all the down to the bottom and I would like to have some margin so it there's some space between the end of the screen/view and the button. However whatever I do the button margin just doesn't do anything on 2.1+ for some reason. The relative layout contains a background so I cant but the margin on that.

Anyone know a fix for this?

<?xml version="1.0" encoding="utf-8"?>
<RelativeLayout xmlns:android="http://schemas.android.com/apk/res/android"
android:layout_width="match_parent"
android:layout_height="match_parent"
android:layout_marginBottom="0dp"
android:background="@drawable/background" >

    <Button
        android:id="@+id/confirm_mobile_button_next"
        android:layout_width="fill_parent"
        android:layout_height="40dip"
        android:layout_alignParentBottom="true"
        android:layout_alignParentLeft="false"
        android:layout_centerHorizontal="false"
        android:layout_centerInParent="false"
        android:layout_margin="15dp"
        android:background="@drawable/button_shape_selector"
        android:paddingLeft="10dip"
        android:paddingRight="10dip"
        android:text="@string/confirm_mobile_no_continue"
        android:textColor="@color/white"
        android:textStyle="bold" />

</RelativeLayout>
Coincident answered 18/11, 2012 at 15:51 Comment(0)
A
76

You can simply add a padding to the RelativeLayout instead of a margin to the Button, e.g. android:paddingBottom="15dp".

In general I'm always testing my layout in the Exclipse preview using API Level 8 setting. This gives quite accurate results for most devices, including ICS and JB.

Astolat answered 18/11, 2012 at 15:55 Comment(5)
This didn't do it for me since I am using MapView that should cover all screen. I am simply adding a blank TextView with the desired height using android:layout_alignParentBottom="true" and put the desired object (Button in this case) above.Transmigrant
This solution is not valid when the textview/button has a background, because its size is affected by the paddingBottom, and it will look horrible. It is better to place an invisible View on the bottomRichards
That's true, @voghDev. I guess the best advice is to think about the layout before applying any random padding or margin as both are fundamentally different although they often produce very similar output. There's a good article about the differences between padding and margin here on Stackoverflow: #5959199. Although it covers CSS, the same principles apply to Android's layout engine as well.Dabbs
Setting the Padding of a view is different from setting the Margin of the view. Padding defines the space between the view boundary and the inner content of the view, while Margin defines the space surrounding the view boundary. This distinction is important for Views such as Buttons and TextViews, where setting Padding but not Margin could result in the text inside the view being cut off. This would be especially true for the Button defined above, since layout_height defines both content height + padding. More info here: https://mcmap.net/q/46198/-difference-between-a-view-39-s-padding-and-marginTonie
Thank you for this! Though as far as the Android source is concerned, this seems like a workaround rather than a solutionRabe
M
34

The other thing you can do is put a View that's aligned to the bottom of the RelativeLayout, and set its height to the bottom margin you would want to use (or simply specify a value for layout_marginBottom) like so:

 <RelativeLayout
    android:layout_width="wrap_content"
    android:layout_height="wrap_content"        
    > 
    <ImageView
        android:layout_width="match_parent"
        android:layout_height="match_parent"
        android:src="@drawable/some_image"
        android:adjustViewBounds="true"

         />
    <TextView
        android:layout_width="match_parent"
        android:layout_height="wrap_content"
        android:text="Some Overlay"
        android:padding="3dip"
        android:gravity="center_vertical|center_horizontal"

        android:layout_above="@+id/empty_view"
        android:layout_marginBottom="35dip"
        />
    <View 
        android:id = "@+id/empty_view"
        android:layout_height = "30dip"
        android:layout_width = "match_parent"
        android:visibility="invisible"
        android:layout_alignParentBottom="true"
        />

    </RelativeLayout>

This example fills the RelativeLayout with the ImageView, and positions a TextView over the ImageView.

Mallon answered 19/9, 2013 at 4:18 Comment(4)
Don't list ids with a + more than once. You should only use @+id on the first instance and then only use @id elsewhere in the XML file. So where you have android:id = "@+id/empty_view" after the start of the padding View you should not have the +Seashore
Use Space instead of an invisible ViewRoadway
And also released with a support package: developer.android.com/tools/support-library/index.htmlRoadway
@DaveHaigh all I can offer you at the moment is the answer to this question: #11161454 The meaning of the + is a bit like the java keyword new. If you use + more than once in the XML, you are effectively telling the system to create another new id. I think the system is smart enough to not actually create another new one, but that's not the point; if the system changes in future, your code would break. I think this is also pulled up by lint if you turn it on with the right settings.Seashore
T
23

Yu can use translateY attribute

translateY="-16dp"

Final code

<?xml version="1.0" encoding="utf-8"?>
<RelativeLayout xmlns:android="http://schemas.android.com/apk/res/android"
    android:layout_width="match_parent"
    android:layout_height="match_parent"
    android:layout_marginBottom="0dp"
    android:background="@drawable/background">

    <Button
        android:id="@+id/confirm_mobile_button_next"
        android:layout_width="fill_parent"
        android:layout_height="40dip"
        android:layout_alignParentBottom="true"
        android:layout_alignParentLeft="false"
        android:layout_centerHorizontal="false"
        android:layout_centerInParent="false"
        android:layout_margin="15dp"
        android:background="@drawable/button_shape_selector"
        android:paddingLeft="10dip"
        android:paddingRight="10dip"
        android:text="@string/confirm_mobile_no_continue"
        android:textColor="@color/white"
        android:textStyle="bold"
        android:translateY="-16dp" />

</RelativeLayout>
Tempietempla answered 21/7, 2016 at 9:7 Comment(0)
E
5

only working solution suggested by @franny zhao is below.

<?xml version="1.0" encoding="utf-8"?>
<RelativeLayout
    android:layout_width="match_parent"
    android:layout_height="wrap_content">

    <FrameLayout
        android:id="@+id/fl_layout"
        android:layout_alignParentBottom="true"
        android:layout_width="wrap_content"
        android:layout_height="wrap_content">
        <TextView
            android:id="@+id/tv_layout"
            android:text="hello world"
            android:layout_marginBottom="50dp"
            android:layout_width="wrap_content"
            android:layout_height="wrap_content" />
    </FrameLayout>
</RelativeLayout>

If you add padding to the bottom aligned view as suggested by others, the view background will also extend. If you have colored background then the view will look like it is glued to the bottom. Padding and margin are entirely different, padding is part of view, but margin leaves space between views.

Elisavetpol answered 16/5, 2017 at 11:13 Comment(0)
B
2

I think the best way is to set android:layout_alignParentBottom in XML then in java code behind:

Button confirm_mobile_button_next = (Button)findViewById(R.id.confirm_mobile_button_next)

and

confirm_mobile_button_next.setTransitionY(-THE_VALUE) or setTransitionX(-THE_VALUE)
Bijugate answered 9/1, 2015 at 14:20 Comment(0)
B
2

I think the best way is to set:

<...
android:layout_alignParentBottom="true" />

then in java code behind:

Button confirm_mobile_button_next = (Button)findViewById(R.id.confirm_mobile_button_next)
confirm_mobile_button_next.setTransitionY(-THE_VALUE) or setTransitionX(-THE_VALUE)
Bijugate answered 9/1, 2015 at 14:25 Comment(0)
E
2

You can use a ViewGroup(for example, FrameLayout or LinearLayout) to wrap the view. Set alignParentBottom in the outside ViewGroup, then marginBottom can work in the inside View.

<?xml version="1.0" encoding="utf-8"?>
<RelativeLayout
    android:layout_width="match_parent"
    android:layout_height="wrap_content">

    <FrameLayout
        android:id="@+id/fl_layout"
        android:layout_alignParentBottom="true"
        android:layout_width="wrap_content"
        android:layout_height="wrap_content">
        <TextView
            android:id="@+id/tv_layout"
            android:text="hello world"
            android:layout_marginBottom="50dp"
            android:layout_width="wrap_content"
            android:layout_height="wrap_content" />
    </FrameLayout>
</RelativeLayout>
Ex answered 14/11, 2016 at 8:55 Comment(0)
G
1

Since I stumbled upon this issue, and saw no answers fit to my situation I started thinking for half a second and resolved it by setting a negative margin on the view inside the RelativeLayout sample:

<RelativeLayout
    android:layout_width="match_parent"
    android:layout_height="match_parent">
    <ImageView
    android:layout_width="48dp"
    android:layout_height="48dp"
        android:layout_marginTop="-8dp"
        android:layout_marginStart="-8dp">
</RelativeLayout>

This should prove useful to some people.

Gain answered 23/12, 2014 at 14:21 Comment(0)
R
0

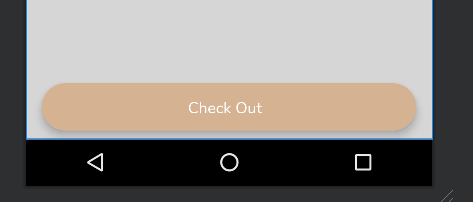
Well this is 2022, but if you still are not using ConstraintLayout for some reason, like the one legacy project code I am fixing, use this property for a Bottom margin type visual.

android:translationY="-8dp"

and your code should look like this (in my case this a FAB in Relative Layout)

<com.google.android.material.floatingactionbutton.ExtendedFloatingActionButton
    android:id="@+id/cart_check_out_btn"
    style="@style/FABThemeDark"
    android:layout_width="match_parent"
    android:layout_height="wrap_content"
    android:layout_alignParentBottom="true"
    android:layout_marginHorizontal="16dp"
    android:layout_marginVertical="16dp"
    android:text="@string/cart_check_out_btn"
    android:textAllCaps="false"
    android:translationY="-8dp" />

And it will work like this

enter image description here

Right answered 21/10, 2022 at 16:37 Comment(0)
G
-1

Try in this way :

<RelativeLayout xmlns:android="http://schemas.android.com/apk/res/android"
         xmlns:tools="http://schemas.android.com/tools"
         android:layout_width="fill_parent"
         android:layout_height="fill_parent" >

<Button
    android:id="@+id/button1"
    android:layout_width="wrap_content"
    android:layout_height="wrap_content"
    android:layout_alignParentBottom="true"
    android:layout_centerHorizontal="true"
    android:layout_marginBottom="17dp"
    android:text="Button" />

Goy answered 18/11, 2012 at 16:0 Comment(0)
J
-3

Here is another alternative. If you want to set the child's margin instead of parent's padding, you should set the value of android:layout_marginTop to double of the desired margin and then set the android:layout_centerVertical to true. Top margin is given double the desired value to compensate the bottom margin. That way you will have an equal top and bottom margin around the child view.

<Button
    android:id="@+id/confirm_mobile_button_next"
    android:layout_width="fill_parent"
    android:layout_height="40dip"
    android:layout_alignParentBottom="true"
    android:layout_alignParentLeft="false"
    android:layout_centerVertical="true"
    android:layout_centerInParent="false"
    android:layout_marginLeft="15dp"
    android:layout_marginRight="15dp"
    android:layout_marginTop="30dp"
    android:background="@drawable/button_shape_selector"
    android:paddingLeft="10dip"
    android:paddingRight="10dip"
    android:text="@string/confirm_mobile_no_continue"
    android:textColor="@color/white"
    android:textStyle="bold" />

It will give you the same result.

John answered 21/5, 2013 at 18:6 Comment(0)

© 2022 - 2024 — McMap. All rights reserved.