Cocoapods Warning - CocoaPods did not set the base configuration of your project because because your project already has a custom config set
Asked Answered
N

23

471

After I execute a pod install at the base of my project, I get the following error:

CocoaPods did not set the base configuration of your project because because your project already has a custom config set. In order for CocoaPods integration to work at all, please either set the base configurations of the target BluePlaquesLondonFramework to Pods/Target Support Files/Pods/Pods.debug.xcconfig or include the Pods/Target Support Files/Pods/Pods.debug.xcconfig in your build configuration.

This probably sounds like a silly question, but how do I set the base configuration for a target?

https://github.com/seanoshea/BluePlaquesLondon/blob/ios8/Podfile is the Podfile which is causing this issue.

http://github.com/seanoshea/BluePlaquesLondon on the iOS 8 branch is the Podfile in question if you're curious to see what the project looks like.

Nadya answered 9/10, 2014 at 20:8 Comment(3)
This is a bit off-topic, but; I just want to warn you about iOS-KML-Framework. It uses version 1.5 of TBXML, which is a bit buggy. If you get malformed XML in your feed, your app will crash. You may want to make a private fork for iOS-KML-Framework where you remove the '1.5' from the podspec, and just use the HEAD of TBXML. That seems to fix a lot of the problems.Keys
github.com/CocoaPods/CocoaPods/issues/2633 has a good workaround - set all configs to None, then run "pod install"Adulterer
For me everything worked fine. Next morning, without changing any single thing, when I tried to run my app, I got this message... It is unbelievable that you get into problems out of the blueDotti
S
679

I had the same problem, but in Xcode 6.1.1 - what fixed it for me was to change the configuration file setting to None for the two Pods-related targets, then run pod install again.

The configuration file setting is found by selecting the project (not the target) and then the Info tab.

Saffren answered 20/11, 2014 at 12:18 Comment(10)
This setting is found by selecting the project (not the target) and then the Info tab.Timoshenko
It helps to make the change, followed by quitting xcode, running pod install, then re-opening. Do not keep Xcode open during that time.Twinge
This fixed it for me. my config was pointing to an old xcconfig name, which changed since I added two explicit targets in my Podfile (one for the main proj one for testing), causing the generation of new config files with different names.Peritonitis
For those who had the same worry as me that setting that to None would break stuff.. the subsequent pod install sorts everything out.Donn
It works, but... Do I have to do this every time I update my pods? I have two a workspace with TWO projects, THREE configurations each (Debug/Release/Distribution) and it's a real PITA to go over all and select "None" for each config file each time Google releases a new version of their maps SDK...Bologna
Oh, it looks like I should run pod update instead of pod install (source: guides.cocoapods.org/using/pod-install-vs-update.html)Bologna
However, if I ever add a new pod to my projects I will have to go over this again...Bologna
where is this setting in xcode 10? Went through all the tabs, couldn't find itTravers
It works! I would put PROJECT (NOT TARGET) in upper case, I'm developing in Flutter and I have 0 knowledge in iOS dev. Thanks!Backcross
@JenonD , as per your query, for xCode 10, on the right side of the "side menu" in xCode, you'll see "ProjectName" with ^ and \/ symbol (basically a dropdown type menu) click that and you shall find Project and Target section. By default xCode open the project with Target. You have to change it to whatever is inside Project Section. P.S. This drown-down is in the same line as that of Tabs (General, Resource Tag, Info, Build Settings, etc.). I hope this helps to the future you or anyone who is looking for the clarity on the same. Cheers. ;)Corfam
D
365

Don't tinker, Reset.

Step-by-step

  1. Show Project Navigator
  2. Select Project
  3. Select Info
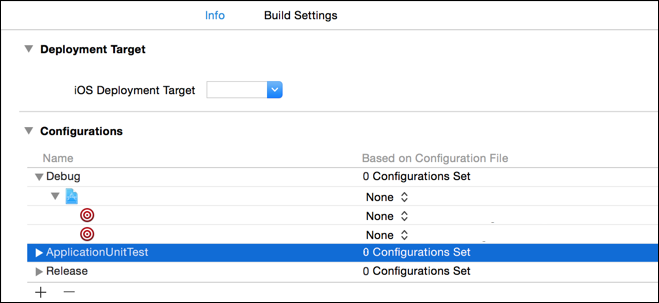
  4. In Configurations, select each one, one at a time (Debug, ApplicationUnitTest, Release, etc.), and for each target within said configuration, set configuration to None.
  5. Make certain that Based on Configuration File reads 0 Configurations Set or No Configurations Set for each configuration. That is the crux. 0 Configurations Set
  6. Quit Xcode
  7. rm -rf Pods/ Podfile.lock ; pod install

Once you have allowed pod install in step 7 to do its magic, you may be able to use a custom config and change your configurations.

Declination answered 3/11, 2015 at 21:20 Comment(5)
Using the Pods config, as suggested in other answers, did not resolve my issue in the least bit: Build Settings were already matching Pods.debug & Pods.release, which was the problem. What did was 0 Configurations Set for each configuration. Not the same answer whatsoever.Declination
"[!] Unable to determine Swift version for the following pods:"Senseless
make sure you do the last step in the ios folder. Doing it in the root of the project will not have any effect :)Originate
I have over 50 items in each dropdown for debug, profile and release, do you expect me to manually change each one (150 times) to none ?Juniper
Per @HarshPhoujdar 's concern, I found if you use one hand to click each config, and the other to repeatedly push "N" and "return" keys, you could run through 100+ configs in no time. "N" immediately selects "None".Mahlstick
M
140

Go into XCode and open your project settings and under the Info tab, you will see "Configurations" where you can set a configuration file for both Debug and Release. You apparently have already set these to some custom config and CocoaPods wants/needs you to use the Pods config.

Here's a screen shot

Margetmargette answered 9/10, 2014 at 20:15 Comment(3)
Note that this doesn't solve the problem if you actually need to use a custom config for a real purpose. See this open issue.Imbue
Nothing has changed in Xcode 6 to make this answer incorrectMargetmargette
Another issue but it solved my issue for me. Was using cocoa pods with UI Tests and this thing saved my life! Thank you.Placement
B
71

Ran into the same problem. It would build on the simulator but not on my device. None of the answers solved this for me. Here's what I did piecing some answers together:

  1. Changed my pods file to use a specific target:

    target :MyProject do
        pod 'AWSCognitoSync'
        pod 'Facebook-iOS-SDK'
    end
    
  2. Ran pod install

  3. That gives an error: [!] CocoaPods did not set the base configuration of your project because your project already has a custom config set. In order for CocoaPods integration to work at all, please either set the base configurations of the target `MyProject` to `Pods/Target Support Files/Pods-MyProject/Pods-MyProject.debug.xcconfig` or include the `Pods/Target Support Files/Pods-MyProject/Pods-MyProject.debug.xcconfig` in your build configuration.
  4. Go Project settings and click on Info tab. There will be an error where it cannot find the Configuration file. Set it to "None" for Debug and Release.
  5. Run pod install yet again
  6. Clean and build. This works.
Boito answered 23/1, 2015 at 18:10 Comment(3)
Between steps 4 and 5, I always close xcode. I have had issues arise when xcode is running during pod install.Ronald
Just ran into this myself creating custom schemes. The above also works in Xcode 7. I'd recommend @srayhunter advice on closing Xcode during an install.Fusillade
I wish I could up vote more than once. This gets me every time.Softshoe
L
38

I fixed my issue after a careful reading of the error message:

[!] CocoaPods did not set the base configuration of your project because your project already has a custom config set. In order for CocoaPods integration to work at all, please either set the base configurations of the target Runner to Target Support Files/Pods-Runner/Pods-Runner.profile.xcconfig or include the Target Support Files/Pods-Runner/Pods-Runner.profile.xcconfig in your build configuration (Flutter/Release.xcconfig).

Solution

  1. Open Xcode and change the Runner Info Base Configurations to the related Pods-Runner.profile.xconfig.

  2. Quit Xcode

  3. Terminal: From the ios project folder run pod deintegrate

  4. Verify pods are removed

    Project has been deintegrated. No traces of CocoaPods left in project.
    Note: The workspace referencing the Pods project still remains.
    
  5. Terminal: From the ios project folder run pod install

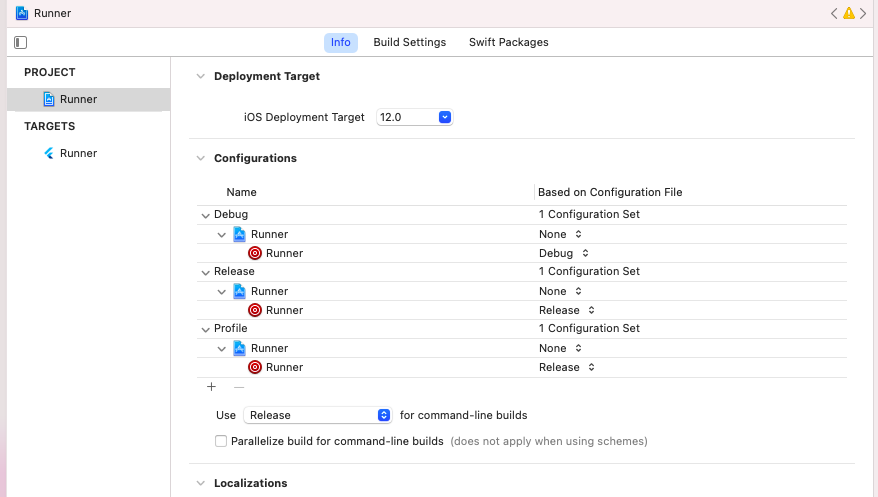
(from this original - BAD)

bad-image

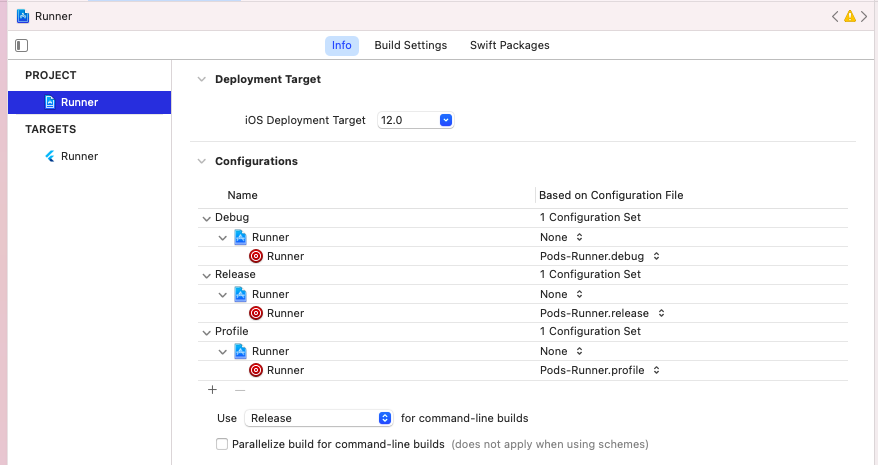
(to this GOOD settings)

solution-image

Notes

I have not been able to resolve the issue using the second suggestion of including the xconfig file inside of the Flutter/Release.xcconfig configuration file as mentioned in the error message.

Lozoya answered 6/8, 2021 at 12:18 Comment(2)
Worked for me. I used the same idea but simpler steps. On the (from this original - BAD) screenshot I set all of them to None. I shut down Xcode and ran pod install. When I opened a project in Xcode again I got (to this GOOD settings) screenshot.Gebelein
Once I updated the Runners from "X" to "Pod-Runner.X" the warning of "[!] CocoaPods did not set the base configuration..." went away for me on XCode 14.3 when running $ pod installLauricelaurie
P
34

For those coming from the Flutter world, this is a misleading error message suggesting an unnecessary action, and the correct course is to ignore the error and use the flutter cli (not pod), as discussed in https://github.com/flutter/flutter/issues/73845:

gatzsche says a better message would be:

In Flutter pod install should not called manually. To run pod install execute the following commands flutter clean, flutter pub get and flutter build ios.

jmagman notes:

As you point out, the error message is suggesting an action that isn't necessary. The flutter command suppresses that message from pod. You ran pod directly, which isn't a recommended workflow. We don't have any control of error messages coming from CocoaPods, and the flutter command line tool already suppresses the confusing message.

Peritonitis answered 26/4, 2022 at 4:0 Comment(1)
flutter build ios runs pod install. That'll teach me to do a web search on a warning!Cerulean
B
16

You should also make sure that you have no pods in the root of Podfile, you should define all the pods that are used in many targets like that:

def shared_pods
  pod 'ReactiveCocoa', '~> 2.5'
end
target 'app' do
  shared_pods
  pod 'RestKit'
end
target 'tests' do
  shared_pods
  pod 'OCMock'
end

You also might need to delete libPods.a and libPods-app.a from the target dependencies, perform a clean and then run pod install again.

Bicorn answered 19/5, 2015 at 5:41 Comment(0)
P
10

I just ran into this issue after adding some custom build configurations. I could see under:

Pods (target) > Target Support Files > Pods

that it had actually created the new xcconfig files that matched the new build configurations but for some reason I could not select these in the project target of my app.

What fixed it for me was to install and use cocoapods-deintegrate:

gem install cocoapods-deintegrate

and then run:

pod deintegrate

followed by:

pod install
Pennell answered 23/10, 2015 at 14:22 Comment(2)
This helped me.Dorison
a project is broken.Koontz
S
9

If you added a custom build configuration to your existing project, Cocoapods will complain about it.

Cocoapods will automatically create xcconfig files under the directory Pods/Target Support Files/<build_target> following the naming pattern Pods-<build_target>.<build_config>.xcconfig.

Just make sure to manually add those files to your project in Xcode (under the Pods directory, but not inside the Pods project!). Once those files are included select your project in Xcode, go to the "Info" tab, and expand your custom configuration. Select the appropriate xcconfig file for each target under your custom configuration.

Sooksoon answered 4/3, 2015 at 14:35 Comment(0)
S
8

In case you are using custom config you can follow the suggestion in the warning and include the Pod config in your config file

     #include "Pods/Target Support Files/Pods-YYY/Pods-YYYY.develop-archive.xcconfig"

This will NOT stop the warnings but will allow you to use your private config (there is an open bug on the warning with CocoaPods project) https://github.com/CocoaPods/CocoaPods/issues/2633

Sungsungari answered 19/11, 2014 at 17:52 Comment(1)
Thanks for adding an answer that does not sacrifice your current project setup.Remex
D
7

The line in the podfile that is generating a problem is : link_with ['BluePlaquesLondon', 'BluePlaquesLondonFramework'].

Just make this : link_with ['BluePlaquesLondon'] or this (worked in my case, hope it will in yours :-)) :

source 'https://github.com/CocoaPods/Specs.git'
platform :ios, '8.0'

xcodeproj 'BluePlaquesLondon.xcodeproj'
inhibit_all_warnings!
link_with ['BluePlaquesLondon']

def import_pods

     pod 'TTTAttributedLabel', '~> 1.10.1'
     pod 'GoogleAnalytics-iOS-SDK', '~> 3.0.9'
     pod 'Google-Maps-iOS-SDK'
     pod 'IntentKit'
     pod 'HCViews'
     pod 'SVProgressHUD', :head
     pod 'iRate'
     pod 'iOS-KML-Framework', :git => 'https://github.com/FLCLjp/iOS-KML-Framework.git'

end

import_pods

target "BluePlaquesLondonFramework" do
    import_pods
    pod 'Kiwi'
end
Doorstop answered 20/10, 2014 at 13:49 Comment(1)
This worked beautifully for me. I already had the Cocoapods configurations set as per the accepted answer, but was still seeing the warning. So why does this work, when having link_with ['BluePlaquesLondon', 'BluePlaquesLondonFramework'] does not?Keys
S
7

I had the same error while pod install. I tried everything (reinstall pod, update all gems, etc.) and I found solution worked in my case. There was problem because of changing target's name. In this case solution is simple:

  1. Click Product -> Scheme -> Manage Schemes...
  2. Click on your target on the list and delete it with "-" sign on bottom of window.
  3. Click "+" to add target back to list. Choose correct target and name.

After all everything should works.

Straightout answered 4/11, 2014 at 14:44 Comment(2)
This worked for me, my project is written with Flutter. Thanks!Matchmaker
This worked for me too, also with a Flutter project. Thank you!Hysterectomize
N
4

I moved pods in Podfile outside from the target. File changes from this:

# Uncomment this line to define a global platform for your project
# platform :ios, '8.0'
# Uncomment this line if you're using Swift
use_frameworks!

target 'MyProject' do

pod 'Firebase', '>= 2.5.0'
pod 'Onboard'
pod 'GoogleMaps'
pod 'IQDropDownTextField'

end

To this:

# Uncomment this line to define a global platform for your project
# platform :ios, '8.0'
# Uncomment this line if you're using Swift
use_frameworks!

pod 'Firebase', '>= 2.5.0'
pod 'Onboard'
pod 'GoogleMaps'
pod 'IQDropDownTextField'

target 'MyProject' do

end
Naca answered 28/3, 2016 at 20:27 Comment(0)
F
3
  1. Add the relevent xcconfig files to your project. Cocoapods will have created them but you can't set them in Xcode until they are in the project.
    • You probably want to add them to the Pods group where the other pods xcconfig files are. Right click and add files.
    • Search for xcconfig files in your project folder or look in Pods/Target Support Files/[TARGET_NAME]/ (I have different cocoapods configured for each target (extension and main project this may be slightly different in your case)
  2. Go to project configurations in the Info of your main project
  3. For each target and configuration set the appropriate pods configuration.
  4. pod install again and you should see no errors.
Folger answered 9/7, 2015 at 11:22 Comment(0)
T
3

This is the messages I got after running pod install or pod update:

[!] CocoaPods did not set the base configuration of your project because your project already has a custom config set. In order for CocoaPods integration to work at all, please either set the base configurations of the target `Runner` to `Target Support Files/Pods-Runner/Pods-Runner.debug-staging.xcconfig` or include the `Target Support Files/Pods-Runner/Pods-Runner.debug-staging.xcconfig` in your build configuration (`Flutter/Debug.xcconfig`).

[!] CocoaPods did not set the base configuration of your project because your project already has a custom config set. In order for CocoaPods integration to work at all, please either set the base configurations of the target `Runner` to `Target Support Files/Pods-Runner/Pods-Runner.release-staging.xcconfig` or include the `Target Support Files/Pods-Runner/Pods-Runner.release-staging.xcconfig` in your build configuration (`Flutter/Release.xcconfig`).

[!] CocoaPods did not set the base configuration of your project because your project already has a custom config set. In order for CocoaPods integration to work at all, please either set the base configurations of the target `Runner` to `Target Support Files/Pods-Runner/Pods-Runner.profile-staging.xcconfig` or include the `Target Support Files/Pods-Runner/Pods-Runner.profile-staging.xcconfig` in your build configuration (`Flutter/Release.xcconfig`).

This is what I did to solve the issue:

Add Schemes to Podfile under project 'Runner'

project 'Runner', {
  'Debug' => :debug,
  'Debug-staging' => :debug,
  'Profile' => :release,
  'Profile-staging' => :release,
  'Release' => :release,
  'Release-staging' => :release,
}

Go to ios/Flutter/Debug.xcconfig and include

#include "Pods/Target Support Files/Pods-Runner/Pods-Runner.debug-staging.xcconfig"

Go to ios/Flutter/Release.xcconfig and include

#include "Pods/Target Support Files/Pods-Runner/Pods-Runner.release-staging.xcconfig"
#include "Pods/Target Support Files/Pods-Runner/Pods-Runner.profile-staging.xcconfig"
  1. flutter clean
  2. Delete podfile.lock
  3. Pub get
  4. pod install
Timely answered 29/11, 2022 at 15:10 Comment(0)
I
1

So for me, the problem was due to the aforementioned xcconfig files names being changed before the Swift 3 update took place.

Something was out of sync, so Cocoapods created a 'Recovered References' folder section with the old named files, and linked to them.

To fix this, I:

  1. Removed the 'Recovered References' folder and the containing old .xcconfig files from Xcode and file system
  2. Quit Xcode

  3. Run pod install

Everything was handled for me after then, and the warnings were gone.

Indeliberate answered 25/1, 2017 at 11:58 Comment(0)
T
1

Just follow the Android Studio instructions. This is the error output:

"[!] CocoaPods did not set the base configuration of your project because your project already has a custom config set. In order for CocoaPods integration to work at all, please either set the base configurations of the target `Runner` to `Target Support Files/Pods-Runner/Pods-Runner.profile.xcconfig` or include the `Target Support Files/Pods-Runner/Pods-Runner.profile.xcconfig` in your build configuration (`Flutter/Release.xcconfig`)."

In android studio IDE go to IOS folder/Flutter and open the file Release.xconfig

Then just paste this line:

Target Support Files/Pods-Runner/Pods-Runner.profile.xcconfig

Delete podfile.lock and try to rebuild in Xcode. Worked for me.

Tighe answered 10/12, 2021 at 11:37 Comment(0)
E
0

I was able to build the project touched by this issue on XCode 6 by:

  • selecting Project from the Project Navigator
  • choosing Project instead of Target
  • going to Info tab
  • choosing Pods.(debug/release) Configuration Files from the combobox for the respective Configurations.

Hope this will help someone.

Emptyhanded answered 26/8, 2015 at 13:43 Comment(0)
L
0

This happened to me because I already had a Pod configuration. I'm new on iOS development, was searching instructions to install Alamofire + SwiftyJSON and ended up installing the libraries more than once, inadvertently. To me, what worked was: on the folder "Target Support Files" in "Pods" project, I selected the two correct .xcconfig files and dragged them to the "Pods" folder of my app project. This enabled the selection of the correct config files on the base configuration.

But then, if I run "pod install" again, the warning will change to the previous .xcconfig file. I try to delete the files and the old framework from the main project but when i ran the previous command once more, gave me the same warning, and created the file "Pods.framework" under the "Pods" folder of my app project. I ignored it, and it seems to be running ok, despite the two frameworks. I don't know if it's right, and a solution, if exists, it would be welcomed.

Locust answered 4/11, 2015 at 12:41 Comment(2)
This does not really answer the question. If you have a different question, you can ask it by clicking Ask Question. You can also add a bounty to draw more attention to this question once you have enough reputation.Fondness
Thanks for the explanation Petro. I simply wanted to share the result that worked for me (with warnings, but still), yet I will be more careful in the future.Locust
H
0

I had error:

diff: /../Podfile.lock: No such file or directory diff: /Manifest.lock: No such file or directory error: The sandbox is not in sync with the Podfile.lock.

I just checked the path where I was installing the pod and corrected it and installed again,It just worked.

Make sure give the path just before where .xcodeproj or .xcworkspace (if it is already there) exists.

Hemorrhoidectomy answered 4/5, 2018 at 11:9 Comment(0)
F
0

Sorry my previous answer was unclear. This was just one of many errors i've got while trying to set up Cloud Firestore, so this answer is specific for that situation. In order to solve this error and make firebase work, eventually, you have to follow all of the steps from this page: https://firebase.flutter.dev/docs/firestore/overview/ . If you are having problems with generating the 'firebase_options.dart' file, then you need to follow the steps on this page: https://firebase.google.com/docs/cli#mac-linux-auto-script . The last step is optional, but it reduces build time, and I really don't know how or why, but it made some of other errors also disappear... Step 4. Improve iOS & macOS build times, from this page https://firebase.flutter.dev/docs/firestore/overview/. And off course, don't forget to add dependencies in pubspec.yaml: https://pub.dev/packages/firebase_core/install . There is also a great comment here about using Firebase.initializeApp() : https://mcmap.net/q/74167/-no-firebase-app-39-default-39-has-been-created-call-firebase-initializeapp-in-flutter-and-firebase

Facet answered 15/12, 2021 at 15:11 Comment(1)
As it’s currently written, your answer is unclear. Please edit to add additional details that will help others understand how this addresses the question asked. You can find more information on how to write good answers in the help center.Softfinned
I
0

Seems a good ole system restart and probably more importantly it seems I had to reinstall cocoa pods even though the CLI seemed to be in perfectly working condition and had been working for many days before today.

Reinstalled CocoaPods 🤷

sudo gem install cocoapods

It doesn't seem this was the fix for anyone else, but I figured I should post it since this was driving me nuts, and hopefully it helps at least one other person.

Imamate answered 31/10, 2022 at 20:43 Comment(0)
C
-2

The simplest solution for this (after having this issue multiple times):

  1. Delete Podfile & Podfile.lock from your project library (save Podfile somewhere so you could easily paste to new Podfile)
  2. run 'pod init'
  3. Edit the 'Podfile' to your will (add pods you are using)
  4. run 'pod install'

This would recreate everything and works always in minutes (not spending time to reverse engineer the "bug").

Cesta answered 21/10, 2015 at 10:33 Comment(0)

© 2022 - 2024 — McMap. All rights reserved.