InputAccessoryView / View Pinned to Keyboard with SwiftUI
Asked Answered
B

7

14

Is there an equivalent to InputAccessoryView in SwiftUI (or any indication one is coming?)

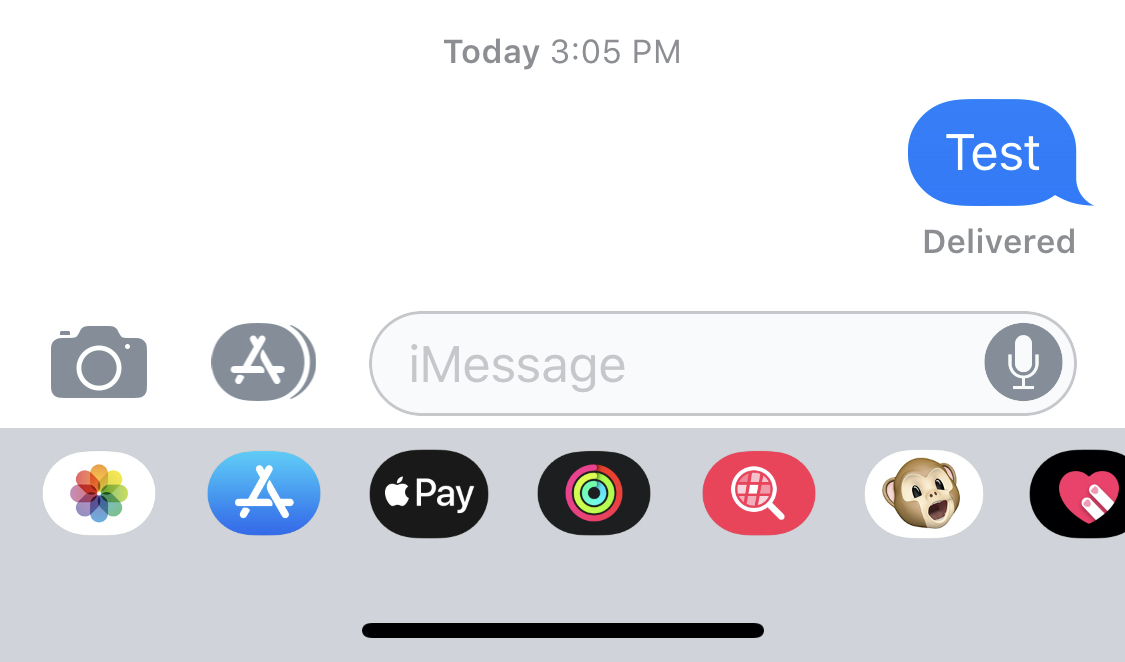
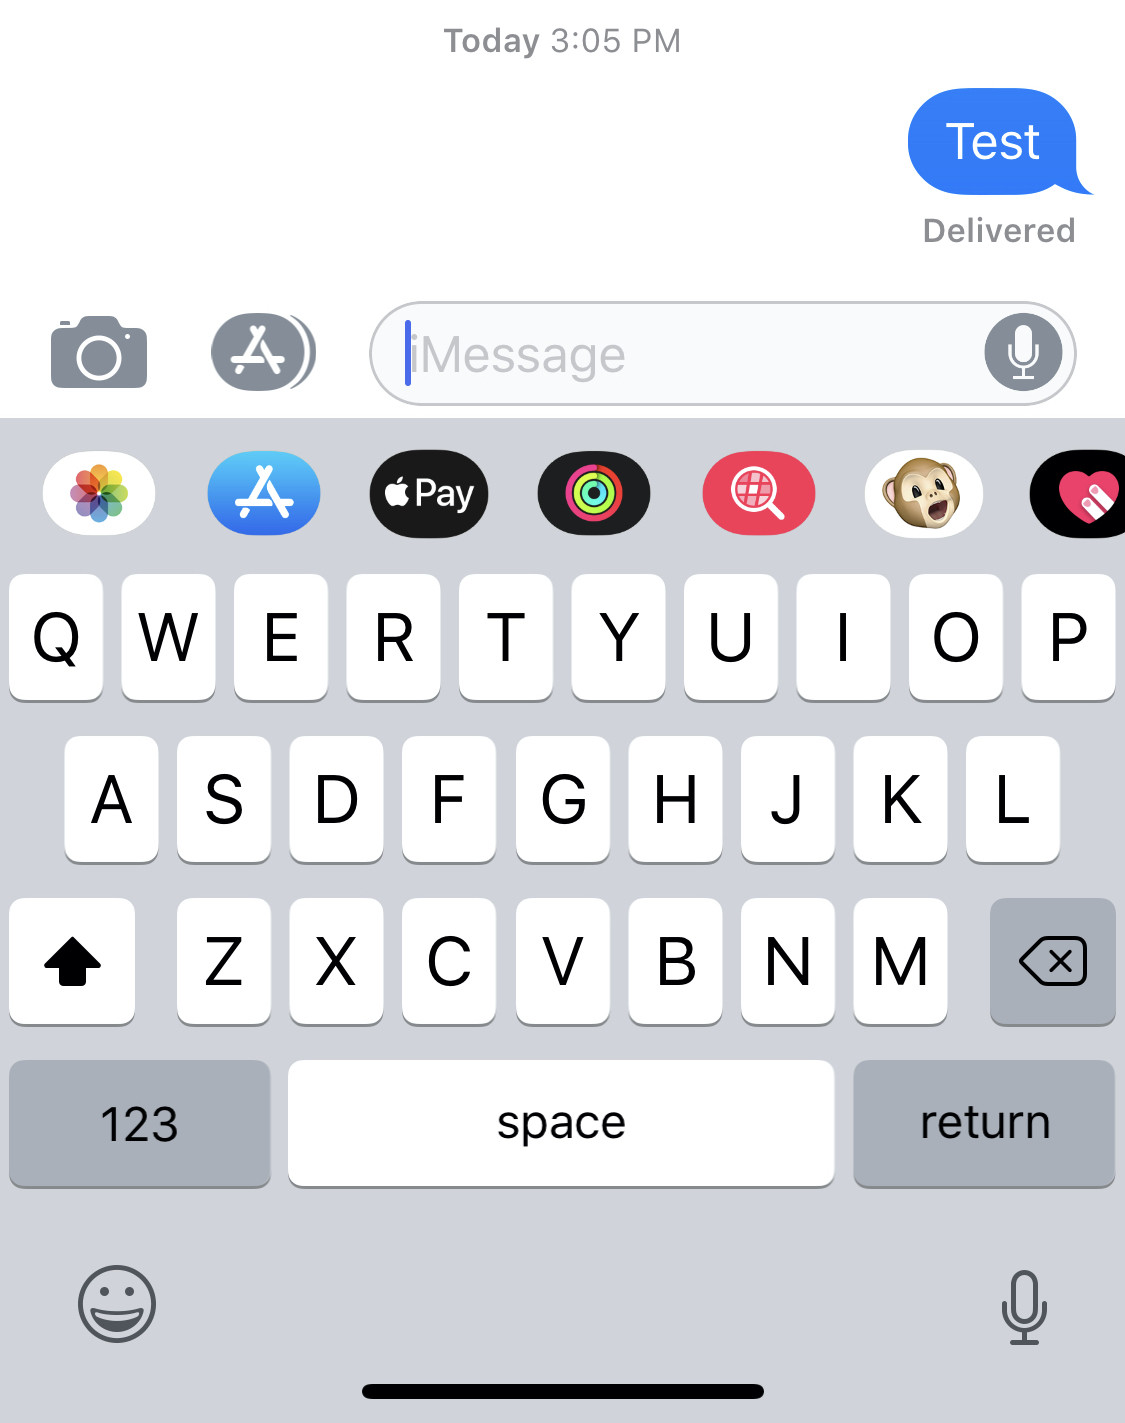
And if not, how would you emulate the behavior of an InputAccessoryView (i.e. a view pinned to the top of the keyboard)? Desired behavior is something like iMessage, where there is a view pinned to the bottom of the screen that animates up when the keyboard is opened and is positioned directly above the keyboard. For example:

Keyboard closed:

keyboard closed

Keyboard open:

keyboard open

Burhans answered 8/7, 2019 at 19:10 Comment(2)
I don't know about Accessory View, but you can determine the keyboard position, by listening to keyboardWillShow and keyboardDidHide.Then you may use GeometryReader and other techniques to position your "accessory view". Check this two links: https://mcmap.net/q/150841/-move-textfield-up-when-the-keyboard-has-appeared-in-swiftui and swiftui-lab.com/geometryreader-to-the-rescueTwinkling
Does this answer your question? SwiftUI equivalent of input accessory view to a UIViewController, i.e. view above Keyboard is always visible like in iMessageTrevatrevah
H
8

I got something working which is quite near the wanted result. So at first, it's not possible to do this with SwiftUI only. You still have to use UIKit for creating the UITextField with the wanted "inputAccessoryView". The textfield in SwiftUI doesn't have the certain method.

First I created a new struct:

import UIKit
import SwiftUI

struct InputAccessory: UIViewRepresentable  {

    func makeUIView(context: Context) -> UITextField {

        let customView = UIView(frame: CGRect(x: 0, y: 0, width: 10, height: 44))
        customView.backgroundColor = UIColor.red
        let sampleTextField =  UITextField(frame: CGRect(x: 20, y: 100, width: 300, height: 40))
        sampleTextField.inputAccessoryView = customView
        sampleTextField.placeholder = "placeholder"

        return sampleTextField
    }
    func updateUIView(_ uiView: UITextField, context: Context) {
    }
}

With that I could finally create a new textfield in the body of my view:

import SwiftUI

struct Test: View {
    @State private var showInput: Bool = false
    var body: some View {
        HStack{
            Spacer()
            if showInput{
                InputAccessory()
            }else{
                InputAccessory().hidden()
            }
        }
    }
}

Now you can hide and show the textfield with the "showInput" state. The next problem is, that you have to open your keyboard at a certain event and show the textfield. That's again not possible with SwiftUI and you have to go back to UiKit and making it first responder. If you try my code, you should see a red background above the keyboard. Now you only have to move the field up and you got a working version.

Overall, at the current state it's not possible to work with the keyboard or with the certain textfield method.

Han answered 30/9, 2019 at 16:30 Comment(0)
A
14

iOS 15.0+

macOS 12.0+,Mac Catalyst 15.0+

ToolbarItemPlacement has a new property in iOS 15.0+

keyboard

On iOS, keyboard items are above the software keyboard when present, or at the bottom of the screen when a hardware keyboard is attached. On macOS, keyboard items will be placed inside the Touch Bar. https://developer.apple.com

struct LoginForm: View {
    @State private var username = ""
    @State private var password = ""
    var body: some View {
        Form {
            TextField("Username", text: $username)
            SecureField("Password", text: $password)

        }
        .toolbar(content: {
            ToolbarItemGroup(placement: .keyboard, content: {
                Text("Left")
                Spacer()
                Text("Right")
            })
        })
    }
}


iMessage like InputAccessoryView in iOS 15+.


struct KeyboardToolbar<ToolbarView: View>: ViewModifier {
    private let height: CGFloat
    private let toolbarView: ToolbarView
    
    init(height: CGFloat, @ViewBuilder toolbar: () -> ToolbarView) {
        self.height = height
        self.toolbarView = toolbar()
    }
    
    func body(content: Content) -> some View {
        ZStack(alignment: .bottom) {
            GeometryReader { geometry in
                VStack {
                    content
                }
                .frame(width: geometry.size.width, height: geometry.size.height - height)
            }
            toolbarView
                .frame(height: self.height)
        }
        .frame(maxWidth: .infinity, maxHeight: .infinity)
    }
}


extension View {
    func keyboardToolbar<ToolbarView>(height: CGFloat, view: @escaping () -> ToolbarView) -> some View where ToolbarView: View {
        modifier(KeyboardToolbar(height: height, toolbar: view))
    }
}

And use .keyboardToolbar view modifier as you would normally do.


struct ContentView: View {
    @State private var username = ""
    
    var body: some View {
        NavigationView{
            Text("Keyboar toolbar")
                .keyboardToolbar(height: 50) {
                    HStack {
                        TextField("Username", text: $username)
                    }
                    .border(.secondary, width: 1)
                    .padding()
                }
        }
    }
}
Augustin answered 11/6, 2021 at 12:9 Comment(4)
I believe that this toolbar will only be visible if the input field is selected (keyboard is up). The OP is trying to emulate iMessage like chat input bar that sticks to the bottom if keyboard is not presented.Lamed
@Ferologics check my answer. I just found a solution.Augustin
Do you know if we can use this when using a UIViewRepresentable UITextField to create a custom keyboard?Horsecar
It's not like in iMessage. You can't dismiss it using scroll with .interactiveWithAccessory keyboardDismissMode. It can only animate between 2 states, and stuck when you are moving the keyboard interactively.Austere
H
8

I got something working which is quite near the wanted result. So at first, it's not possible to do this with SwiftUI only. You still have to use UIKit for creating the UITextField with the wanted "inputAccessoryView". The textfield in SwiftUI doesn't have the certain method.

First I created a new struct:

import UIKit
import SwiftUI

struct InputAccessory: UIViewRepresentable  {

    func makeUIView(context: Context) -> UITextField {

        let customView = UIView(frame: CGRect(x: 0, y: 0, width: 10, height: 44))
        customView.backgroundColor = UIColor.red
        let sampleTextField =  UITextField(frame: CGRect(x: 20, y: 100, width: 300, height: 40))
        sampleTextField.inputAccessoryView = customView
        sampleTextField.placeholder = "placeholder"

        return sampleTextField
    }
    func updateUIView(_ uiView: UITextField, context: Context) {
    }
}

With that I could finally create a new textfield in the body of my view:

import SwiftUI

struct Test: View {
    @State private var showInput: Bool = false
    var body: some View {
        HStack{
            Spacer()
            if showInput{
                InputAccessory()
            }else{
                InputAccessory().hidden()
            }
        }
    }
}

Now you can hide and show the textfield with the "showInput" state. The next problem is, that you have to open your keyboard at a certain event and show the textfield. That's again not possible with SwiftUI and you have to go back to UiKit and making it first responder. If you try my code, you should see a red background above the keyboard. Now you only have to move the field up and you got a working version.

Overall, at the current state it's not possible to work with the keyboard or with the certain textfield method.
Han answered 30/9, 2019 at 16:30 Comment(0)
D
8

I've solved this problem using 99% pure SwiftUI on iOS 14. In the toolbar you can show any View you like.

That's my implementation:

import SwiftUI

 struct ContentView: View {

    @State private var showtextFieldToolbar = false
    @State private var text = ""

    var body: some View {
    
        ZStack {
            VStack {
                TextField("Write here", text: $text) { isChanged in
                    if isChanged {
                        showtextFieldToolbar = true
                    }
                } onCommit: {
                    showtextFieldToolbar = false
                }
                .textFieldStyle(RoundedBorderTextFieldStyle())
                .padding()
            }
        
             VStack {
                Spacer()
                if showtextFieldToolbar {
                    HStack {
                        Spacer()
                        Button("Close") {
                            showtextFieldToolbar = false
                            UIApplication.shared
                                    .sendAction(#selector(UIResponder.resignFirstResponder),
                                            to: nil, from: nil, for: nil)
                        }
                        .foregroundColor(Color.black)
                        .padding(.trailing, 12)
                    }
                    .frame(idealWidth: .infinity, maxWidth: .infinity,
                           idealHeight: 44, maxHeight: 44,
                           alignment: .center)
                    .background(Color.gray)   
                }
            }
        }
    }
}

 struct ContentView_Previews: PreviewProvider {
    static var previews: some View {
        ContentView()
    }
}
Descendible answered 9/10, 2020 at 23:38 Comment(3)
Nice to see a MOSTLY pure swiftUI solution. Alternatively, instead of using the textfield's on commit and on change properties, you could also use onRecieve to listen to the keyboard notification publishers for keyboard will show/hide. You could use this to trigger the toolbar show/hide change.Led
what does #selector mean?Oleta
The OP is trying to emulate iMessage like chat input bar that sticks to the bottom if keyboard is not presented. This is just a regular input accessory view.Lamed
P
1

I managed to create a nicely working solution with some help from this post by Swift Student, with quite a lot of modification & addition of functionality you take for granted in UIKit. It is a wrapper around UITextField, but that's completely hidden from the user and it's very SwiftUI in its implementation. You can take a look at it in my GitHub repo - and you can bring it into your project as a Swift Package.

(There's too much code to put it in this answer, hence the link to the repo)

Pelican answered 4/2, 2021 at 20:14 Comment(4)
This looks very promising - thank you! Unfortunately the returnKey option doesn't work on numberPad and decimalPad. Also only the back arrow seems to work for me to navigate between fields. Is there a way to show next/done on the toolbar instead of the arrows & keyboard?Voiceful
@Voiceful It's a work-in-progress I'm afraid, & therefore may not have all the functionality you'd like, plus there may be bugs as I haven't been able to thoroughly test it - feel free to fork it & add/fix stuffPelican
@Voiceful Also, I don't believe numberPads & decimalPads are able to show the return key, hence the use of the toolBar (you can set the action on the keyboard dismiss button, and the icon too). There's no intention in this component to produce custom keyboards, it was solely built for the customisable toolBarPelican
@Pelican the OP is trying to emulate an iMessage like chat input bar that stays on the bottom of the screen when dismissed, not a plain input accessory view.Lamed
K
0

I have a implementation that can custom your toolbar

public struct InputTextField<Content: View>: View {
    
    private let placeholder: LocalizedStringKey
    
    @Binding
    private var text: String
    
    private let onEditingChanged: (Bool) -> Void
    
    private let onCommit: () -> Void
    
    private let content: () -> Content
    
    @State
    private var isShowingToolbar: Bool = false
    
    public init(placeholder: LocalizedStringKey = "",
                text: Binding<String>,
                onEditingChanged: @escaping (Bool) -> Void = { _ in },
                onCommit: @escaping () -> Void = { },
                @ViewBuilder content: @escaping () -> Content) {
        self.placeholder = placeholder
        self._text = text
        self.onEditingChanged = onEditingChanged
        self.onCommit = onCommit
        self.content = content
    }
    
    public var body: some View {
        ZStack {
            TextField(placeholder, text: $text) { isChanged in
                if isChanged {
                    isShowingToolbar = true
                }
                onEditingChanged(isChanged)
            } onCommit: {
                isShowingToolbar = false
                onCommit()
            }
            .textFieldStyle(RoundedBorderTextFieldStyle())
            
            VStack {
                Spacer()
                if isShowingToolbar {
                    content()
                }
            }
        }
    }
}
Kristine answered 28/2, 2021 at 18:29 Comment(0)
T
0

You can do it this way without using a UIViewRepresentable. Its based on https://mcmap.net/q/688291/-select-all-text-in-textfield-upon-click-swiftui

.onReceive(NotificationCenter.default.publisher(for: UITextField.textDidBeginEditingNotification)) { notification in
    if let textField = notification.object as? UITextField {
        let yourAccessoryView = UIToolbar()
        // set your frame, buttons here
        textField.inputAccessoryView = yourAccessoryView
    }
}
Tello answered 8/2, 2022 at 17:12 Comment(0)
T
0

This is a SwiftUI bug: https://github.com/feedback-assistant/reports/issues/437

Please try my solution https://github.com/frogcjn/BottomInputBarSwiftUI

  1. docks the bottom side
  2. changes the keyboardDismissPadding
  3. updates the safe area inset correctly

This solution uses keyboard layout guide to track the keyboard location, and add a BottomBar SwiftUI View to the layout guide.

It also changes keyboardDismissPadding accurately for interactively dismissing the keyboard.

Trevatrevah answered 10/1 at 18:34 Comment(2)
frogcjn, a link to a solution is welcome, but please ensure your answer is useful without it: add context around the link so your fellow users will have some idea what it is and why it is there, then quote the most relevant part of the page you are linking to in case the target page is unavailable. Answers that are little more than a link may be deleted.Asher
@mozway, it is a complex problem to solve. only use text could not solve all the bugs.Trevatrevah

© 2022 - 2024 — McMap. All rights reserved.