create a trusted self-signed SSL cert for localhost (for use with Express/Node)
Asked Answered
L

19

197

Trying to follow various instructions on creating a self-signed cert for use with localhost, Most of the instructions seem to be for IIS, but I'm trying to use Nodejs/Express. None of them work properly because while the cert gets installed, it is not trusted. here's what I've tried that fails:

Can someone offer a workflow that can do this? I can get a cert installed, but I can't get the cert to be trusted in either chrome (v32) or IE (v10).

EDIT: it was suggested in comments that the problem is no trusted cert-root. I installed the cert via IE but it's still not being trusted.

Locus answered 28/1, 2014 at 5:46 Comment(3)
None of the self signed certificates can be made trusted for web browsers. They are not signed by trusted signing authorities.Observable
that's not true: you can install a root certificate to get your self-signed cert trusted. however I can't seem to do this properly. I read that you can install the cert chain in IE (not in chrome), so I tried that but it's still not being recognized. I don't know if it's because localhost is special or if the self-signed cert is just not correct.Locus
I never got a self-signed cert working with browsers like Chrome. Here is my workaround: I created a DNS entry for local.MYDOMAIN.com pointing to 127.0.0.1 (localhost) and then just use my production cert. This has the added benefit of making sure there are no problems with your production cert chain, etc.Locus
G
178

The answers above were partial. I've spent so much time getting this working, it's insane. Note to my future self, here is what you need to do:

I'm working on Windows 10, with Chrome 65. Firefox is behaving nicely - just confirm localhost as a security exception and it will work. Chrome doesn't:

Step 1. in your backend, create a folder called security. we will work inside it.

Step 2. create a request config file named req.cnf with the following content (credit goes to: @Anshul)

req.cnf :

[req]
distinguished_name = req_distinguished_name
x509_extensions = v3_req
prompt = no
[req_distinguished_name]
C = Country initials like US, RO, GE
ST = State
L = Location
O = Organization Name
OU = Organizational Unit 
CN = www.localhost.com
[v3_req]
keyUsage = critical, digitalSignature, keyAgreement
extendedKeyUsage = serverAuth
subjectAltName = @alt_names
[alt_names]
DNS.1 = www.localhost.com
DNS.2 = localhost.com
DNS.3 = localhost

An explanation of this fields is here.

Step 3. navigate to the security folder in the terminal and type the following command :

openssl req -x509 -nodes -days 365 -newkey rsa:2048 -keyout cert.key -out cert.pem -config req.cnf -sha256

Step 4. then outside of security folder, in your express app do something like this: (credit goes to @Diego Mello)

backend 
 /security
 /server.js

server.js:

const express = require('express')
const app = express()
const https = require('https')
const fs = require('fs')
const port = 3000

app.get('/', (req, res) => {
    res.send("IT'S WORKING!")
})

const httpsOptions = {
    key: fs.readFileSync('./security/cert.key'),
    cert: fs.readFileSync('./security/cert.pem')
}
const server = https.createServer(httpsOptions, app)
    .listen(port, () => {
        console.log('server running at ' + port)
    })

Step 5. start the server, node server.js, and go to https://localhost:3000.

At this point we have the server setup. But the browser should show a warning message.

We need to register our self-signed certificate, as a CA trusted Certificate Authority, in the chrome/windows certificates store. (chrome also saves this in windows,)

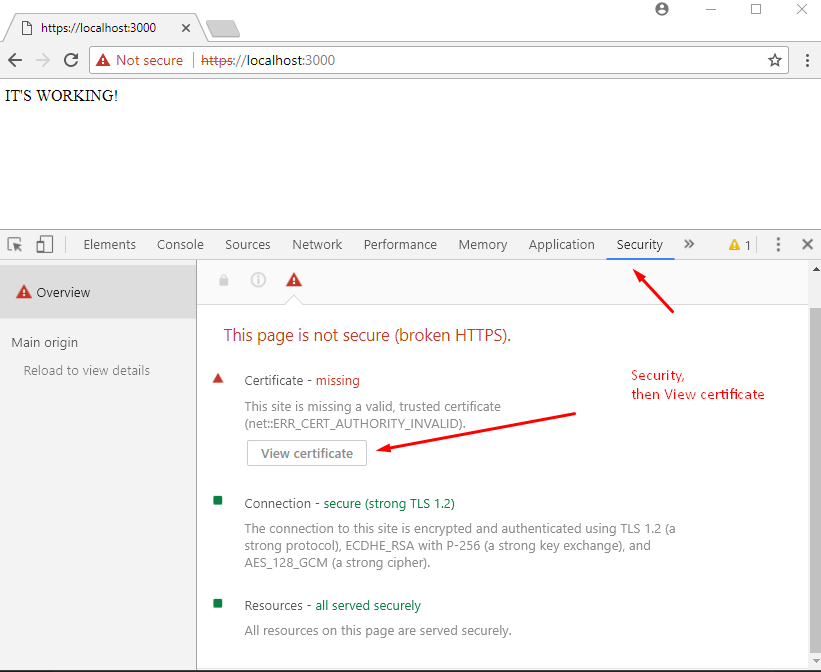
Step 6. open Dev Tools in chrome, go to Security panel, then click on View Certificate. enter image description here

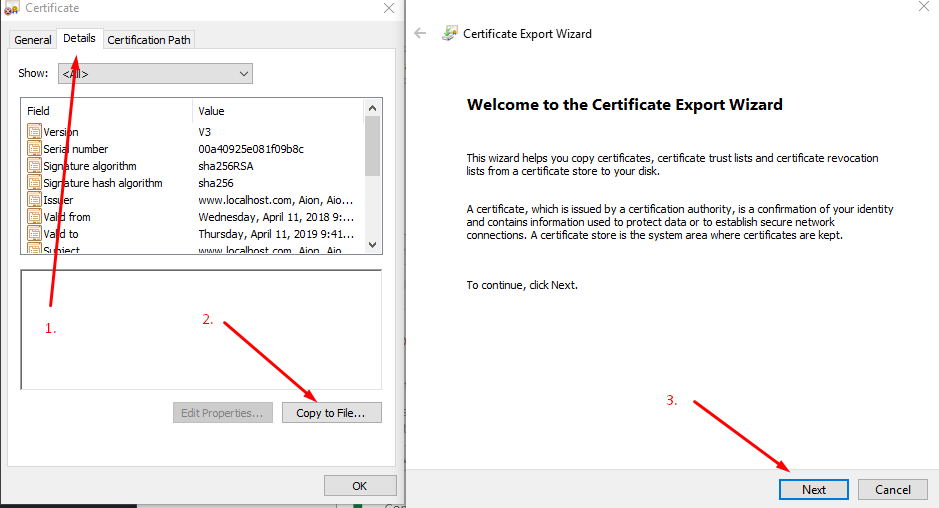
Step 7. go to Details panel, click Copy File, then when the Certificate Export Wizard appears, click Next as below:

go to details - copy file - next on export wizard

Step 8. leave DER encoding, click next, choose Browse, put it on a easy to access folder like Desktop, and name the certificate localhost.cer, then click Save and then Finish.. You should be able to see your certificate on Desktop.

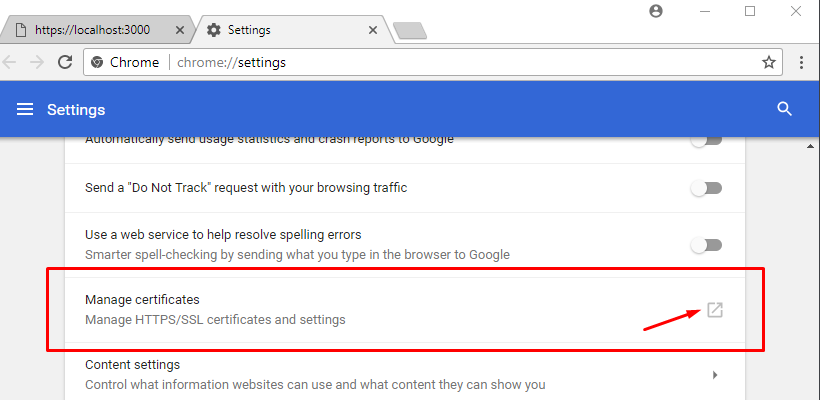
Step 9. Open chrome://settings/ by inserting it in the url box. Down below, click on Advanced / Advanced Options, then scroll down to find Manage Certificates.

choose manage certificates

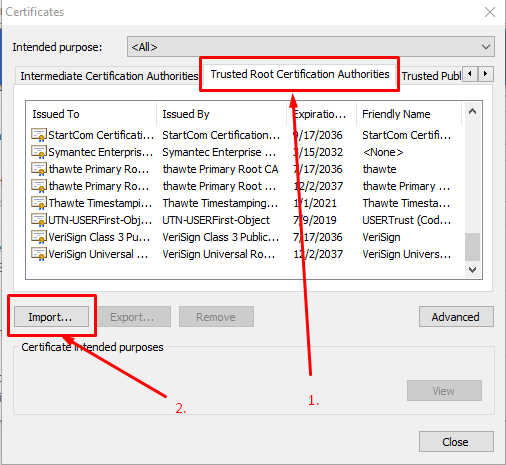
Step 10. Go to Trusted Root Certification Authorities panel, and click import.

Go to Trusted Root Certification Authorities panel, and click import

We will import the localhost.cer certificate we just finished exporting in step 8.

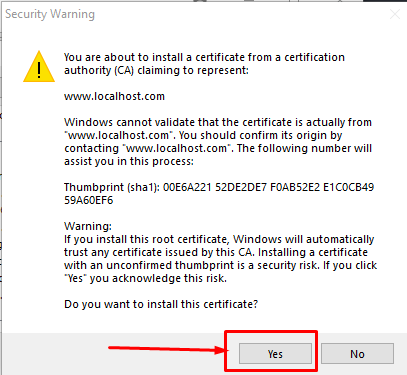
Step 11. click browse, find the localhost.cer, leave the default values click next a bunch of times - until this warning appears, click yes.

confirm security exception

Step 12. close everything, and restart chrome. Then, when going to https://localhost:3000 you should see: gotta love the green

Grivet answered 11/4, 2018 at 20:52 Comment(13)
Hi, when I finish all the steps I open https://localhost:3000 and Chrome is stuck on loading. Anyone can tell what might be the reason?Vignette
@Vignette any message in the console? Press crl+shift+i or F12 to open the console.Grivet
If you're doing this for an address on a network I found that setting up the certificate DNS to a hostname such as: DNS.1 = server.local Then on the connecting machine update the HOSTS file to point the server IP address to the hostname, for example: 192.168.0.50 server.local This will allow the certificate and the address to match up and validate the certificate.Cochleate
@Grivet the console doesn't show anything. The page just shows: "Waiting for localhost...". Did you configure anything in the hosts file?Vignette
@Vignette "Waiting for localhost..." indeed seems like an DNS resolution problem. I have an uncomented line in the hosts file: 127.0.0.1 localhost #transitCalculator Not sure who put it here. # means a commented line. The line i have typed here is uncomented. Please check you have aprox the same configuration there.Grivet
@Grivet Hi, I didn't have to have any row in the hosts file. Your initial solution worked perfectly. I didn't include the "app.get('/') and that's why it was waiting for localhost forever. Thank youVignette
@Alon it's unclear which of the fields in req.cnf need to be changedRodneyrodolfo
@Alon nevermind I think I got it. But what if we want it, instead of being localhost, to be an ip on the network? For example if I was running my node server on 192.168.1.10 and wanted other computers on the network to access it via https, how could i change your advice and have it still work?Rodneyrodolfo
I found a semi-answer to my own question: if you change CN and DNS.1 to something like "local.com" for example, and in each computer that needs access to the server, change the etc/hosts file to point local.com to the ip of the server, this works.Rodneyrodolfo
Step 2 is creating issue in window. 14148:error:0D07A097:asn1 encoding routines:ASN1_mbstring_ncopy:string too long:.\crypto\asn1\a_mbstr.c:158:maxsize=2Carrasquillo
@Hermenpreet Singh not sure what you mean. step 2 is only about creating that file and pasting that content inside it. Is not about validating that file content. But check this for what looks like a simmilar issue: github.com/certbot/certbot/issues/1915Grivet
@HermenpreetSingh Its a problem with the country initials, you probably just didn't change the line in the req.cnf C = Country initials like US, RO, GE, it should just be something like C = USImply
In step 3 I have this error: Error making certificate request 34050000:error:06800097:asn1 encoding routines:ASN1_mbstring_ncopy:string too long:crypto\asn1\a_mbstr.c:106:maxsize=2Puisne
Y
152

Shortest way. Tested on MacOS, but may work similarly on other OS.

Generate pem

> openssl req -x509 -newkey rsa:2048 -keyout keytmp.pem -out cert.pem -days 365

> openssl rsa -in keytmp.pem -out key.pem

Your express server

const express = require('express')
const app = express()
const https = require('https')
const fs = require('fs')
const port = 3000

app.get('/', (req, res) => {
  res.send('WORKING!')
})

const httpsOptions = {
  key: fs.readFileSync('./key.pem'),
  cert: fs.readFileSync('./cert.pem')
}
const server = https.createServer(httpsOptions, app).listen(port, () => {
  console.log('server running at ' + port)
})
  • Open https://localhost:3000 in Google Chrome and you'll see that it's not secure. Yet!
  • In Developer Tools > Security > View Certificate: Drag image to your desktop and double click it.
  • Click 'Add'
  • Find it in Keychain Access and double click it
  • Expand 'Trust' and change 'When using this certificate' to 'Always trust'.
  • You may be prompted to authenticate.
  • Restart your server.
  • Refresh your browser.
  • Enjoy! :)
Yahairayahata answered 17/2, 2017 at 12:45 Comment(11)
Beautiful! This worked! I'd like to addition: Install OpenSSL from here: indy.fulgan.com/SSL/?C=M;O=A. Get the .cnf file from here: and then, configure it from here: gist.githubusercontent.com/pandurang90/dbe6a67339747ef5bacf/raw/… and configure openSSL from here: #7361102Plug
I'd like to add that for Chrome 58+, you're going to receive an error "Subject Alternative Name missing".https://mcmap.net/q/35904/-getting-chrome-to-accept-self-signed-localhost-certificate-closed. Check the answers below for more help: https://mcmap.net/q/35904/-getting-chrome-to-accept-self-signed-localhost-certificate-closed, https://mcmap.net/q/35904/-getting-chrome-to-accept-self-signed-localhost-certificate-closedPlug
Drag image to your desktop and double click it -> i can't drag anything to my desktop, is not draggable.. What image are you talking about ore exactly?Grivet
To overcome "Subject Alternative Name missing" in Chrome, you could do openssl req -newkey rsa:2048 -x509 -nodes -keyout keytmp.pem -new -out cert.pem -subj /CN=localhost -reqexts SAN -extensions SAN -config <(cat /System/Library/OpenSSL/openssl.cnf <(printf '[SAN]\nsubjectAltName=DNS:localhost')) -sha256 -days 3650 instead of the first line you suggested. And also this one will ask less questions in the process...Guttural
@AIon, this is only for MacOS, on Windows it's probably much more complicated ;)Guttural
Amazing, thanks!!! You'll also need to add to the httpsOptions passphrase: 'XXXX'Kynan
I tried this exact exercise on Windows 10 OS and it worked. Thanks!Greyhound
this only works for safari and chrome, firefox still won't play.Papilla
for anyone looking to what cryptic drag and drop means find an answer here #25940896Ibis
No wonder Stackoverflow is laying off half of its employees. You can't unvote some answers. You cant post the same questions twice. wtf, how is stack overflow helpful when I can use chatgpt.Alfonzoalford
Amazing... I forgot we can choose which certificates we trust, we don't need to rely on a corporation on the other side of the planet to tell us who we can trust. I believe this setting is also possible insde the browser itself.Amytal
O
78

You can try openSSL to generate certificates. Take a look at this.

You are going to need a .key and .crt file to add HTTPS to node JS express server. Once you generate this, use this code to add HTTPS to server.

var https = require('https');
var fs = require('fs');
var express = require('express');

var options = {
    key: fs.readFileSync('/etc/apache2/ssl/server.key'),
    cert: fs.readFileSync('/etc/apache2/ssl/server.crt'),
    requestCert: false,
    rejectUnauthorized: false
};


var app = express();

var server = https.createServer(options, app).listen(3000, function(){
    console.log("server started at port 3000");
});

This is working fine in my local machine as well as the server where I have deployed this. The one I have in server was bought from goDaddy but localhost had a self signed certificate.

However, every browser threw an error saying connection is not trusted, do you want to continue. After I click continue, it worked fine.

If anyone has ever bypassed this error with self signed certificate, please enlighten.

Observable answered 28/1, 2014 at 6:33 Comment(11)
Your certificate is still not trusted, so you have the same problem I'm describing. I need it to be trusted to test/debug a webservice properly.Locus
So you want this certificate to be trusted only in your local machine and not in the network?Observable
yeah, my dev environment is running on a single machine, and of course the "localhost" domain is only available locally :)Locus
does it still give the warning if you add the certificate to the browsers certificate list?Cover
the link at the top of the answer recomends 1024 bit 3DES encryption, which is way outdated. Better to use openssl genrsa -out key.pem 2048 for a better key.Berners
Your certificate is still not trusted.Yahairayahata
As far as getting a certificate goes - this is probably better than using some untrusted self signed cert (and equally as free) letsencrypt.orgWolfe
Then, in Chrome, go to chrome://flags and activate "Allow invalid certificates for resources loaded from localhost."Sulfate
This should not be the accepted answer (yet). Note that some things require a green bar. E.g. if your website is also a progressive web ap (pwa), TLS is mandatory. For chrome 58+ to trust the certificate properly, you also need to become/create a CA (Certificate Authority). I found this resource quite usefull: ram.k0a1a.net/self-signed_https_cert_after_chrome_58Ansermet
the express code above works, utilising github.com/FiloSottile/mkcert (instead of openSSL) to create a local CA / trusted cert. Green bars all the way.Guenevere
You just got the same http page but only the UI showing https, this is not correct, unsecure and still not working, can't understand why so many upvotes from people not checking thoroughly and (I guess) forget to remove their upvote only so people wont get confused thinking this is a viable answer,Cassaundra
G
32

Mkcert from @FiloSottile makes this process infinitely simpler:

  1. Install mkcert, there are instructions for macOS/Windows/Linux
  2. mkcert -install to create a local CA
  3. mkcert localhost 127.0.0.1 ::1 to create a trusted cert for localhost in the current directory
  4. You're using node (which doesn't use the system root store), so you need to specify the CA explicitly in an environment variable, e.g: export NODE_EXTRA_CA_CERTS="$(mkcert -CAROOT)/rootCA.pem"
  5. Finally run your express server using the setup described in various other answers (e.g. below)
  6. boom. localhost's swimming in green.

Basic node setup:

const https = require('https');
const fs = require('fs');
const express = require('express');

const app = express();    
const server = https.createServer({
    key: fs.readFileSync('/XXX/localhost+2-key.pem'), // where's me key?
    cert: fs.readFileSync('/XXX/localhost+2.pem'), // where's me cert?
    requestCert: false,
    rejectUnauthorized: false,
}, app).listen(10443); // get creative
Guenevere answered 7/1, 2019 at 23:42 Comment(3)
Works greatly! With this approach we don't need to register our self-signed certificate, as a CA trusted Certificate Authority, in the chrome/windows certificates store. As mentioned in other answers.Lavinialavinie
Can I run this on pipelines ? here is a reference for my question #71850980Forgave
@Forgave there seems to be some discussion around pipelines usage on the mkcert github repo so assume it's possible .. but keep in mind mkcert isn't intended for production useGuenevere
G
13

How to generate an SSL certificate for localhost: link

openssl genrsa -des3 -out server.key 1024

you need to enter a password here which you need to retype in the following steps

openssl req -new -key server.key -out server.csr

when asked "Common Name" type in: localhost

openssl x509 -req -days 1024 -in server.csr -signkey server.key -out server.crt
Gilbye answered 17/1, 2017 at 13:48 Comment(1)
This is the solution ive scoured the internet for over the past 2 hours. For anyone in ubuntu move the cp server.crt /usr/local/share/ca-certificates/. and run sudo update-ca-certificates Then localhost https requests work under NodeJS 8+. Id also increase 1024 to 2048Welldressed
V
8

For windows, follow these simple steps.

  1. Open Windows PowerShell, run as administrator
  2. install Chocolatey following this hyperlink.
  3. use choco install mkcert to install mkcert.
  4. run mkcert -install will create local CA.
  5. run mkcert localhost 127.0.0.1 ::1 will create a trusted cert for localhost in the current directory.
  6. Use the generated ./localhost+2.pem and ./localhost+2-key.pem in your server as cert and key respectively. (adding key and cert varies from server to server.)
  7. Finally run your server using the setup described in various other answers (For Express server, it is given below)
    const https = require('https');
    const fs = require('fs');
    const express = require('express');

    const app = express();


    app.get('/', function(req, res){
      res.send("HELLO!");
    });

    const server = https.createServer({
        key: fs.readFileSync('./localhost+2-key.pem'), // path to localhost+2-key.pem
        cert: fs.readFileSync('./localhost+2.pem'), // path to localhost+2.pem
        requestCert: false,
        rejectUnauthorized: false,
    }, app).listen(3000, function(){
      console.log("Successfully started server on port 3000");
    });

then run your server using node server.js

  1. On your browser use https://localhost:3000 and you will see a lock in address bar.

Enjoy!!

Variorum answered 14/7, 2021 at 6:29 Comment(0)
B
7

Some of the answers posted have pieces that were very useful to me to overcome this problem too. However, I was also interested in the minimum number of steps and, ideally, avoiding OpenSSL (on Windows 10).

So, one critical piece from the answers (credit: @TroyWorks) is that you need to edit your HOSTS file to create a fictitious server, and map that to 127.0.0.1. This assumes you are going to be doing local development.

In my case, I was using the SS certificate to secure a websocket in NodeJS, and that socket was being connected to programmatically (as opposed to via browser). So for me, it was critical that the certificate be accepted without warnings or errors, and the critical piece there was to get the cert created with a proper CN (and of course accept the cert into Trusted Authorities, as described elsewhere in the answers). Using IIS to create a self-signed cert won't create the proper CN, so I discovered the following simple command using Powershell:

New-SelfSignedCertificate -DnsName "gandalf.dummy.dev" -FriendlyName "gandalf" -CertStoreLocation "cert:\LocalMachine\My"

This has to be run in the PS Admin console, but it simply works, and puts the cert into the "Personal" section of the LocalMachine certificate store. You can verify it got created by executing:

ls cert:\LocalMachine\My 

To trust it, simply copy this and paste into "Trusted Root Certification Authorities" using Certificate Manager (making sure you are looking at the Local Machine certificates, not Current User!).

If you bind to this certificate in IIS, you should be able to hit https://gandalf.dummy.dev/ and get a secure connection without any warnings.

The final piece, using this in NodeJS, is described above and in other SO answers, so I'll only add that on Windows, it is easier to work with a pfx file that combines the cert and private key. You can export a pfx easily from the Certificate Manager, but it does affect how you use it in NodeJS. When instantiating a Server using the 'https' module, the options you would use (instead of 'key' and 'cert') would be 'pfx' and 'passphrase', as in:

var https = require('https');
var options = { 
    pfx: fs.readFileSync('mypfxfile'), 
    passphrase: 'foo' 
};
var server = https.createServer(options);
Brunhild answered 8/6, 2018 at 13:45 Comment(0)
P
6

Here's what's working for me

on windows

1) Add this to your %WINDIR%\System32\drivers\etc\hosts file: 127.0.0.1 localdev.YOURSITE.net (cause browser have issues with 'localhost' (for cross origin scripting)

Windows Vista and Windows 7 Vista and Windows 7 use User Account Control (UAC) so Notepad must be run as Administrator.

  1. Click Start -> All Programs -> Accessories

  2. Right click Notepad and select Run as administrator

  3. Click Continue on the "Windows needs your permission" UAC window.

  4. When Notepad opens Click File -> Open

  5. In the filename field type C:\Windows\System32\Drivers\etc\hosts

  6. Click Open

  7. Add this to your %WINDIR%\System32\drivers\etc\hosts file: 127.0.0.1 localdev.YOURSITE.net

  8. Save

  9. Close and restart browsers

On Mac or Linux:

  1. Open /etc/hosts with su permission
  2. Add 127.0.0.1 localdev.YOURSITE.net
  3. Save it

When developing you use localdev.YOURSITE.net instead of localhost so if you are using run/debug configurations in your ide be sure to update it.

Use ".YOURSITE.net" as cookiedomain (with a dot in the beginning) when creating the cookiem then it should work with all subdomains.

2) create the certificate using that localdev.url

TIP: If you have issues generating certificates on windows, use a VirtualBox or Vmware machine instead.

3) import the certificate as outlined on http://www.charlesproxy.com/documentation/using-charles/ssl-certificates/

Palikar answered 17/4, 2014 at 5:11 Comment(3)
Hi Troy, thanks for sharing this. Someone else will have to comment on if this works or not. My workaround: I ended up adding dev.phantomjscloud.com to my hosts file, and then using my production cert. That is only useful if you want your production keys available on your dev box though, so I think your solution could still be valid, if someone else can please verifyLocus
It works for me and my team, in a combination of ways, secure local to local server to secure local to production server.Palikar
For Windows, the git bash console works great using openssl commands from here. Just have to install the root certificate and you can create multiple site-specific certificates signed by it if you want.Watusi
X
4

If you're on OSX/Chrome you can add the self-signed SSL certificate to your system keychain as explained here: http://www.robpeck.com/2010/10/google-chrome-mac-os-x-and-self-signed-ssl-certificates

It's a manual process, but I got it working finally. Just make sure the Common Name (CN) is set to "localhost" (without the port) and after the certificate is added make sure all the Trust options on the certificate are set to "Always Trust". Also make sure you add it to the "System" keychain and not the "login" keychain.

Xylol answered 12/11, 2015 at 23:11 Comment(1)
He mentions IE, which means he is using Windows.Pedantry
G
4

Go to: chrome://flags/

Enable: Allow invalid certificates for resources loaded from localhost.

You don't have the green security, but you are always allowed for https://localhost in chrome.

Gwendolin answered 9/6, 2018 at 8:53 Comment(0)
B
3

If you're using node, why not generate them with node? This module seems to be pretty full featured:

Note that I wouldn't generate on the fly. Generate with some kind of build script so you have a consistent certificate and key. Otherwise you'll have to authorize the newly generated self-signed certificate every time.

Bandung answered 13/10, 2014 at 21:14 Comment(0)
S
3

SMH, a lot of hours wasted on this due to lack of proper documentation and not everyone uses IIS... If anyone else is still stuck on this issue I hope this helps.

Solution: Trusted Self Signed SSL CERT for localhost on Windows 10

Note: If you only need the SSL cert follow the Certification Creation section

Stack: Azure Function App(Node.js), React.js - Windows 10

Certification Creation

Step 1 - Create Certificate: OpenPowershell and run the following:

New-SelfSignedCertificate -NotBefore (Get-Date) -NotAfter (Get-Date).AddYears(5) `
-Subject "CN=localhost" -KeyAlgorithm "RSA" -KeyLength 2048 `
-HashAlgorithm "SHA256" -CertStoreLocation "Cert:\CurrentUser\My" `
-FriendlyName "HTTPS Development Certificate" `
-TextExtension @("2.5.29.19={text}","2.5.29.17={text}DNS=localhost")

Step 2 - Copy Certificate: Open Certificate Manager by pressing the windows key and search for "manage user certificates". Navigate to Personal -> Certificates and copy the localhost cert to Trusted Root Certification Authorities -> Certificates

Personal -> Certificates

Trusted Root Certification Authorities -> Certificates

(Friendly Name will be HTTPS Development Certificate)

Step 3. Export Certificate right click cert -> All Tasks -> Export which will launch the Certificate Export Wizard: Certificate Export Wizard

  • Click next
  • Select Yes, export the private Key Export private key
  • Select the following format Personal Information Exchange - PKCS #12 and leave the first and last checkboxes selected. Export format
  • Select a password; enter something simple if you like ex. "1111" Enter password
  • Save file to a location you will remember ex. Desktop or Sites (you can name the file development.pfx) Save file

Step 4. Restart Chrome

Azure Function App (Server) - SSL Locally with .PFX

In this case we will run an Azure Function App with the SSL cert.

  • copy the exported development.pfx file to your azure functions project root
  • from cmd.exe run the following to start your functions app func start --useHttps --cert development.pfx --password 1111" (If you used a different password and filename don't forget to update the values in this script)
  • Update your package.json scripts to start your functions app:

React App (Client) - Run with local SSL

Install openssl locally, this will be used to convert the development.pfx to a cert.pem and server.key. Source - Convert pfx to pem file

  1. open your react app project root and create a cert folder. (project-root/cert)
  2. create a copy of the development.pfx file in the cert folder. (project-root /cert/development.pfx)
  3. open command prompt from the cert directory and run the following:
  4. convert development.pfx to cert.pem: openssl pkcs12 -in development.pfx -out cert.pem -nodes
  5. extract private key from development.pfx to key.pem: openssl pkcs12 -in development.pfx -nocerts -out key.pem
  6. remove password from the extracted private key: openssl rsa -in key.pem -out server.key
  7. update your .env.development.local file by adding the following lines:
SSL_CRT_FILE=cert.pem
SSL_KEY_FILE=server.key
  1. start your react app npm start
Syndrome answered 31/1, 2021 at 8:6 Comment(1)
there are so many explanations online on how to use powershell for self signed certificate creationn. And all of them fail at some point (powershell script failing, export does not allow setting passward etc.). Finally this one worked for me.Precept
C
2

on windows I made the iis development certificate trusted by using MMC (start > run > mmc), then add the certificate snapin, choosing "local computer" and accepting the defaults. Once that certificate snapip is added expand the local computer certificate tree to look under Personal, select the localhost certificate, right click > all task > export. accept all defaults in the exporting wizard.

Once that file is saved, expand trusted certificates and begin to import the cert you just exported. https://localhost is now trusted in chrome having no security warnings.

I used this guide resolution #2 from the MSDN blog, the op also shared a link in his question about that also should using MMC but this worked for me. resolution #2

Cornerstone answered 8/11, 2014 at 8:32 Comment(0)
A
2

There are more aspects to this.

You can achieve TLS (some keep saying SSL) with a certificate, self-signed or not.

To have a green bar for a self-signed certificate, you also need to become the Certificate Authority (CA). This aspect is missing in most resources I found on my journey to achieve the green bar in my local development setup. Becoming a CA is as easy as creating a certificate.

This resource covers the creation of both the CA certificate and a Server certificate and resulted my setup in showing a green bar on localhost Chrome, Firefox and Edge: https://ram.k0a1a.net/self-signed_https_cert_after_chrome_58

Please note: in Chrome you need to add the CA Certificate to your trusted authorities.

Ansermet answered 13/12, 2017 at 10:54 Comment(0)
B
1

If you need to go a step further than @alon's detailed steps and also create a self signed ca:

https.createServer({
  key: fs.readFileSync(NODE_SSL_KEY),
  cert: fs.readFileSync(NODE_SSL_CERT),
  ca: fs.readFileSync(NODE_SSL_CA),
}, app).listen(PORT, () => {});

package.json

"setup:https": "openssl genrsa -out src/server/ssl/localhost.key 2048
&& openssl req -new -x509 -key src/server/ssl/localhost.key -out src/server/ssl/localhost.crt -config src/server/ssl/localhost.cnf
&& openssl req -new -out src/server/ssl/localhost.csr -config src/server/ssl/localhost.cnf
&& openssl x509 -req -in src/server/ssl/localhost.csr -CA src/server/ssl/localhost.crt -CAkey src/server/ssl/localhost.key -CAcreateserial -out src/server/ssl/ca.crt",

Using the localhost.cnf as described:

[req]
distinguished_name = req_distinguished_name
x509_extensions = v3_req
prompt = no
[req_distinguished_name]
C = UK
ST = State
L = Location
O = Organization Name
OU = Organizational Unit 
CN = www.localhost.com
[v3_req]
keyUsage = critical, digitalSignature, keyAgreement
extendedKeyUsage = serverAuth
subjectAltName = @alt_names
[alt_names]
DNS.1 = www.localhost.com
DNS.2 = localhost.com
DNS.3 = localhost
Bloc answered 11/6, 2020 at 15:37 Comment(0)
M
1

To follow up on answers from @Alon and @Diego above, the following should eliminate some of the manual browsers steps:

  1. Create your request config file [as ./req.cnf]:
[req]
distinguished_name = req_distinguished_name
x509_extensions = v3_req
prompt = no
[req_distinguished_name]
C = NG
ST = Lagos
L = Ikeja
O = Acme
OU = Dev 
CN = localhost
[v3_req]
keyUsage = critical, digitalSignature, keyAgreement
extendedKeyUsage = serverAuth
subjectAltName = @alt_names
[alt_names]
DNS.1 = www.localhost.com
DNS.2 = localhost.com
DNS.3 = localhost
  1. Create your certificate files [by running the following in your terminal]:
openssl req -x509 -nodes -days 365 -newkey rsa:2048 -keyout client-cert.key -out client-cert.pem -config req.cnf -sha256
  1. Add as trusted certificates to your Keychain:
sudo security add-trusted-cert -d -r trustRoot -k /Library/Keychains/System.keychain ./client-cert.pem

Note: Update the req.cnf according to your specific location, etc.

Note: This procedure was tested on MacOS High Sierra (10.13.6). If you're on Windows, you may need an alternative command for Step 3.

Melisandra answered 10/10, 2022 at 11:35 Comment(0)
S
0

in my case the .cert always change to default ( thats mean denied ) what ever we have change to always trusted. my device is macOS.

  1. command + space , type keychain access and open it.
  2. so we need to drag and drop into System Keychains -> System for the .cert file and double click on file -> get info -> make it change always trusted
  3. so my chrome for localhost or 127.0.0.1 the hyperlink proccess unsafe are visible , before its gone type.
openssl genrsa -out server.key 2048
openssl req -new -x509 -key server.key -out server.cert -days 365
Sharisharia answered 9/1, 2022 at 3:24 Comment(0)
D
0

its often required to use https for simple development work and to save going through the rigormal of creating a new set of keys and certificates every time I want to run some code

I use the following server certificate, private key and ca cert

for .... : https://localhost , https://127.0.0.1 , https://127.0.0.2 , https://tst-server

until .. : Dec 30 09:30:07 2049

the ca certificate needs to be installed into the trusted certificate store if you want the server to be automatically trusted, bounca.org : install root certificate ( note : show all files )

a host file entry will be required for tst-server to be resolved, phoenixnap.com : How to Edit Hosts File

to check the validity of a certificate, paste the plain text part of the certificates here keycdn.com : Certificate Checker

i also created a useful npm module for quickly setting up https, npm : https-quick

      var port    = 443;
      var host    = '127.0.0.1'; 
      var key,cert,cacert;
      setup();

      //require('fs').writeFile(__dirname+'/ca-cert',ca_cert);

      var https    = require('https');
      var server   = https.createServer({key,cert});
      server.listen(port,host);

      server.on('request',(req,res)=>{
            res.writeHead(200,{'Content-Type':'text/html'});
            res.end(`<title>test ${host}:${port}</title>It Works!`);
      });
      
      
function setup(){

      key     = `
-----BEGIN RSA PRIVATE KEY-----
MIIEowIBAAKCAQEAp1/aEck7k7OGlQe373+zEYiznlk0ORrg0UeyDGsULaGyIpG+
DW/1m6hga/y5LCObKNYhU2O2CYLOunzEXgFEhLq73zQ1rWNKdF/dE1P97lAeNmJ7
qapVHgmvqRR+M5JxGHHAr3cRS06WW2H4jJD4HWVuYhuww6igP6WhVWYoPn6sgDcW
E+HLI1DVwTxkA9J/poPSSdT/VEgvH2aOwA0h1KVa9l6DrC3E/tPo8D8NPyeViSRb
/HjyI3gXr74jQvq8+4fTcftNAtyhUXUhXvlryBGKZmARB1gXAiNCuXYK08I8PmhR
PwqVq15YYto9E4QYkfCZoJaNrztbFCfDl8yiVQIDAQABAoIBABhTaQlOuvbzj6rX
TVdksuzodlqcUme+TVB9YBZH9c3QA2jcz8d6LzMpXKI1P+B3aFSeEofhJRLqzQrz
mUKkYoX78dQ17Vs+5BJX4HSvr2dUg5+Z3qlBFU/hToN/c/wg24kW909JOd09FcNA
UPR1GWqEVG+z4JP/TRMTCoiz6UNzv4CRyWCF+iMkMQuWYXS3j+fd586eDElJGJEV
XujujNrAM/Qpj/ddLBy0vpHmiNNBJKJTWLVaCrk5zozss2uTxi3BWkwQ9w3lZyRp
ferWo0CNIDXwvA4ZX2ykKo9dKXwT1E3d/qo2LE8QGpzC5Gs50ZUUlnCGtp2qavd1
NR6WLmECgYEA1fTYqvC+BzX2/xaqAwZqfjBxvto29TjE8syrpB3S3vaS6lz/cw99
sb9l5b/KYAIsUVV3HbDIGCkHiCfochFD9ORLkuwSgijXrgEIKNyZHtL3pCq//hFq
H2k5hCmnXt3YhWF3ue3zSHyiDv/ps5n6YhI6HJyzD4XOM3z67EPnHA0CgYEAyEOu
Wd/G/w11rX9J+NcbSHUwUibrgCQFsuXohsCBVCr9zngqMfDqW5pbdc0CZ5RinC7y
bENI/4SLY7qZE3l/C8de3iSwgmw+K3blXoYtgFcp83s3hiiNvBeRGY1C8bL0bYZc
s5XfaTVjymXh6UlsIHnnJeDInMOd5FJW4zZ1ZWkCgYEAuGbCpvG+ljBopQo/lUPe
XMwb/MXOQCOhezHzbQtXR1t03BEzCVP8nUm85PsbzQuSbrceZrSKgGg8WZkrucQv
sc1hZUuZ2ByjZxD0m2MlhW+GiDNgLfWMZW4naEUOP7EsgCi1K8Ztu7fPZOYj4et/
5S6YbziPC33jbnT1PtR3R7ECgYBN2SF5hmfQ1eac3xJeTSAp9oQmK0L4uQgOFxlg
6Ixdr6iiDkw4xbIUkdhj3qHEqgX7OLS8KRvDWD7nMa43x87/QS07pX+H85PnSXy4
VehyL2/7WjanTDRsnaymBiez1SD3Qnfex6/lMf/sudYr3YLOzRRxwQO7DL/f9bIY
+R6BoQKBgFJN52moK6gfRCuTfqhihMy0O9CJCYIQm8tSMCrLD53DtoiMTuP1LDFu
5r3/rrCl5dRcb33nWz76hggtxpJo4H5DqLjoZlbajWxee5fSwqiBgWN2WNfFeui4
2DLyPhNkj/odVDub9Jxc8RoKK+D89b4/2jM955IiExkWb8MItV0E
-----END RSA PRIVATE KEY-----
`;

      cert    = `
Certificate:
    Data:
        Version: 3 (0x2)
        Serial Number: 4096 (0x1000)
    Signature Algorithm: sha256WithRSAEncryption
        Issuer: CN=tst-root-ca
        Validity
            Not Before: Aug 14 09:30:07 2022 GMT
            Not After : Dec 30 09:30:07 2049 GMT
        Subject: CN=tst-server
        Subject Public Key Info:
            Public Key Algorithm: rsaEncryption
                Public-Key: (2048 bit)
                Modulus:
                    00:a7:5f:da:11:c9:3b:93:b3:86:95:07:b7:ef:7f:
                    b3:11:88:b3:9e:59:34:39:1a:e0:d1:47:b2:0c:6b:
                    14:2d:a1:b2:22:91:be:0d:6f:f5:9b:a8:60:6b:fc:
                    b9:2c:23:9b:28:d6:21:53:63:b6:09:82:ce:ba:7c:
                    c4:5e:01:44:84:ba:bb:df:34:35:ad:63:4a:74:5f:
                    dd:13:53:fd:ee:50:1e:36:62:7b:a9:aa:55:1e:09:
                    af:a9:14:7e:33:92:71:18:71:c0:af:77:11:4b:4e:
                    96:5b:61:f8:8c:90:f8:1d:65:6e:62:1b:b0:c3:a8:
                    a0:3f:a5:a1:55:66:28:3e:7e:ac:80:37:16:13:e1:
                    cb:23:50:d5:c1:3c:64:03:d2:7f:a6:83:d2:49:d4:
                    ff:54:48:2f:1f:66:8e:c0:0d:21:d4:a5:5a:f6:5e:
                    83:ac:2d:c4:fe:d3:e8:f0:3f:0d:3f:27:95:89:24:
                    5b:fc:78:f2:23:78:17:af:be:23:42:fa:bc:fb:87:
                    d3:71:fb:4d:02:dc:a1:51:75:21:5e:f9:6b:c8:11:
                    8a:66:60:11:07:58:17:02:23:42:b9:76:0a:d3:c2:
                    3c:3e:68:51:3f:0a:95:ab:5e:58:62:da:3d:13:84:
                    18:91:f0:99:a0:96:8d:af:3b:5b:14:27:c3:97:cc:
                    a2:55
                Exponent: 65537 (0x10001)
        X509v3 extensions:
            X509v3 Basic Constraints: critical
                CA:FALSE
            X509v3 Key Usage: critical
                Digital Signature, Non Repudiation, Key Encipherment, Key Agreement
            X509v3 Extended Key Usage: critical
                TLS Web Server Authentication
            X509v3 Subject Key Identifier:
                3E:94:90:A9:2D:D7:71:A3:19:79:81:19:08:EE:CB:4A:AB:16:20:07
            X509v3 Authority Key Identifier:
                keyid:4B:0D:7A:26:6B:7A:A1:9E:EB:98:19:27:77:42:D0:BB:D0:A1:57:16
                DirName:/CN=tst-root-ca
                serial:EA:41:A9:B3:0F:FF:81:95
                
            X509v3 Subject Alternative Name:
                DNS:localhost, IP Address:127.0.0.1, IP Address:127.0.0.2, DNS:tst-server
    Signature Algorithm: sha256WithRSAEncryption
         93:ea:dc:4a:9c:3d:cb:df:bf:8a:9b:b9:22:40:21:c0:b1:77:
         20:31:d9:fc:ae:b1:41:bf:ca:58:52:aa:be:55:37:d4:f1:f4:
         4e:7b:2d:38:47:7c:63:2a:9f:36:d0:73:9c:7e:10:3b:8d:81:
         21:7e:10:d1:99:c0:4c:15:b4:79:66:4f:94:41:7f:15:72:3e:
         19:52:04:59:14:1d:a7:e2:04:36:60:7a:cc:ee:82:2a:46:82:
         7f:cc:90:ba:b0:d2:a4:eb:93:0b:0c:f6:ab:82:d0:90:36:3c:
         6c:04:74:6d:43:e9:ed:a6:3b:dd:e9:34:b7:a4:65:11:95:ba:
         ca:ef:67:7a:16:89:39:49:a8:9c:64:44:14:ba:26:8f:a6:37:
         e1:37:f4:0d:36:f8:39:cc:4e:a9:49:f6:21:33:e3:f5:b1:12:
         de:7e:66:eb:09:7c:41:b7:09:4c:d5:6a:04:65:29:13:07:d3:
         bb:13:4e:56:b2:28:f2:ba:c6:a7:ac:ba:92:68:06:40:49:dd:
         4a:43:85:f5:6b:87:85:7a:cf:3f:38:78:85:58:e7:80:fd:72:
         d0:0c:f8:92:f2:16:1f:33:32:ed:44:ca:3c:f3:94:be:a2:b4:
         a0:92:7a:2d:a5:59:5a:1d:be:f3:be:06:69:04:a8:ba:a9:19:
         7a:eb:8b:9b
-----BEGIN CERTIFICATE-----
MIIDdjCCAl6gAwIBAgICEAAwDQYJKoZIhvcNAQELBQAwFjEUMBIGA1UEAwwLdHN0
LXJvb3QtY2EwHhcNMjIwODE0MDkzMDA3WhcNNDkxMjMwMDkzMDA3WjAVMRMwEQYD
VQQDDAp0c3Qtc2VydmVyMIIBIjANBgkqhkiG9w0BAQEFAAOCAQ8AMIIBCgKCAQEA
p1/aEck7k7OGlQe373+zEYiznlk0ORrg0UeyDGsULaGyIpG+DW/1m6hga/y5LCOb
KNYhU2O2CYLOunzEXgFEhLq73zQ1rWNKdF/dE1P97lAeNmJ7qapVHgmvqRR+M5Jx
GHHAr3cRS06WW2H4jJD4HWVuYhuww6igP6WhVWYoPn6sgDcWE+HLI1DVwTxkA9J/
poPSSdT/VEgvH2aOwA0h1KVa9l6DrC3E/tPo8D8NPyeViSRb/HjyI3gXr74jQvq8
+4fTcftNAtyhUXUhXvlryBGKZmARB1gXAiNCuXYK08I8PmhRPwqVq15YYto9E4QY
kfCZoJaNrztbFCfDl8yiVQIDAQABo4HOMIHLMAwGA1UdEwEB/wQCMAAwDgYDVR0P
AQH/BAQDAgPoMBYGA1UdJQEB/wQMMAoGCCsGAQUFBwMBMB0GA1UdDgQWBBQ+lJCp
Lddxoxl5gRkI7stKqxYgBzBGBgNVHSMEPzA9gBRLDXoma3qhnuuYGSd3QtC70KFX
FqEapBgwFjEUMBIGA1UEAwwLdHN0LXJvb3QtY2GCCQDqQamzD/+BlTAsBgNVHREE
JTAjgglsb2NhbGhvc3SHBH8AAAGHBH8AAAKCCnRzdC1zZXJ2ZXIwDQYJKoZIhvcN
AQELBQADggEBAJPq3EqcPcvfv4qbuSJAIcCxdyAx2fyusUG/ylhSqr5VN9Tx9E57
LThHfGMqnzbQc5x+EDuNgSF+ENGZwEwVtHlmT5RBfxVyPhlSBFkUHafiBDZgeszu
gipGgn/MkLqw0qTrkwsM9quC0JA2PGwEdG1D6e2mO93pNLekZRGVusrvZ3oWiTlJ
qJxkRBS6Jo+mN+E39A02+DnMTqlJ9iEz4/WxEt5+ZusJfEG3CUzVagRlKRMH07sT
TlayKPK6xqesupJoBkBJ3UpDhfVrh4V6zz84eIVY54D9ctAM+JLyFh8zMu1Eyjzz
lL6itKCSei2lWVodvvO+BmkEqLqpGXrri5s=
-----END CERTIFICATE-----
`;

      ca_cert    = `
-----BEGIN CERTIFICATE-----
MIIDOzCCAiOgAwIBAgIJAOpBqbMP/4GVMA0GCSqGSIb3DQEBCwUAMBYxFDASBgNV
BAMMC3RzdC1yb290LWNhMB4XDTIyMDgxNDA5MjgwNFoXDTQ5MTIzMDA5MjgwNFow
FjEUMBIGA1UEAwwLdHN0LXJvb3QtY2EwggEiMA0GCSqGSIb3DQEBAQUAA4IBDwAw
ggEKAoIBAQCfdZdpipCK7gVxhhC4CvInK0n6Gf4MAJdkp3bqXXuMSIJsGrF9qbpY
FYAdpptr7X+EwkQ80nQcudXMsbou0Yg/iUG0FYp0iy8F4Fo6JTTLQAJ2l3OWrDsJ
Tp8w3HrKjPjzQUHc+NCv2RBIur+ViiF5Ur3qAvVygY3yyZWPzAHsZ+IckXtxvKZr
046zTekLJaXPA/iR5funJEJelDGOMbR4gGc3LOJp4BtRFuUX0dUdjPYzVvdhz4JA
H1+8bvY0qJCMlYFgRcPi6z47yU4ZgY0HTBtY0PqMX5HTskcvmavckPWFNigqS7zr
CikE8gbiC0E+u5mVk1j6k4hrvnEE1JGdAgMBAAGjgYswgYgwDwYDVR0TAQH/BAUw
AwEB/zAOBgNVHQ8BAf8EBAMCAYYwHQYDVR0OBBYEFEsNeiZreqGe65gZJ3dC0LvQ
oVcWMEYGA1UdIwQ/MD2AFEsNeiZreqGe65gZJ3dC0LvQoVcWoRqkGDAWMRQwEgYD
VQQDDAt0c3Qtcm9vdC1jYYIJAOpBqbMP/4GVMA0GCSqGSIb3DQEBCwUAA4IBAQCD
GB8xbbozjvEij6DESLKougYHjG33lT79tegixXnh+fFwr374VTx+nEcmz8ha0cFA
z0lig/8aOJm2vlB+iGY9/chztd91QL4/xiTIi4dYZFbQXXpsSwaIaEEDJ496p+Kx
nlh4AgczG7Yxs1MPm7QiYdLpRD128x8B4gkOwe54D9yUch/PHkb5jkII7a1ctb9q
ZzrfWtPiYt7x/DT1ljIYo2m4lLdns5CHkqHlDRjyaiV4kgi7EVlpIKvjZaNNpN1a
0aKw0m5zG50jX44AtKttW/EybFj0KR9hHeaGvB9MFIz2ZiPM9OGek6NPrLr7tSjJ
KcW4i/Y+AMJCHEjy+Mj/
-----END CERTIFICATE-----
`;

}//setup
Depreciation answered 30/10, 2023 at 12:2 Comment(1)
i answered another similar question with a working solution running in the html snippet of the stackoverflow answer, check it out and generate the cert and key straight away #8170499Depreciation
A
0

Posting this here, as @Michael Litvin suggested, a modification needed to make the other answer work:

> openssl req  -newkey rsa:2048  -x509  -nodes  -keyout keytmp.pem  -new  -out cert.pem  -subj /CN=localhost  -reqexts SAN  -extensions SAN  -config <(cat /System/Library/OpenSSL/openssl.cnf  <(printf '[SAN]\nsubjectAltName=DNS:localhost'))  -sha256  -days 3650


> openssl rsa -in keytmp.pem -out key.pem
  1. Use key.pem for private key, cert.pem for the public certificate.

  2. Open https://localhost:PORT,

  3. Right click > Developer Tools > Security tab > View Certificate > Details > Export.

  4. Click on the saved file, add certificate to your system.

  5. Double click certificate on keychain> Trust > Always trust

Amytal answered 19/2 at 2:10 Comment(0)

© 2022 - 2024 — McMap. All rights reserved.