Multiple clipping areas on Fabric.js canvas
Asked Answered
R

7

20

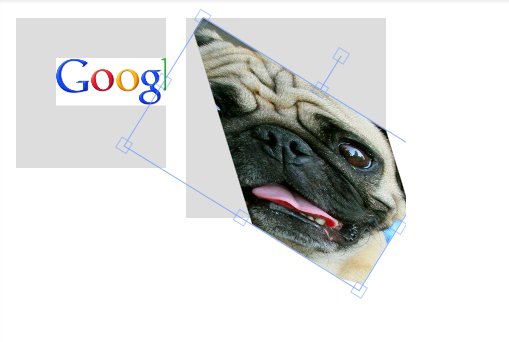
For making Photo Collage Maker, I use fabric js which has an object-based clipping feature. This feature is great but the image inside that clipping region cannot be scaled, moved or rotated. I want a fixed position clipping region and the image can be positioned inside the fixed clipping area as the user want.

I googled and find very near solution.

var canvas = new fabric.Canvas('c');
var ctx = canvas.getContext("2d");
ctx.beginPath();
ctx.rect(10,10,150,150);
ctx.rect(180,10,200,200);
ctx.closePath();
ctx.stroke();
ctx.clip();

Multiple Clipping Areas on fabric js canvas

where the image of one clipping region has appeared in another clipping region. How can I avoid this or is there another way of accomplishing this using fabric js.

Recliner answered 8/5, 2013 at 9:57 Comment(3)
I'd appreciate if you could select my answer, there being no other answers, and assuming of course that it works for you.Laryngoscope
@Recliner This is exactly what i am after, did you solve this using the answer below? - if so how did you stop when you scale the images bigger, the clipping area and position changes? How can i make it so the clipping area is always that size and position?Kyongkyoto
If someone have noticed issues with clipping to a group of objects in Fabric.js, then should take a look to this answer too.Cleavable
L
32

This can be accomplished with Fabric using the clipTo property, but you have to 'reverse' the transformations (scale and rotation), in the clipTo function.

When you use the clipTo property in Fabric, the scaling and rotation are applied after the clipping, which means that the clipping is scaled and rotated with the image. You have to counter this by applying the exact reverse of the transformations in the clipTo property function.

My solution involves having a Fabric.Rect serve as the 'placeholder' for the clip region (this has advantages because you can use Fabric to move the object around and thus the clip region.

Please note that my solution uses the Lo-Dash utility library, particularly for _.bind() (see code for context).

Example Fiddle


Breakdown

1. Initialize Fabric

First, we want our canvas, of course:

var canvas = new fabric.Canvas('c');

2. Clip Region

var clipRect1 = new fabric.Rect({
    originX: 'left',
    originY: 'top',
    left: 180,
    top: 10,
    width: 200,
    height: 200,
    fill: 'none',
    stroke: 'black',
    strokeWidth: 2,
    selectable: false
});

We give these Rect objects a name property, clipFor, so the clipTo functions can find the one by which they want to be clipped:

clipRect1.set({
    clipFor: 'pug'
});
canvas.add(clipRect1);

There doesn't have to be an actual object for the clip region, but it makes it easier to manage, as you're able to move it around using Fabric.

3. Clipping Function

We define the function which will be used by the images' clipTo properties separately to avoid code duplication:

Since the angle property of the Image object is stored in degrees, we'll use this to convert it to radians.

function degToRad(degrees) {
    return degrees * (Math.PI / 180);
}

findByClipName() is a convenience function, which is using Lo-Dash, to find the with the clipFor property for the Image object to be clipped (for example, in the image below, name will be 'pug'):

function findByClipName(name) {
    return _(canvas.getObjects()).where({
            clipFor: name
        }).first()
}

And this is the part that does the work:

var clipByName = function (ctx) {
    var clipRect = findByClipName(this.clipName);
    var scaleXTo1 = (1 / this.scaleX);
    var scaleYTo1 = (1 / this.scaleY);
    ctx.save();
    ctx.translate(0,0);
    ctx.rotate(degToRad(this.angle * -1));
    ctx.scale(scaleXTo1, scaleYTo1);
    ctx.beginPath();
    ctx.rect(
        clipRect.left - this.left,
        clipRect.top - this.top,
        clipRect.width,
        clipRect.height
    );
    ctx.closePath();
    ctx.restore();
}

NOTE: See below for an explanation of the use of this in the function above.

4. fabric.Image object using clipByName()

Finally, the image can be instantiated and made to use the clipByName function like this:

var pugImg = new Image();
pugImg.onload = function (img) {    
    var pug = new fabric.Image(pugImg, {
        angle: 45,
        width: 500,
        height: 500,
        left: 230,
        top: 170,
        scaleX: 0.3,
        scaleY: 0.3,
        clipName: 'pug',
        clipTo: function(ctx) { 
            return _.bind(clipByName, pug)(ctx) 
        }
    });
    canvas.add(pug);
};
pugImg.src = 'https://fabricjs.com/lib/pug.jpg';

What does _.bind() do?

Note that the reference is wrapped in the _.bind() function.

I'm using _.bind() for the following two reasons:

  1. We need to pass a reference Image object to clipByName()
  2. The clipTo property is passed the canvas context, not the object.

Basically, _.bind() lets you create a version of the function that uses the object you specify as the this context.

Sources
  1. https://lodash.com/docs#bind
  2. https://fabricjs.com/docs/fabric.Object.html#clipTo
  3. https://html5.litten.com/understanding-save-and-restore-for-the-canvas-context/
Laryngoscope answered 14/6, 2013 at 4:30 Comment(4)
The fiddle needs updating (as location of fabricjs has changed): jsfiddle.net/32AcbPorterporterage
@Laryngoscope This is exactly what i am after apart from one thing - can i ask why the actual images and clipping areas don't match up with the black rectangles? And why when you scale the images bigger, the clipping area and position changes? How can i make it so the clipping area is always that size and position?Kyongkyoto
Fabric has a utils class where it have a degreesToRadians function. fabric.util.degreesToRadians(value)Striate
TypeError: _(canvas.getObjects()).where is not a function. (In '_(canvas.getObjects()).where({ clipFor: name })', '_(canvas.getObjects()).where' is undefined)Tami
J
11

I have tweaked the solution by @natchiketa as the positioning of the clip region was not positioning correctly and was all wonky upon rotation. But all seems to be good now. Check out this modified fiddle: https://jsfiddle.net/PromInc/ZxYCP/

The only real changes were made in the clibByName function of step 3 of the code provided by @natchiketa. This is the updated function:

var clipByName = function (ctx) {
    this.setCoords();

    var clipRect = findByClipName(this.clipName);

    var scaleXTo1 = (1 / this.scaleX);
    var scaleYTo1 = (1 / this.scaleY);
    ctx.save();

    var ctxLeft = -( this.width / 2 ) + clipRect.strokeWidth;
    var ctxTop = -( this.height / 2 ) + clipRect.strokeWidth;
    var ctxWidth = clipRect.width - clipRect.strokeWidth + 1;
    var ctxHeight = clipRect.height - clipRect.strokeWidth + 1;

    ctx.translate( ctxLeft, ctxTop );

    ctx.rotate(degToRad(this.angle * -1));
    ctx.scale(scaleXTo1, scaleYTo1);
    ctx.beginPath();

    ctx.rect(
        clipRect.left - this.oCoords.tl.x,
        clipRect.top - this.oCoords.tl.y,
        ctxWidth,
        ctxHeight
    );
    ctx.closePath();
    ctx.restore();
}

Two minor catches I found:

  1. Adding a stroke to the clipping object seems to throw things off by a few pixels. I tried to compensate for the positioning, but then upon rotation, it would add 2 pixels to the bottom and right sides. So, I've opted to just remove it completely.
  2. Once in a while when you rotate the image, it will end up with a 1px spacing on random sides in the clipping.
Julietajulietta answered 22/7, 2014 at 20:54 Comment(3)
Note - I found that my original fiddle didn't work right in FireFox. I was able to fix that by using FabricJS 1.4.8 instead of 1.4.0. It appears there is some bug/conflict with FF and crossOrigin images. github.com/kangax/fabric.js/issues/903 I've updated the fiddle link in my post above.Julietajulietta
Note that it is required to keep aspect ratio of the image. If you dont it will produce some strange effects. This is probably some issue with the transformation matrixModillion
In my case clipping area is not adopting angle given to rect. prntscr.com/8gw2qi Clipping area always get the straight. This should fit exactly in this frame section. but its clipping by 90 degree. any thoughts ?Gymnosophist
M
8

Update to @Promlnc answer.

You need to replace the order of context transformations in order to perform proper clipping.

  1. translation
  2. scaling
  3. rotation

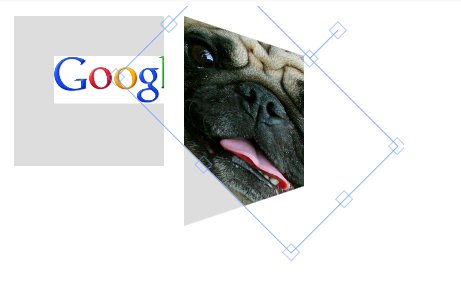
Otherwise, you will get wrongly clipped object - when you scale without keeping aspect ratio (changing only one dimension).

bad

Code (69-72):

ctx.translate( ctxLeft, ctxTop );

ctx.rotate(degToRad(this.angle * -1));
ctx.scale(scaleXTo1, scaleYTo1);

Replace to:

ctx.translate( ctxLeft, ctxTop );
ctx.scale(scaleXTo1, scaleYTo1);
ctx.rotate(degToRad(this.angle * -1));

See this: https://jsfiddle.net/ZxYCP/185/

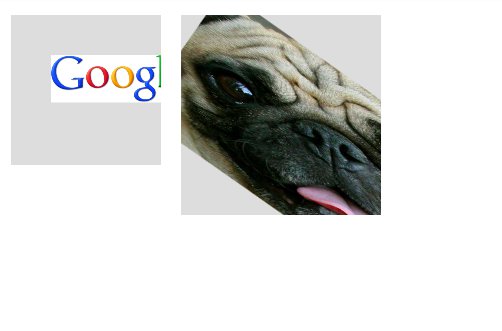
Proper result:

good

UPDATE 1:

I have developed a feature to clip by polygon: https://jsfiddle.net/ZxYCP/198/

poly

Modillion answered 14/9, 2015 at 3:40 Comment(5)
In my case clipping area is not adopting angle given to rect. prntscr.com/8gw2qi Clipping area always get the straight. This should fit exactly in this frame section. but its clipping by 90 degree. any thoughts ?Gymnosophist
@deveshsinghal Ask new question. I will answer you. This is not a topic of this question.Modillion
ok @Luk , but I got solution of my problem in #32506205Gymnosophist
Unfortunately I have already started to code my solution :P Try it, maybe it will help you somehow.Modillion
I have another question for you. ;) :P please have a look if you can help. #32627389Gymnosophist
G
4

This can be done much more easily. Fabric provides render method to clip by the context of another object.

Checkout this fiddle. I saw this on a comment here.

obj.clipTo = function(ctx) {
    ctx.save();
    ctx.setTransform(1, 0, 0, 1, 0, 0);

    clippingRect.render(ctx);

    ctx.restore();
};
Grotius answered 26/4, 2017 at 18:30 Comment(0)
V
3

As I tested all fiddles above they have one bug. It is when you will flip X and Y values together, clipping boundaries will be wrong. Also, in order not doing all calculations for placing images into the right position, you need to specify originX='center' and originY='center' for them.

Here is a clipping function update to original code from @natchiketa

var clipByName = function (ctx) {
    var clipRect = findByClipName(this.clipName);
    var scaleXTo1 = (1 / this.scaleX);
    var scaleYTo1 = (1 / this.scaleY);
    ctx.save();
    ctx.translate(0,0);
        
    //logic for correct scaling
    if (this.getFlipY() && !this.getFlipX()){
        ctx.scale(scaleXTo1, -scaleYTo1);
    } else if (this.getFlipX() && !this.getFlipY()){
        ctx.scale(-scaleXTo1, scaleYTo1);
    } else if (this.getFlipX() && this.getFlipY()){
        ctx.scale(-scaleXTo1, -scaleYTo1);
    } else {
        ctx.scale(scaleXTo1, scaleYTo1);
    }

    //IMPORTANT!!! do rotation after scaling
    ctx.rotate(degToRad(this.angle * -1));
    ctx.beginPath();
    ctx.rect(
        clipRect.left - this.left,
        clipRect.top - this.top,
        clipRect.width,
        clipRect.height
    );
    ctx.closePath();
    ctx.restore();
}

Please check the updated fiddle

Venal answered 15/6, 2017 at 18:40 Comment(1)
This is working fine, I have origin center for an object, Previously I wasn't using origin, Now I am having problem on calculating top and left dynamically.Enthusiast
M
1

With the latest update on fabric 1.6.0-rc.1, you are able to skew the image by hold shift and drag the middle axis.

I have trouble with how to reverse the skew so that the clipping area stays the same. I have tried the following code to try to reverse it back, but didn't work.

var skewXReverse = - this.skewX;
var skewYReverse = - this.skewY;

ctx.translate( ctxLeft, ctxTop );
ctx.scale(scaleXTo1, scaleYTo1);
ctx.transform(1, skewXReverse, skewYReverse, 1, 0, 0);
ctx.rotate(degToRad(this.angle * -1));

Demo: https://jsfiddle.net/uimos/bntepzLL/5/

Misalliance answered 29/10, 2015 at 16:11 Comment(0)
Z
-1

Update to previous guys answers.

ctx.rect(
    clipRect.oCoords.tl.x - this.oCoords.tl.x - clipRect.strokeWidth,
    clipRect.oCoords.tl.y - this.oCoords.tl.y - clipRect.strokeWidth,
    clipRect.oCoords.tr.x - clipRect.oCoords.tl.x,
    clipRect.oCoords.bl.y - clipRect.oCoords.tl.y
);

Now we are able to scale the clipping area without a doubt.

Zebec answered 27/10, 2016 at 14:41 Comment(1)
If you are updating others' answers, update them instead of posting another answer.Canaigre

© 2022 - 2024 — McMap. All rights reserved.