How to draw a gradient line (fading in/out) with Core Graphics/iPhone?
Asked Answered
A

8

28

I know how to draw a simple line:

CGContextSetRGBStrokeColor(context, 1.0, 1.0, 1.0, 1.0);
CGContextMoveToPoint(context, x, y);
CGContextAddLineToPoint(context, x2, y2);
CGContextStrokePath(context);

And I know how to do a gradient rectangle, i.g.:

CGColorSpaceRef myColorspace=CGColorSpaceCreateDeviceRGB();
size_t num_locations = 2;
CGFloat locations[2] = { 1.0, 0.0 };
CGFloat components[8] = { 0.0, 0.0, 0.0, 1.0,    1.0, 1.0, 1.0, 1.0 };

CGGradientRef myGradient = CGGradientCreateWithColorComponents(myColorspace, components, locations, num_locations);

CGPoint myStartPoint, myEndPoint;
myStartPoint.x = 0.0;
myStartPoint.y = 0.0;
myEndPoint.x = 0.0;
myEndPoint.y = 10.0;
CGContextDrawLinearGradient (context, myGradient, myStartPoint, myEndPoint, 0);

But how could I draw a line with a gradient, i.g. fading in from black to white (and maybe fading out to black on the other side as well) ?

Anatolian answered 20/8, 2009 at 3:52 Comment(1)
A quick note – the currently selected answer here is incorrect. It is possible to stroke arbitrary paths with a gradient as this answer shows.Bawbee
A
20

After several tries I'm now sure that gradients doesn't affect strokes, so I think it's impossible to draw gradient lines with CGContextStrokePath(). For horizontal and vertical lines the solution is to use CGContextAddRect() instead, which fortunately is what I need. I replaced

CGContextMoveToPoint(context, x, y);
CGContextAddLineToPoint(context, x2, y2);
CGContextStrokePath(context);

with

CGContextSaveGState(context);
CGContextAddRect(context, CGRectMake(x, y, width, height));
CGContextClip(context);
CGContextDrawLinearGradient (context, gradient, startPoint, endPoint, 0);
CGContextRestoreGState(context);

and everything works fine. Thanks to Brad Larson for the crucial hint.

Anatolian answered 20/8, 2009 at 16:42 Comment(2)
I've found exactly the same thing. It would appear gradients require a clip path (or rectangle) to be applied to the graphics context first. Perhaps this is because gradients are rendered in the enclosing area rather than on the path (or rectangle) border itself?Luger
This can't render a slop line?Markus
B
36

It is possible to stroke arbitrary paths with a gradient, or any other fill effect, such as a pattern.

As you have found, stroked paths are not rendered with the current gradient. Only filled paths use the gradient (when you turn them in to a clip and then draw the gradient).

However, Core Graphics has an amazingly cool procedure CGContextReplacePathWithStrokedPath that will transform the path you intend to stroke in to a path that is equivalent when filled.

Behind the scenes, CGContextReplacePathWithStrokedPath builds up an edge polygon around your stroke path and switches that for the path you have defined. I'd speculate that the Core Graphics rendering engine probably does this anyway in calls to CGContextStrokePath.

Here's Apple's documentation on this:

Quartz creates a stroked path using the parameters of the current graphics context. The new path is created so that filling it draws the same pixels as stroking the original path. You can use this path in the same way you use the path of any context. For example, you can clip to the stroked version of a path by calling this function followed by a call to the function CGContextClip.

So, convert your path in to something you can fill, turn that in to a clip, and then draw your gradient. The effect will be as if you had stroked the path with the gradient.

Code

It'll look something like this…

    // Get the current graphics context.
    //
    const CGContextRef context = UIGraphicsGetCurrentContext();

    // Define your stroked path. 
    //
    // You can set up **anything** you like here.
    //
    CGContextAddRect(context, yourRectToStrokeWithAGradient);

    // Set up any stroking parameters like line.
    //
    // I'm setting width. You could also set up a dashed stroke
    // pattern, or whatever you like.
    //
    CGContextSetLineWidth(context, 1);

    // Use the magical call.
    //
    // It turns your _stroked_ path in to a **fillable** one.
    //
    CGContextReplacePathWithStrokedPath(context);

    // Use the current _fillable_ path in to define a clipping region.
    //
    CGContextClip(context);

    // Draw the gradient.
    //
    // The gradient will be clipped to your original path.
    // You could use other fill effects like patterns here.
    //
    CGContextDrawLinearGradient(
      context, 
      yourGradient, 
      gradientTop, 
      gradientBottom, 
      0
    );

Further notes

It's worth emphasising part of the documentation above:

Quartz creates a stroked path using the parameters of the current graphics context.

The obvious parameter is the line width. However, all line drawing state is used, such as stroke pattern, mitre limit, line joins, caps, dash patterns, etc. This makes the approach extremely powerful.

For additional details see this answer of this S.O. question.

Bawbee answered 30/7, 2014 at 10:47 Comment(0)
A
20

After several tries I'm now sure that gradients doesn't affect strokes, so I think it's impossible to draw gradient lines with CGContextStrokePath(). For horizontal and vertical lines the solution is to use CGContextAddRect() instead, which fortunately is what I need. I replaced

CGContextMoveToPoint(context, x, y);
CGContextAddLineToPoint(context, x2, y2);
CGContextStrokePath(context);

with

CGContextSaveGState(context);
CGContextAddRect(context, CGRectMake(x, y, width, height));
CGContextClip(context);
CGContextDrawLinearGradient (context, gradient, startPoint, endPoint, 0);
CGContextRestoreGState(context);

and everything works fine. Thanks to Brad Larson for the crucial hint.

Anatolian answered 20/8, 2009 at 16:42 Comment(2)
I've found exactly the same thing. It would appear gradients require a clip path (or rectangle) to be applied to the graphics context first. Perhaps this is because gradients are rendered in the enclosing area rather than on the path (or rectangle) border itself?Luger
This can't render a slop line?Markus
G
8

You can use Core Animation layers. You can use a CAShaperLayer for your line by settings its path property and then you can use a CAGradientLayer as a layer mask to your shape layer that will cause the line to fade.

Replace your CGContext... calls with calls to CGPath... calls to create the line path. Set the path field on the layer using that path. Then in your gradient layer, specify the colors you want to use (probably black to white) and then set the mask to be the line layer like this:

 [gradientLayer setMask:lineLayer];

What's cool about the gradient layer is that is allows you to specify a list of locations where the gradient will stop, so you can fade in and fade out. It only supports linear gradients, but it sounds like that may fit your needs.

Let me know if you need clarification.

EDIT: Now that I think of it, just create a single CAGradientLayer that is the width/height of the line you desire. Specify the gradient colors (black to white or black to clear color) and the startPoint and endtPoints and it should give you what you need.

Garek answered 20/8, 2009 at 4:28 Comment(4)
You are right, this would perfectly fit my needs, but unfortunately this is only available with version 3 of the iPhone OS and I want to use at least 2.2. Thanks anyway...Anatolian
I guess you meant [gradientLayer setMask:LineLayer]; - right? You mask the CAGradientLayer with the CAShapeLayer.Unblown
Brilliant. Learnt a lot doing this.Surly
@Unblown Both are correct, based on whether you want a solid-colored line that fades out, or you want a gradient-filled line that stays solid all the way through.Retina
B
8

After you draw the line, you can call

CGContextClip(context);

to clip further drawing to your line area. If you draw the gradient, it should now be contained within the line area. Note that you will need to use a clear color for your line if you just want the gradient to show, and not the line underneath it.

There is the possibility that a line will be too thin for your gradient to show up, in which case you can use CGContextAddRect() to define a thicker area.

I present a more elaborate example of using this context clipping in my answer here.

Boddie answered 20/8, 2009 at 12:50 Comment(1)
I tried your suggestion: CGContextSetLineWidth(context, 10.0); // should be thick enough CGContextSetRGBStrokeColor(context, 0.0, 0.0, 0.0, 0.0); CGContextMoveToPoint(context, 50,50); CGContextAddLineToPoint(context, 100,100); CGContextStrokePath(context); CGContextClip(context); CGContextDrawLinearGradient (context, myGradient, myStartPoint, myEndPoint, 0); but this throws <Error>: doClip: empty path. The documentation says that CGContextStrokePath(context); clears the path - without this method no error is thrown, but nothing is drawn at all. Any ideas?Anatolian
M
1

I created a Swift version of Benjohn's answer.

class MyView: UIView {
    override func draw(_ rect: CGRect) {
    super.draw(rect)

    guard let context = UIGraphicsGetCurrentContext() else {
        return
    }

    context.addPath(createPath().cgPath)
    context.setLineWidth(15)
    context.replacePathWithStrokedPath()
    context.clip()

    let gradient = CGGradient(colorsSpace: nil, colors: [UIColor.red.cgColor, UIColor.yellow.cgColor, UIColor.green.cgColor] as CFArray, locations: [0, 0.4, 1.0])!
    let radius:CGFloat = 200
    let center = CGPoint(x: bounds.width / 2, y: bounds.height / 2)
    context.drawRadialGradient(gradient, startCenter: center, startRadius: 10, endCenter: center, endRadius: radius, options: .drawsBeforeStartLocation)
    }
}

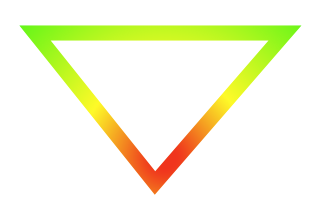
If the createPath() method creates a triangle, you get something like this:

enter image description here

Hope this helps anyone!

Maris answered 10/8, 2020 at 8:0 Comment(1)
Cool effect but radial gradient is about as appropriate as tie dye gradient for most sharp angled shapes and applications.Fluted
A
1

Swift 5 Version

This code worked for me.

override func draw(_ rect: CGRect) {
    super.draw(rect)
    
    guard let context = UIGraphicsGetCurrentContext() else {
        return
    }
    
    drawGradientBorder(rect, context: context)
}

fileprivate 
func drawGradientBorder(_ rect: CGRect, context: CGContext) {
    context.saveGState()
    let path = ribbonPath()
    context.setLineWidth(5.0)
    context.addPath(path.cgPath)
    context.replacePathWithStrokedPath()
    context.clip()
                 
    let baseSpace = CGColorSpaceCreateDeviceRGB()
    let gradient = CGGradient(colorsSpace: baseSpace, colors: [UIColor.red.cgColor, UIColor.blue.cgColor] as CFArray, locations: [0.0 ,1.0])!
    context.drawLinearGradient(gradient, start: CGPoint(x: 0, y: rect.height/2), end: CGPoint(x: rect.width, y: rect.height/2), options: [])
    context.restoreGState()
}

fileprivate 
func ribbonPath() -> UIBezierPath {
    let path = UIBezierPath()
    path.move(to: CGPoint.zero)
    path.addLine(to: CGPoint(x: bounds.maxX - gradientWidth, y: 0))
    path.addLine(to: CGPoint(x: bounds.maxX - gradientWidth - ribbonGap, y: bounds.maxY))
    path.addLine(to: CGPoint(x: 0, y: bounds.maxY))
    path.close()
    return path
}
Appaloosa answered 29/3, 2021 at 20:46 Comment(1)
Well, it's almost perfect :-) A great example that's going to save me a lot of time. Your answer doesn't account for setting start and end to respective UIColors, nor for setting gradientWidth or ribbonGap, and it would be better to account for them in the answer. Finally, using the code with a gradient width of 3.0 and a ribbonGap of 3.0, the top, left and bottom legs of the rectangle are stroked reasonably well, but the right side skews. But credit for getting a Swift 5.0 answer pointed in the right direction.Fluted
S
0
CGContextMoveToPoint(context, frame.size.width-200, frame.origin.y+10);
CGContextAddLineToPoint(context, frame.size.width-200, 100-10);
CGFloat colors[16] = { 0,0, 0, 0,
    0, 0, 0, .8,
    0, 0, 0, .8,
    0, 0,0 ,0 };
CGColorSpaceRef baseSpace = CGColorSpaceCreateDeviceRGB();
CGGradientRef gradient = CGGradientCreateWithColorComponents(baseSpace, colors, NULL, 4);

CGContextSaveGState(context);
CGContextAddRect(context, CGRectMake(frame.size.width-200,10, 1, 80));
CGContextClip(context);
CGContextDrawLinearGradient (context, gradient, CGPointMake(frame.size.width-200, 10), CGPointMake(frame.size.width-200,80), 0);
CGContextRestoreGState(context);

its work for me.

Serration answered 30/5, 2012 at 6:55 Comment(0)
F
0

Based on @LinJin's answer, here's something that draws a linear rainbow gradient border around a rectangle... I guess the start of a rectangular UIColorWell sort of thing.

Swift 5

import UIKit
import QuartzCore

class RectangularColorWell : UIControl {
    
    var lineWidth : CGFloat = 3.0 {
        didSet {
            self.setNeedsDisplay()
        }
    }
      
    required init?(coder aDecoder: NSCoder) {
        fatalError("init(coder:) has not been implemented")
    }

    override init(frame: CGRect) {
        super.init(frame: frame)
        let tapGestureRecognizer = UITapGestureRecognizer(target: self, action: #selector(CustomToggleControl.controlTapped(_:)))
        tapGestureRecognizer.numberOfTapsRequired = 1;
        tapGestureRecognizer.numberOfTouchesRequired = 1;
        self.addGestureRecognizer(tapGestureRecognizer)
        self.setNeedsDisplay()
        
    }
    override func draw(_ rect: CGRect) {
        guard let ctx = UIGraphicsGetCurrentContext() else { return }
        ctx.setLineWidth(lineWidth)
        ctx.setFillColor(backgroundColor!.cgColor)
        ctx.fill(rect)
        drawGradientBorder(rect, context: ctx)
    }
    
    
    func drawGradientBorder(_ rect: CGRect, context: CGContext) {
        context.saveGState()
        let path = UIBezierPath(rect: rect)
        context.addPath(path.cgPath)
        context.replacePathWithStrokedPath()
        context.clip()
        
        let rainbowColors : [UIColor] = [ .red, .orange, .yellow, .green, .blue, .purple ]
        let colorDistribution: [CGFloat] = [0.0, 0.2, 0.4, 0.6, 0.8, 1.0 ]
        let gradient = CGGradient(
                 colorsSpace: CGColorSpaceCreateDeviceRGB(),
                 colors: rainbowColors.map { $0.cgColor } as CFArray,
                 locations: colorDistribution)!
        context.drawLinearGradient(gradient, 
                 start: CGPoint(x: 0, y: 0), 
                 end: CGPoint(x: rect.width, y: rect.height), options: [])
        context.restoreGState()
    }

    
    @objc func controlTapped(_ gestureRecognizer :UIGestureRecognizer) {
        UIView.animate(withDuration: 0.2, delay: 0.0, options: UIView.AnimationOptions.curveEaseIn, animations: {
            self.alpha = 0.5
        }, completion: { (finished: Bool) -> Void in
            UIView.animate(withDuration: 0.2, delay: 0.0, options: UIView.AnimationOptions.curveEaseOut, animations: {
                self.alpha = 1.0
            }, completion: { (finished: Bool) -> Void in
            })
        })

        setNeedsDisplay()
        sendActions(for: .touchDown)
    }
}
Fluted answered 9/5, 2022 at 13:27 Comment(0)

© 2022 - 2024 — McMap. All rights reserved.