How to maintain multiple bitbucket accounts with multiple ssh keys in the same system
Asked Answered
T

9

80

I have multiple Git accounts one is my personal use and one is for company use. Both accounts source need to be activated from my laptop. Here I generated two ssh keys like id_rsa.pub,id_benwork_rsa.pub and I configured the config of git as

Host sfsworkdid
 HostName bitbucket.org
 IdentityFile ~/.ssh/id_rsa
Host workdid
 HostName bitbucket.org
 IdentityFile ~/.ssh/id_benwork_rsa

So here is my problem: while pushing to any repo git asking the first ssh_key passphrase. Everytime I am changing the user.name in git config as git config user.name "mybitbucketusername". So please tell me how to maintain multiple git accounts with multiple ssh keys in the same system

I tried How to work with multiple ssh keys, Multiple bitbucket accounts but no use

push using multiple account / multiple identity on github / bitbucket is somewhat helpful to reach up to now

Tripletail answered 15/1, 2014 at 14:23 Comment(6)
user.name has nothing to do with your bitbucket account. According to the git docs: "user.name: Your full name to be recorded in any newly created commits. Can be overridden by the GIT_AUTHOR_NAME and GIT_COMMITTER_NAME environment variables. See git-commit-tree(1)." What is your issue and what are you trying to achieve?Frankpledge
Did you check this one? gist.github.com/jexchan/2351996Indulgent
can you please add your ".git/config" from of your projects, of course change your username and project to USERNAME and PROJECTWeinman
possible duplicate of Specify an SSH key for git push for a given domainStringent
You must change remote url to include your alias name instead of 'bitbucket.org'.Ur
1. dont touch user.name. It is not used for authorization. It is used only for git history and can be 2. You must change remote url to include your alias name (sfsworkdid or workdid) instead of 'bitbucket.org'. I.e change "[email protected]:my-group/my-repo.git" to "git@sfsworkid:my-group/my-repo.git" or "git@workid:my-group/my-repo.git". In this way ssh will know which config it should use. With "[email protected]" ssh will use default identity (id_rsa.pub).Ur
G
121

Create multiple identities for Mac OSX, GitBash, and Linux

You should at this point already have created at least a single default identity. To see if you have a default identity already, list the contents of your .ssh directory. Default identity files appear as a id_encrypt and id_encrypt.pub pair. The encrypt value is either rsa or dsa. Use the ssh-keygen command to create a new identity. In the example below, the identity is named personalid.

$ ssh-keygen -f ~/.ssh/personalid -C "personalid"
Generating public/private rsa key pair.
Enter passphrase (empty for no passphrase): 
Enter same passphrase again: 
Your identification has been saved in /Users/manthony/.ssh/personalid.
Your public key has been saved in /Users/manthony/.ssh/personalid.pub.
The key fingerprint is:
7a:9c:b2:9c:8e:4e:f4:af:de:70:77:b9:52:fd:44:97 personalid
The key's randomart image is:
+--[ RSA 2048]----+
|         |
|         |
|        .|
|        Eo|
|  .  S  . ..|
|  . . o . ... .|
|  . = = ..o o |
|  . o X ... . .|
|  .ooB.o ..  |
+-----------------+

If you have multiple Bitbucket accounts, you need to generate a new public/private key pair for each account.

Create a SSH config file

When you have multiple identity files, create a SSH config file mechanisms to create aliases for your various identities. You can construct a SSH config file using many parameters and different approaches. The format for the alias entries use in this example is:

Host alias
HostName bitbucket.org
IdentityFile ~/.ssh/identity

To create a config file for two identities (workid and personalid), you would do the following:

  1. Open a terminal window.

  2. Edit the ~/.ssh/config file. If you don't have a config file, create one.

  3. Add an alias for each identity combination for example:

    Host workid
     HostName bitbucket.org
     IdentityFile ~/.ssh/workid
    Host personalid
     HostName bitbucket.org
     IdentityFile ~/.ssh/personalid
    
  4. Close and save the file.

Now, you can substitute the alias for portions of the repository URL address as below: [email protected]:accountname/reponame.git -> git@alias:accountname/reponame.git

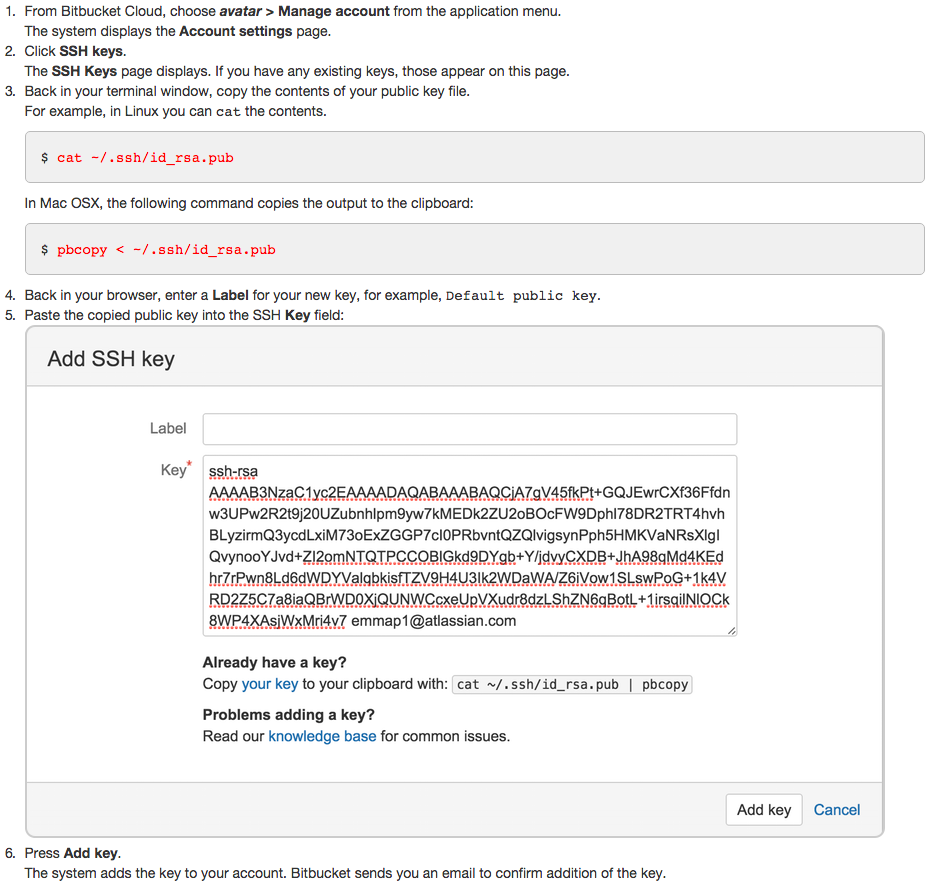
Load each key into the appropriate Bitbucket account

enter image description here

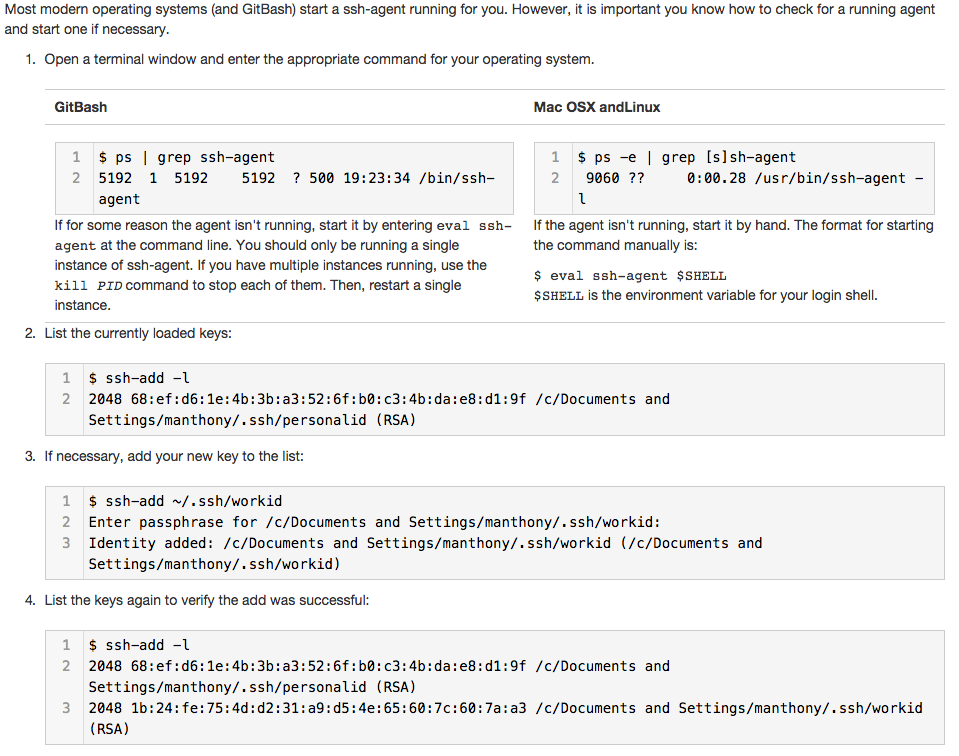
Ensure the ssh-agent is running and loaded with your keys

enter image description here

Clone a repository using SSH and your alias configuration

To clone a repository with one of multiple SSH identities that you configured, you clone the repo and using your alias in the SSH URL. To try this for yourself, log into Bitbucket and do the following:

  1. Navigate to the repository Overview.
  2. Display the SSH URL.
    For example, ssh URL as:
    [email protected]:accountname/reponame.git
    then clone the repository using:
    git clone git@personalid:accountname/reponame.git

This refers to official solution Configure multiple SSH identities for GitBash, Mac OSX, & Linux, It works fine for me!

Garate answered 6/10, 2015 at 5:41 Comment(8)
as complement in the .ssh/config, I have to add "IdentitiesOnly yes", else there is a try with my default id_rsa on bitbucket and failed the flow because it's associated to an existing other account (on bitbucket), that is used to login.Kathernkatheryn
The main thing which worked for me was For example, ssh URL as: [email protected]:accountname/reponame.git then clone the repository using: git clone git@personalid:accountname/reponame.gitPosterior
I don't understand the git@alias:accountname/reponame.git bit. What if your repository is namespaced under a Bitbucket project? Can you provide more examples?Trammell
Works like a charm! if you already have a repository just edit .git/config, replace bitbucket.org domain for alias and you're good to go. On [remote "origin"] => url = git@<alias>:<account>/<reponame>.gitHematite
This bloody thing works flawlessly, thanks!Antoniaantonie
This was missing only the User yourusername from @Syllabic s answer. Once I added it - it started workingGizmo
I have no words to express my gratitude. Thank you so muchAcme
this is one hell of an explanation...this needs to be done as you cannot provide one public key to more than one bitbucket account.Oestrogen
S
23

Edit your ~/.ssh/config file as following !

Host bitbucket.org-yourusername
    HostName bitbucket.org
    User yourusername
    IdentityFile ~/.ssh/yoursshkey
    IdentitiesOnly yes

Change your remote git url to have your username before '@bitbucket.org'

git remote add origin [email protected]:company/app.git

or

git remote set-url origin [email protected]:company/app.git    

If you have not yet cloned your repository:

git clone [email protected]:company/app.git
Syllabic answered 2/9, 2019 at 7:22 Comment(1)
this worked for me however with one slight modification - the Host field must be the same in both cases, e.g. Host bitbucket.org instead of Host bitbucket.org-yourusernameHengist
H
11

An alternative to the ~/.ssh/config method above is to specify the configuration variable core.sshCommand in the clone command itself. For example,

git clone --config core.sshCommand='ssh -i/home/username/.ssh/id_ed25519' [email protected]:the_best/awesome_repo.git

This will set the local repository configuration value and make subsequent push/pull commands 'just work'.

$ git config --local --get core.sshCommand
ssh -i/home/username/.ssh/id_ed25519

This is supported in git versions 2.10 and later.

Himmler answered 24/9, 2017 at 18:25 Comment(1)
This was the only working solution in 2019/06 on my ubuntu client.Furbish
A
9

After searching a lot on the web and with the community help I figured out how to configure 2 differents bitbuckets account on my Mac - MacOS Monterey.

Suppose that you have 2 bitbucket accounts witch usernames are username1 and username12.

  1. Open the terminal and create 2 ssh file2 for both usernames:

ssh-keygen -f ~/.ssh/username1-Bitbucket

ssh-keygen -f ~/.ssh/username2-Bitbucket

  1. Start ssh-agent:

eval $(ssh-agent)

  1. Create or edit the ~/.ssh/config file:

Create:

touch ~/.ssh/config

open ~/.ssh/config

Edit:

open ~/.ssh/config

The ~/.ssh/config file should look like this:

Host username1-Bitbucket
    HostName bitbucket.org
    User username1
    IdentityFile ~/.ssh/username1-Bitbucket

Host username2-Bitbucket
    HostName bitbucket.org
    User username2
    IdentityFile ~/.ssh/username2-Bitbucket

Host *
    UseKeychain yes
    AddKeysToAgent yes
    PreferredAuthentications publickey
    IdentityFile ~/.ssh/username1-Bitbucket
    IdentityFile ~/.ssh/username2-Bitbucket
    IdentitiesOnly yes
    PreferredAuthentications keyboard-interactive,password
  1. Add the keys to the ssh-agent:

ssh-add --apple-use-keychain ~/.ssh/username1-Bitbucket

ssh-add --apple-use-keychain ~/.ssh/username2-Bitbucket

  1. Copy the ssh key and add it to your bitbuckets accounts. See link:

pbcopy < ~/.ssh/username1-Bitbucket.pub

pbcopy < ~/.ssh/username1-Bitbucket.pub

  1. Check if connection to bitbucket succeeded (At least one) in order to add Bitbucket as a known hosts:

ssh -T [email protected]

  1. Clone your repositories using ssh and cd on the terminal to the repository folder.

  2. Check the reposiroties remote url:

git remote -v

You'll get information like this one:

[email protected]:companyUserName/repositoryName.git

  1. Change the repositories remote url:

git remote set-url origin username1@username1-Bitbucket:username1/repositoryName.git

git remote set-url origin username2@username2-Bitbucket:username2/repositoryName.git

So we changed [email protected]:companyUserName/repositoryName.git to username1@username1-Bitbucket:username1/repositoryName.git

git -> username1 or username2, the username of the accounts.

bitbucket -> username1-Bitbucket or username2-Bitbucket, the host alias of the config file.

companyUserName -> It's the username of the account that holds the repository, in our case the repositories are owned by username1 or username2.

repositoryName -> The name of the repository.

  1. Test your connection on both repositories creating a new branch and trying to push it:

git checkout -b newBranch

git push origin newBranch

If everything works correctly on both repositories, you are done!

Hope that this solution works for every Mac user.

That's all folk!

Apartment answered 18/3, 2022 at 0:6 Comment(1)
ssh-add --apple-use-keychain ~/.ssh/username2-Bitbucket importantJimjams
C
2

FRONT EDIT: It appears that Bitbucket has now stopped supporting the mechanism described below. As of today, I'm using the solutioon of @shannon-chou above, and it's working just fine. Remainder of post left here for historical reference. --JBC, 2019-06-23

In 2016, it appears that BitBucket added support for a somewhat simpler solution that doesn't involve extra futzing with the .ssh config file. Specifically, it's now possible to use the ssh username to indicate which account you're accessing. For instance, rather than using the git url

[email protected]:efhutton/squanzle.git

you can use the git url

[email protected]:efhutton/squanze.git

(or ssh://[email protected]/efhutton/squanze.git , which appears to be equivalent)

The basic issue is that your ssh client is going to present ssh-key identities in a fixed order. Let's say that your work account is named bobobogo, and your private one is called efhutton, and your ssh client is configured to offer the key registered with bobobogo first. If you're trying to, say, fetch on an account associated with efhutton, then your ssh client offers the bobobogo key, bitbucket accepts it, and then observes that the bobobogo account doesn't have access to the efhutton/squanze repo, and blocks you. Using the new mechanism, you're telling bitbucket that you want to use a key that's authorized for the efhutton account, and so when your ssh client presents the key registered for bobobogo, bitbucket turns it down, and your ssh client can present the next key, which is registered with the efhutton account.

Details in this blog post

https://bitbucket.org/blog/better-support-multiple-ssh-keys

EDIT: you saw the message at the top, right?

Chicane answered 29/3, 2019 at 18:6 Comment(2)
Did this for a while until it suddenly stopped working. Switched to the old way: blog.developer.atlassian.com/… Works perfect.Veinlet
Per [email protected]:efhutton/squanze.git - what if squanze.git is located under a Bitbucket project? Do you know what the URL look like in this case?Trammell
H
2

Please follow this Github gist for reference. https://gist.github.com/shakeeb91/cd3d3c387f339fbd93ac7388b3c885e0

1)Create Config file inside ~/.ssh/config in home directory. 2)Add a code:

Host myaccount2access
   HostName bitbucket.org
   User git
   IdentityFile /home/shakeeb/.ssh/newsshkey
   IdentitiesOnly yes
and then clone the repository.

Than run below. Make sure use your own repo details.

git clone git@myaccount2access:shakeeb91/repository.git

Hawley answered 22/12, 2019 at 13:33 Comment(0)
B
0

If you receive an "ssh: Could not resolve hostname : Name or service not known" error, the following may be helpful.

As pointed out by Shannon Chou's answer, you want to create SSH aliases. GitHub, BitBucket etc. have instructions on how to do this, but I encountered one problem on Windows 10 that may help others. SSH has two different config files: a system-wide config file and a user-specific config file. The instructions I read, including Shannon Chou's, all say to add the aliases to the user-specific config file which is located at ~/.ssh/.config

In my case, I needed to add the aliases to the system-wide configuration file, which when using Git on Windows 10 is typically located here: C:\Program Files\Git\etc\ssh\ssh_config, in Git's directory.

You can determine which config file SSH is using by running this command, "myalias" can be any string" all we're interested in is the config file path that this will output:

ssh -vv myalias

OpenSSH_7.1p2, OpenSSL 1.0.2d 9 Jul 2015
debug1: Reading configuration data /etc/ssh/ssh_config

Note in the output the file path, "/etc/ssh/ssh_config". This tells us that SSH is looking for aliases there and not in the ~/.ssh/.config file.

Butta answered 24/5, 2016 at 20:17 Comment(0)
B
0

In case the other comments don't work, here is what I did for my bitbucket accounts.

    Host *
         StrictHostKeyChecking=no
         UserKnownHostsFile=/dev/null

    Host nameOfSSH-Bitbucket bitbucket.org
    HostName bitbucket.org
    User myBITBUCKETUserName
    IdentityFile /Users/luisconstante/.ssh/nameOfSSH-Bitbucket

    Host nameOf2ndSSH-Bitbucket bitbucket.org
    HostName bitbucket.org
    User myBITBUCKET2ndUserName
    IdentityFile /Users/luisconstante/.ssh/nameOf2ndSSH-Bitbucket

    git remote add origin [email protected]:mybitbucketteam/my-cool-app.git
    git remote add origin [email protected]:mybitbucketteam/my-cool-app2.git

if you dont want to input your passphrase everytime, (it may be insecure) you can create a new ssh key by leaving the password prompt empty.

I've tried UseKeychain yes but it failed. This is what worked for me.

Let me know if I'm missing something, this is complementary to the other comments.

2019

Beatitude answered 15/5, 2019 at 23:36 Comment(0)
I
0

If you wants to use different identity keys for different projects. You can simply use git command and configuration as below:

  1. While cloning:

    • git clone -c "core.sshCommand=ssh -i ~/.ssh/BitbucketKey1 -F /dev/null" {your repo url}
  2. For existing repo:

    • Go to your .git folder.
    • Edit config file.
    • Add below line under [core] section
    • sshCommand = "ssh -i ~/.ssh/BitbucketKey1 -F /dev/null"
Intravenous answered 4/5, 2023 at 8:22 Comment(0)

© 2022 - 2024 — McMap. All rights reserved.