How do I adjust brightness, contrast and vibrance with opencv python?
Asked Answered
D

4

5

I am new to image processing. I program in Python3 and uses the OpenCV image processing library.I want to adjust the following attributes.

  1. Brightness
  2. Contrast
  3. Vibrance
  4. Hue
  5. Saturation
  6. Lightness

For 4, 5, 6. I am using the following code to convert to HSV space.

hsv = cv2.cvtColor(img, cv2.COLOR_BGR2HSV)
h, s, v = cv2.split(hsv)
h += value # 4
s += value # 5
v += value # 6
final_hsv = cv2.merge((h, s, v))
img = cv2.cvtColor(final_hsv, cv2.COLOR_HSV2BGR)

The only tutorial I found for 1 and 2 is here. The tutorial uses C++, but I program in Python. Also, I do not know how to adjust 3. vibrance. I would very much appreciate the help, thanks!.

Dittmer answered 22/5, 2018 at 18:31 Comment(3)
This should help... https://mcmap.net/q/280092/-how-do-i-increase-the-contrast-of-an-image-in-python-opencvColvin
@MarkSetchell Thanks! I just tried it and this works!Dittmer
Excellent! Good luck.Colvin
D
9

Thanks to @MarkSetchell for providing the link. In short, the answers uses numpy only and the formula can be presented as in below.

new_image = (old_image) × (contrast/127 + 1) - contrast + brightness

Here contrast and brightness are integers in the range [-127,127]. The scalar 127 is used for this range. Also, below is the code I used.

brightness = 50
contrast = 30
img = np.int16(img)
img = img * (contrast/127+1) - contrast + brightness
img = np.clip(img, 0, 255)
img = np.uint8(img)
Dittmer answered 22/5, 2018 at 22:12 Comment(1)
It's worth pointing out that OpenCV has a built-in function convertScaleAbs) which will do all of the clipping for you. It will give abs(alpha*img + beta). In this case alpha=contrast/127+1. beta = brightness-contrast.Ulbricht
S
4

Here is one way to do the vibrance in Python/OpenCV.

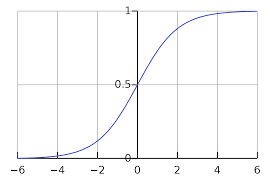
Convert to HSV. Then create a sigmoid function LUT.

(The sigmoid function increases linearly from the origin, but then tapers off to flat.)

enter image description here

See https://en.wikipedia.org/wiki/Sigmoid_function

Apply the LUT to S channel.

Convert back to BGR.

Input:

enter image description here

import cv2
import numpy as np

# read image
img = cv2.imread('yellow_building.jpg')

# convert image to hsv colorspace as floats
hsv = cv2.cvtColor(img, cv2.COLOR_BGR2HSV)
h, s, v = cv2.split(hsv)
print(np.amax(s), np.amin(s), s.dtype)

# set vibrance
vibrance=1.4

# create 256 element non-linear LUT for sigmoidal function
# see https://en.wikipedia.org/wiki/Sigmoid_function
xval = np.arange(0, 256)
lut = (255*np.tanh(vibrance*xval/255)/np.tanh(1)+0.5).astype(np.uint8)

# apply lut to saturation channel
new_s = cv2.LUT(s,lut)

# combine new_s with original h and v channels
new_hsv = cv2.merge([h,new_s,v])

# convert back to BGR
result =  cv2.cvtColor(new_hsv,  cv2.COLOR_HSV2BGR)

# save output image
cv2.imwrite('yellow_building_vibrance.jpg', result)

# display images
cv2.imshow('result', result)
cv2.waitKey(0)
cv2.destroyAllWindows()

Result:

enter image description here

Southdown answered 4/4, 2022 at 22:14 Comment(0)
E
1

a simple way for brightness adjustment, proper for both color and monochrome images is

img = cv2.imread('your path',0)
brt = 40  

img[img < 255-brt] += brt  

cv2.imshow('img'+ img)

where brt could be a positive number for increase brightness or a negative for darkness.

The following links for a before and after of an image processed in this code, when the brt = 40 :

input image

output image

Errolerroll answered 13/9, 2018 at 12:30 Comment(0)
P
1

I am not sure if this would help, but for changing Brightness, Contrast I personally switch the image to PIL.Image and use PIL.ImageEnhance which comes in handy when using the ratios or percentages.

image = PIL.Image.open("path_to_image")

#increasing the brightness 20%
new_image = PIL.ImageEnhance.Brightness(image).enhance(1.2)

#increasing the contrast 20%
new_image = PIL.ImageEnhance.Contrast(image).enhance(1.2)

I still have not found a clean way for Vibrance. For more on ImageEnahance, I'd suggest to read the official doc - https://pillow.readthedocs.io/en/stable/reference/ImageEnhance.html

For Conversion, I use this ..

NOTE - OpenCV uses BGR and PIL uses RGB channels. So, can get messy if not converted properly.

#convert pil.image to opencv (numpy.ndarray)
#need numpy library for this
cv_image = numpy.array(pil_image)

#convert opencv to pil.image

image = cv2.cvtColor(cv_image, cv2.COLOR_BGR2RGB)
pil_image = Image.fromarray(image)
Pierre answered 20/7, 2020 at 21:59 Comment(0)

© 2022 - 2024 — McMap. All rights reserved.