Xcode 9 asset catalog Preserves Vector Data not working?
Asked Answered
P

4

28

I thought the new Preserves Vector Data checkmark in the Xcode 9 asset catalog would finally give us resizing of vector PDF images, but apparently not. Here's my test image seen at two zooms in Preview:

enter image description here

enter image description here

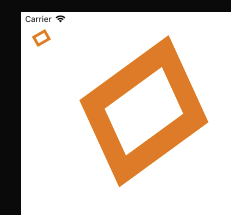
Nice and sharp with lots of zoom, so clearly this is a vector image. But here's what two image views look like in my app:

enter image description here

So where's my vector data? Is this much-desired feature still missing in action? Does it still work only for the automatically generated 2x and 3x images? And if so, what does the Preserve Vector Data checkbox give us that we didn't have already?

Paquito answered 10/8, 2017 at 20:26 Comment(0)
P
7

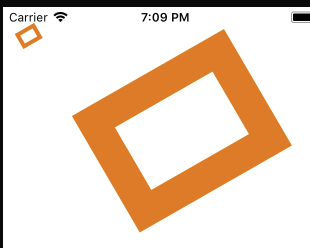
It works, but only if you perform the resizing yourself:

enter image description here

That was achieved in code, like this:

    let im = UIImage(named:"Image")!
    let r = UIGraphicsImageRenderer(size:self.iv2.bounds.size)
    let im2 = r.image {
        _ in
        im.draw(in: self.iv2.bounds)
    }
    self.iv2.image = im2
    self.iv2.contentMode = .center

So UIImageView will rasterize as it scales (e.g. for Aspect Fit), but drawing in code will preserve the vector data.

EDIT New in Xcode 9 beta 5, this now works as expected! In this screen shot, the second image view just does a scale-to-fill, no more. We resize sharply!

enter image description here

EDIT In playing around with Xcode 11 I have finally found a formula that always works. This means that on launch, with no extra code, in an image view or elsewhere, a vector-based image appears sharp at any size.

In the asset catalog, you must set the Scales pop-up menu to Individual Scales and put the vector-based image into the 1x slot. Check Preserve Vector Data. Done.

Paquito answered 10/8, 2017 at 20:33 Comment(10)
are you using two regular UIImageView with no code? I can't seem to have the two images to render without rasterizing with Xcode 9b6...Iritis
@GuillaumeAlgis Yes! Those are just two ordinary image views, no code needed. Did you remember to check Preserves Vector Data?Paquito
yup I did check it :(. When using the snippet you provided, I get a crisp image, but with two ordinary image views, the big one gets aliased. Maybe I should file a radar with my sample project attached :/Iritis
My image views are ordinary. Do you need me to send you the example? It would be silly to submit this as a bug report now; the bug is fixed.Paquito
Sure, I'd love to have the example! Thank you! Can you send it to guillaume.algis at gmail please ?Iritis
Sent. Let me know what you think.Paquito
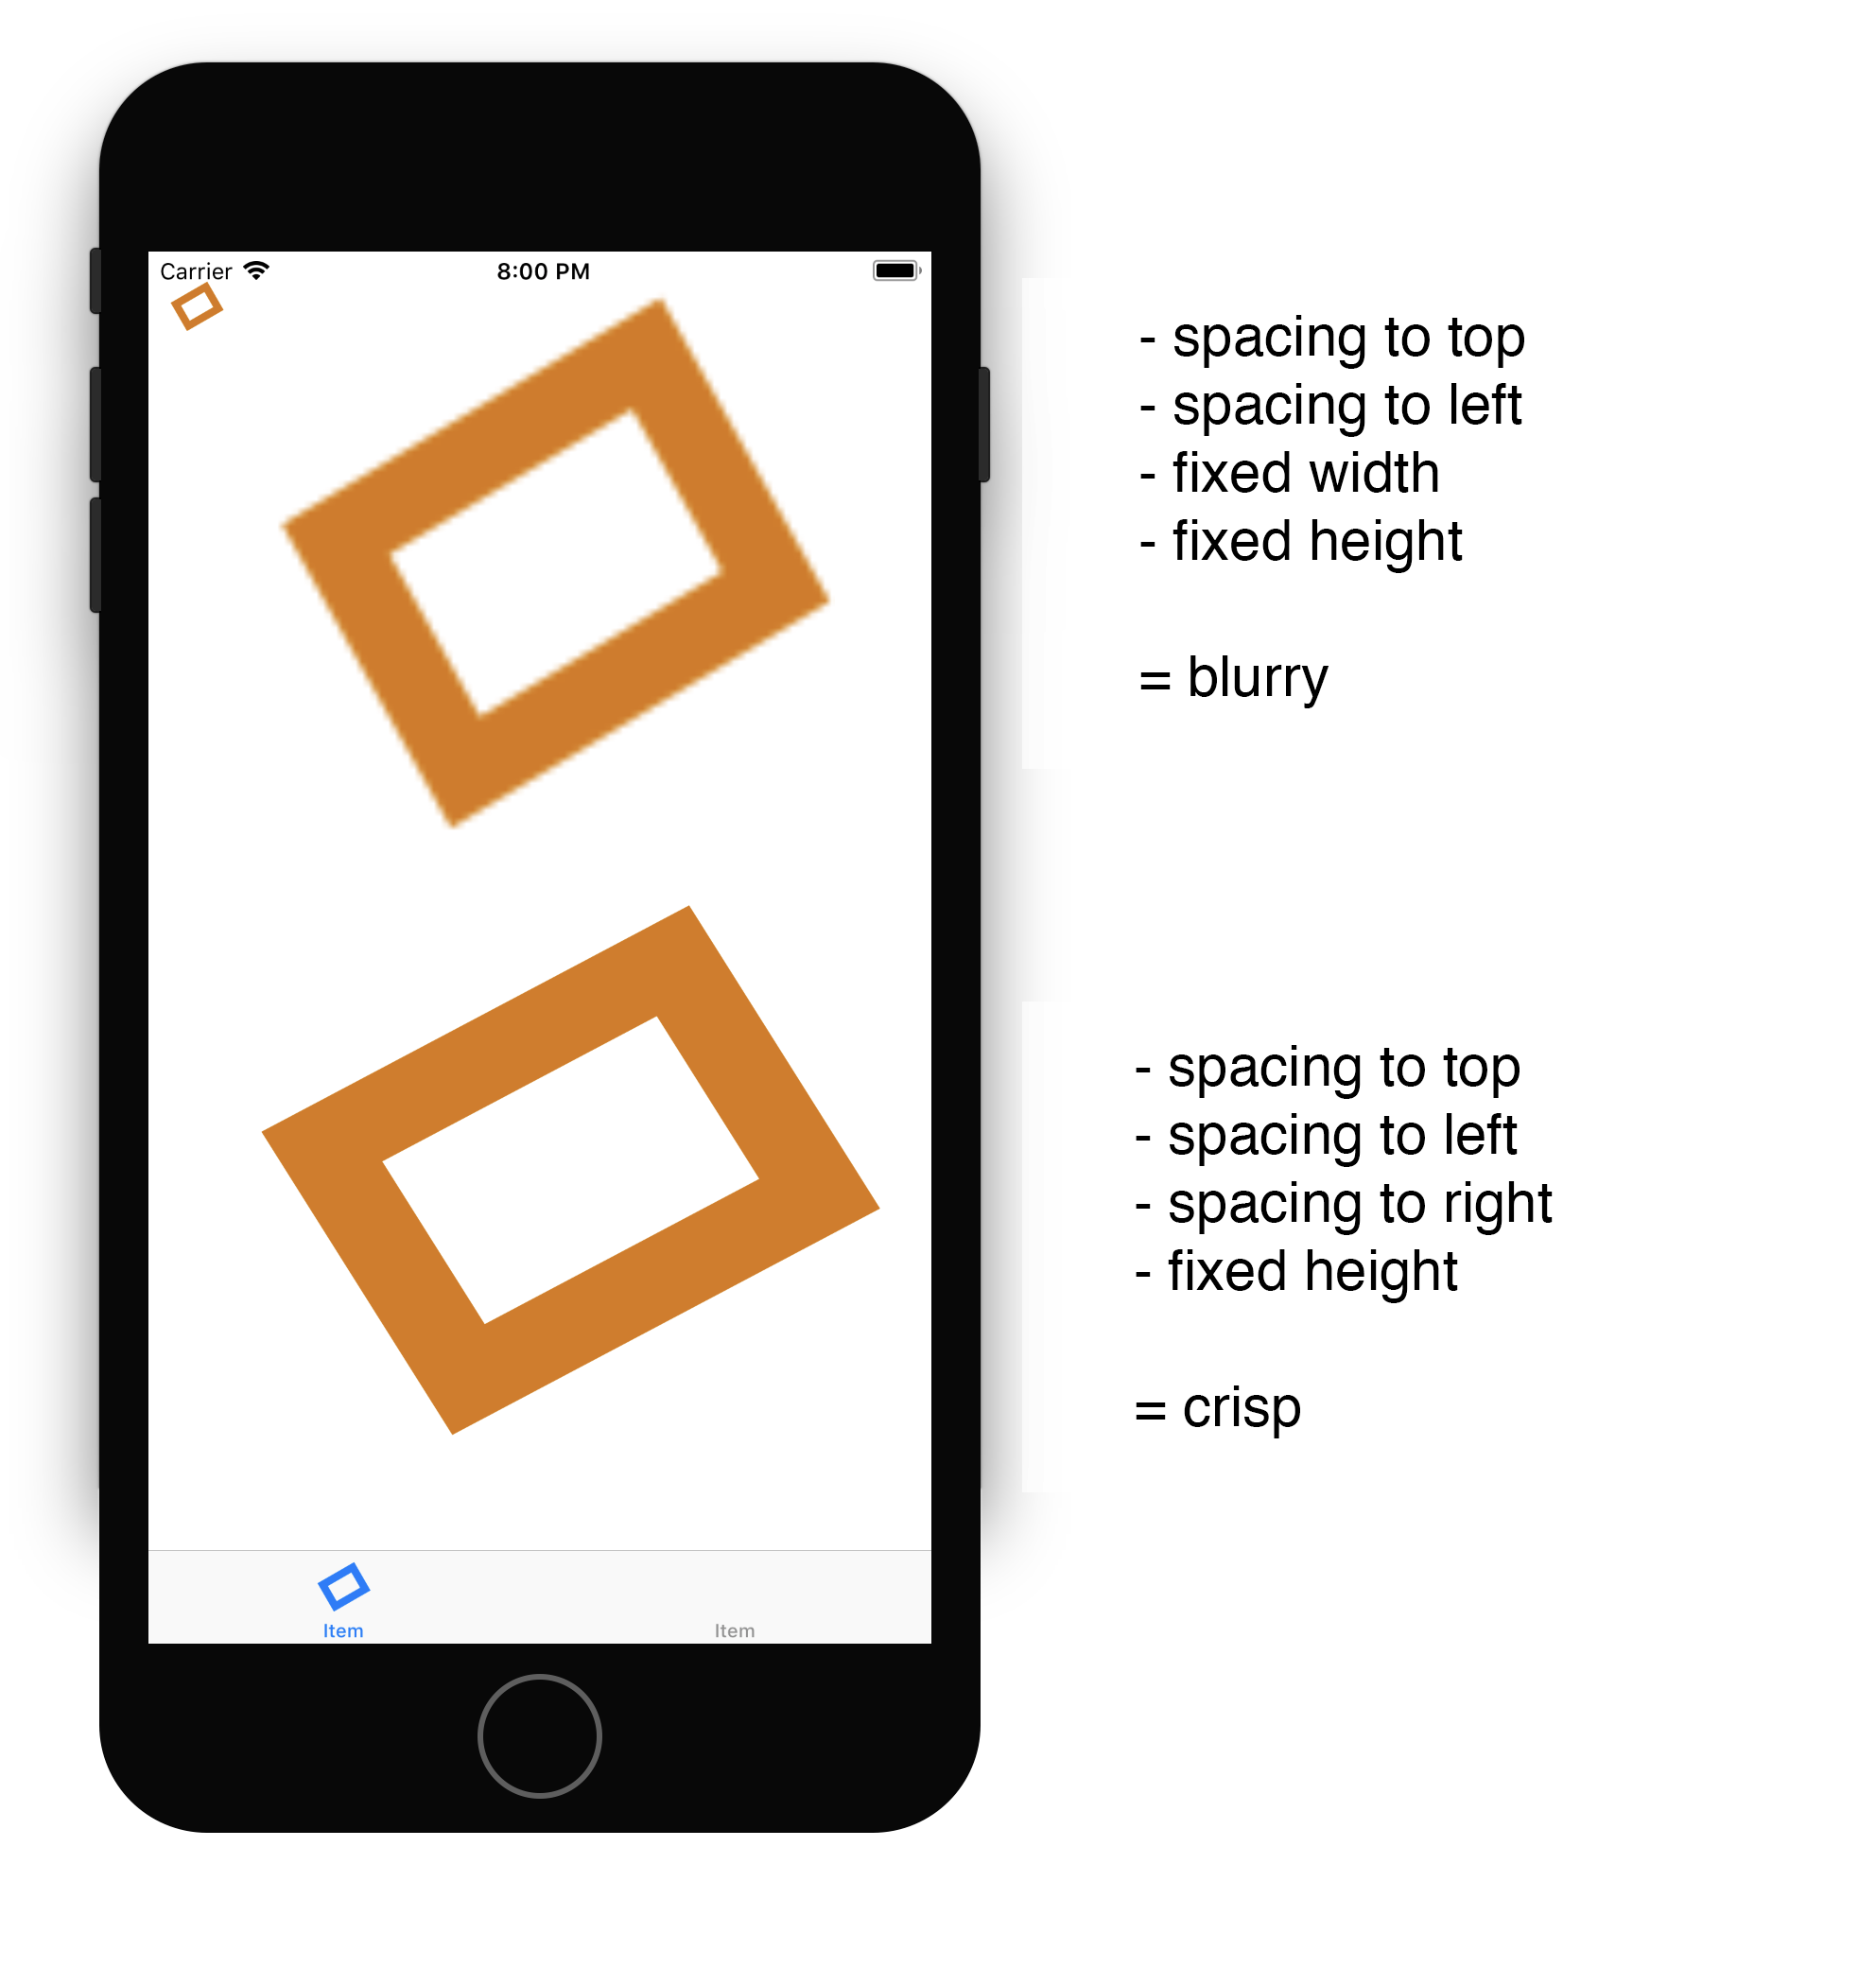
Thanks Matt! It seems there's a bug with autolayout, related to the one I filled earlier today: openradar.me/radar?id=5005434293321728. Long story short, if the UIImageView has less than 3 "spacing"-related constraint, it will render incorrectly. Otherwise it works fine (so it worked for you because you have a top, left, and right constraints on your UIImageView). Here's the result on my machine: imgur.com/DpLd15i. The top image view has 2 constraints, the bottom one 3 + height. Let me know if you can reproduce it too please, thanks!Iritis
Very cool screen shot! But I have one question: Did you use the View Debugger? It sounds to me like you might have ambiguous constraints.Paquito
I didn't, but I just checked and unfortunately I have no ambiguous layout :(. It's easily reproducible by having the image view with a fixed width and height and aligned horizontally and vertically in its container.Iritis
Thanks for checking! This sounds like a really great bug report; thank you for filing it, and congratulations on some excellent research. Feel free to add a second answer to my question, pointing out that the fix doesn't work under certain kinds of autolayout.Paquito
I
17

Edit: Still the same buggy behavior in Xcode 9 GM (9A235)

As of today (Xcode 9 beta 6 9M214v), the image will only be rendered properly (non-blurry) if the UIImageView has at least 3 spacing-related constraints.

eg. spacing to left, spacing to right, spacing to top, and another constraint to define the UIImageView height.

enter image description here

Note also that disabling autolayout completely will make all the UIImageView render incorrectly.

I filled rdar://34306192 (http://www.openradar.me/radar?id=4968083747766272) for this bug.

Iritis answered 7/9, 2017 at 13:27 Comment(6)
1 year later with iOS 12 and Xcode 10 GM it's still the same. Have now wasted hours finding this issue. Of course Apple is a small garage company with no resources to fix bugs (or at least document them).Expulsive
@Expulsive please consider duping my radar then, thanks!Iritis
Is there a quick way to dupe it without describing the bug in my own words and also providing a test case?Expulsive
@Expulsive sure, you can download Brisk, and use Cmd+Shift+N to file a duplicate by giving my radar id : 34279759Iritis
Any updates on this? Still no solution to make it works without mentioned workarounds?Rausch
@StasIvanov Nope. My radars are closed as duplicates, but the original radars are still marked as "Open". The best you can do to make things go faster is to dupe the radar to make it clear to Apple that they need to fix this.Iritis
B
13

I had the same issue multiple times with the new Preserves Vector Data.

Super simple solution that worked very well for me:

  1. Never set the UIImageView image property in Interface Builder, just leave it empty.
  2. Set the image value programmatically.

Hope it helps.

Biffin answered 18/12, 2018 at 10:14 Comment(3)
Wow . Thank you so much . Set image name in code is the solutionQuartet
Can't believe that's the solution! Thanks!Ignazio
This solution still does the trick in 2020, thanks!Segregate
C
8

In my case (Xcode 9.4.1), with imageView created in Interface Builder - I noticed that when I initially arrive on the screen, the image is blurry. If I then change device orientation, the image becomes crisp. I tried calling different methods manually in viewDidLoad() and here is what I found so far:

This worked:

let image = imageView.image
imageView.image = nil
imageView.image = image

None of these worked:

imageView.layoutSubviews()
imageView.layoutMarginsDidChange()
imageView.setNeedsLayout()
imageView.setNeedsDisplay()
imageView.reloadInputViews()
imageView.updateConstraints()
imageView.contentMode = .center ; imageView.contentMode = .scaleToFill

You should of course extend or subclass UIImageView if you'll be calling it often, like this for example

class UIImageViewWithPreserveVectorDataFix: UIImageView {
    override func awakeFromNib() {
        super.awakeFromNib()
        let image = self.image
        self.image = nil
        self.image = image
    }
}

(and then of course set UIImageViewWithPreserveVectorDataFix as the class in Interface Builder)

Cretinism answered 28/9, 2018 at 9:38 Comment(1)
Excellent research, thanks! I wonder if this is related: https://mcmap.net/q/138706/-uiimageview-image-does-not-update-visibly-when-image-property-is-setPaquito
P
7

It works, but only if you perform the resizing yourself:

enter image description here

That was achieved in code, like this:

    let im = UIImage(named:"Image")!
    let r = UIGraphicsImageRenderer(size:self.iv2.bounds.size)
    let im2 = r.image {
        _ in
        im.draw(in: self.iv2.bounds)
    }
    self.iv2.image = im2
    self.iv2.contentMode = .center

So UIImageView will rasterize as it scales (e.g. for Aspect Fit), but drawing in code will preserve the vector data.

EDIT New in Xcode 9 beta 5, this now works as expected! In this screen shot, the second image view just does a scale-to-fill, no more. We resize sharply!

enter image description here

EDIT In playing around with Xcode 11 I have finally found a formula that always works. This means that on launch, with no extra code, in an image view or elsewhere, a vector-based image appears sharp at any size.

In the asset catalog, you must set the Scales pop-up menu to Individual Scales and put the vector-based image into the 1x slot. Check Preserve Vector Data. Done.

Paquito answered 10/8, 2017 at 20:33 Comment(10)
are you using two regular UIImageView with no code? I can't seem to have the two images to render without rasterizing with Xcode 9b6...Iritis
@GuillaumeAlgis Yes! Those are just two ordinary image views, no code needed. Did you remember to check Preserves Vector Data?Paquito
yup I did check it :(. When using the snippet you provided, I get a crisp image, but with two ordinary image views, the big one gets aliased. Maybe I should file a radar with my sample project attached :/Iritis
My image views are ordinary. Do you need me to send you the example? It would be silly to submit this as a bug report now; the bug is fixed.Paquito
Sure, I'd love to have the example! Thank you! Can you send it to guillaume.algis at gmail please ?Iritis
Sent. Let me know what you think.Paquito
Thanks Matt! It seems there's a bug with autolayout, related to the one I filled earlier today: openradar.me/radar?id=5005434293321728. Long story short, if the UIImageView has less than 3 "spacing"-related constraint, it will render incorrectly. Otherwise it works fine (so it worked for you because you have a top, left, and right constraints on your UIImageView). Here's the result on my machine: imgur.com/DpLd15i. The top image view has 2 constraints, the bottom one 3 + height. Let me know if you can reproduce it too please, thanks!Iritis
Very cool screen shot! But I have one question: Did you use the View Debugger? It sounds to me like you might have ambiguous constraints.Paquito
I didn't, but I just checked and unfortunately I have no ambiguous layout :(. It's easily reproducible by having the image view with a fixed width and height and aligned horizontally and vertically in its container.Iritis
Thanks for checking! This sounds like a really great bug report; thank you for filing it, and congratulations on some excellent research. Feel free to add a second answer to my question, pointing out that the fix doesn't work under certain kinds of autolayout.Paquito

© 2022 - 2024 — McMap. All rights reserved.