UISheetPresentationController Underneath Tab Bar
Asked Answered
P

2

9

I am trying to present a UIViewController within a UISheetPresentationController to have a permanent modal that sits below my UITabBarController exactly like how Apple has shown it possible in the "Find My" app:

UISheetPresentationController Underneath Tab Bar

Reference Code:

let navigationController = UINavigationController(rootViewController: UIViewController());

navigationController.modalPresentationStyle = .formSheet;
if let sheet = navigationController.sheetPresentationController {
    sheet.detents = [.medium(), .large()];
    sheet.prefersGrabberVisible = true;
    sheet.largestUndimmedDetentIdentifier = .medium;
    sheet.prefersScrollingExpandsWhenScrolledToEdge = false;
}

present(navigationController, animated: true);

This post: UISheetPresentationController with a tabBar poses a similar question but does not have any answers.

Pomcroy answered 22/7, 2022 at 19:32 Comment(1)
Don't know if this will help, I had a similar issue with other (custom) dialogs. Setting dialog.modalPresentationStyle = .overFullScreen worked for me - but I don''t know if it will work for bottom sheets.Brotherly
C
2

There are several aspects to this issue and its solution.

To start, we need a custom UISheetPresentationController to prevent the presented view controller from covering the tab bar. The following class can be used:

class TabSheetPresentationController : UISheetPresentationController {
    override func presentationTransitionWillBegin() {
        super.presentationTransitionWillBegin()

        // Update the container frame if there is a tab bar
        if let tc = presentingViewController as? UITabBarController, let cv = containerView {
            cv.clipsToBounds = true // ensure tab bar isn't covered
            var frame = cv.frame
            frame.size.height -= tc.tabBar.frame.height
            cv.frame = frame
        }
    }
}

The above class shortens the height of the container view so the tab bar is exposed allowing user interaction with the tab bar even while the presented sheet is in view. It also ensures that if the user pulls down the presenting view, the bottom doesn't cover the tab bar.

In order to make use of the custom presentation controller, we can no longer use the standard sheetPresentationController property of the view controller to be presented. Instead, we need to provide a custom modal presentation.

First, the code to create and present the view controller to be shown in the sheet would be something like the following:

let vc = UIViewController()
let nc = UINavigationController(rootViewController: vc)
nc.modalPresentationStyle = .custom
nc.transitioningDelegate = self
nc.isModalInPresentation = true // don't let it be dismissed by dragging to the bottom

present(nc, animated: false)

Note the line nc.transitioningDelegate = self. This requires the class represented by self to conform to the UIViewControllerTransitioningDelegate protocol.

Let's say self is a SomeTabViewController class representing one of the tabs in the view controller. We can then add:

extension SomeTabViewController: UIViewControllerTransitioningDelegate {
    func presentationController(forPresented presented: UIViewController, presenting: UIViewController?, source: UIViewController) -> UIPresentationController? {
        let sc = TabSheetPresentationController(presentedViewController: presented, presenting: source)
        sc.detents = [
            .mySmall(),
            .medium(),
            .myLarge(),
        ]
        sc.largestUndimmedDetentIdentifier = .myLarge
        sc.prefersGrabberVisible = true
        sc.prefersScrollingExpandsWhenScrolledToEdge = false
        sc.widthFollowsPreferredContentSizeWhenEdgeAttached = true
        sc.selectedDetentIdentifier = .medium

        return sc
    }
}

That code basically replaces the usual setup code used with the presented view controller's sheetPresentationController property.

In the example code I'm making use of two custom detents. Those are provided with the following:

extension UISheetPresentationController.Detent.Identifier {
    static let mySmall = UISheetPresentationController.Detent.Identifier("mySmall")
    static let myLarge = UISheetPresentationController.Detent.Identifier("myLarge")
}

extension UISheetPresentationController.Detent {
    class func mySmall() -> UISheetPresentationController.Detent {
        return UISheetPresentationController.Detent.custom(identifier: .mySmall) { context in
            return 60
        }
    }

    class func myLarge() -> UISheetPresentationController.Detent {
        return UISheetPresentationController.Detent.custom(identifier: .myLarge) { context in
            return context.maximumDetentValue - 0.1
        }
    }
}

The small dentent lets the user minimize the sheet and the custom large detent is a trick that allows the sheet to be shown nearly fullscreen without the side effect of the underlying view controller shrinking like you normally get with the standard .large() detent.

Note that the custom sheet presentation has only been tested on an iPhone and in portrait. Further work is likely needed to fully support an iPhone in landscape and the likely need for different layout on an iPad. I leave that as an exercise for the reader.

The above code basically answers the question of showing a presented view controller in a sheet presentation while still allowing the tab bar to be visible and active.

However, this brings up the next big issue. When you present a view controller from one of the tab bar controller's view controllers, the presented view controller is actually presented from the tab bar controller, not the original view controller. This means that only one view controller (tab) of the tab bar controller can present a sheet at any one time. Using the code I've provided above, as you switch tabs, the sheet stays in view. If this is not desired then logic needs to be added to dismiss the sheet when a different tab is selected.

The "Find My" app shows a sheet on all four tabs. I strongly believe that there is only one sheet being shown from the tab bar controller. Its contents are updated based on whichever tab is currently selected.

Given this, and depending on your own requirements, you may need to change my solution just a bit so the the sheet's view controller is presented directly by the tab bar controller and not from one of the tab view controllers. Handling the update of the content based on the selected tab is beyond the original scope and I leave that details as an exercise for the reader.

California answered 27/10, 2023 at 6:57 Comment(3)
when I scroll down it covers the tabbar and shows a weird rounded corners. Do you know why?Autocephalous
imgur.com/yDZJtmoAutocephalous
@LuizFernandoSalvaterra I figured out a solution for the presented view covering the tab bar if you pull down the sheet. See the updated answer (added the cv.clipsToBounds = true line). Still looking into how to avoid the bottom corners getting rounded when you pull down on the sheet.California
N
0

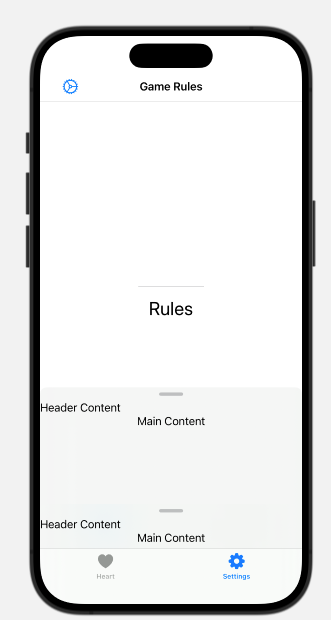
I made a previous post, but what I did was use this. From there just create your tab bar as normal and you can add pretty much what ever you want. Just make sure the hierarchy is correct.

import SwiftUI
import BottomSheet

struct ContentView: View{
    
    @State var bottomSheetPosition: BottomSheetPosition = .absolute(325)
    
    var body: some View{
        
        TabView{
            ZoneView()
                .bottomSheet(bottomSheetPosition: self.$bottomSheetPosition, switchablePositions: [
                                .relative(0.200),
                                .relative(0.4),
                                .relativeTop(0.95)
                            ], title: "Zone") {
                                
                            }
                          
                .tabItem{
                    Image(systemName: "heart.fill")
                    Text("Heart")
                }
                .toolbarBackground(.visible, for: .tabBar)
              
                
            Test()
                .bottomSheet(
                    bottomSheetPosition: $bottomSheetPosition,
                    switchablePositions: [.absolute(150),
                                          .absolute(325), .relative(0.95)],
                    headerContent: {
                        Text("Header Content")
                    },
                    mainContent: {
                        Text("Main Content")
                    }
                )
                .tabItem{
                    Image(systemName: "gearshape.fill")
                    Text("Settings")
                }
                .toolbarBackground(.visible, for: .tabBar)
        }
        
        
    }
}

#Preview{
    ContentView()
}

Image

If you want to add an entire page into your bottom sheet instead of coding everything in the ContentView, do something like this:

import SwiftUI
import BottomSheet

struct ContentView: View{
    
    @State var bottomSheetPosition: BottomSheetPosition = .absolute(325)
    
    var body: some View{
        
        TabView{
            ZoneView()
                .bottomSheet(bottomSheetPosition: self.$bottomSheetPosition, switchablePositions: [
                                .relative(0.200),
                                .relative(0.4),
                                .relativeTop(0.95)
                            ] ) {
                                ZoneView()
                            }
                            .customBackground(
                                Color.white
                                                .cornerRadius(20)
                                                
                                        )
                          
                .tabItem{
                    Image(systemName: "heart.fill")
                    Text("Heart")
                }
                .toolbarBackground(.visible, for: .tabBar)
              
                
            Test()
                .bottomSheet(
                    bottomSheetPosition: $bottomSheetPosition,
                    switchablePositions: [.absolute(150),
                                          .absolute(325), .relative(0.95)],
                    headerContent: {
                        Text("Header Content")
                    },
                    mainContent: {
                        Text("Main Content")
                    }
                )
                .tabItem{
                    Image(systemName: "gearshape.fill")
                    Text("Settings")
                }
                .toolbarBackground(.visible, for: .tabBar)
        }
        
        
    }
}

#Preview{
    ContentView()
}

Image

You can even mess around with it to have two bottom sheets my having .bottomSheet in one file and then calling it with a .bottomSheet in ContentView:

Image

Nu answered 29/6 at 20:29 Comment(0)

© 2022 - 2024 — McMap. All rights reserved.