Drawing fancy rectangle around face
Asked Answered
T

4

11

I am using the following code to detect face and draw rectangle on top of the face.

while True:
    # get video frame
    ret, img = cap.read()

    input_img = cv2.cvtColor(img, cv2.COLOR_BGR2RGB)
    img_h, img_w, _ = np.shape(input_img)

    detected = detector(input_img, 1)

    for i, d in enumerate(detected):
        x1, y1, x2, y2, w, h = d.left(), d.top(), d.right() + 1, d.bottom() + 1, d.width(), d.height()
        cv2.rectangle(img, (x1, y1), (x2, y2), (255, 0, 0), 2)

    cv2.imshow("result", img)
    key = cv2.waitKey(30)

    if key == 27:
        break

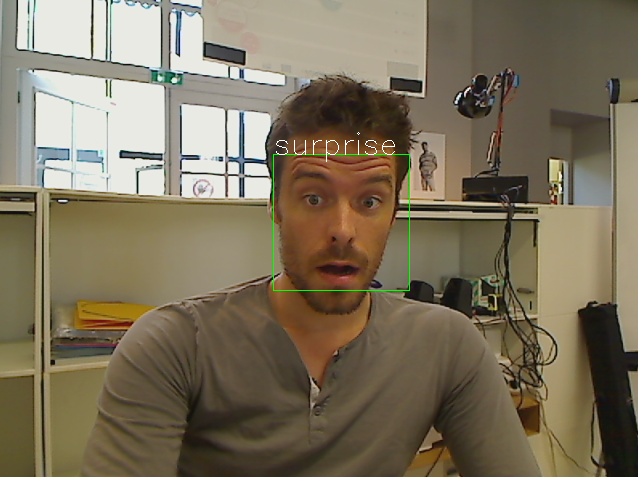
The rectangle appears to be like this:

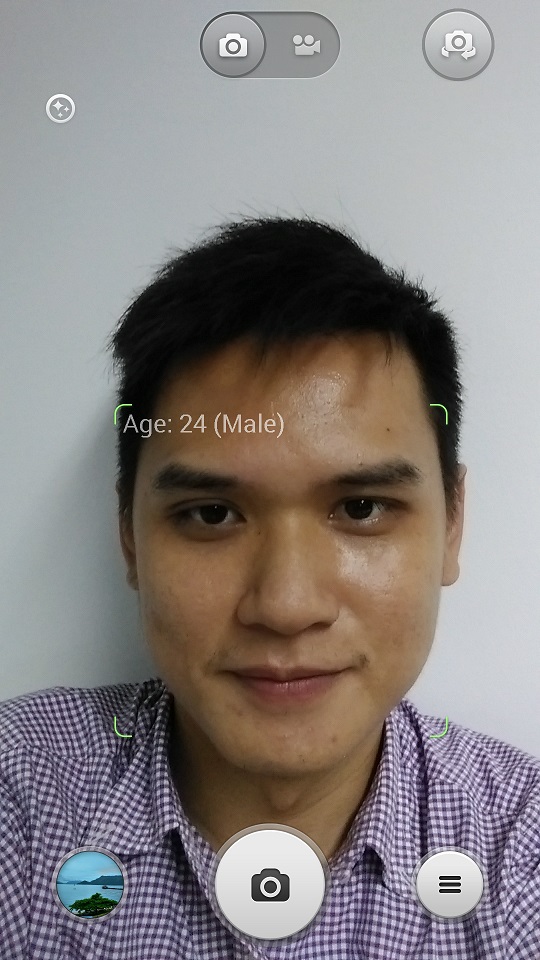
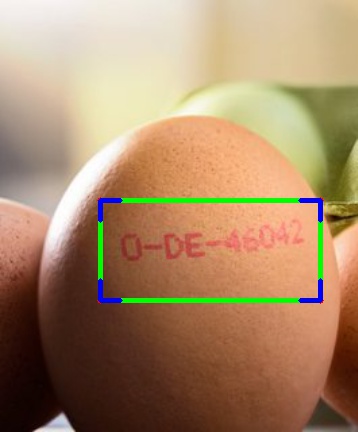
However Im trying to get a rectangle similar to this:

Is there any OpenCV or dlib function that can help me get this sort of effective rectangle?

Tyra answered 4/9, 2017 at 11:53 Comment(3)
There are various drawing functions that let you draw lines and arcs. Seems like everything you need to achieve what you want.Lillie
Oops, Page not found.Colunga
@DheerajMPai Good catch. I managed to find the images (fortunately the path only slightly changed) and I uploaded them locally so it should be good in the future. Thanks (and thanks for the bounty :) )Lillie
P
16

You can achieve what you want by using the functions that draw lines and arcs.

The frame you want to draw consists of 4 similar parts (one per corner), each rotated (or mirrored).

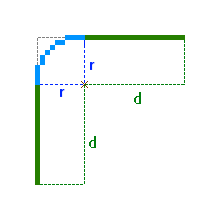
Let's have a look at the top left corner:

Illustration

As you can see, we need to draw 2 line segments (of length d) and an arc (a quarter of a circle of radius r).

Let's say the coordinates of the top-left corner are (x1, y1).

That means that the arc will have a center at position (x1 + r, y1 + r).

One of the lines will go from (x1 + r, y1) to (x1 + r + d, y1).

The other line will go from (x1, y1 + r) to (x1, y1 + r + d).

Similar situation will happen with the other corners.


Sample code:

import cv2
import numpy as np

# ============================================================================

def draw_border(img, pt1, pt2, color, thickness, r, d):
    x1,y1 = pt1
    x2,y2 = pt2

    # Top left
    cv2.line(img, (x1 + r, y1), (x1 + r + d, y1), color, thickness)
    cv2.line(img, (x1, y1 + r), (x1, y1 + r + d), color, thickness)
    cv2.ellipse(img, (x1 + r, y1 + r), (r, r), 180, 0, 90, color, thickness)

    # Top right
    cv2.line(img, (x2 - r, y1), (x2 - r - d, y1), color, thickness)
    cv2.line(img, (x2, y1 + r), (x2, y1 + r + d), color, thickness)
    cv2.ellipse(img, (x2 - r, y1 + r), (r, r), 270, 0, 90, color, thickness)

    # Bottom left
    cv2.line(img, (x1 + r, y2), (x1 + r + d, y2), color, thickness)
    cv2.line(img, (x1, y2 - r), (x1, y2 - r - d), color, thickness)
    cv2.ellipse(img, (x1 + r, y2 - r), (r, r), 90, 0, 90, color, thickness)

    # Bottom right
    cv2.line(img, (x2 - r, y2), (x2 - r - d, y2), color, thickness)
    cv2.line(img, (x2, y2 - r), (x2, y2 - r - d), color, thickness)
    cv2.ellipse(img, (x2 - r, y2 - r), (r, r), 0, 0, 90, color, thickness)

# ============================================================================

img = np.zeros((256,256,3), dtype=np.uint8)

draw_border(img, (10,10), (100, 100), (127,255,255), 1, 10, 20)
draw_border(img, (128,128), (240, 160), (255,255,127), 1, 5, 5)

cv2.imwrite('round_rect.png', img)

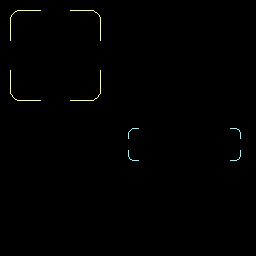
Result:

Result

Photocathode answered 4/9, 2017 at 12:41 Comment(3)
you are a super genius!Tyra
Fantastic!! This was really really helpful! I was too board to look at the dumb green rectangular outputColunga
If I had more reps. I would have given all of them as bountyColunga
V
3

I did something naive. You can implement with further modifications using a function.

Steps:

  1. I manually marked a rectangle around the text and extracted the 4 points.

  2. Then I fixed a length for the line to be drawn from these 4 points.

Result:

enter image description here

Functions used:

  • cv2.line()
  • cv2.rectangle()

See THIS LINK for details about their usage.

Valediction answered 4/9, 2017 at 12:36 Comment(2)
The answer above your's is superb. May be you can editColunga
No may be you add the entire code. Instead of just adding the linkColunga
R
1

Instead of looking for a function/lib that lets you make fancy rectangles, the following tactic might be easier:

Step 1 - Download an image of the rectangle that you want, such that it should only contain the 4 strokes at the corner, and the rest of the background should be black.

Step 2 - In your code, use imread to save this image as a Mat object:

border = cv2.imread('your_img.jpg')

Step 3 - Modify your for loop to superimpose the border Mat on the detected rectangle, as shown below:

for i, d in enumerate(detected):
    x1, y1, x2, y2, w, h = d.left(), d.top(), d.right() + 1, d.bottom() + 1, d.width(), d.height()

    #cv2.rectangle won't be needed anymore
    #cv2.rectangle(img, (x1, y1), (x2, y2), (255, 0, 0), 2)

    roi=img[y1+h/2-100:y1+h/2+100,x1+w/2-100:x1+w/2+100]
    #this points to a section in original image
    cv2.addWeighted(roi,1,border,1,0,roi)

Ensure that the size of roi and border is the same, or your code will crash.

This will superimpose the corner strokes on your input frame, and neglect the black background.

Rosaniline answered 4/9, 2017 at 12:21 Comment(0)
C
0

Drawing Fancy Rectangle

Thanks to @Dan Mašek for his suggestions. You can easily draw a fancy rectangle by like this way. You can check the full details Here: Drawing Fancy Round Rectangle around the Face

def draw_border(img, pt1, pt2, color, thickness, r, d):
    x1,y1 = pt1
    x2,y2 = pt2

    # Top left
    cv2.line(img, (x1 + r, y1), (x1 + r + d, y1), color, thickness)
    cv2.line(img, (x1, y1 + r), (x1, y1 + r + d), color, thickness)
    cv2.ellipse(img, (x1 + r, y1 + r), (r, r), 180, 0, 90, color, thickness)

    # Top right
    cv2.line(img, (x2 - r, y1), (x2 - r - d, y1), color, thickness)
    cv2.line(img, (x2, y1 + r), (x2, y1 + r + d), color, thickness)
    cv2.ellipse(img, (x2 - r, y1 + r), (r, r), 270, 0, 90, color, thickness)

    # Bottom left
    cv2.line(img, (x1 + r, y2), (x1 + r + d, y2), color, thickness)
    cv2.line(img, (x1, y2 - r), (x1, y2 - r - d), color, thickness)
    cv2.ellipse(img, (x1 + r, y2 - r), (r, r), 90, 0, 90, color, thickness)

    # Bottom right
    cv2.line(img, (x2 - r, y2), (x2 - r - d, y2), color, thickness)
    cv2.line(img, (x2, y2 - r), (x2, y2 - r - d), color, thickness)
    cv2.ellipse(img, (x2 - r, y2 - r), (r, r), 0, 0, 90, color, thickness)


def detect(path,img):
    cascade = cv2.CascadeClassifier(path)

    img=cv2.imread(img,1)
    # converting to gray image for faster video processing
    gray = cv2.cvtColor(img, cv2.COLOR_BGR2GRAY)

    rects = cascade.detectMultiScale(gray, 1.2, 3,minSize=(50, 50))
    # if at least 1 face detected
    if len(rects) >= 0:
        # Draw a rectangle around the faces
        for (x, y, w, h) in rects:
            draw_border(img, (x, y), (x + w, y + h), (255, 0, 105),4, 15, 10)
        # Display the resulting frame
        cv2.imshow('Face Detection', img)
        # wait for 'c' to close the application
        cv2.waitKey(0)
Crenshaw answered 7/5, 2019 at 4:47 Comment(2)
you have just copy pasted the first answer dude, anyways thanksTyra
That's why I have also given him thanks for his code. I think you didn't read my comment on that properly. Check it properly and I tried to answer the question with Face detection and fancy rectangle.Crenshaw

© 2022 - 2024 — McMap. All rights reserved.