Xcode 6 - How to pick signing certificate/provisioning profile for Ad-Hoc distribution?
Asked Answered
E

18

144

To distribute the app to our testers we use Xcode, which we do using the following process:

  • Archive application
  • Distribute for Ad-Hoc
  • Choose provisioning profile
  • Save the .ipa to a folder

But with Xcode 6, this workflow was changed a bit. I can still select the Ad-Hoc distribution option, but I cannot select the provisioning profile I want. This gives us no control over which signing certificate is used and the provisioning profile configuration (we use push notifications).

By default iPhone distribution signing identity is used and some kind of XC Ad Hoc provisioning profile is generated, which can be seen on image below:Exporting IPA If you click the arrow near provisioning profile, it opens the folder with provisioning profiles.

So my question is:

Is there any way in Xcode 6 to select the provisioning profile used with Ad Hoc distribution?

Thanks!

Eyde answered 31/7, 2014 at 10:5 Comment(6)
Does anyone know if this has been fixed? Is there anyway to distribute a build to iOS 7 users to test push notifications?Hitherward
using Xcode 6 GM version, same issue...Clarendon
So we still don't have any good solution for this ? answers below don't work for me. Can we use the XC provisionning profile ?? I don't want to loose a week waiting for apple review. ThanksHamrnand
I had this problem today and it seems like Xcode only uses distribution profiles that use all devices you registered online.Stellate
Seriously? We can't pick the provisioning file? I believe Yossarian lives.Insert
Not being able to select devices really sucks....... test flight (good old web version) sends out invitation emails for builds to ALL users who have devices included in the profiles for a build. I make apps for rivalling organisations - I have accidentally sent them each others apps' builds.......... ;-DGherardo
E
52

I was facing same issue, resolved using command line "xcodebuild" tool script, which is preinstalled with Xcode 6 (didn't need to re-install Xcode 5).

http://www.thecave.com/2014/09/16/using-xcodebuild-to-export-a-ipa-from-an-archive/

Script in terminal:

xcodebuild -exportArchive -archivePath $projectname.xcarchive -exportPath $projectname -exportFormat ipa -exportProvisioningProfile 'Provisioning Profile Name'
Etrem answered 10/10, 2014 at 9:28 Comment(7)
this works for me! the other answers using xcodebuild didn't have the -exportProvisioningProfile switch.Amazed
Note that this will not work properly if your app uses any extensions, embedded frameworks or libraries.Caernarvonshire
This helped me. thanks! So Apple updates XCode to generate crappy XC Prov Profiles but forgets about XCodeBuild. We just got lucky this time. Oh! How Apple makes us suffer!Sheasheaf
I'm setting this as the accepted answer. The answer might not work for all cases, but with certain modifications xcodebuild can be used to solve this issue (this is what we are doing on our CI server).Eyde
I wish I had learned 3 hours earlier that xcodebuild can now also export to ipa format! I wasted that much time trying to get xcrun to embed a given provisioning profile, but it just won't work on Xcode 6. xcodebuild does! Thank you.Clubfoot
Does Apple plan to at least "fix" this one?Momently
It looks like xcodebuild utility doesn't take -exportProvisioningProfile-argument anymore.Julian
C
31

I had a similar issue when submitting to The App Store. I created an archive, then clicked "submit" and Xcode wanted to automatically sign with the default "XC com.*" wildcard provisioning profile instead of the explicit profile that already had.

To fix this, I just re-generated the profile on the Apple Developer Portal:

1) Go to developer.apple.com and find the distribution provisioning profile you want to use.
2) Select it, click "Edit", re-name the profile, and click "Generate".
3) Download the provisioning profile to the Desktop and drag it onto the Xcode 6 icon.
4) Re-start Xcode 6.
5) Open the organizer window and click "Submit" on the archive you built. Xcode will automatically pick your explicit profile instead of the generic one.

Capwell answered 16/9, 2014 at 16:2 Comment(11)
Hi,is there some official statement about this change?Renal
Not that I know of. I tried comparing the old & new profiles in a text editor to see if I could spot changes in the format, but I didn't notice anything significantCapwell
I was skeptical but this worked for me. I have only just switched over to Xcode 6 and attempted to output my first ad hoc buildCresa
Until now I used Development provisioning profile. Is this still usable or I need to create distribution profile?Eyde
Yes Legoless, you'll need to create a Distribution profile to export a build. You can still use a Development profile to debug when your device is connected to your Mac.Debatable
@Amazed did you restart Xcode? Did you try restarting your computer? I've had this work on four separate apps/profiles.Capwell
Thanks for the detailed instructions. I'm working on publishing my first iOS app and this was very helpful!Hithermost
@Capwell i did restart xcode and my computer. no luck, unfortunately.Amazed
When I click the "Generate" button after renaming the profile, it just sits and spins and never comes back. Any ideas?Benempt
This answer is related to APP STORE. The question is related to AD HOC. Fail. -1Gherardo
@Gherardo Did you try the answer? Ad Hoc and App Store profiles are both distribution profiles and I expect that they suffer from the same underlying issue that causes this problemCapwell
L
27

Once you are in Organizer

  • Select the ad-hoc build and click "Export...."
  • Select "Save for Ad Hoc Deployment" -> Next
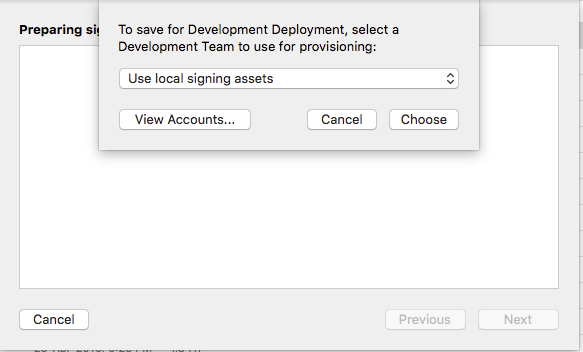
  • Instead of selecting an organisation from the drop down select "Use local signing asset" -> Choose
  • Export and save .ipa as before.

Of course you need to have generated, downloaded and installed the ad-hoc provisioning profile.

Lindstrom answered 19/12, 2014 at 15:37 Comment(3)
Solved the problem thanks to this answer, and this answer. The provisioning profile needs to be linked to an Explicit App ID, that uses the same bundle identifier as your app. A wildcard App ID will not work. You then need to select "Use local signing asset" when exporting the app.Etheridge
@SarahElan combine the two answers and write a new one... thanksBricabrac
In my opinion and regarding my experience, I think this is the best answer. Thanks.Maisey
D
17

It seems the last generated provisioning profile wins right now. So you can just re-generate the profile you want and download it and Xcode will use it.

A slightly better approach: set the desired prov profile in your target and use the command line to build your ipa, that works, too.

Here is the script, I'm using:

#!/bin/sh

# Current as working as of 2014/09/22
# Xcode 6

OUTPUTDIR="$HOME/build"
APPNAME="your-app"
SCHEME="your-app"
APP_WORKSPACE="$HOME/Path/To/your-app.xcworkspace"

rm "$OUTPUTDIR/$APPNAME.ipa" #deletes previous ipa
xcodebuild -workspace "$APP_WORKSPACE" -scheme "$SCHEME" archive -archivePath "$OUTPUTDIR/$APPNAME.xcarchive"
xcodebuild -exportArchive -exportFormat ipa -archivePath "$OUTPUTDIR/$APPNAME.xcarchive" -exportPath "$OUTPUTDIR/$APPNAME.ipa" 

and my settings:

Xcode settings

Derwood answered 22/9, 2014 at 18:21 Comment(5)
Is there any easier way?Cordwood
I think it's because MacOS 10.0. is still in beta.Cordwood
The problem with using XC Ad Hoc profiles is that they always include all devices - takes away the option to disable some devices which you can do with manual profiles.Gherardo
XC Ad Hoc profile is only an example. You can use whatever profile you like.Derwood
You should remove the '.ipa' extension from the argument to -exportPath, since it's already added automatically by xcodebuild.Clubfoot
P
8

I couldn't figure this out either - got bit by it when submitting to the AppStore, where it defaulted to a wildcard profile.

I ended up building in Xcode 6, then going back to Xcode 5's Organizer window for the submission. That way it'll prompt you to pick a profile to sign with.

Perse answered 16/9, 2014 at 9:55 Comment(2)
This is the workaround I am doing. But I really want to get rid of Xcode 5 now. I'm thinking of using xcrun and command line now.Eyde
I did try all suggested solutions I found, yet this is the only one that actually works.Custom
S
8

In Xcode 6 (at least 6.1 I am using now)when you are doing the export for ad hoc, xcode 6 will automatically scan if there is any provisioning profile contains all devices registered in the developer account and at the same time match the bundle ID. If no, it will use XC provision profile. Therefore, if you want to use your own profile, for example, for the purpose of push notification, you will need to select all devices in your profile on apple developer portal. I guess that's the reason why some people recreate profile would work and some wouldn't.

btw,use script can export and upload to testflight, but device just can't download it. probably somewhere I got wrong. if anyone knows why it is, pls let me know. tks

Shellieshellproof answered 23/10, 2014 at 8:38 Comment(2)
Thanks! This did the trick for me. I edited the profile to include all devices, re-archived the app, and viola, it used the right profile.Groningen
This is exactly it and it sounds like a bug to me or that now that Apple introduce TestFlight to distribute beta versions the AdHoc distribution did not get the appropriate attention. What happened to me was just what @Shellieshellproof describes; I created my provisioning profile as I have always done before, selected only a subset of all my registered devices and when I tried to generate the IPA, Xcode could not find any valid provisioning profile and tried to use this auto-generated XC one (which also failed in my case). The fix was to add all my registered devices to the provisioning profile.Smudge
A
7

This worked for me:

  1. click "View Accounts.." within the "..select a Development Team.." dialog.
  2. click "View Details.." and find the XC Ad Hoc provisioning profile.
  3. right click on that profile and chose "Show in Finder".
  4. delete the selected profile.
  5. go back to the dialog in step 1.
  6. click "Chose".
  7. click the arrow near provisioning profile to open the provisioning profiles directory.
  8. delete again the generic profile like in step 4.
  9. click "Previous" button from the "Send [application name] to Apple:" dialog.
  10. select again "Save for Ad Hoc Deployment"
  11. click again the "choose" button.

now you should see the right provisioning profile name.

Arlenarlena answered 19/9, 2014 at 12:20 Comment(5)
I didn't try the first one. But this one worked for me. Thanks. =]Flambeau
Didn't work for me. Even after deleting the profiles in steps 4 and 8, the profiles get recreated and automatically selected again in step 11.Knifeedged
Doesn't work for me because every time I have to click choose an account (I have multiple accounts for delivering apps to my clients) the XC Generated profile is recreated. PITA from Apple.Aladdin
I would add that before following these steps with XCode 6, you should delete the XC:* provisioning profiles from your apple developer account. After step 4, I'd go back to the View Details dialog and hit the refresh button to make sure those XC:* profiles are no longer there. Also, use Thorsten's build settings to make sure you select the correct profile. Worked for me twice.Limicolous
I had the same issue as @Knifeedged and (@)wuf810. Those damn .mobileprovisions keep getting recreated. What I did was keep the "Provisioning Profiles" directory window open and just keep going through the steps from (@)user3382891- deleting the .mobileprovision records as fast as they were being recreated. Eventually Xcode selected my correct provisioning profile. Now I am onto the next problem...Rhizomorphous
W
6

I have a workaround for this that works for me.

I have both Xcode 6 and Xcode 5.1.1 installed, Xcode 6 is in Applications and Xcode 5.1.1 is in another directory. When I want to do a build I use Xcode 6 to create the Archive. But you can also see the created Archive in Xcode 5.1.1 so I use Xcode 5.1.1 to distribute the Ad Hoc .ipa using the provisioning profile that I want to use. So build using Xcode 6 but distribute using Xcode 5.1.1.

Wieldy answered 28/9, 2014 at 21:41 Comment(2)
i am not able to upload build to testflight this way.Lederer
If you are using the same provisioning profile for building and distributing, then you should be able to upload your build to test flight this way. Double check that the provisioning profile that you are using for building is the same as the one you are using for distributing.Wieldy
A
4

Using local signing assets while exporting solved the issue for me:enter image description here

Aceous answered 19/7, 2016 at 13:11 Comment(0)
S
3

The answer from @MrPatol did not work for me. My working scenario for Xcode 6.3.2

In Member Centre -> iOS Provisioning Profiles

  • Delete provisioning profile which was set by default when you were trying to build the app (e.g. "XC..."). Create an ad-hoc provisioning profile (not production) with a short name.

In iPhone Configuration Utility -> Provisioning Profiles

  • Delete the same provisioning profile (e.g. "XC...")

In Xcode -> Organizer

  • Select the ad-hoc build and click "Export...." Select "Save for Ad Hoc Deployment" -> Next
  • Select an organisation from the drop down
  • Check that your new ad-hoc provisioning profile is selected automatically
  • Export and save .ipa as before.
Saiz answered 9/6, 2015 at 11:59 Comment(0)
E
2

Here are the two key points that solved the problem for me.

  • When you generate the provisioning profile, it needs to be linked to an Explicit App ID that uses the same bundle identifier as your app. A wildcard App ID will not work.
  • When you export the app for ad-hoc deployment, select Use local signing asset in the dropdown and click Choose.

Xcode will then find the correct provisioning profile by matching up the App ID with the bundle identifier of the app.

Etheridge answered 29/5, 2015 at 13:8 Comment(0)
R
1

In fact, you need to create a new Distribution profile, specific for Ad Hoc Deployment. This can be found in the classic member center, but it is a new type of certificate.

You can then select which devices can be used to test the app as ou would do with a developer profile.

And the newly created certificate will be available when you export your package from the Organizer the usual way.

Alternatively you can use the TestFlight solution provided by Apple with iOS 8 to enable your user to have access to prerelease.

enter image description here

Romaineromains answered 22/9, 2014 at 12:11 Comment(1)
Yes but as you point out this means iOS8 only. Apple have been particular stupid forcing Testflight users to iOS8 only. For a good while yet the largest installed base will still be iOS7, so apple should have allowed for that.Aladdin
O
1

I had the same problem, finally I solved it regenerating the profile that I wanted to use in Xcode 6 including all the devices that I have registered on my iOS Dev account, doing it that way, when selecting export it shows the correct profile and I can do the Ad Hoc export with Xcode 6 without using a script. Hope it helps.

Ozone answered 13/10, 2014 at 12:28 Comment(1)
This works, but only if you are okay with the provisioning profile containing all of the devices registered with your iOS dev account. To use only a subset of the devices in the provisioning profile I had to use this technique: https://mcmap.net/q/95283/-xcode-6-how-to-pick-signing-certificate-provisioning-profile-for-ad-hoc-distributionInterposition
S
0

I've been stuck for a while with this ,, but using Crashlytics solved it , build distributed using the selected profile in the build settings of your Xcode project .

hope it helps somebody .

Stockmon answered 30/12, 2014 at 15:15 Comment(0)
S
0

Almost the same problem. After creating an archive for distribution (Product > Archive) you export the archive (click Export...) and choose "Save for Enterprise Deployment"; then "Next". You then select the "Development Team" default (e.g. organisation name) and click "Choose". Finally you will be presented with a summary view that also lists the provisioning profile that Xcode automatically has found (maybe created on-the-fly) for you. This MIGHT be the wrong provisioning profile (typically a wildcard provisioning profile, like "XC: *") and MIGHT be happening because there already is a wildcard provisioning profile on the developer portal. The wildcard provisioning profile MIGHT be used by other older project and maybe it is not wise to just remove the wildcard provisioning profile from the developer portal.

I used a support ticket for this and only got this link back https://developer.apple.com/library/ios/documentation/IDEs/Conceptual/AppDistributionGuide/ConfiguringPushNotifications/ConfiguringPushNotifications.html#//apple_ref/doc/uid/TP40012582-CH32-SW1. Not really a big help.

I have found that MrPatol's solution also works for Enterprise Deployment as well and solves the problem for us. I first logged into the developer portal and manually create a provisioning profile that suited my app. Then downloaded and installed the new manually created provisioning profile.

Suzannesuzerain answered 21/5, 2015 at 7:49 Comment(0)
M
0

In xcode 7, I couldn't be able to pick adhoc provisioning via

Organizer -> Upload to App Store & Organizer -> Validate

But I could choose via Organizer -> Export

Edited:

Uploading the app after exporting for adhoc to app store for testFlight caused another issue discussed here. So, solution to both these problem is one. Create AppStore provisioning to be able to pick it via organizer and utilize testFlight by uploading to appstore.

Morelock answered 8/12, 2015 at 11:15 Comment(0)
F
0
  1. I think it's a right way to specify a -exportOptionsPlist option after Xcode 7. It will choose the right provision files like in the GUI export no matter what you specify in project setting.

xcodebuild -exportArchive -archivePath $Archive_Path -exportPath $LOCAL_PACKAGE_DIR -exportOptionsPlist $Export_Plist_Path

optionPlist file is like this,

<dict>
  <key>teamID</key>
        <string>MYTEAMID123</string>
        <key> teamID </key>
        <string>app-store</string>
        <key>uploadSymbols</key>
        <true/>
</dict>


<plist>

app-store, enterprise, ad-hoc, development are alternative

  1. But you may meet another error after above.

Error Domain=IDEDistributionErrorDomain Code=14 "No applicable devices found." UserInfo={NSLocalizedDescription=No applicable devices found.}

It's a ruby problem. Try this shell script, xcbuild-safe.sh

xcbuild-safe.sh xxxxNormalOptionsInXcodebuild bla...
  1. Wait for a moment, another strange error comes.

xcbuild-safe.sh: line 62: shell_session_update: command not found

What's the hell shell_session_update ? Let us work around it. Just define a function before the real xcodebuild cmd, namely at the line 60 or 61.

function shell_session_update() { :; }
Fervent answered 27/4, 2017 at 3:41 Comment(0)
C
-4

In answer to your specific question, no there is no way to select the provisioning profile to be used. What are you attempting to do? (i.e. what does the profile that you want to select allow that the automatically generated one doesn't?)

Caernarvonshire answered 28/10, 2014 at 13:51 Comment(8)
For example having specific list of UDIDs available for that application. I am developing apps for multiple clients and I can't have them mixed up. There are ways around this, sure, but all of them are much more complicated than simply selecting provisioning profile I want to useUnsuccessful
There is most certainly a way to select the provisioning profile to be used. https://mcmap.net/q/95283/-xcode-6-how-to-pick-signing-certificate-provisioning-profile-for-ad-hoc-distributionInterposition
@Unsuccessful If a client has one of your apps and the associated profile installed, they can install any of your apps (even if the other apps' profiles do not contain their device). This confusion is one of the primary reasons that we want to move developers away from manually specifying their profiles and device lists. (i.e. many people seem to be relying on a false sense of security as their primary reason for wanting to manually specify profiles)Caernarvonshire
@Caernarvonshire well that's even worse, I want to keep client from being able to see each other appsUnsuccessful
@Lope: I'm not aware of a way to distribute ad hoc ipa files that would make all of your apps available to your testers. In other words, you have to explicitly provide to your testers the app you want them to test, right? That physical separation would prevent them from using any other apps. (It's not like they can go on the store and get all of them, yes?) Is there another way in which your testers could get access to all of your apps without your permission???Minaret
@Minaret I was reacting to what clarkcox3 said, if I understood correctly, it should be possible for one user to install your ad-hoc apps even if his device is not in provisioning profile if he has one of your ad-hoc builds installed. I am bit confused about all thisUnsuccessful
clarkcox3, can you clarify: is the idea behind using one profile for everything because tester(s) can't get to ALL the apps available for a developer without that developer specifically providing the apps to the tester(s) via .ipa file or testflight?Minaret
If an app is signed with a given signing identity, and a user's device has a provisioning profile (any provisioning profile) with that identity's certificate that allows the entitlements that that app uses, then they will be allowed to install that app. It doesn't matter if the installed profile isn't the same one that was used when the app was signed.Caernarvonshire

© 2022 - 2024 — McMap. All rights reserved.