Analysis of a shader in VR
Asked Answered
L

1

1

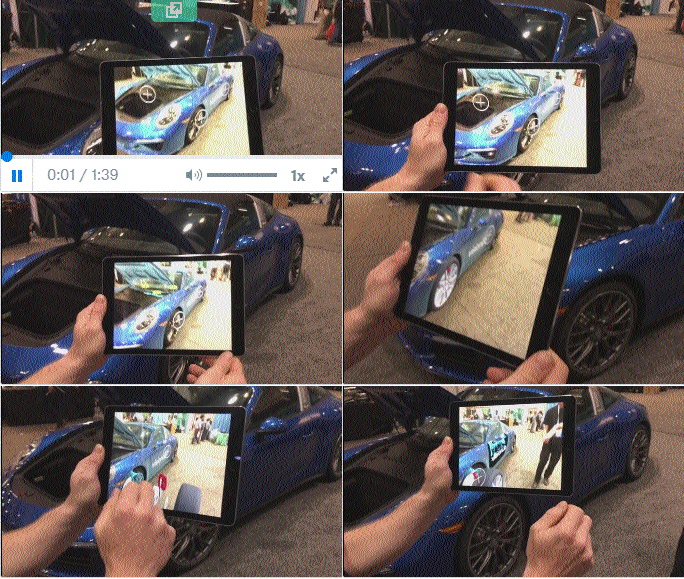
I would like to create a shader like that that takes world coordinates and creates waves. I would like to analyse the video and know the steps that are required. I'm not looking for codes, I'm just looking for ideas on how to implement that using GLSL or HLSL or any other language.

Here low quality and fps GIF in case link broke.

video

Here is the fragment shader:

#version 330 core

// Interpolated values from the vertex shaders
in vec2 UV;
in vec3 Position_worldspace;
in vec3 Normal_cameraspace;
in vec3 EyeDirection_cameraspace;
in vec3 LightDirection_cameraspace;

// highlight effect
in float pixel_z;       // fragment z coordinate in [LCS]
uniform float animz;    // highlight animation z coordinate [GCS]

// Ouput data
out vec4 color;
vec3 c;

// Values that stay constant for the whole mesh.
uniform sampler2D myTextureSampler;
uniform mat4 MV;
uniform vec3 LightPosition_worldspace;

void main(){

    // Light emission properties
    // You probably want to put them as uniforms
    vec3 LightColor = vec3(1,1,1);
    float LightPower = 50.0f;

    // Material properties
    vec3 MaterialDiffuseColor = texture( myTextureSampler, UV ).rgb;
    vec3 MaterialAmbientColor = vec3(0.1,0.1,0.1) * MaterialDiffuseColor;
    vec3 MaterialSpecularColor = vec3(0.3,0.3,0.3);

    // Distance to the light
    float distance = length( LightPosition_worldspace - Position_worldspace );

    // Normal of the computed fragment, in camera space
    vec3 n = normalize( Normal_cameraspace );
    // Direction of the light (from the fragment to the light)
    vec3 l = normalize( LightDirection_cameraspace );
    // Cosine of the angle between the normal and the light direction, 
    // clamped above 0
    //  - light is at the vertical of the triangle -> 1
    //  - light is perpendicular to the triangle -> 0
    //  - light is behind the triangle -> 0
    float cosTheta = clamp( dot( n,l ), 0,1 );

    // Eye vector (towards the camera)
    vec3 E = normalize(EyeDirection_cameraspace);
    // Direction in which the triangle reflects the light
    vec3 R = reflect(-l,n);
    // Cosine of the angle between the Eye vector and the Reflect vector,
    // clamped to 0
    //  - Looking into the reflection -> 1
    //  - Looking elsewhere -> < 1
    float cosAlpha = clamp( dot( E,R ), 0,1 );

    c = 
        // Ambient : simulates indirect lighting
        MaterialAmbientColor +
        // Diffuse : "color" of the object
        MaterialDiffuseColor * LightColor * LightPower * cosTheta / (distance*distance) +
        // Specular : reflective highlight, like a mirror
        MaterialSpecularColor * LightColor * LightPower * pow(cosAlpha,5) / (distance*distance);


    float z;
    z=abs(pixel_z-animz);   // distance to animated z coordinate
    z*=1.5;                 // scale to change highlight width
    if (z<1.0)
        {
        z*=0.5*3.1415926535897932384626433832795;   // z=<0,M_PI/2> 0 in the middle
        z=0.5*cos(z);
        color+=vec3(0.0,z,z);
        }

        color=vec4(c,1.0);

}

here is the vertex shader:

#version 330 core

// Input vertex data, different for all executions of this shader.
layout(location = 0) in vec3 vertexPosition_modelspace;
layout(location = 1) in vec2 vertexUV;
layout(location = 2) in vec3 vertexNormal_modelspace;

// Output data ; will be interpolated for each fragment.
out vec2 UV;
out vec3 Position_worldspace;
out vec3 Normal_cameraspace;
out vec3 EyeDirection_cameraspace;
out vec3 LightDirection_cameraspace;

out float pixel_z;      // fragment z coordinate in [LCS]

// Values that stay constant for the whole mesh.
uniform mat4 MVP;
uniform mat4 V;
uniform mat4 M;
uniform vec3 LightPosition_worldspace;

void main(){


    pixel_z=vertexPosition_modelspace.z;
    // Output position of the vertex, in clip space : MVP * position
    gl_Position =  MVP * vec4(vertexPosition_modelspace,1);

    // Position of the vertex, in worldspace : M * position
    Position_worldspace = (M * vec4(vertexPosition_modelspace,1)).xyz;

    // Vector that goes from the vertex to the camera, in camera space.
    // In camera space, the camera is at the origin (0,0,0).
    vec3 vertexPosition_cameraspace = ( V * M * vec4(vertexPosition_modelspace,1)).xyz;
    EyeDirection_cameraspace = vec3(0,0,0) - vertexPosition_cameraspace;

    // Vector that goes from the vertex to the light, in camera space. M is ommited because it's identity.
    vec3 LightPosition_cameraspace = ( V * vec4(LightPosition_worldspace,1)).xyz;
    LightDirection_cameraspace = LightPosition_cameraspace + EyeDirection_cameraspace;

    // Normal of the the vertex, in camera space
    Normal_cameraspace = ( V * M * vec4(vertexNormal_modelspace,0)).xyz; // Only correct if ModelMatrix does not scale the model ! Use its inverse transpose if not.

    // UV of the vertex. No special space for this one.
    UV = vertexUV;
}
Lexy answered 8/8, 2017 at 9:37 Comment(0)
S
5

there are 2 approaches I can think of for this:

  1. 3D reconstruction based

    so you need to reconstruct the 3D scene from motion (not an easy task and way of my cup of tea). then you simply apply modulation to the selected mesh texture based on u,v texture mapping coordinates and time of animation.

    Describe such topic will not fit in SO answer so you should google some CV books/papers on the subject instead.

  2. Image processing based

    you simply segmentate the image based on color continuity/homogenity. So you group neighboring pixels that have similar color and intensity (growing regions). When done try to fake surface 3D reconstruction based on intensity gradients similar to this:

    and after that create u,v mapping where one axis is depth.

    When done then just apply your sin-wave effect modulation to color.

    I would divide this into 2 stages. 1st pass will segmentate (I would chose CPU side for this) and second for the effect rendering (on GPU).

As this is form of augmented reality you should also read this:

btw what is done on that video is neither of above options. They most likely have the mesh for that car already in vector form and use silhouette matching to obtain its orientation on image ... and rendered as usual ... so it would not work for any object on the scene but only for that car ... Something like this:

[Edit1] GLSL highlight effect

I took this example:

And added the highlight to it like this:

  1. On CPU side I added animz variable

    it determines the z coordinate in object local coordinate system LCS where the highlight is actually placed. and I animate it in timer between min and max z value of rendered mesh (cube) +/- some margin so the highlight does not teleport at once from one to another side of object...

    // global
    float animz=-1.0;
    // in timer
    animz+=0.05; if (animz>1.5) animz=-1.5; // my object z = <-1,+1> 0.5 is margin
    // render
    id=glGetUniformLocation(prog_id,"animz"); glUniform1f(id,animz);
    
  2. Vertex shader

    I just take vertex z coordinate and pass it without transform into fragment

    out float pixel_z;      // fragment z coordinate in [LCS]
    pixel_z=pos.z;
    
  3. Fragment shader

    After computing target color c (by standard rendering) I compute distance of pixel_z and animz and if small then I modulate c with a sinwave depended on the distance.

    // highlight effect
    float z;
    z=abs(pixel_z-animz);   // distance to animated z coordinate
    z*=1.5;                 // scale to change highlight width
    if (z<1.0)
        {
        z*=0.5*3.1415926535897932384626433832795;   // z=<0,M_PI/2> 0 in the middle
        z=0.5*cos(z);
        c+=vec3(0.0,z,z);
        }
    

Here the full GLSL shaders...

Vertex:

#version 400 core
#extension GL_ARB_explicit_uniform_location : enable
layout(location = 0) in vec3 pos;
layout(location = 2) in vec3 nor;
layout(location = 3) in vec3 col;
layout(location = 0) uniform mat4 m_model;  // model matrix
layout(location =16) uniform mat4 m_normal; // model matrix with origin=(0,0,0)
layout(location =32) uniform mat4 m_view;   // inverse of camera matrix
layout(location =48) uniform mat4 m_proj;   // projection matrix
out vec3 pixel_pos;     // fragment position [GCS]
out vec3 pixel_col;     // fragment surface color
out vec3 pixel_nor;     // fragment surface normal [GCS]

// highlight effect
out float pixel_z;      // fragment z coordinate in [LCS]

void main()
    {
    pixel_z=pos.z;
    pixel_col=col;
    pixel_pos=(m_model*vec4(pos,1)).xyz;
    pixel_nor=(m_normal*vec4(nor,1)).xyz;
    gl_Position=m_proj*m_view*m_model*vec4(pos,1);
    }

Fragment:

#version 400 core
#extension GL_ARB_explicit_uniform_location : enable
layout(location =64) uniform vec3 lt_pnt_pos;// point light source position [GCS]
layout(location =67) uniform vec3 lt_pnt_col;// point light source color&strength
layout(location =70) uniform vec3 lt_amb_col;// ambient light source color&strength
in vec3 pixel_pos;      // fragment position [GCS]
in vec3 pixel_col;      // fragment surface color
in vec3 pixel_nor;      // fragment surface normal [GCS]
out vec4 col;

// highlight effect
in float pixel_z;       // fragment z coordinate in [LCS]
uniform float animz;    // highlight animation z coordinate [GCS]

void main()
    {
    // standard rendering
    float li;
    vec3 c,lt_dir;
    lt_dir=normalize(lt_pnt_pos-pixel_pos); // vector from fragment to point light source in [GCS]
    li=dot(pixel_nor,lt_dir);
    if (li<0.0) li=0.0;
    c=pixel_col*(lt_amb_col+(lt_pnt_col*li));
    // highlight effect
    float z;
    z=abs(pixel_z-animz);   // distance to animated z coordinate
    z*=1.5;                 // scale to change highlight width
    if (z<1.0)
        {
        z*=0.5*3.1415926535897932384626433832795;   // z=<0,M_PI/2> 0 in the middle
        z=0.5*cos(z);
        c+=vec3(0.0,z,z);
        }
    col=vec4(c,1.0);
    }

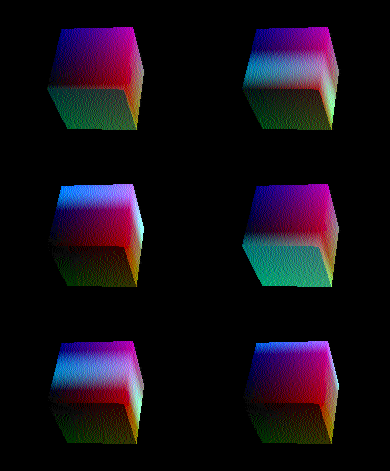
And preview:

preview

This approach does not require textures nor u,v mapping.

[Edit2] highlight with start point

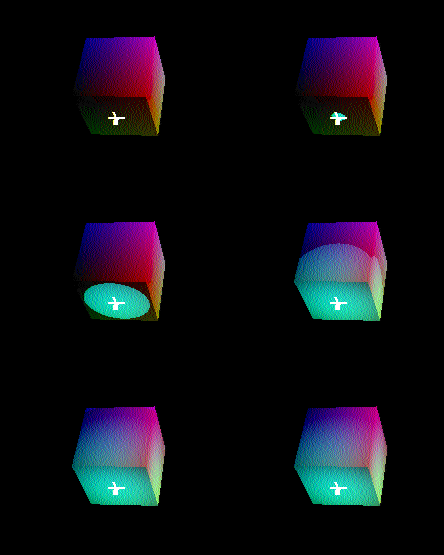
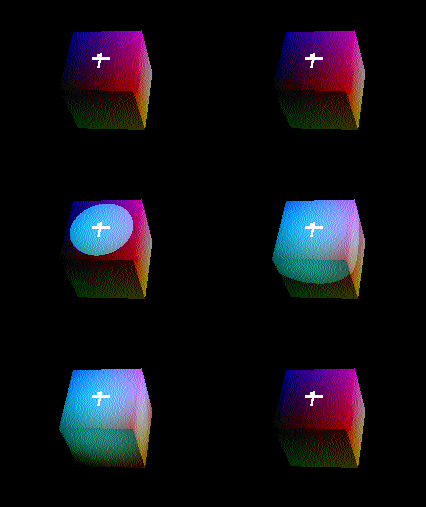
There are many ways how to implement it. I chose distance from the start point as a highlight parameter. So the highlight will grow from the point in all directions. Here preview for two different touch point locations:

preview preview

The white bold cross is the location of touch point rendered for visual check. Here the code:

Vertex:

// Vertex
#version 400 core
#extension GL_ARB_explicit_uniform_location : enable
layout(location = 0) in vec3 pos;
layout(location = 2) in vec3 nor;
layout(location = 3) in vec3 col;
layout(location = 0) uniform mat4 m_model;  // model matrix
layout(location =16) uniform mat4 m_normal; // model matrix with origin=(0,0,0)
layout(location =32) uniform mat4 m_view;   // inverse of camera matrix
layout(location =48) uniform mat4 m_proj;   // projection matrix
out vec3 LCS_pos;       // fragment position [LCS]
out vec3 pixel_pos;     // fragment position [GCS]
out vec3 pixel_col;     // fragment surface color
out vec3 pixel_nor;     // fragment surface normal [GCS]

void main()
    {
    LCS_pos=pos;
    pixel_col=col;
    pixel_pos=(m_model*vec4(pos,1)).xyz;
    pixel_nor=(m_normal*vec4(nor,1)).xyz;
    gl_Position=m_proj*m_view*m_model*vec4(pos,1);
    }

Fragment:

// Fragment
#version 400 core
#extension GL_ARB_explicit_uniform_location : enable
layout(location =64) uniform vec3 lt_pnt_pos;// point light source position [GCS]
layout(location =67) uniform vec3 lt_pnt_col;// point light source color&strength
layout(location =70) uniform vec3 lt_amb_col;// ambient light source color&strength
in vec3 LCS_pos;        // fragment position [LCS]
in vec3 pixel_pos;      // fragment position [GCS]
in vec3 pixel_col;      // fragment surface color
in vec3 pixel_nor;      // fragment surface normal [GCS]
out vec4 col;

// highlight effect
uniform vec3  touch;    // highlight start point [GCS]
uniform float animt;    // animation parameter <0,1> or -1 for off
uniform float size;     // highlight size

void main()
    {
    // standard rendering
    float li;
    vec3 c,lt_dir;
    lt_dir=normalize(lt_pnt_pos-pixel_pos); // vector from fragment to point light source in [GCS]
    li=dot(pixel_nor,lt_dir);
    if (li<0.0) li=0.0;
    c=pixel_col*(lt_amb_col+(lt_pnt_col*li));
    // highlight effect
    float t=length(LCS_pos-touch)/size; // distance from start point
    if (t<=animt)
        {
        t*=0.5*3.1415926535897932384626433832795;   // z=<0,M_PI/2> 0 in the middle
        t=0.75*cos(t);
        c+=vec3(0.0,t,t);
        }
    col=vec4(c,1.0);
    }

You control this with uniforms:

uniform vec3  touch;    // highlight start point [GCS]
uniform float animt;    // animation parameter <0,1> or -1 for off
uniform float size;     // max distance of any point of object from touch point
Saddle answered 8/8, 2017 at 9:46 Comment(13)
can you show me some pseudo code for the last method ? I didn't understand if they have the mesh in vector form. How would I apply modulation sine wave onto the mesh ? GLSL pseudo code would be an awesome and a great answer to the SOF community. A sample implementation when you have timeLexy
@Lexy the last link describes how to obtain the orientation and position of known object (for which you have a 3D rendering model stored) (It can be simplified by fusion of onboard sensors and prepositioned markers.) If you want just the sinwave effect I could bust something ... it is just applying a color modulation while rendering ...Saddle
Thanks so much!. I would like to know how would I know if I touch a specific point in the model and do the highlighting over there, should I do picking on the GPU, or just do the high lighting over the whole car ? In the video sample, it seems that it gets the touch points and it does the shader over the clicked point over thereLexy
@Lexy those touch points are defined in their 3D mesh. They just find closest point to mouse/touch and if in range start its functionality (like that wheel decomposition animation). Looks like they highlighting in very similar manner to my example (which makes sense as it is cheap on both CPU/GPU side). But you can do all sorts of stuff like animate the textures instead etc ...Saddle
I tried your code but it doesn't work, if you don't mind, can you post the complete project here ? www.mediafire.com ?Lexy
Hi Spektre, I would like to know as the video is doing, they are getting the touch coordinates, and they start the shader the modulation from that point, how its actually doneLexy
Is it possible to fire the highlighting at both directions one forward and the other backward using your technique ?Lexy
@Lexy yes you just change the modulation parameter a bit. What exactly you want? a) 2 highlights one going in Z+ and the other in Z- from some start Z0 or b) single highlight enlarging in both directions also from Z0Saddle
I need number b) for example the highlighting comes from the center of the car, and one enlarges from the center of the car to right and the other from the center of the car to leftLexy
@Lexy weird I was not notified ... You want highlight to go left/right instead of following Z coordinate? that sounds a lot simpler but I am afraid the result will not look as good. More like to define some direction and glue it with the depth ... so the result follows the contours of rendered mesh and not just be vertically cut.Saddle
yea that's what I want to do, please provide me an example :), but I want it to follow the Z coordinate too as the original exampleLexy
please note that I want to start a glow from a specific world coordinate point, is that possible ?Lexy
@Lexy added [edit2] we should clear out unimportant comments in here before someone puts all this to chatSaddle

© 2022 - 2024 — McMap. All rights reserved.