How do I make my radio button fully filled with color in active color without white borders in Flutter?
Asked Answered
C

2

0

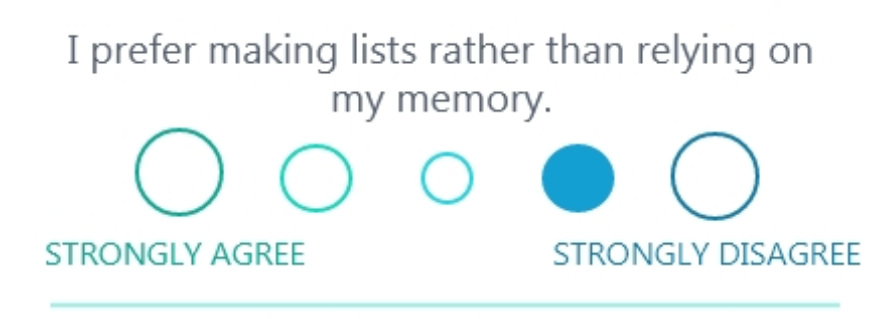
I want to fully fill my radio button with a single color. Like this

enter image description here

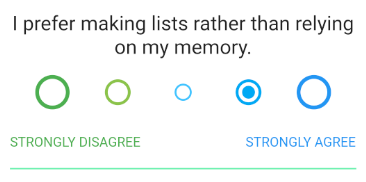
Currently Radio button give this layout by default.

enter image description here

So how can I change this?

My Code

Radio(
                    value: 3,
                    groupValue: radioValue,
                    onChanged: onChanged,
                    fillColor: MaterialStateColor.resolveWith(
                        (states) => Colors.lightBlueAccent),
                  ),

Please Help

Cubature answered 4/7, 2021 at 8:0 Comment(1)
create your own custom widget using a Container() and gesture detector and on tapped fill the container with colour, now to get which container was tapped use a listview builder that can return you the index of the tapped container. wait ill write and code and post it as answer you will understand betterSequel
D
3

You can create your own radio widget to achieve this:

class FilledRadio<T> extends StatelessWidget {
  final T value;
  final T groupValue;
  final ValueChanged<T> onChanged;
  final double radius;
  final Color color;

  FilledRadio(
      {required this.value,
      required this.groupValue,
      required this.onChanged,
      this.radius = 16,
      this.color = const Color(0xFF49EF3E)});

  @override
  Widget build(BuildContext context) {
    return Padding(
      padding: const EdgeInsets.all(8.0),
      child: GestureDetector(
        onTap: () {
          onChanged(this.value);
        },
        child: Container(
          height: this.radius * 2,
          width: this.radius * 2,
          decoration: ShapeDecoration(
            shape: CircleBorder(),
            color: color,
          ),
          child: Center(
            child: Container(
              height: (this.radius * 2) - 8,
              width: (this.radius * 2) - 8,
              decoration: ShapeDecoration(
                shape: CircleBorder(),
                color: value == groupValue
                    ? color
                    : Theme.of(context).scaffoldBackgroundColor,
              ),
            ),
          ),
        ),
      ),
    );
  }
}

You can use it like:

Row(
   mainAxisAlignment: MainAxisAlignment.center,
   children: <Widget>[
      FilledRadio(
        value: "0",
        radius: 20,
        color: Colors.redAccent,
        groupValue: _radValue,
        onChanged: (String value) {
          setState(() {
            _radValue = value;
          });
        },
      ),
      FilledRadio(
        value: "1",
        radius: 16,
        color: Colors.red,
        groupValue: _radValue,
        onChanged: (String value) {
          setState(() {
            _radValue = value;
          });
        },
      ),
      FilledRadio(
        value: "2",
        radius: 12,
        color: Colors.amber,
        groupValue: _radValue,
        onChanged: (String value) {
          setState(() {
            _radValue = value;
          });
        },
      ),
      FilledRadio(
        value: "3",
        radius: 16,
        color: Colors.green,
        groupValue: _radValue,
        onChanged: (String value) {
          setState(() {
            _radValue = value;
          });
        },
      ),
      FilledRadio(
        value: "4",
        radius: 20,
        color: Colors.greenAccent,
        groupValue: _radValue,
        onChanged: (String value) {
          setState(() {
            _radValue = value;
          });
        },
      ),
   ],
),

And it will look like:

Radio Group

Note: This implementation supports only from dart 2.12.0 and above. If you are trying to use it in older versions of dart, just change the constructor to:

FilledRadio(
      {@required this.value,
      @required this.groupValue,
      @required this.onChanged,
      this.radius = 16,
      this.color = const Color(0xFF49EF3E)});
Dogmatism answered 4/7, 2021 at 9:32 Comment(0)
E
0

The answer shared above works well. However, in my case, I needed to show a text beside the button. To achieve this, I have updated the code as shown below:

import 'package:flutter/material.dart';

class FilledRadio<T> extends StatelessWidget {
  final T value;
  final T groupValue;
  final ValueChanged<T> onChanged;
  final double radius;
  final Color color;
  final title;

  FilledRadio({
    required this.title,
    required this.value,
    required this.groupValue,
    required this.onChanged,
    this.radius = 16,
    this.color = const Color(0xFF49EF3E),
  });

  @override
  Widget build(BuildContext context) {
    return Row(
      children: [
        Padding(
          padding: const EdgeInsets.all(8.0),
          child: GestureDetector(
            onTap: () {
              onChanged(this.value);
            },
            child: Container(
              height: this.radius * 2,
              width: this.radius * 2,
              decoration: ShapeDecoration(
                shape: CircleBorder(),
                color: color,
              ),
              child: Center(
                child: Container(
                  height: (this.radius * 2) - 4,
                  width: (this.radius * 2) - 4,
                  decoration: ShapeDecoration(
                    shape: CircleBorder(),
                    color: value == groupValue
                        ? color
                        : Theme.of(context).scaffoldBackgroundColor,
                  ),
                ),
              ),
            ),
          ),
        ),
        GestureDetector(
          onTap: () {
            onChanged(this.value);
          },
          child: Text(
            title,
            style: TextStyle(fontSize: 16, color: secondaryTextColor),
          ),
        ),
      ],
    );
  }
}

Example usage

FilledRadio(
  title: "Wallet",
  radius: 10,
  value: PaymentMethod.wallet.name,
  groupValue: checkoutController
      .paymentMethod.value,
  onChanged: (value) {
    checkoutController.setPaymentMethod(
        value.toString());
  },
);

The result is as shown below:

enter image description here

Eliza answered 7/3 at 1:50 Comment(0)

© 2022 - 2024 — McMap. All rights reserved.