How to localise a string inside the iOS info.plist file?
Asked Answered
C

15

381

As you might know the iOS 8 requires NSLocationWhenInUseUsageDescription key for using user's location. I have added this key and some general information into my info plist. enter image description here

How can I use translation string inside the plist file ?

-- Update --

I already have a Localizable string. I'm just wondering that can I use something like NSLocalizedString(MYSTRING,nil) inside the plist string. I know that I can create multiple file of info.plist for localisation but I was wondering there might be an easier way.

Chapa answered 9/9, 2014 at 4:28 Comment(1)
Did you ever work this out, I'm struggling to get NSLocationWhenInUseUsageDescription localised too?Tamberg
S
696

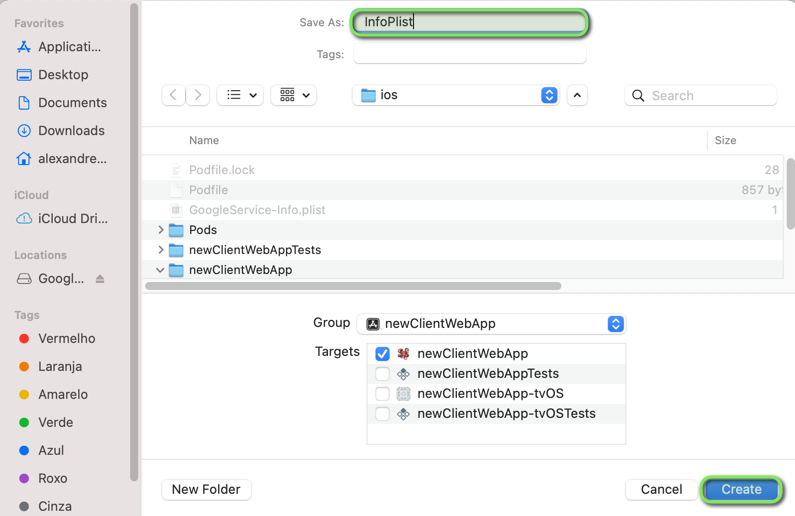
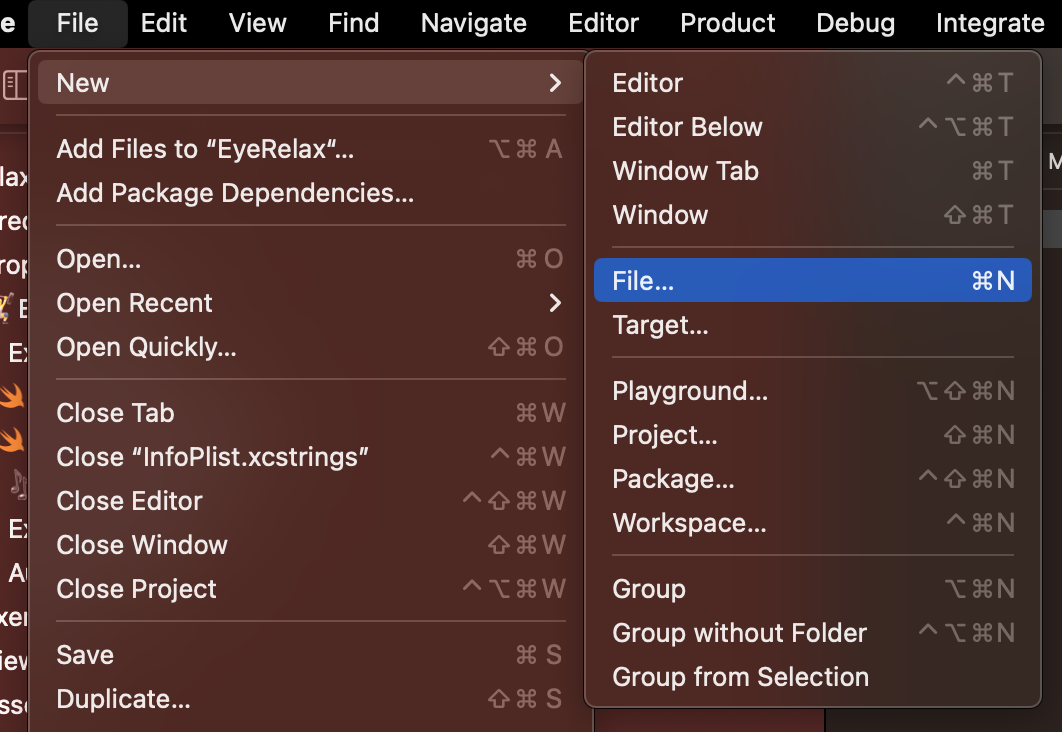
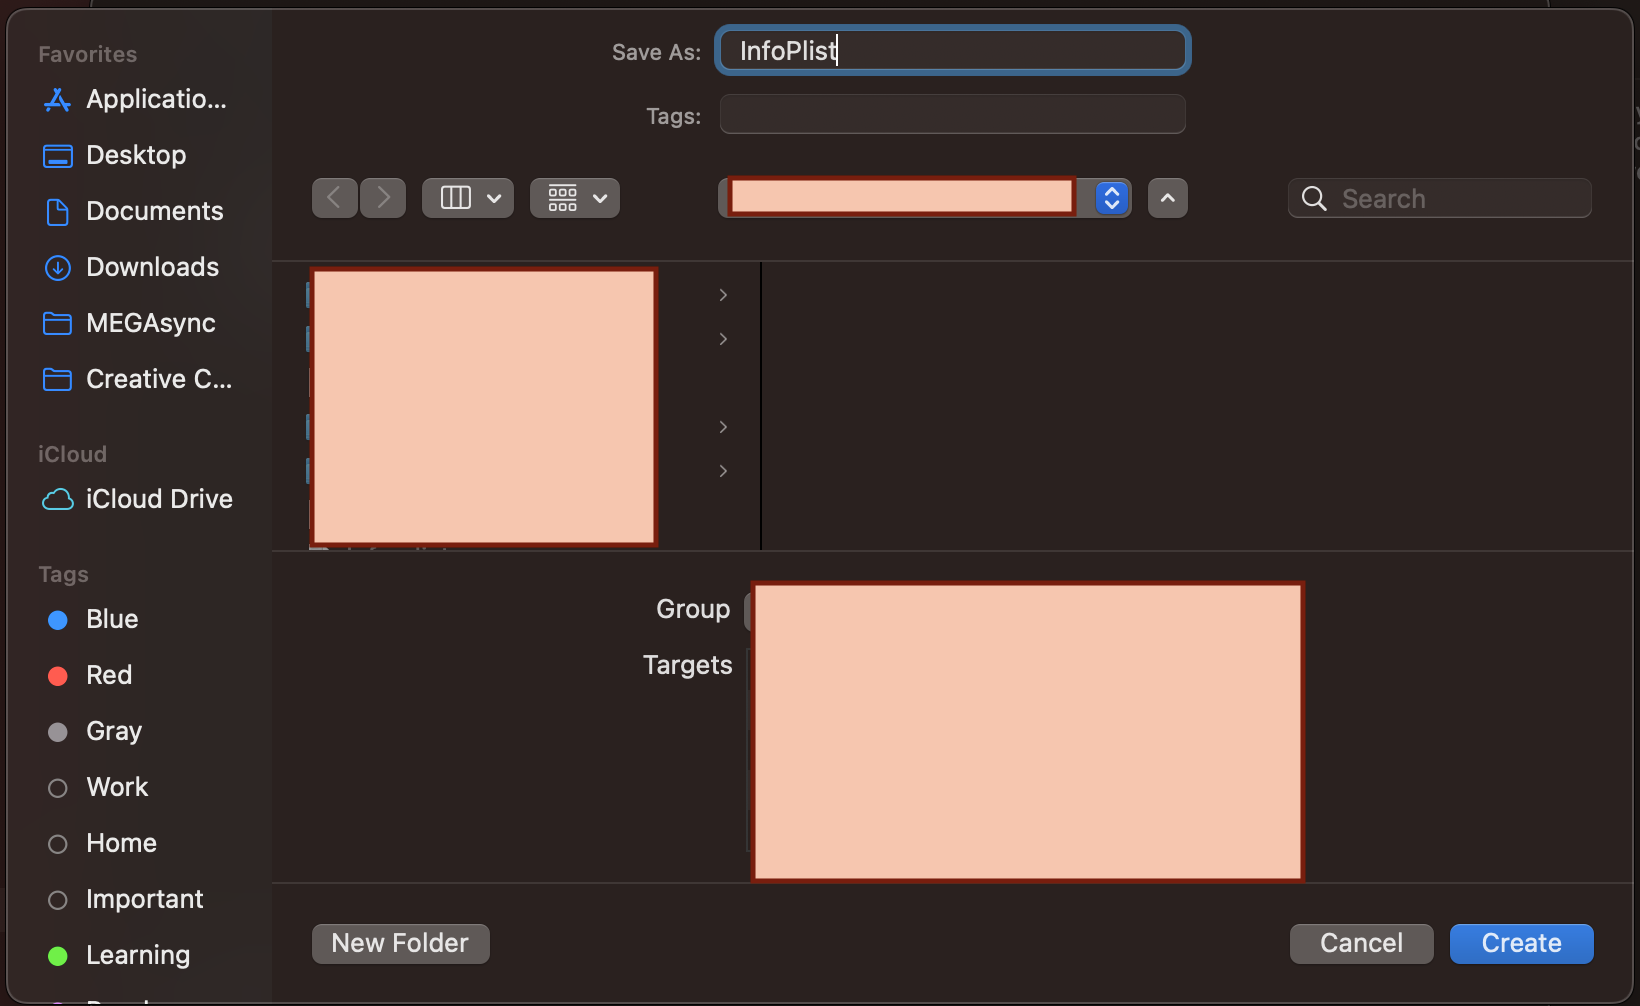
You should use InfoPlist.strings file (keep both I & P capital) to localize values of Info.plist. To do this, go to File->New->File, choose Strings File under Resource tab of iOS, name it InfoPlist, and create. Open and insert the Info.plist values you want to localize like:

"NSLocationWhenInUseUsageDescription" = "Description of this";

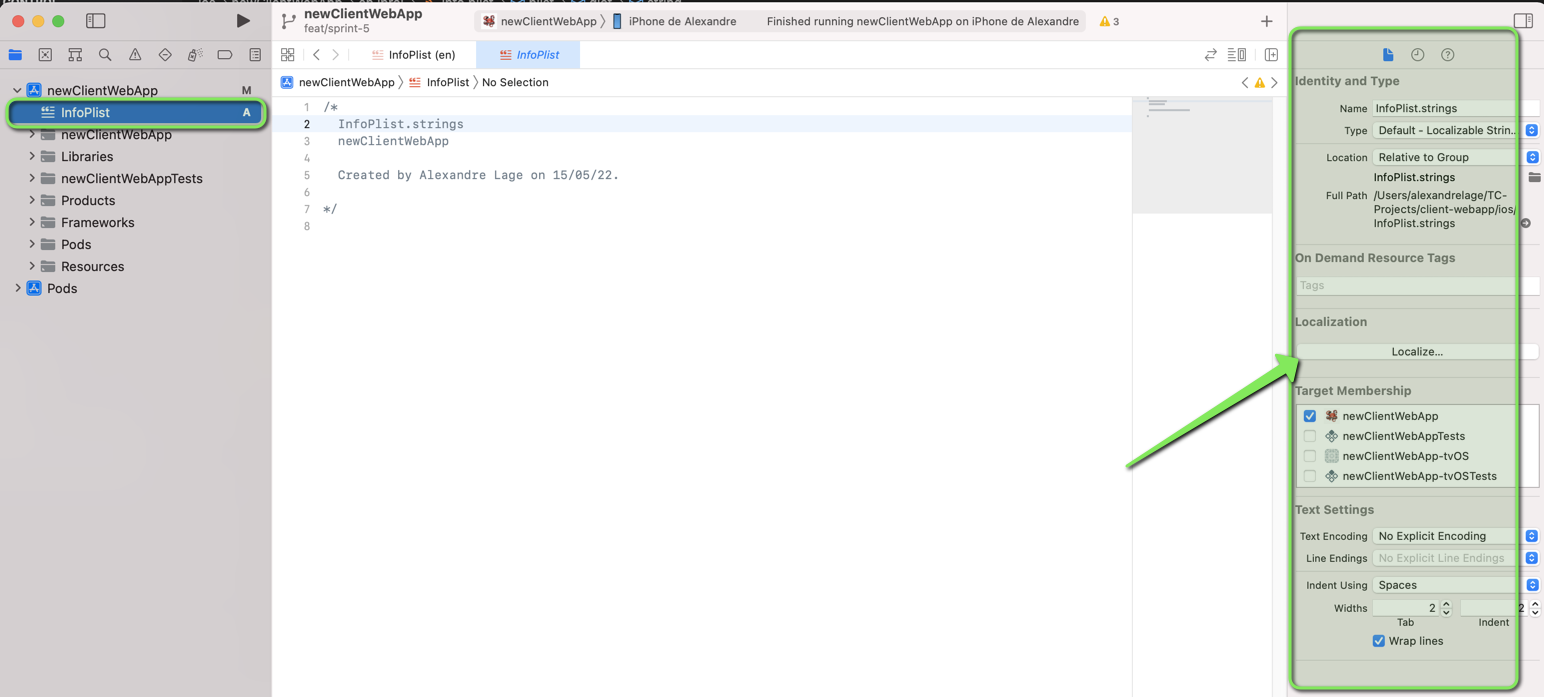
Now you can localize InfoPlist.strings file with translations.

Select the localization options, or enable localization if needed,

right side editor

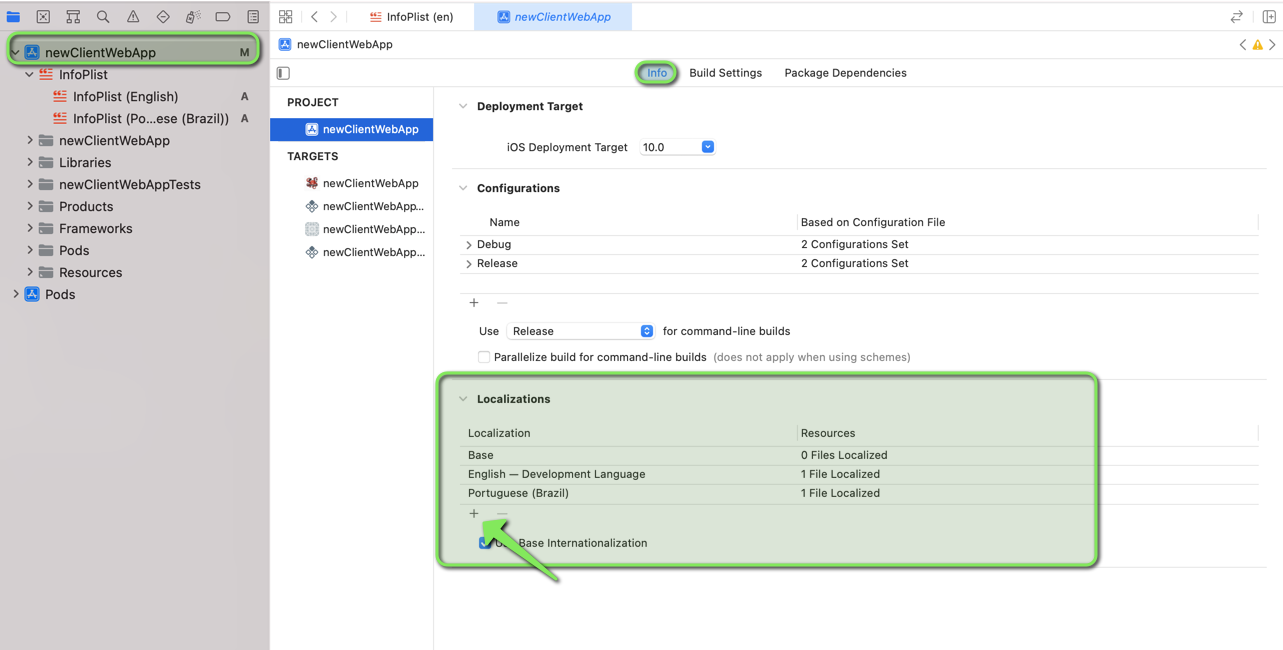
You should be able to see the file also on the left side editor.

left side editor

NOTE: When testing the localizations on the simulator. You have to change the language on the simulator itself not just the language in the Xcode target. (Credits to John Webb)

Here is the official documentation for Info.plist keys localization.

Credits to Marco, thanks for including the pics in this answer!

Skivvy answered 9/9, 2014 at 4:52 Comment(30)
Works. Don't forget to clean the project first, and make sure it's a freshly installed build on your iDevcie or reset the content on the simulator.Counteraccusation
Plus for a comprehensive answer with graphics.Boulanger
After creating the strings file, do you need to include the key in the Info.plist file as well, or is it safe to delete from there?Gredel
@Gredel I'm not totally sure, but I think, you should keep it in the plist file as well. Anyways, you can make an experiment :).Skivvy
After creating InfoPlist.strings file and adding it to the project, I made a mistake by selecting the localization options of Info.plist. Instead, we should localize the "InfoPlist.strings" file. (They are different files)Booher
Tip: Use exactly the name "InfoPlist.strings" and nothing else. For example my original infoplist file was named something else but I needed to use this name exactly in order to get it to work.Record
When testing the localizations on the simulator. I had to change the language on the simulator itself not just the language in the xcode target. Just a warning for anyone else.Bohs
Note that the string on the left needs to be exactly as shown in this answer, and NOT the base language version of the description.Bidle
Note that the filename InfoPlist.strings is case-sensitive. I lost 2 hours debugging the mistake that someone had named it infoPlist.strings (missing the capital 'I')Cooksey
What if there is another plist file with name test.plist, and what shall I create for it ? testPlist.strings ?@FahriAzimovBustos
@TejaNandamuri, no, you can just localize that file by selecting, and going to File Inspector->Localization, pressing 'Localize' button, and selecting right localization.Skivvy
Notice that Info.plist is translated by properties keyex.: NSLocationWhenInUseUsageDescription" = "Your text"; or "CFBundleDisplayName" = "An app name";Kehoe
To answer a previous comment, you should keep the keys/values in the actual plist file. If a corresponding value is found in a localized version of InfoPlist.strings, that value will be used instead. If certain keys aren't in the actual Info.plist file itself, iTunes Connect will trigger warnings when you submit your app.Klingensmith
the correct usage is keyname = "your text"; e.g: NSLocationWhenInUseUsageDescription = "your text"Condemn
Caution: the key in this file should not have quotation mark, which is different with the normal localization. e.g: NSMicrophoneUsageDescription = "your description";Podiatry
So weird that this works, and yet Xcode does the wrong thing when you try to localize your Info.plist. Thanks for this answer, saved me a ton of timeTruax
Here's the part from Apple: developer.apple.com/library/content/documentation/General/…Gorblimey
That works well, I have couple of targets and each of them has different property file with different messages so how do I handle that?Crake
Create separate .strings files for each target.Skivvy
After spending 30 minutes on this, what you need to add to that InfoPlist.strings as the KEY (value on the left) is the KEY of that permission, which is ALWAYS the permission name (e.g. NSPhotoLibraryAddUsageDescription), and NOT the value you put in that info plist.Inhaul
Don't forget the semi-colon at the end of each line. Otherwise build fails with "Couldn't parse property list because the input data was in an invalid format" error.Tugman
@Tugman Yes, that's the localizable string making basics.Skivvy
I am using xcode10.1, I am unable to find those Localization checkboxes for multiple languages you have in your screenshot, please tell me are they removed in this version of xcode? Also I am confused how app will differentiate which value to use for which localized languageCircus
Make sure your string file for the base language is located in the Base.lproj folder, and the various alternative localization string files are located in the various xx.lproj folders.Rainarainah
If you failed to make this work, remember to check the ; at the end of the line.Helenahelene
Can I use the Localizable.strings file I already have in my project of does it necessarily need to be name infoPlist.strings ?Causalgia
@SjoerdPerfors, yes, thank you, it needs to be exactly "InfoPlist.strings". But what if I have more than a target?Microwave
This is the perfect solution...It's working in xcode 12.4 and ios 14.6. Thank you.Clarkson
As @YodagamaHeshan noted with XCode 15, you can use "String Catalog" (String File is marked as Legacy). It works quite similar.Fantail
See https://mcmap.net/q/86969/-how-to-localise-a-string-inside-the-ios-info-plist-file for XCode 15+Aufmann
U
45

All the above did not work for me (Xcode 7.3) so I read Apple reference on how to do, and it is much simpler than described above. According to Apple:

Localized values are not stored in the Info.plist file itself. Instead, you store the values for a particular localization in a strings file with the name InfoPlist.strings. You place this file in the same language-specific project directory that you use to store other resources for the same localization.

Accordingly, I created a string file named InfoPlist.strings and placed it in the xx.lproj folder of the "xx" language (and added it to the project using File->Add Files to ...). That's it. No need for the key "Localized resources can be mixed" = YES, and no need for InfoPlist.strings in base.lproj or en.lproj.

The application uses the Info.plist key-value as the default value if it can not find a key in the language specific file. Thus, I put my English value in the Info.plist file and the translated one in the language specific file, tested and everything works.

In particular, there is no need to localize the InfoPlist.strings (which creates a version of the file in the base.lproj, en.lroj, and xx.lproj), and in my case going that way did not work.

Union answered 14/9, 2016 at 9:1 Comment(4)
Why did't include the link to appropriate document?Orran
Here the link to Apple doc's relevant page in case anyone is interested: developer.apple.com/library/archive/documentation/General/…Coppice
and how we decide that xx? for example for english it can be en, En, Eng, English etc? Sorry if its a stupid question because I am a beginnerCircus
Your answer worked for me except the fallback language scenario, app is getting fallback language always the previously used language and not english, my english value is present in Info.plist file though, also I have tried base.lproj as wellCircus
M
44

Step by step localize Info.plist:

  1. Find in the Xcode the folder Resources (is placed in root)
  2. Select the folder Resources
  3. Then press the main menu File->New->File...
  4. Select in section "Resource" Strings File and press Next
  5. Then in Save As field write InfoPlist ONLY ("I" (eye) capital and "P" capital - the l (ell) after the P should not be capital)
  6. Then press Create
  7. Then select the file InfoPlist.strings that created in Resources folder and press in the right menu the button "Localize"
  8. Then you Select the Project from the Project Navigator and select the The project from project list
  9. In the info tab at the bottom you can as many as language you want (There is in section Localizations)
  10. The language you can see in Resources Folder
  11. To localize the values ("key") from info.plist file you can open with a text editor and get all the keys you want to localize
  12. You write any key as the example in any InfoPlist.strings like the above example

"NSLocationAlwaysAndWhenInUseUsageDescription"="blabla";

"NSLocationAlwaysUsageDescription"="blabla2";

That's all work and you have localize your info.plist file!

Mortmain answered 9/3, 2019 at 13:36 Comment(4)
It is great advice: "Then in Save As field write InfoPlist ONLY ("I" capital and "P" capital)"Pixie
If you get lost in some step, I recommend this short YouTube video tutorial: youtube.com/watch?v=e-T_8jZTrv0Vanbuskirk
I had to place the InfoPlist.strings file in my project folder.. moved it out before and it stoped working.Lassa
please fix your post. there should be quotes in keyHaruspex
A
37

Tips

  1. Remember that the iOS Simulator exploits by default your system language. Please change the language (and region) in the iOS Simulator Setting too in order to test your translations.

  2. The localisation string (see Apple docs here) should be

    NSLocationWhenInUseUsageDescription = "Description of this";
    

    and not (with quote "...")

    "NSLocationWhenInUseUsageDescription" = "Description of this";
    
Answer answered 8/10, 2018 at 9:54 Comment(5)
Valuable additions, but I think this should be a comment under the respective answer, not a new answer. Also note that "363" is not a post identifier but the number of votes the answer has (the number has since changed).Fluorine
I have not 50 reputation to add a comment there.Answer
It doesn't matter whether you use quotes "..." around the key e.g: ("NSLocationWhenInUseUsageDescription"="description" is valid). It can be with or without.Lugubrious
Xcode 12.0.1 - keys with quotes work as well.Kristine
Keys with quotes have always worked fine. In fact, some keys MUST have quotes around them.Hear
B
32

For newer Xcode 12 / 13 /...

1. Create a new InfoPlist.string file in your project.

Select your project, click with the right button and select New File

Select the type of file 'Strings File'

Name it 'InfoPlist' and create it

2. Select your file, and you should see the right sidebar option "Localize"

Select Localize in the right sidebar

Done.

3. If you want add more languages in your project's Info >> Localizations

It will create automatically a copy of your "InfoPlist.string" for the new languages you add.

Add more languages to your project.

Butts answered 15/5, 2022 at 19:1 Comment(0)
A
24

If something is not working make sure you added:

"Localized resources can be mixed" = YES

into the info.plist. In my case the InfoPlist.strings files were just ignored.

Attired answered 12/5, 2015 at 13:16 Comment(1)
CFBundleAllowMixedLocalizationsTermite
C
15

You can use string catalog from,

Xcode 15 +

Simply create a String catalog file named InfoPlist.

enter image description here

enter image description here

enter image description here

enter image description here

Cockeyed answered 17/7, 2023 at 2:50 Comment(2)
Works fine with Flutter Xcode 15Serieswound
You have to build your project to fill this String Catalog with the empty keys from the Info.plist.Widow
D
14

I would highly recommend reading Apple's guides, and viewing the WWDC resources listed here: Internationalization and Localization Topics

To specifically answer your question, when you add a new language to your projectenter image description here, you get an opportunity to choose what InfoPlist files to include (if you have multiple targets, you'll have multiple Info plist files). All you need to do to get the following screen is hit the + under Localizations and choose a new language to add support for. enter image description here

Once you've added, it will create the necessary string files in the appropriate lproj directories for the given language.

--EDIT--

Just to be clear, iOS will swap out the string for your Plist file based upon the user's currently selected language using the plist entry's key as the key in the localized strings file.

Doronicum answered 9/9, 2014 at 4:46 Comment(3)
Translating the entire plist for just one key is an overkill. Find more info here: bit.ly/1yBUTruWelloff
It simply does not true for XCode 9. It nevers asks for plist localization when adding a new language.Tangency
I will need to look into that for Xcode 9 - have not had a chance to test in the new Xcode yet.Doronicum
A
9

In addition to the accepted answer (the project is on Flutter but it's basically the same as native):

I do have folders Base.lproj, en.lproj, xx.kproj. etc. with InfoPlist.strings in each. This file has lines like this (no quotes around the key and with a semicolon at the end):

NSLocationWhenInUseUsageDescription = "My explanation why I need this";

Check that you have your languages in your YourProject > Info: enter image description here

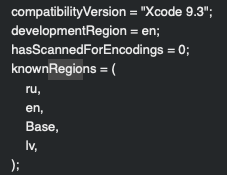
Also, check the project.pbxproj file, it is in XXX.xcodeproj/project.pbxproj: it should have all your languages in codes (en, fr, etc.)

enter image description here

But even then it didn't work. Finally, I noticed the CFBundleLocalizations key in the Info.plist file. (to open it as raw key-values in XCode - right mouse button on the Info.plist file -> Open As -> Source Code) Make sure that the values in array are codes rather than complete words, for example fr instead of French etc.

<key>CFBundleLocalizations</key>
<array>
    <string>en</string>
    <string>ru</string>
    <string>lv</string>
</array>

And double-check that your device is set to the language you're testing. Cheers

P.S. "Development Language" doesn't affect your issue, don't bother changing it.

Aftershock answered 15/10, 2020 at 21:39 Comment(1)
"no quotes around the key and with a semicolon at the end" - Xcode 12.0.1 - Actually, it works fine even if keys have quotes.Kristine
P
7

For anyone experiencing the problem of the info.plist not being included when trying to add localizations, like in Xcode 9.

You need make the info.plist localiazble by going into it and clicking on the localize button in the file inspector, as shown below.

The info.plist will then be included in the file resources for when you go to add new Localizations.

enter image description here

Pistol answered 17/10, 2017 at 22:46 Comment(4)
Did you encounter any problems? I can't build project when I add two languages to Localization since xcode is saying "The file info.plist couldn't be opened because there is no such file.Marillin
@Marillin I'm having the same issue now. Have you found a solution?Unintentional
@Unintentional skip this solution it doesn't work for me. Use InfoPlist.strings instead.Marillin
@Marillin Thank you that works. And also when testing with simulator, I had to change the language setting of simulator rather than that of my target for it to work.Unintentional
S
3

As RGML say, you can create an InfoPlist.strings, localize it then add your key and the value like this: "NSLocationWhenInUseUsageDescription" = "Help To locate me!";

It will add the key to your info.plist for the specified language.

Skyeskyhigh answered 19/12, 2014 at 13:23 Comment(0)
J
2

In my case everything was set up correctly but still the InfoPlist.strings file was not found.

The only thing that really worked was, to remove and add the InfoPlist.strings files again to the project.

Jellybean answered 8/11, 2016 at 11:25 Comment(0)
W
2

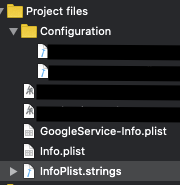
When using InfoPlist.strings file (in XCode it should be placed next to Info.plist file - real file location can be anywhere within the project probably

View in XCode

) be careful to use the key's short name for the translation.

I was trying to use Privacy - Camera Usage Description, but the working key is NSCameraUsageDescription

Withrow answered 15/4, 2020 at 17:46 Comment(0)
B
1

In my case the localization not worked cause of '-' symbol in the name. Example: "aero-Info.plist" And localized files: "aero-InfoPlist.strings" and "aeroInfoPlist.strings" did not work.

Bagpipe answered 4/4, 2019 at 9:26 Comment(1)
It's looking for "InfoPlist.strings" exactly. I believe adding a prefix is throwing it off unless you have the same prefix for the Info.plist file for your target and the project setting STRINGS_FILE_INFOPLIST_RENAME is enabled (developer.apple.com/documentation/xcode/…).Weigel
S
1

iOS localize .plist

You can skip defining the description key at all in .plist if you add a translation to the InfoPlist.strings files.

<lang>.lproj/InfoPlist.strings

"NSPhotoLibraryAddUsageDescription" = "You need to allow access to your photo library to download images.";
Sorcery answered 27/1, 2023 at 11:59 Comment(1)
You could, but as it says here "If a localized version of a key does not exist, the routines return the value stored in the Info.plist file." — so you should probably keep it in the plist file for languages you haven't localized for already.Weigel

© 2022 - 2024 — McMap. All rights reserved.