How to add Search bar with edit text in toolbar
Asked Answered
D

7

14

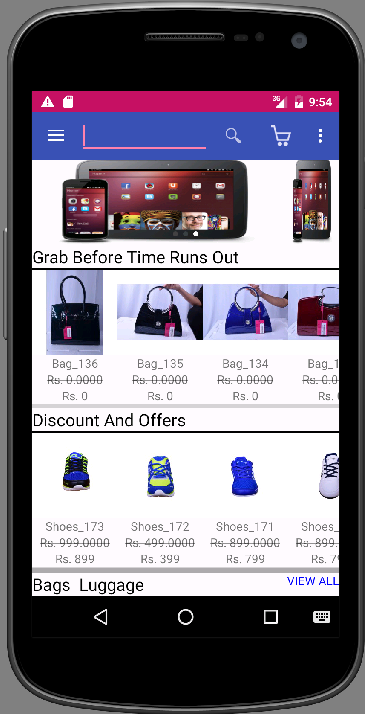
I want to add search bar with edit text in toolbar like below image enter image description here

My toolbar.xml:-

    <?xml version="1.0" encoding="utf-8"?>
<android.support.v7.widget.Toolbar xmlns:android="http://schemas.android.com/apk/res/android"
    xmlns:local="http://schemas.android.com/apk/res-auto"
    android:id="@+id/toolbar"
    android:layout_width="match_parent"
    android:layout_height="wrap_content"
    android:minHeight="?attr/actionBarSize"
    android:background="?attr/colorPrimary"
    local:theme="@style/ThemeOverlay.AppCompat.Dark.ActionBar"
    local:popupTheme="@style/ThemeOverlay.AppCompat.Light" >

    <EditText
        android:id="@+id/searchEditText"
        android:layout_width="match_parent"
        android:layout_height="wrap_content"
        android:layout_gravity="center"
        />

    </android.support.v7.widget.Toolbar>

After adding edit text in toolbar my toolbar show like this:-

enter image description here

Discant answered 21/10, 2015 at 4:19 Comment(2)
your desired image is first one but you are getting second one , actually you want something like first image . am i right?Achromatism
ok .. may be i got it ... wait pleaseAchromatism
A
14

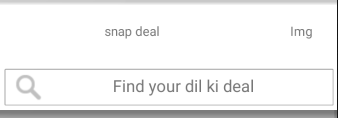
as my understanding I hope this code can help you...

<android.support.v7.widget.Toolbar
    android:id="@+id/toolbar"
    android:layout_width="match_parent"
    android:layout_height="wrap_content"
    android:elevation="10dp">

    <LinearLayout
        android:layout_width="match_parent"
        android:layout_height="match_parent"
        android:background="@color/gray_500"
        android:orientation="vertical"
        android:gravity="center|right">

        <LinearLayout
            android:layout_width="match_parent"
            android:layout_height="0dp"
            android:layout_weight="1"
            android:background="@color/white"
            android:orientation="horizontal"
            android:gravity="center|right">
            <TextView
                android:layout_width="0dp"
                android:layout_height="60dp"
                android:layout_weight="8"
                android:layout_margin="5dp"
                android:text="snap deal"
                android:gravity="center" >
            </TextView>

            <TextView
                android:layout_width="0dp"
                android:layout_height="60dp"
                android:layout_weight="2"
                android:layout_margin="5dp"
                android:ems="10"
                android:text="Img"
                android:gravity="center" >
            </TextView>


        </LinearLayout>
        <LinearLayout
            android:layout_width="match_parent"
            android:layout_height="0dp"
            android:layout_weight="1"
            android:background="@color/white"
            android:gravity="center|right">

            <EditText
                android:id="@+id/editMobileNo"
                android:layout_width="match_parent"
                android:layout_height="40dp"
                android:layout_margin="5dp"
                android:background="@drawable/login_edittext"
                android:ems="10"
                android:hint="Find your dil ki deal"
                android:drawableLeft="@drawable/search"
                android:gravity="center" >
            </EditText>

        </LinearLayout>

    </LinearLayout>

</android.support.v7.widget.Toolbar>

this is custom shape for EditText login_edittext.xml

 <?xml version="1.0" encoding="utf-8"?>
<selector xmlns:android="http://schemas.android.com/apk/res/android">
    <item>
        <shape>
            <gradient 
                android:angle="270"
                android:endColor="@color/white"
                android:startColor="@color/white" />
            <stroke 
                android:width="1dp"
                android:color="@color/gray_500" />
            <corners 
                android:radius="1dp" />
            <padding 
                android:bottom="10dp" 
                android:left="10dp" 
                android:right="10dp" 
                android:top="10dp" />
        </shape>
    </item>

</selector>

enter image description here

this is just sketch... you need to change back color ,size ,image etc.....

Achromatism answered 21/10, 2015 at 6:4 Comment(7)
Your android:background="@drawable/login_edittext" can you give me these fileDiscant
This work well but search bar override other icon and show top of the toolbar.Discant
is EditText top of the snap deal ?Achromatism
Yes EditText top of snap dealDiscant
How is it possible !!!.. i used linearlayout. did u copied exactly same code which i have posted..Achromatism
wait i provided you sanpshotDiscant
Let us continue this discussion in chat.Achromatism
D
11

I believe the view you are looking for is a SearchView. You can define on your menu.xml that you want to add it to your ActionBar/ToolBar. Like this:

<?xml version="1.0" encoding="utf-8"?>
<menu xmlns:android="http://schemas.android.com/apk/res/android"
    xmlns:app="http://schemas.android.com/apk/res-auto">
    <item
        android:id="@+id/search"
        android:icon="@drawable/search_icon"
        android:title="@string/search"
        app:actionViewClass="android.support.v7.widget.SearchView"
        app:showAsAction="always" />

</menu>

Back on your Activity or Fragment you can manipulate the search view behavior and looks:

@Override
public void onPrepareOptionsMenu(Menu menu) {
    super.onPrepareOptionsMenu(menu);
    MenuItem searchViewMenuItem = menu.findItem(R.id.search);
    searchView = (SearchView) searchViewMenuItem.getActionView();
    ImageView v = (ImageView) searchView.findViewById(android.support.v7.appcompat.R.id.search_button);
    v.setImageResource(R.drawable.search_icon); //Changing the image

    if (!searchFor.isEmpty()) {
        searchView.setIconified(false);
        searchView.setQuery(searchFor, false);
    }

    searchView.setQueryHint(getResources().getString(R.string.search_hint));
    searchView.setOnQueryTextListener(new SearchView.OnQueryTextListener() {
        @Override
        public boolean onQueryTextSubmit(String query) {
          //Do your search
        }

        @Override
        public boolean onQueryTextChange(String newText) {
            if(newText.isEmpty()) clearSearch();
            return false;
        }
    });
}

That is a simpler way to do it. The most advised way is to actually have an activity to respond to your search intents. For more info on that behalf visit: http://developer.android.com/intl/pt-br/guide/topics/search/search-dialog.html

Dill answered 21/10, 2015 at 4:50 Comment(1)
I am not talking about developing side i just want how to design my toolbar like i given snap deal imageDiscant
Y
3

Just add an edit text as part of your toolbar, something like this:

<android.support.v7.widget.Toolbar
    xmlns:android="http://schemas.android.com/apk/res/android"
    android:layout_width="match_parent"
    android:layout_height="wrap_content"
    android:background="@color/primaryColor"
    android:elevation="4dp">

    <EditText
        android:id="@+id/searchEditText"
        android:layout_width="match_parent"
        android:layout_height="wrap_content"
        android:layout_gravity="center"
        />

</android.support.v7.widget.Toolbar>
Yancey answered 21/10, 2015 at 4:23 Comment(4)
and how to add search image icon right side of edit textDiscant
add it as a regular item menu.Yancey
your question has completely changed. For what you want now, have a look at this link.Yancey
No my question is same i want same search box i given images aboveDiscant
E
0

you can directly place the searchview in your activity.xml inside your toolbar and initialize it.I guess you will get the desired layout .

Erikaerikson answered 19/3, 2016 at 6:27 Comment(0)
L
0

I like the TextEdit solution above for backward compatibility.

Here are two more things to consider to achieve the original example:

  1. On the Activity xml TextEdit definition add:

android:drawableStart="@android:drawable/ic_menu_search"

                               // To add the magnifying glass.

android:hint="@string/Search_Txt"

                              // To add the hint message.
  1. On the String xml file add:

    string name="Search_Txt">Find your dil ki deal

                             // Customize your message here.
    

Note: The SearchView alternative will require API 21.

Enjoy.

Larochelle answered 19/3, 2018 at 20:10 Comment(0)
A
0

Just add either one of this will hide the underline of edit text.

android:background="#fff"

or

android:background="@null"
Alienism answered 14/4, 2022 at 3:10 Comment(0)
E
0
you can follow this code: 

step 1:
make the menu and add an icon :
   <item android:id="@+id/search"
    android:title="Search  "
    android:icon="@drawable/search_ic"
    app:showAsAction="collapseActionView|ifRoom"
    app:actionViewClass="androidx.appcompat.widget.SearchView" />
step 2: in adapter file make on create option menu over ride:


     override fun onCreateOptionsMenu(menu: Menu): Boolean {
            menuInflater.inflate(R.menu.search_option, menu)
            val menuitem = menu.findItem(R.id.search)
            val searchView: SearchView = menuitem.actionView as SearchView
            searchView.queryHint = "Type here to search categories"
    
            searchView.setOnQueryTextListener(object : SearchView.OnQueryTextListener {
                override fun onQueryTextSubmit(query: String?): Boolean {
                    return false
                }
    
                @SuppressLint("NotifyDataSetChanged")
                override fun onQueryTextChange(newText: String?): Boolean {
    
    
                    templist.clear()
                    val searcktext = newText!!.toLowerCase(Locale.getDefault())
                    if (searcktext.isNotEmpty()) {
                        list.forEach {
    
                            if (it.eng_name.toLowerCase(Locale.getDefault())
                                    .contains(searcktext) || it.eng_name.toUpperCase(Locale.getDefault())
                                    .contains(searcktext)
                            ) {
                                templist.add(it)
                            }
                        }
                        resView2.adapter!!.notifyDataSetChanged()
    
                    } else {
                        templist.clear()
                        templist.addAll(list)
                        resView2.adapter!!.notifyDataSetChanged()
    
                    }
    
                    return false
                }
        })
            return super.onCreateOptionsMenu(menu)
        }
Eliseoelish answered 3/8, 2022 at 23:11 Comment(0)

© 2022 - 2024 — McMap. All rights reserved.