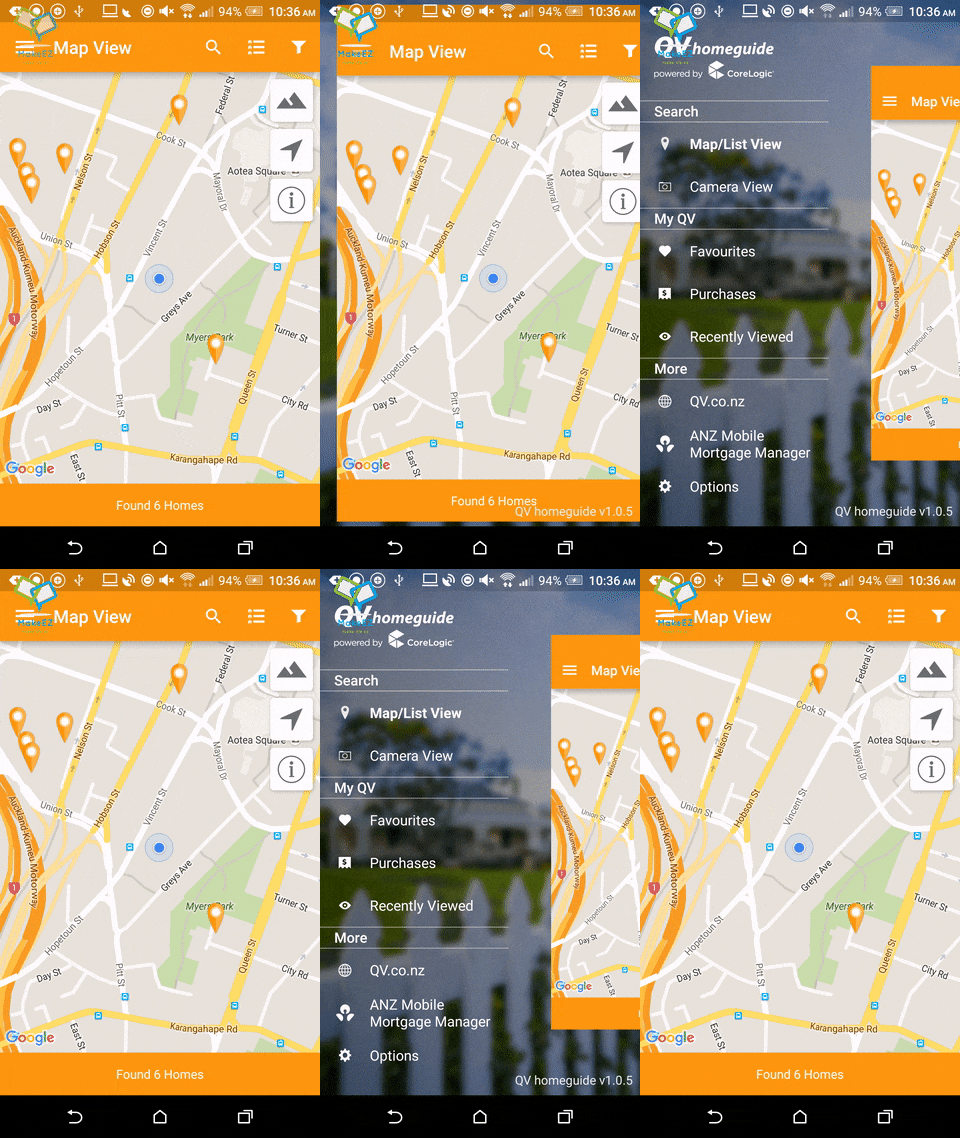
I just came across this app and saw this custom animation for a DrawerLayout.
I'm guessing it has to take a screenshot first, then draw a custom View in the Activity, but I'm not sure about that, nor the details.
Does anyone know how to do this?
You can do this by translating and scaling the content View in the onDrawerSlide() method of a DrawerListener on your DrawerLayout. Since the content View itself is resizing, and there's a separate TextView that appears in the bottom right corner, we'll stick both of these in another holder ViewGroup. If that label TextView isn't needed, the holder ViewGroup can be omitted, as well.
A basic DrawerLayout setup for the example:
<android.support.v4.widget.DrawerLayout
    xmlns:android="http://schemas.android.com/apk/res/android"
    android:id="@+id/drawer_layout"
    android:layout_width="match_parent"
    android:layout_height="match_parent"
    android:background="#222222">

    <RelativeLayout android:id="@+id/holder"
        android:layout_width="match_parent"
        android:layout_height="match_parent">

        <LinearLayout android:id="@+id/content"
            android:layout_width="match_parent"
            android:layout_height="match_parent"
            android:orientation="vertical">

            <android.support.v7.widget.Toolbar
                android:id="@+id/toolbar"
                android:layout_width="match_parent"
                android:layout_height="?attr/actionBarSize"
                android:background="#E97411" />

            <ImageView android:id="@+id/main_content"
                android:layout_width="match_parent"
                android:layout_height="0dp"
                android:layout_weight="1"
                android:background="#EEEEEE"
                android:src="@drawable/ic_launcher" />

        </LinearLayout>

        <TextView android:id="@+id/label"
            android:layout_width="wrap_content"
            android:layout_height="wrap_content"
            android:layout_alignParentBottom="true"
            android:layout_alignParentRight="true"
            android:visibility="gone"
            android:textSize="26dp"
            android:text="My App" />

    </RelativeLayout>

    <android.support.design.widget.NavigationView
        android:id="@+id/navigation_view"
        android:layout_width="240dp"
        android:layout_height="match_parent"
        android:layout_gravity="left"
        android:background="#555555" />

</android.support.v4.widget.DrawerLayout>
The example Activity shows the standard View initializations, and the DrawerListener that is actually doing the work.
public class MainActivity extends AppCompatActivity {

    private static final float END_SCALE = 0.7f;

    private DrawerLayout drawerLayout;
    private NavigationView navigationView;
    private Toolbar toolbar;
    private TextView labelView;
    private View contentView;

    @Override
    protected void onCreate(Bundle savedInstanceState) {
        super.onCreate(savedInstanceState);
        setContentView(R.layout.main);

        drawerLayout = (DrawerLayout) findViewById(R.id.drawer_layout);
        navigationView = (NavigationView) findViewById(R.id.navigation_view);
        toolbar = (Toolbar) findViewById(R.id.toolbar);
        labelView = (TextView) findViewById(R.id.label);
        contentView = findViewById(R.id.content);

        toolbar.setNavigationIcon(new DrawerArrowDrawable(this));
        toolbar.setNavigationOnClickListener(new OnClickListener() {
                @Override
                public void onClick(View v) {
                    if (drawerLayout.isDrawerOpen(navigationView)) {
                        drawerLayout.closeDrawer(navigationView);
                    }
                    else {
                        drawerLayout.openDrawer(navigationView);
                    }
                }
            }
        );

        drawerLayout.setScrimColor(Color.TRANSPARENT);
        drawerLayout.addDrawerListener(new DrawerLayout.SimpleDrawerListener() {
                @Override
                public void onDrawerSlide(View drawerView, float slideOffset) {
                    labelView.setVisibility(slideOffset > 0 ? View.VISIBLE : View.GONE);

                    // Scale the View based on current slide offset
                    final float diffScaledOffset = slideOffset * (1 - END_SCALE);
                    final float offsetScale = 1 - diffScaledOffset;
                    contentView.setScaleX(offsetScale);
                    contentView.setScaleY(offsetScale);

                    // Translate the View, accounting for the scaled width
                    final float xOffset = drawerView.getWidth() * slideOffset;
                    final float xOffsetDiff = contentView.getWidth() * diffScaledOffset / 2;
                    final float xTranslation = xOffset - xOffsetDiff;
                    contentView.setTranslationX(xTranslation);
                }

                @Override
                public void onDrawerClosed(View drawerView) {
                    labelView.setVisibility(View.GONE);
                }
            }
        );
    }
}
The example uses a SimpleDrawerListener, but the onDrawerSlide() method can be overridden similarly in an ActionBarDrawerToggle, if using that. The super method would need to be called, in that case, to preserve the hamburger-arrow animation.
Do note that DrawerLayout retains the drawer state during Activity recreation, so you might need to account for this when handing orientation changes, etc.
Drawer behavior is a library use Android DrawerLayout Support library as Parent Class [Easy to migrate], that provide an extra behavior on drawer, such as, move view or scaling view's height while drawer on slide.
If current project use Android DrawerLayout Support library and kinda boring with the effect. Then, just change the layout code and calling necessary method for animation/effect.
Gradle
dependencies {
   implementation 'com.infideap.drawerbehavior:drawer-behavior:0.1.5'
}
if the gradle unable to sync, you may include this line in project level gradle,
repositories {
 maven{
   url "https://dl.bintray.com/infideap2/Drawer-Behavior"
 }
}
© 2022 - 2024 — McMap. All rights reserved.


final float xTranslation = xOffset - xOffsetDiff;tofinal float xTranslation = xOffsetDiff - xOffset;and the rest works fine – Burkey