Add buttons to Mac window Title Bars, system-wide
Asked Answered
C

6

17

I want to be able to add a button to the title bar of all windows that open on a Mac.

The button will go on the right hand side, opposite the X - + buttons.

This is asked about windows of my app here:
How can I create Yosemite-style unified toolbar in Interface Builder?

But I want the button to appear on all windows, of any app, that are opened on the Mac. Obviously, this will only happen once the user has installed this program.

I understand that this is essentially "plugging into" the OS's UI, but I have seen other apps do this, which makes me feel that it is do-able.

Here is screenshot where I want the button:

Screenshot

Custer answered 31/3, 2012 at 12:0 Comment(2)
Just be careful where you add it- users with Mac OS X 10.7 and up will have a "Fullscreen" button on the right hand side. Make sure your button is moved to the left a bit.Refurbish
A useful related question: #3833741Allomerism
K
9

This is really a two-part question. As for how to get a button up there, I’d suggest using -[NSWindow standardWindowButton:] to get an existing window button and its superview (i. e. the title bar):

NSButton *closeButton = [window standardWindowButton:NSWindowCloseButton]; // Get the existing close button of the window. Check documentation for the other window buttons.
NSView *titleBarView = closeButton.superview; // Get the view that encloses that standard window buttons.
NSButton *myButton = …; // Create custom button to be added to the title bar.
myButton.frame = …; // Set the appropriate frame for your button. Use titleBarView.bounds to determine the bounding rect of the view that encloses the standard window buttons.
[titleBarView addSubview:myButton]; // Add the custom button to the title bar.

The plugging-in is probably easiest to do as a SIMBL plug-in.

Kalfas answered 31/3, 2012 at 13:32 Comment(3)
From what I can tell, using NSWindowCloseButton and similar is used to decide whether or not to show the standard buttons. The API isn't very helpful here, doesn't tell me what the method would return or anything. What I mean is, I'm not sure how I would use the standardWindowButton:] to place my own buttons, it seems to be for editing the existing ones.Custer
The API returns the requested buttons. You can use it to hide them, but you needn’t. In the example, an existing window button is used to find the view that encloses the standard window buttons (i. e. the title bar view). I’ve expanded my example and added comments. I’m not quite sure what you mean by “doesn't tell me what the method would return or anything”. The NSWindow class reference clearly does so.Kalfas
Thanks for adding the comments, I shall give it a go. (Will look into that SIMBL plug-in now as never heard of it before).Custer
D
16

The officially-supported way to add a title bar button in OS X 10.10 (Yosemite) and later is by creating an NSTitlebarAccessoryViewController and adding it to your window using -[NSWindow addTitlebarAccessoryViewController].

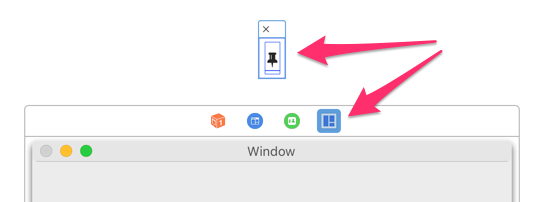
For example, I have a window that has a title bar accessory view:

demo window title bar

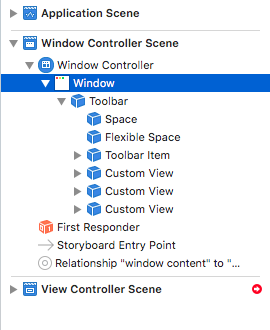
To set this up, I started by adding a standalone view to the window controller scene in my storyboard. (You don't have to use a storyboard but I did in this project.)

accessory view

My accessory view is an NSView with an NSButton subview. The button title uses Font Awesome to display the pushpin.

I connected the accessory view to an outlet (cleverly named accessoryView) in my NSWindowController subclass:

outlet connection

Then, in my window controller's windowDidLoad, I create the NSTitlebarAccessoryViewController, set its properties, and add it to the window:

@IBOutlet var accessoryView: NSView!
var accessoryViewController: NSTitlebarAccessoryViewController?

override func windowDidLoad() {
    super.windowDidLoad()
    createAccessoryViewControllerIfNeeded()
}

fileprivate func createAccessoryViewControllerIfNeeded() {
    guard self.accessoryViewController == nil else { return }
    let accessoryViewController = NSTitlebarAccessoryViewController()
    self.accessoryViewController = accessoryViewController
    accessoryViewController.view = accessoryView
    accessoryViewController.layoutAttribute = .right
    self.window?.addTitlebarAccessoryViewController(accessoryViewController)
}
Divulge answered 10/5, 2016 at 18:47 Comment(1)
For those of us still struggling with Swift, would you please add an Objective C version?Chink
S
13

This answer addresses the latest Xcode Version 9.3

  • Go to a storyboard.
  • Drag and drop a toolbar in the storyboard to a Window.

enter image description here

  • The toolbar will be visible below a title.

enter image description here

  • Locate the Window on the storyboard

enter image description here

  • Check "Hide Title" in properties of the Window.

enter image description here

  • The toolbar is a part of the title now.

enter image description here

Simmon answered 2/5, 2018 at 19:19 Comment(0)
K
9

This is really a two-part question. As for how to get a button up there, I’d suggest using -[NSWindow standardWindowButton:] to get an existing window button and its superview (i. e. the title bar):

NSButton *closeButton = [window standardWindowButton:NSWindowCloseButton]; // Get the existing close button of the window. Check documentation for the other window buttons.
NSView *titleBarView = closeButton.superview; // Get the view that encloses that standard window buttons.
NSButton *myButton = …; // Create custom button to be added to the title bar.
myButton.frame = …; // Set the appropriate frame for your button. Use titleBarView.bounds to determine the bounding rect of the view that encloses the standard window buttons.
[titleBarView addSubview:myButton]; // Add the custom button to the title bar.

The plugging-in is probably easiest to do as a SIMBL plug-in.

Kalfas answered 31/3, 2012 at 13:32 Comment(3)
From what I can tell, using NSWindowCloseButton and similar is used to decide whether or not to show the standard buttons. The API isn't very helpful here, doesn't tell me what the method would return or anything. What I mean is, I'm not sure how I would use the standardWindowButton:] to place my own buttons, it seems to be for editing the existing ones.Custer
The API returns the requested buttons. You can use it to hide them, but you needn’t. In the example, an existing window button is used to find the view that encloses the standard window buttons (i. e. the title bar view). I’ve expanded my example and added comments. I’m not quite sure what you mean by “doesn't tell me what the method would return or anything”. The NSWindow class reference clearly does so.Kalfas
Thanks for adding the comments, I shall give it a go. (Will look into that SIMBL plug-in now as never heard of it before).Custer
P
4

Swift 4 - In NSWindowController add the below code

if let window = window {
    let myButton = NSButton()
    myButton.title = "Help"
    myButton.bezelStyle = .rounded

    let titleBarView = window.standardWindowButton(.closeButton)!.superview!
    titleBarView.addSubview(myButton)
    myButton.translatesAutoresizingMaskIntoConstraints = false
    titleBarView.addConstraints(NSLayoutConstraint.constraints(withVisualFormat: "H:[myButton]-2-|", options: [], metrics: nil, views: ["myButton": myButton]))
    titleBarView.addConstraints(NSLayoutConstraint.constraints(withVisualFormat: "V:|-1-[myButton]-3-|", options: [], metrics: nil, views: ["myButton": myButton]))
}

Hope this is helpful.

Pascoe answered 25/6, 2019 at 6:0 Comment(1)
As of Catalina (10.15.6), Swift 5.2, and Xcode 11.6, this was the solution that I was able to make work.Jack
K
0

enter image description here

All you need is to call createTitleBarButtons().

import Foundation
import SwiftUI

fileprivate var windowBtnsAdded = false

extension NSWindow {
    func createTitleBarBtns() {
        guard windowBtnsAdded == false else { return }
        
        createToggleBackground()
        
        createToggleFloating()
        
        windowBtnsAdded.toggle()
    }
    
    fileprivate func createToggleFloating() {
        let titleBarView = self.standardWindowButton(.closeButton)!.superview!
        
        let btn = NSButton()
        btn.setButtonType(.toggle)
        btn.isBordered = false
        btn.action = #selector(toggleWndFloating(_:))
        
        btn.title = ""
        btn.image = NSImage(systemSymbolName: "pin.slash.fill", accessibilityDescription: nil)
        btn.alternateImage = NSImage(systemSymbolName: "pin.fill", accessibilityDescription: nil)
        
        titleBarView.addSubview(btn)
        
        // remember, you ALWAYS need to turn of the auto resize mask!
        btn.translatesAutoresizingMaskIntoConstraints = false
        
        NSLayoutConstraint.activate([
            btn.widthAnchor.constraint(equalToConstant: 15.0),
            btn.heightAnchor.constraint(equalToConstant: 15.0),
            btn.trailingAnchor.constraint(equalTo: titleBarView.trailingAnchor, constant: -10),
            btn.topAnchor.constraint(equalTo: titleBarView.topAnchor, constant: 7)
        ])
    }
    
    fileprivate func createToggleBackground() {
        let titleBarView = self.standardWindowButton(.closeButton)!.superview!
        
        let btn2 = NSButton()
        btn2.setButtonType(.toggle)
        btn2.isBordered = false
        btn2.action = #selector(toggleWndBg(_:))
        
        btn2.title = ""
        btn2.image = NSImage(systemSymbolName: "rectangle.portrait.fill", accessibilityDescription: nil)
        btn2.alternateImage = NSImage(systemSymbolName: "rectangle.portrait", accessibilityDescription: nil)
        
        titleBarView.addSubview(btn2)
        
        // remember, you ALWAYS need to turn of the auto resize mask!
        btn2.translatesAutoresizingMaskIntoConstraints = false
        
        NSLayoutConstraint.activate([
            btn2.widthAnchor.constraint(equalToConstant: 15.0),
            btn2.heightAnchor.constraint(equalToConstant: 15.0),
            btn2.trailingAnchor.constraint(equalTo: titleBarView.trailingAnchor, constant: -30),
            btn2.topAnchor.constraint(equalTo: titleBarView.topAnchor, constant: 7)
        ])
        
    }
    
    @IBAction func toggleWndBg(_ sender: AnyObject) {
        AppModel.shared.toggleClearBg()
    }
    
    @IBAction func toggleWndFloating(_ sender: AnyObject) {
        AppModel.shared.toggleFloating()
    }
}

#endif

Krugersdorp answered 20/8, 2023 at 10:32 Comment(0)
K
0

Native SwiftUI way:

import SwiftUI

struct ContentView: View {
    var body: some View {
        Text("Hello, World!")
            .toolbar {
                ToolbarItem {
                    Button("Save") { /* Save action */ }
                }
                ToolbarItem {
                    Button("Load") { /* Load action */ }
                }
            }
    }
}

enter image description here

or with custom placements:

import SwiftUI

struct ContentView: View {
    var body: some View {
        Text("Hello, World!")
            .toolbar {
                ToolbarItem(placement: .confirmationAction) {
                    Button("Save") { /* Save action */ }
                }
                ToolbarItem(placement: .navigation) {
                    Button("Home") { /* Load action */ }
                }
            }
    }
}

enter image description here

Krugersdorp answered 26/7 at 22:6 Comment(0)

© 2022 - 2024 — McMap. All rights reserved.