You don't have write permissions for the /Library/Ruby/Gems/2.3.0 directory. (mac user)
Asked Answered
B

38

470

below is what I need to do.

To run the specs, you'll need to install RSpec. First, run gem install bundler in the root directory of your project. Then, run bundle install. To run a single spec file, run a command like this: bundle exec rspec spec/00_hello_spec.rb. To run all of the specs at once, run bundle exec rspec.

So, I typed gem install bundler in Terminal, and got the error:

You don't have write permissions for the /Library/Ruby/Gems/2.3.0 directory.

and this was in the project file in atom

source "https://rubygems.org"
gem "rspec", "~> 3.2.0"

My question is:

It seems like terminal is giving me the response because I'm not supposed to change anything on ruby, and I need to bundle install inside of atom? Could anyone tell me how to use atom or run anything in atom?

Bathometer answered 1/7, 2018 at 19:32 Comment(5)
Simply use following command sudo chown -R $USER /Library/Ruby/Gems/Wite
Set global ruby version like this rbenv global 3.1.2 then it will work.Norby
@FaizFareed I tried this and am still getting the same error. Any ideas?Cite
@Cite you should update your system OS accordinglyWite
None of these worked for me but github.com/rbenv/rbenv/issues/1267#issuecomment-730126503 didAlgo
S
574

You are correct that macOS won't let you change anything with the Ruby version that comes installed with your Mac. However, it's possible to install gems like bundler using a separate version of Ruby that doesn't interfere with the one provided by Apple.

Using sudo to install gems, or changing permissions of system files and directories is strongly discouraged, even if you know what you are doing. Can we please stop providing this bad advice?

The solution involves two main steps:

  1. Install a separate version of Ruby that does not interfere with the one that came with your Mac.
  2. Update your PATH such that the location of the new Ruby version is first in the PATH. Some tools do this automatically for you. If you're not familiar with the PATH and how it works, it's one of the basics that you should learn, and you'll understand why you sometimes get "command not found" errors and how to fix them.

First, you will want to install Homebrew, which installs the prerequisite command line tools, and makes it easy to install other necessary tools.

Then, the two easiest ways to install a separate version of Ruby are:

If you would like the flexibility of easily switching between many Ruby versions [RECOMMENDED]

Choose one of these four options:

brew install chruby ruby-install

If you chose chruby and ruby-install, you can then install the latest Ruby like this:

ruby-install ruby

Once you've installed everything and configured your .zshrc or .bash_profile according to the instructions from the tools above, quit and restart Terminal, then switch to the version of Ruby that you want. In the case of chruby, it would be something like this:

chruby 3.1.3

Whether you need to configure .zshrc or .bash_profile depends on which shell you're using.

If you know for sure you don't need more than one version of Ruby at the same time (besides the one that came with macOS) [NOT RECOMMENDED]

Even if you think you won't need another version now, you will eventually and you won't be able to easily switch. This will cause confusion and headaches, which is why I don't recommend installing and managing Ruby with Homebrew.

If you choose to use Homebrew to install Ruby despite my warnings, you'll be on your own if you run into any issues.

  • Install ruby with Homebrew:
brew install ruby

Then update your PATH by running this command:

echo 'export PATH="/usr/local/opt/ruby/bin:/usr/local/lib/ruby/gems/3.1.0/bin:$PATH"' >> ~/.zshrc

The 3.1.0 in the command above assumes Homebrew installed a Ruby version that starts with 3.1. If it installed a different version, replace 3.1 with the first two digits of your Ruby version.

If you're on an M1/M2 Mac, replace /usr/local with /opt/homebrew

Then "refresh" your shell for these changes to take effect:

source ~/.zshrc

Or you can open a new terminal tab, or quit and restart Terminal.

Replace .zshrc with .bash_profile if you are using Bash. If you're not sure, read my guide to find out which shell you're using.

To check that you're now using the non-system version of Ruby, you can run the following commands:

which ruby

It should not be /usr/bin/ruby

ruby -v

It should be 3.1.3 or later.

Once you have this new version of Ruby installed, you can now install bundler (or any other gem):

gem install bundler
Stamm answered 25/2, 2019 at 20:12 Comment(12)
if you're like me and you use zsh (or another shell other than bash), there is an extra step! After installing rbenv you have to do echo 'eval "$(rbenv init -)"' >> ~/.bash_profile. SourceBateman
If you face a permission error on /usr/local directory, run sudo chown -R $(whoami) $(brew --prefix)/*. See this thread for more infoHollington
Since MacOS is encouraging people to switch to zsh, you should also apply the change to ~/.bash_profile to ~/.zshrc.Seat
I installed ruby with rbenv, and which ruby does return /usr/bin/ruby. Should I find where the new (rbenv installation) of ruby is located and update the PATH so that location appears before the Mac installation?Sericin
Except of course... "you don't have write permissions for the /Library/Ruby/Gems/2.6.0 directory.Slantwise
@Stamm I followed your steps.. following is the output: $ which ruby /usr/local/opt/ruby/bin/ruby $ ruby -v ruby 3.1.1p18 (2022-02-18 revision 53f5fc4236) [x86_64-darwin21] HOWEVER, when I try to install cocoapods using: $ gem install cocoapods I get: ERROR: While executing gem ... (Errno::EACCES) Permission denied @ dir_s_mkdir - /Users/omkarbojjawar/.local/share/gem/specs Please help.Rota
If you are on Monterey on a M1 Mac the echo command should look like this: echo 'export PATH="/opt/homebrew/Cellar/ruby/3.1.1/bin:$PATH"' >> ~/.zshrc Lajoie
For me ruby-v gives the version of the macOS ruby. Is there a way i can check which version of ruby is installed by homebrew?Cypher
Please search for @Mick answer regarding rebenv. This should be the accepted answer!Gwendolin
Had to brew install xz before ruby-install ruby before it failed with xzcat: command not foundHandicraftsman
For me on M1 ruby-install gave architecture error Undefined symbols for architecture arm64 _rb_arithmetic_sequence_extract referenced from... Found the article rubyonmac.dev/how-to-install-ruby-on-macos-12-6-apple-silicon which suggested to use a flag like this: ruby-install 3.1.2 -- --enable-shared And it workedJensen
Thanks, Simon. I wrote that article, but I forgot to update this answer. However, now that Ruby 3.1.3 is released, that workaround is no longer needed.Stamm
H
310

Worked for me using the parameter --user-install running following command:

gem install name_of_gem --user-install

Install in user's home directory instead of GEM_HOME

https://guides.rubygems.org/command-reference/#gem-install

RubyGems’ default local repository can be overridden with the GEM_PATH and GEM_HOME environment variables. GEM_HOME sets the default repository to install into. GEM_PATH allows multiple local repositories to be searched for gems.

Edit

There was one gem I still could not install (it required the Ruby.h headers of the Ruby development kit or something), then I tried the different version managers, but somehow that still did not really work as it was stated in the documentations how to just install and switch (it did just not switch the versions). Then I removed all the installed version managers and installed afterwards with brew install ruby the latest version and did set the PATH variable, too. (It will be mentioned after the installation of ruby from brew), which worked.

Hamal answered 15/11, 2019 at 13:47 Comment(1)
This worked well for me; I just needed to also add the bin path (~/.gem/ruby/2.6.0/bin in my case) to my $PATH. Didn't need to install an extra Ruby or pay for the current top answer's installation script.Strage
G
168

If you don't want to run sudo then install ruby using homebrew

brew install ruby
export GEM_HOME="$HOME/.gem"
gem install rails

You may want to add export GEM_HOME="$HOME/.gem" to your ~/.bash_profile or .zshrc if you're using zsh

Note: RubyGems keeps old versions of gems, so feel free to do some cleaning after updating:

gem cleanup
Goffer answered 27/12, 2018 at 19:8 Comment(8)
didnt help on Catalina OS 😐Appendicle
Rails is not currently installed on this system. To get the latest version, simply type: $ sudo gem install rails You can then rerun your "rails" commandAppendicle
It sounds like you are trying run a rails command. The last two commands I have do not run rails command. Try to open a new terminal outside of your project then copy last two lines of my answer one by one.Goffer
don't forget to source ~/. zshrc (or ~/.bash_profile)Hanser
Working for me on Catilina 10.15.4, I did remove rvm rbenv and then installed rbenv. Then updated my .zshrc , sourced it(aka $ source ~/.zshrc) and then rails installed flawlessly. Thanks for the PATH correction.Appressed
This worked for me - I use Catalina as well. I didn't want the messiness of using sudo, so thanks!Correlation
It works on macOS Catalina 10.15.7 Thank you!Loose
This worked for me. After I use this command export GEM_HOME="$HOME/.gem"Incantatory
L
128

Just export GEM_HOME:

export GEM_HOME="$HOME/.gem"

And then try:

gem install cocoapods
Lagas answered 1/7, 2021 at 10:55 Comment(12)
As someone who used RVM to install Ruby and Rails on OSX, this worked well for me and is much simpler than the other posted solutions.Typhoeus
ERROR: While executing gem ... (Errno::EACCES) Permission denied @ dir_s_mkdir - /Users/kanchan/.local/share/gem/specsAnnecorinne
give permission to the specified directory.Lagas
Have you resolved the issue @WannaBeGeek? @MuhammadNaeemParacha can you guide me on how to allow that permission?Rota
sudo chown -R /Users/kanchan/.local/share/gem/*Lagas
@MuhammadNaeemParacha it didn't work.. here's my code: sudo chown -R /Users/myName/.local/share/gem/* Password: usage: chown [-fhnvx] [-R [-H | -L | -P]] owner[:group] file ... chown [-fhnvx] [-R [-H | -L | -P]] :group file ... Please help.Rota
what's the error now ?Lagas
@MuhammadNaeemParacha after doing $ sudo gem install cocoapods it says Successfully installed cocoapods-1.11.3. However while I run or use Flutter doctor, I get [!] Xcode - develop for iOS and macOS (Xcode 13.3) • Xcode at /Volumes/ssd/Applications/Xcode.app/Contents/Developer ✗ CocoaPods not installed.Rota
After installing the latest ruby version with rbenv, this was the easiest way to fix the permission issue when installing global gems.Vapid
You're an absolute lifesaver. So much easier than the other posted solutionsBacciferous
Please correct your answer with description of what would happen after making this code.Nuriel
Literally spent 2-3 hours before finding this solution :) Thanks @MuhammadNaeemParachaStaphylo
P
92

As @idleberg mentions, on Mac OS, it is best to install rbenv to avoid permissions errors when using manually installed ruby.

Installation

$ brew update
$ brew install rbenv

Add the following in .bashrc file:

eval "$(rbenv init -)"

Now, we can look at the list of ruby versions available for install

$ rbenv install -l

Install version 2.3.8 for example

$ rbenv install 2.3.8

Now we can use this ruby version globally

$ rbenv global 2.3.8

Finally run

$ rbenv rehash
$ which ruby
/Users/myuser/.rbenv/shims/ruby
$ ruby -v
ruby 2.3.7p456 (2018-03-28 revision 63024) [x86_64-darwin17]

Go for it

Now install bundler

$ gem install bundler

All done!

Pariah answered 26/2, 2021 at 3:40 Comment(2)
This should be the accepted answer.Abnaki
I agree with youReimburse
S
23

Try this:

sudo gem install cocoapods --user-install

Worked for me

Societal answered 18/2, 2021 at 13:8 Comment(4)
This is the only method that's worked for me. Tried installing rbenv and used multiple Ruby versions without any progress.Willettewilley
Warning: This can cause problems in the future.Markham
works for me dear.Prosper
Perfect! Got mine working with this.Fricative
M
15

It's generally recommended to use a version manager like rbenv or rvm. Otherwise, installed Gems will be available as root for other users.

If you know what you're doing, you can use sudo gem install.

Millwater answered 2/7, 2018 at 15:10 Comment(0)
A
14

You don't have write permissions for the /Library/Ruby/Gems/2.3.0 directory.

In my case, the issue was related to ruby access some how the ruby path was messed up in my system.

The below steps helped me resolve the problem

  1. Open the terminal

  2. Install ruby using homebrew

[for fresh install] brew install ruby

[for reinstalling] brew reinstall ruby

  1. Check the path of ruby using the below command

    which ruby

  2. It should be installed in the below path

    /usr/bin/ruby

  3. To change the ruby path to the user path

To check which shell is used by your system

echo $0

-zsh

For zshrc

echo 'export PATH="/usr/local/opt/ruby/bin:$PATH"' >>~/.zshrc

For bash

echo 'export PATH="/usr/local/opt/ruby/bin:$PATH"' >>~/~/.bashrc

  1. Quit and relaunch the terminal

  2. After changing the path with step 5

  3. Check for the path of the ruby again (execute step 3 - please make sure the path displays as given below)

/usr/local/opt/ruby/bin/ruby

[if you don't quit and launch the terminal, step 4 path will be shown]

  1. This step may not be applicable to everyone can skip step 10 & 11, if you have the correct Cocoapods version installed

Check the version of the pod installed

pod --version

  1. Uninstall the specific version of Cocoapods using the below command

In case the version installed is 1.11.0

gem uninstall cocoapods -v 1.11.0

  1. Install the Cocoapods of the specific version

    gem install cocoapods -v 1.11.0

  2. Change the path to the Project directory cd {path of the project directory}

  3. Install the bundler in the project directory

bundle install

  1. Execute pod install

pod install

Arbitress answered 5/12, 2022 at 3:40 Comment(3)
In M1 chip - I got the issue. After step 5 path was not changed a nd again it is showing the step 4 always. What can I do? I have reopened he terminal after quit. but no use. Any specific cmd we use to change the path.Overbid
My ruby installed version is ruby 2.6.8p205 (2021-07-07 revision 67951) [universal.arm64e-darwin21]Overbid
You are herooo!Buseck
S
10

Run this

$ rbenv init
# Load rbenv automatically by appending
# the following to ~/.zshrc:

eval "$(rbenv init -)"

Follow instructions, (in my case add to ~/.zshrc) ;)


Also important: Changes only take effect if you reboot your console. Two options

  • Enter source <modified file>
  • close and open again
Spider answered 24/9, 2019 at 22:0 Comment(2)
I upgraded to Catalina (which switches from bash to zsh) and I forgot to copy everything from .bash_profile over to .zshrcRubiaceous
This works! Don't use sudo! In case you don't use ZSH, you can add this to your .profile or .bash_profile. A great way to check if this works is to use which ruby, it should point to a path which has rbenv and not to /usr/local/ruby.Steeve
R
9

PLEASE USE SUDO WITH CARE!!!!!! ONLY IF YOU KNOW WHAT YOU ARE DOING!!!!!!!!!!!!

I have faced same issue after install macOS Catalina. I had try below command and its working.

sudo gem update
Relations answered 12/8, 2019 at 7:39 Comment(2)
By far the simplest solution for anyone who doesn't want to do a full-blown installation of ruby + package managers + etc etc.Maxey
You should never ever use sudo to install any kind of development dependencies you don't have control over.Marlinemarlinespike
C
8

Tested on M1 MacBook Air (assuming Homebrew installed)

Following to the top answer, we can run:

brew install chruby ruby-install

To install the latest stable ruby:

ruby-install ruby

Then get the version number by running:

chruby

In your ~/.zshrc file:

export PATH=/opt/homebrew/bin:$PATH
source /opt/homebrew/opt/chruby/share/chruby/chruby.sh
source /opt/homebrew/opt/chruby/share/chruby/auto.sh
chruby 3.1.2

The "3.1.2" is the output I got when running chruby. Make sure you add that one line at the end.

Remember to restart the terminal each time you install a new gem.

Courser answered 2/7, 2022 at 6:47 Comment(0)
R
7

To fix this, I ran

brew reinstall ruby

which showed me this message

==> Caveats
==> ruby
By default, binaries installed by gem will be placed into:
  /opt/homebrew/lib/ruby/gems/3.1.0/bin

You may want to add this to your PATH.

ruby is keg-only, which means it was not symlinked into /opt/homebrew,
because macOS already provides this software and installing another version in
parallel can cause all kinds of trouble.

If you need to have ruby first in your PATH, run:
  echo 'export PATH="/opt/homebrew/opt/ruby/bin:$PATH"' >> ~/.profile

So I added these two lines to my ~/.bashrc file

export PATH="/opt/homebrew/opt/ruby/bin:$PATH"
export PATH="/opt/homebrew/lib/ruby/gems/3.1.0/bin:$PATH"

Then I opened a new Terminal.app window and ran my gem install command again and it worked.

Righteousness answered 8/2, 2022 at 12:56 Comment(0)
C
6

Try 1 or 2

1 - $ gem install cocoapods
2 - $ sudo gem install cocoapods

if it doesn't work, then export GEM_HOME:

export GEM_HOME="$HOME/.gem"

And try again:

gem install cocoapods

Remember the oficial doc says you can use sudo (https://guides.cocoapods.org/using/getting-started.html#getting-started).

Calamint answered 27/4, 2021 at 2:16 Comment(2)
export GEM_HOME="$HOME/.gem" worked for meHutto
WOW... This worked for me export GEM_HOME="$HOME/.gem"Kobarid
K
5

If you have installed ruby separately and installed ruby using rbenv/rvm you budler might point to different versions.

try

gem env home

and

ruby -v

both should point to same version.check you have installed ruby using rbenv/rvm, If so delete the ruby version you installed separately.

In order for gem to work, you must invoke rbenv,

rbenv shell <ruby version> 

and

rbenv global <ruby version>

I am not sure how RVM works. Let me know if this works.

Kit answered 27/11, 2019 at 5:34 Comment(2)
was missing setting the shell and global. Why isn't that in rbenv instructions 🤔Ginetteginevra
Not sure, why this was missed, I was able to find out after trying out.Kit
H
4

I deleted those directories by using the below command

sudo rm -rf \
  /Library/Ruby/Gems/2.6.0/{build_info,cache,doc,extensions,gems} \
  /Library/Ruby/Gems/2.6.0/specifications/*.gemspec \
  /Library/Ruby/Site

then installed cocoa pods using sudo gem install cocoapods and it worked for me. Thanks

Haycock answered 14/6, 2022 at 6:26 Comment(1)
This solved my problem when install gollum and cocoapodsGuarantor
J
4

After install rbenv ,I also have this problem , add this line in my .bashrc :

eval "$(rbenv init -)"

solved my problem.

Joesphjoete answered 9/8, 2022 at 3:7 Comment(0)
R
4

I also struggled with this Ruby problem and finally found an easy and working solution for Mac with M1 chip.

To install Ruby I used a simple ruby manager called chruby (https://github.com/postmodern/chruby#readme)

Steps:

  1. Install Homebrew (video guide here: https://youtu.be/IWJKRmFLn-g)
  2. Install chruby with command:
brew install chruby ruby-install 
  1. Install the latest ruby version with command:
ruby-install ruby
  1. Edit .zshrc file. You can use nano or any other text editor. .zshrc file is located in root directory and is a hidden file. This file is responsible for Terminal commands.
nano ~/.zshrc
  1. Add these two lines to .zshrc file and save it. Instead of 3.2.2 put Ruby version you installed in Step 3. It will make Terminal use selected version of Ruby.
source /opt/homebrew/opt/chruby/share/chruby/chruby.sh
chruby 3.2.2
  1. Close and reopen Terminal
  2. Check which version of Ruby is currently in use with command:
ruby -v
Riarial answered 3/10, 2023 at 16:18 Comment(0)
I
3

For latest OS versions

  1. First run sudo xcode-select --switch /
  2. sudo gem install cocoapods --user-install

this did it for me

Internalize answered 24/8, 2022 at 10:57 Comment(1)
Thank you, you solution works with me, I was looking for this answer to fix cocoapods on my mac!Kirkwood
S
3

for Mac OS 12 and above also for 13 Xcode 14 and above

first you call

export GEM_HOME="$HOME/.gem" after that gem install cocoapods

home its help you ☺️

Selfanalysis answered 16/11, 2022 at 8:57 Comment(1)
Lifesaver... quick and effective.Gilgilba
R
2

TL;DR

In several occasions, I've solved this kind of errors by just closing my terminal session and opening a new one before retrying the failing command.

Long explanation

In some SOs (such as MacOS) there is already a pre-installed, system-wide version of ruby. If you are using a version manager, such as rbenv or asdf, they work by playing with the environment of your current session so that the relevant commands point to the binaries installed by the version manager.

When installing a new binary, the version manager installs it in a special location, usually somewhere under the user's home directory. It then configures everything in your PATH so that you get the freshly installed binaries when you issue a command, instead of the ones that came with your system. However, if you don't restart the session (there are other ways of getting your environment updated, but that's the easiest one) you don't get the new configuration and you will be using the original installation.

Reshape answered 19/1, 2021 at 23:6 Comment(0)
R
2

Had the same error because I forgot to run the following after installing ruby:

source ~/.zshrc - or other ~/...rc file depending on your terminal

Rihana answered 3/3, 2022 at 13:3 Comment(0)
A
2

rbenv global 2.6.3 helped me solve this problem.

Aggregation answered 31/3, 2022 at 12:24 Comment(0)
W
1

A different installation of ruby should be used. I use rbenv for that purpose.

# install your version of ruby
$ rbenv install 2.0.0-p247

# modify .ruby_version on current directory
$ rbenv local 2.0.0-p247

# proceed installing gems
$ gem install bundler

Disclamer: I am not a ruby person. This worked for me and if you are a ruby expert and see things to change in this answer, please, go ahead or comment!

Weismannism answered 28/12, 2020 at 17:39 Comment(0)
N
1

I was using the below command to install fastlane but didn't worked

gem install fastlane -NV

So using sudo to install gems worked for me and it would be like

sudo gem install fastlane -NV

Numinous answered 11/8, 2021 at 12:4 Comment(0)
F
1
  1. Install homebrew by passing this into your terminal

    /bin/bash -c "$(curl -fsSL https://raw.githubusercontent.com/Homebrew/install/HEAD/install.sh)"

  2. Install cocoapods using brew

    brew install cocoapods

Featly answered 5/1, 2022 at 7:12 Comment(0)
G
1

I try it, and work to me export PATH=/opt/homebrew/opt/ruby/bin:/opt/homebrew/lib/ruby/gems/3.0.0/bin:$PATH export LDFLAGS="-L/opt/homebrew/opt/ruby/lib" export CPPFLAGS="-I/opt/homebrew/opt/ruby/include" gem install ffi

Gambrel answered 20/2, 2022 at 16:9 Comment(0)
S
1

First, run the following command to install Ruby Gems in your user directory:

gem install activesupport -v 6.1.7.3 --user-install

Sicilia answered 12/6, 2023 at 13:35 Comment(0)
S
1

What solved the issue for me: add to your ~/.bash_profile or ~/.zshrc

eval "$(rbenv init -)"

Then Ruby version of local directory is picked correctly instead of system Ruby version being picked. And I was able to install bundler

Sanguine answered 20/9, 2023 at 12:59 Comment(0)
C
0

Solution for Mac

  1. Install/update RVM with last ruby version

    \curl -sSL https://get.rvm.io | bash -s stable

  2. Install bundler

    gem install bundler


after this two commands (sudo) gem install .... started to work

Corked answered 15/8, 2019 at 23:53 Comment(1)
may need to also specify rvm use <version>Rawdin
S
0

Solution for MAC. run the command

sudo gem update    

then type your Mac password when prompted

Sexy answered 1/2, 2021 at 7:29 Comment(0)
T
0

After trying the previous approaches, this worked for me on Big Sur:

sudo gem install -n /usr/local/bin cocoapods
Thermoelectricity answered 27/4, 2021 at 16:46 Comment(1)
This worked for me using macOS 11.6. ThanksBucko
N
0

After install ruby with rbenv you also need to set global ruby. For that you can do like, rbenv global 3.2.1 then install bundler with gem install bundler. It will work.

Norby answered 23/6, 2022 at 2:58 Comment(0)
S
0

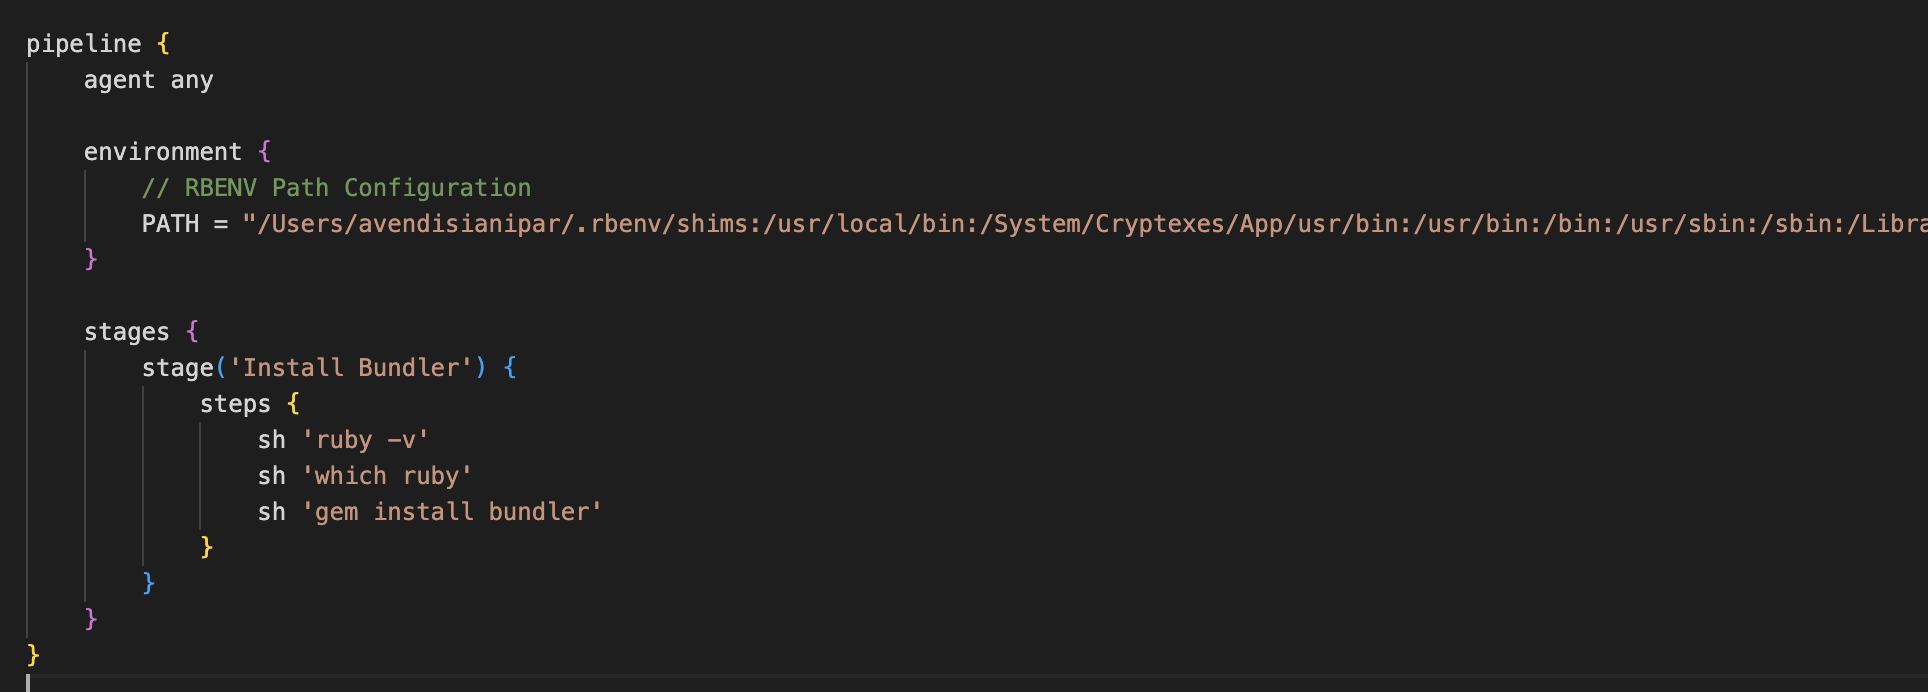
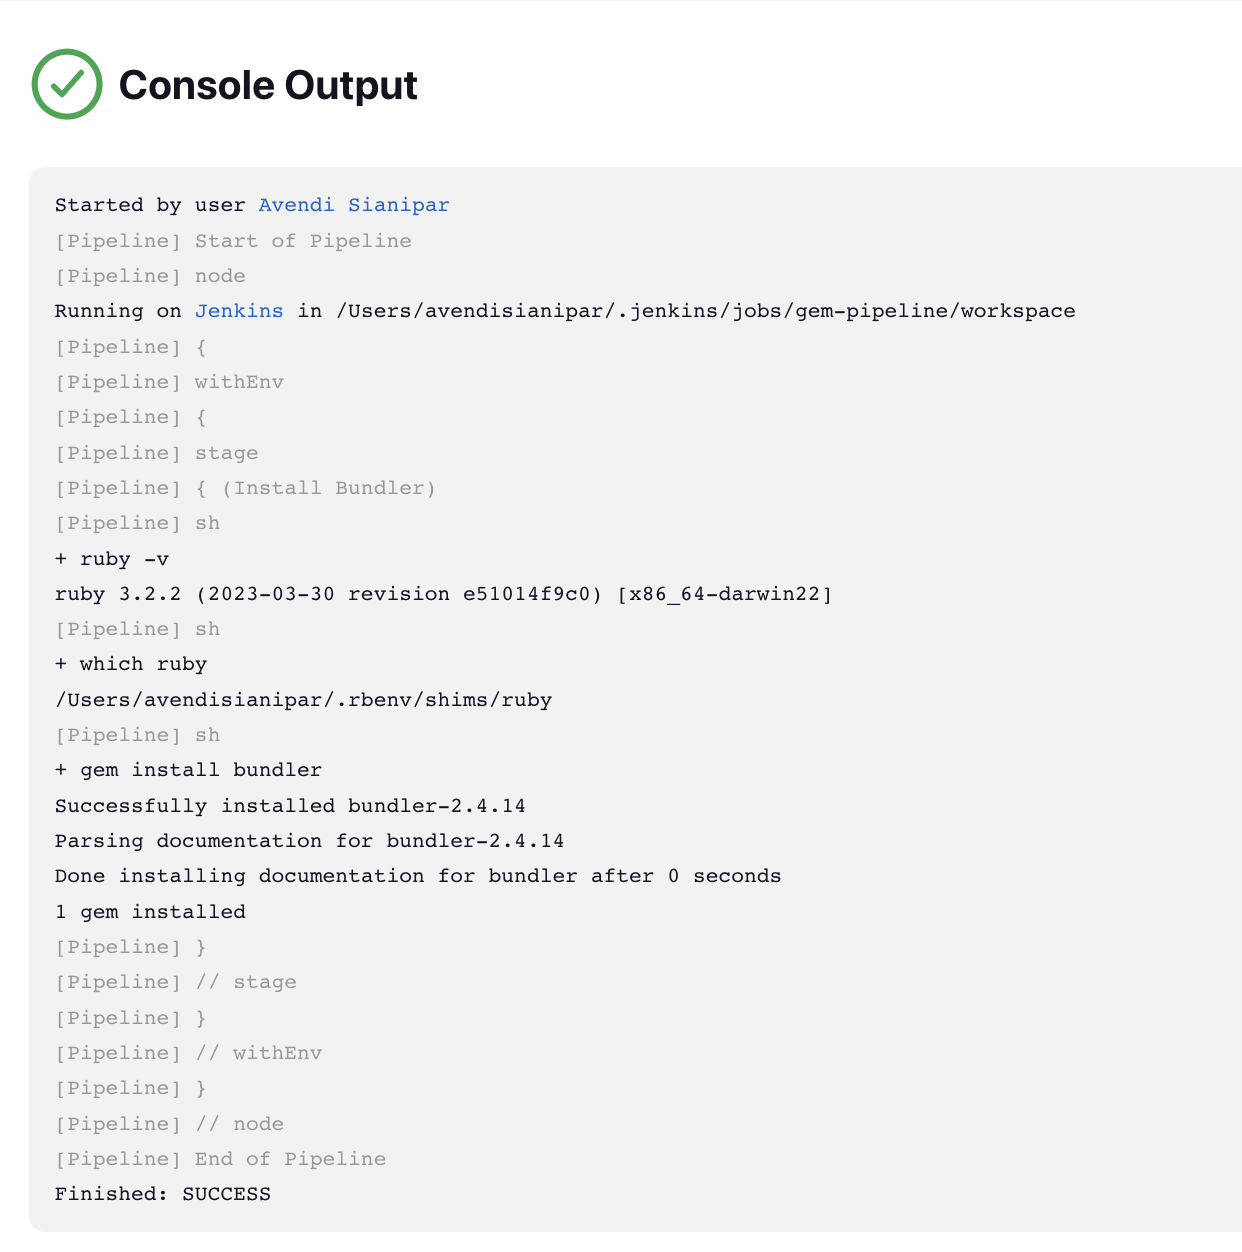
I messed up with this problem for a few days, finally its working well, thanks to the inspiration from:

  1. BlackRainbow - Setup Jenkins $PATH variable
  2. Moncef Belyamani - Why You Should Never Use sudo to Install Ruby

What Exactly I Do:

  1. Used rbenv to manage my Ruby environment
  2. Open terminal and execute echo $PATH
  3. Copy the result and paste to Jenkinsfile
  4. Re-try to build your pipeline
  5. Thats it, and its working well in my enviroment

Attachment:

Step 1-2 To Configure Ruby & Get Path Env -


Step 2-3 To Configure Jenkinsfile -


Step 4 Build Pipeline -

Seiler answered 25/6, 2023 at 15:20 Comment(0)
R
0

I created a Kotlin Multiplatform App for the first time and got CocoaPods not installed error during the Build time by Android Studio. Then, I wanted to install CocoaPods for using the KMM project;

sudo gem install cocoapods 

When I tried to install it by the Terminal, I got this error:

You don't have write permissions for the /System/Library/Frameworks/Ruby.framework/Versions/2.6/usr/lib/ruby/gems/2.6.0 directory directory

Solution First, you should run this command in the Terminal:

brew install ruby-install chruby

Second, to enable auto-switching of Rubies specified by ruby-version files, add the following to ~/.bash_profile or ~/.zshrc:

source /opt/homebrew/opt/chruby/share/chruby/auto.sh
source /opt/homebrew/opt/chruby/share/chruby/chruby.sh

Third, check the Ruby stable versions and then add the following to ~/.bash_profile or ~/.zshrc:

chruby  ruby-3.3.0

Fourth, install the Ruby:

ruby-install --latest ruby  

Now, you have to restart your terminal and then install CocoaPods :

sudo gem install cocoapods 
Retrospective answered 16/3, 2024 at 17:46 Comment(0)
V
-1

I'm using Mojave with rbenv, this solution works for me:

$ vi ~/.bash_profile

Add this line into the file:

if which rbenv > /dev/null; then eval "$(rbenv init -)"; fi
Vergara answered 5/6, 2020 at 4:24 Comment(0)
N
-1

You need to install rbenv and maintain ruby versions under rbenv.

  1. brew install rbenv
  2. rbenv init
  3. append eval "$(rbenv init -)" to ~/.bash_profile
  4. rbenv install {stable_version_#} you can get version number using rbenv install -L
  5. rbenv global {your_preferred_version_#} command use to switch to ruby versions
  6. rbenv shell {your_preferred_version_#}
  7. gem install {whatever you want gems}

More detail https://github.com/rbenv/rbenv

Neilneila answered 17/7, 2021 at 9:5 Comment(0)
B
-2

This worked for me on Mac

sudo chown -R $(whoami) $(brew --prefix)/*

Backbend answered 21/5, 2020 at 13:55 Comment(0)
A
-2

Simply doing sudo gem uninstall cocoapods worked for me.

Atheistic answered 22/9, 2020 at 21:44 Comment(0)

© 2022 - 2025 — McMap. All rights reserved.