Drop cap with NSAttributedString
Asked Answered
A

6

19

I would like to do a drop cap first character in a UILabel using the attributedText NSAttributedString property only. Like this:


(source: interpretationbydesign.com)

I have experimented with adjusting the base line for the range of the first character to a negative value, and it works for aligning the top of the first char with the top of the rest of the first line. But I have not found any way to make the other lines flow to the right of the drop capped character.

Can this be solved using NSAttributedString only, or do I have to split the string and render it myself using Core Text?

Appalachian answered 8/1, 2013 at 12:24 Comment(2)
Can you put a screenshot of what you managed to achieve so far? And the testing code?Mohair
I use Drop cap strings in my application, but to do it, I used a UIWebView and used HTML to do that effect. I'm not sure it can be done in a UILabelAutoroute
E
7

CoreText cannot do drop caps because it consists of lines made up of glyph runs. A drop cap would cover multiple lines which is not supported.

To achieve this effect you would have to draw the cap separately and then draw the rest of the text in a path that goes around it.

Long story short: not possible in UILabel, possible, but a fair bit of work with CoreText.

The steps to do it with CoreText are:

  • create a framesetter for the single character.
  • get its bounds
  • create a path that spares out the frame of the drop cap
  • create a framesetter for the remaining characters with this path
  • draw first glyph
  • draw rest
Entresol answered 15/1, 2013 at 6:42 Comment(2)
I am not looking to do it with a UILabel, I want to do it with Core Text, but using just a NSAttributesString. Not several frame setters, or a frame setter with a path.Appalachian
As I said, that's not possible with a single attributed string. See my CoreText intro to understand how framesetting works. cocoanetics.com/2011/01/befriending-core-textEntresol
M
15

As everyone else mentioned, it's not possible to do this with only NSAttributedString. Nikolai has the right approach, using CTFrameSetters. However it is possible to tell the framesetter to render text in a specific area (i.e. defined by a CGPath).

You'll have to create 2 framesetters, one for the drop cap and the other for the rest of the text.

Then, you grab the frame of the drop cap and build a CGPathRef that runs around the space of the frame of the drop cap.

Then, you render both framesetters into your view.

I've created a sample project with an object called DropCapView which is a subclass of UIView. This view renders the first character and wraps the remaining text around it.

It looks like this:

dropcap on ios

There are quite a few steps, so I've added a link to a github project hosting the example. There are comments in the project that will help you along.

DropCap project on GitHub

You'll have to play around with the shape of the textBox element (i.e. the CGPathRef) for padding around the edges of the view, and to tighten it up to the drop cap letter as well.

Here are the guts of the drawing method:

- (void)drawRect:(CGRect)rect {
    //make sure that all the variables exist and are non-nil
    NSAssert(_text != nil, @"text is nil");
    NSAssert(_textColor != nil, @"textColor is nil");
    NSAssert(_fontName != nil, @"fontName is nil");
    NSAssert(_dropCapFontSize > 0, @"dropCapFontSize is <= 0");
    NSAssert(_textFontSize > 0, @"textFontSize is <=0");

    //convert the text aligment from NSTextAligment to CTTextAlignment
    CTTextAlignment ctTextAlignment = NSTextAlignmentToCTTextAlignment(_textAlignment);

    //create a paragraph style
    CTParagraphStyleSetting paragraphStyleSettings[] = { {
            .spec = kCTParagraphStyleSpecifierAlignment,
            .valueSize = sizeof ctTextAlignment,
            .value = &ctTextAlignment
        }
    };

    CFIndex settingCount = sizeof paragraphStyleSettings / sizeof *paragraphStyleSettings;
    CTParagraphStyleRef style = CTParagraphStyleCreate(paragraphStyleSettings, settingCount);

    //create two fonts, with the same name but differing font sizes
    CTFontRef dropCapFontRef = CTFontCreateWithName((__bridge CFStringRef)_fontName, _dropCapFontSize, NULL);
    CTFontRef textFontRef = CTFontCreateWithName((__bridge CFStringRef)_fontName, _textFontSize, NULL);

    //create a dictionary of style elements for the drop cap letter
    NSDictionary *dropCapDict = [NSDictionary dictionaryWithObjectsAndKeys:
                                (__bridge id)dropCapFontRef, kCTFontAttributeName,
                                _textColor.CGColor, kCTForegroundColorAttributeName,
                                style, kCTParagraphStyleAttributeName,
                                @(_dropCapKernValue) , kCTKernAttributeName,
                                nil];
    //convert it to a CFDictionaryRef
    CFDictionaryRef dropCapAttributes = (__bridge CFDictionaryRef)dropCapDict;

    //create a dictionary of style elements for the main text body
    NSDictionary *textDict = [NSDictionary dictionaryWithObjectsAndKeys:
                                 (__bridge id)textFontRef, kCTFontAttributeName,
                                 _textColor.CGColor, kCTForegroundColorAttributeName,
                                 style, kCTParagraphStyleAttributeName,
                                 nil];
    //convert it to a CFDictionaryRef
    CFDictionaryRef textAttributes = (__bridge CFDictionaryRef)textDict;

    //clean up, because the dictionaries now have copies
    CFRelease(dropCapFontRef);
    CFRelease(textFontRef);
    CFRelease(style);

    //create an attributed string for the dropcap
    CFAttributedStringRef dropCapString = CFAttributedStringCreate(kCFAllocatorDefault,
                                                                   (__bridge CFStringRef)[_text substringToIndex:1],
                                                                   dropCapAttributes);

    //create an attributed string for the text body
    CFAttributedStringRef textString = CFAttributedStringCreate(kCFAllocatorDefault,
                                                                (__bridge CFStringRef)[_text substringFromIndex:1],
                                                                   textAttributes);

    //create an frame setter for the dropcap
    CTFramesetterRef dropCapSetter = CTFramesetterCreateWithAttributedString(dropCapString);

    //create an frame setter for the dropcap
    CTFramesetterRef textSetter = CTFramesetterCreateWithAttributedString(textString);

    //clean up
    CFRelease(dropCapString);
    CFRelease(textString);

    //get the size of the drop cap letter
    CFRange range;
    CGSize maxSizeConstraint = CGSizeMake(200.0f, 200.0f);
    CGSize dropCapSize = CTFramesetterSuggestFrameSizeWithConstraints(dropCapSetter,
                                                                      CFRangeMake(0, 1),
                                                                      dropCapAttributes,
                                                                      maxSizeConstraint,
                                                                      &range);

    //create the path that the main body of text will be drawn into
    //i create the path based on the dropCapSize
    //adjusting to tighten things up (e.g. the *0.8,done by eye)
    //to get some padding around the edges of the screen
    //you could go to +5 (x) and self.frame.size.width -5 (same for height)
    CGMutablePathRef textBox = CGPathCreateMutable();
    CGPathMoveToPoint(textBox, nil, dropCapSize.width, 0);
    CGPathAddLineToPoint(textBox, nil, dropCapSize.width, dropCapSize.height * 0.8); 
    CGPathAddLineToPoint(textBox, nil, 0, dropCapSize.height * 0.8);
    CGPathAddLineToPoint(textBox, nil, 0, self.frame.size.height);
    CGPathAddLineToPoint(textBox, nil, self.frame.size.width, self.frame.size.height);
    CGPathAddLineToPoint(textBox, nil, self.frame.size.width, 0);
    CGPathCloseSubpath(textBox);

    //create a transform which will flip the CGContext into the same orientation as the UIView
    CGAffineTransform flipTransform = CGAffineTransformIdentity;
    flipTransform = CGAffineTransformTranslate(flipTransform,
                                               0,
                                               self.bounds.size.height);
    flipTransform = CGAffineTransformScale(flipTransform, 1, -1);

    //invert the path for the text box
    CGPathRef invertedTextBox = CGPathCreateCopyByTransformingPath(textBox,
                                                                   &flipTransform);
    CFRelease(textBox);

    //create the CTFrame that will hold the main body of text
    CTFrameRef textFrame = CTFramesetterCreateFrame(textSetter,
                                                    CFRangeMake(0, 0),
                                                    invertedTextBox,
                                                    NULL);
    CFRelease(invertedTextBox);
    CFRelease(textSetter);

    //create the drop cap text box
    //it is inverted already because we don't have to create an independent cgpathref (like above)
    CGPathRef dropCapTextBox = CGPathCreateWithRect(CGRectMake(_dropCapKernValue/2.0f,
                                                               0,
                                                               dropCapSize.width,
                                                               dropCapSize.height),
                                                    &flipTransform);
    CTFrameRef dropCapFrame = CTFramesetterCreateFrame(dropCapSetter,
                                                       CFRangeMake(0, 0),
                                                       dropCapTextBox,
                                                       NULL);
    CFRelease(dropCapTextBox);
    CFRelease(dropCapSetter);

    //draw the frames into our graphic context
    CGContextRef gc = UIGraphicsGetCurrentContext();
    CGContextSaveGState(gc); {
        CGContextConcatCTM(gc, flipTransform);
        CTFrameDraw(dropCapFrame, gc);
        CTFrameDraw(textFrame, gc);
    } CGContextRestoreGState(gc);
    CFRelease(dropCapFrame);
    CFRelease(textFrame);
}

P.S. this comes with some inspiration from: https://mcmap.net/q/666690/-how-to-draw-a-non-rectangle-uitextview

Mudslinging answered 1/2, 2013 at 4:42 Comment(0)
E
7

CoreText cannot do drop caps because it consists of lines made up of glyph runs. A drop cap would cover multiple lines which is not supported.

To achieve this effect you would have to draw the cap separately and then draw the rest of the text in a path that goes around it.

Long story short: not possible in UILabel, possible, but a fair bit of work with CoreText.

The steps to do it with CoreText are:

  • create a framesetter for the single character.
  • get its bounds
  • create a path that spares out the frame of the drop cap
  • create a framesetter for the remaining characters with this path
  • draw first glyph
  • draw rest
Entresol answered 15/1, 2013 at 6:42 Comment(2)
I am not looking to do it with a UILabel, I want to do it with Core Text, but using just a NSAttributesString. Not several frame setters, or a frame setter with a path.Appalachian
As I said, that's not possible with a single attributed string. See my CoreText intro to understand how framesetting works. cocoanetics.com/2011/01/befriending-core-textEntresol
F
5

If you're using a UITextView you can use textView.textContainer.exclusionPaths as Dannie P suggested here.

Example in Swift:

class WrappingTextVC: UIViewController {
  override func viewDidLoad() {
    super.viewDidLoad()

    let textView = UITextView()
    textView.translatesAutoresizingMaskIntoConstraints = false
    textView.text = "ropcap example. Lorem ipsum dolor sit amet, consectetur adipiscing elit. Mauris aliquam vulputate ex. Fusce interdum ultricies justo in tempus. Sed ornare justo in purus dignissim, et rutrum diam pulvinar. Quisque tristique eros ligula, at dictum odio tempor sed. Fusce non nisi sapien. Donec libero orci, finibus ac libero ac, tristique pretium ex. Aenean eu lorem ut nulla elementum imperdiet. Ut posuere, nulla ut tincidunt viverra, diam massa tincidunt arcu, in lobortis erat ex sed quam. Mauris lobortis libero magna, suscipit luctus lacus imperdiet eu. Ut non dignissim lacus. Vivamus eget odio massa. Aenean pretium eget erat sed ornare. In quis tortor urna. Quisque euismod, augue vel pretium suscipit, magna diam consequat urna, id aliquet est ligula id eros. Duis eget tristique orci, quis porta turpis. Donec commodo ullamcorper purus. Suspendisse et hendrerit mi. Nulla pellentesque semper nibh vitae vulputate. Pellentesque quis volutpat velit, ut bibendum magna. Morbi sagittis, erat rutrum  Suspendisse potenti. Nulla facilisi. Praesent libero est, tincidunt sit amet tempus id, blandit sit amet mi. Morbi sed odio nunc. Mauris lobortis elementum orci, at consectetur nisl egestas a. Pellentesque vel lectus maximus, semper lorem eget, accumsan mi. Etiam semper tellus ac leo porta lobortis."
    textView.backgroundColor = .lightGray
    textView.textColor = .black
    view.addSubview(textView)

    textView.leadingAnchor.constraint(equalTo: view.safeAreaLayoutGuide.leadingAnchor, constant: 20).isActive = true
    textView.trailingAnchor.constraint(equalTo: view.safeAreaLayoutGuide.trailingAnchor, constant: -20).isActive = true
    textView.topAnchor.constraint(equalTo: view.safeAreaLayoutGuide.topAnchor, constant: 20).isActive = true
    textView.bottomAnchor.constraint(equalTo: view.safeAreaLayoutGuide.bottomAnchor, constant: -40).isActive = true

    let dropCap = UILabel()
    dropCap.text = "D"
    dropCap.font = UIFont.boldSystemFont(ofSize: 60)
    dropCap.backgroundColor = .lightText
    dropCap.sizeToFit()
    textView.addSubview(dropCap)

    textView.textContainer.exclusionPaths = [UIBezierPath(rect: dropCap.frame)]
  }
}

Result:

Text wraps around dropcap

Full example on github

Furunculosis answered 20/11, 2018 at 14:25 Comment(0)
P
3

No, this cannot be done with an NSAttributedString and standard string drawing only.

Since the drop cap is a property of a paragraph the CTParagraphStyle would have to contain the information about the drop cap. The only property in CTParagraphStyle that affects indentation of the start of the paragraph is kCTParagraphStyleSpecifierFirstLineHeadIndent, but that affects the first line only.

There's just no way to tell the CTFramesetter how to calculate the beginnings for the second and more rows.

The only way is to define your own attribute and write code to draw the string using CTFramesetter and CTTypesetter that acknowledge this custom attribute.

Priority answered 25/1, 2013 at 11:31 Comment(0)
D
1

Not a perfect solution, but you should give DTCoreText a try and render your normal NSString as an formatted HTML. Within HTML it is possible to "Drop cap" a letter.

Dragging answered 25/1, 2013 at 10:48 Comment(0)
K
0

1. (hard mode) How to do a technical Drop Cap using UIViewRepresentable.

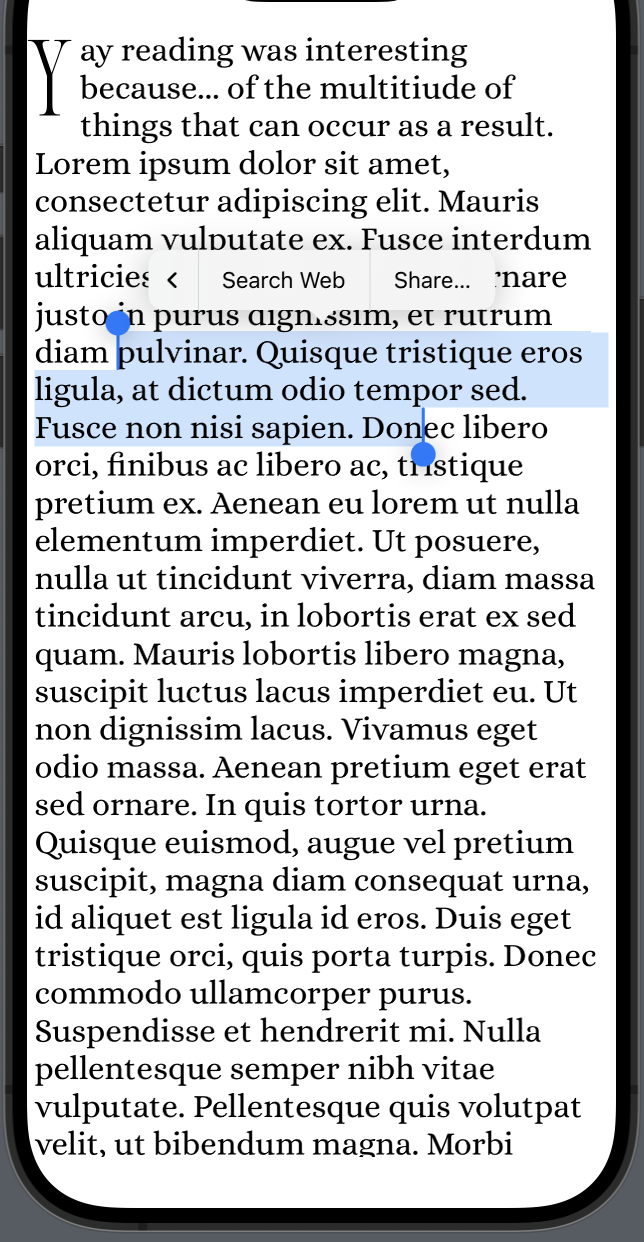
Building of Tieme's 2018 solution I've converted it to UIViewRepresentable with a drop cap

Drop Cap wrapping text view where text is selectable

class DropCapLabel: UILabel {
    //  Override the sizeThatFits(...) method in a UILabel subclass and adjust the frame to fit more closely to the text.
    override func sizeThatFits(_ size: CGSize) -> CGSize {
        let originalSize = super.sizeThatFits(size)
        return CGSize(width: originalSize.width, height: font.pointSize)
    }
}

// The main thing, with CosmicSolace and Alice custom fonts imported. 
struct DropCappedTextView: UIViewRepresentable {
    private let firstCharacterFont = UIFont(name: "CosmicSolace-Regular", size: 72) ?? UIFont.systemFont(ofSize: 72)
    private let remainingFont = UIFont(name: "Alice-Regular", size: 22) ?? UIFont.systemFont(ofSize: 22)
    
    private var dropCap: String
    private var remainingText: String
    
    init(dropCap: String, remainingText: String) {
        self.dropCap = dropCap
        self.remainingText = remainingText
    }
    
    func makeUIView(context: UIViewRepresentableContext<Self>) -> UITextView {
        let textView = UITextView()
        textView.isEditable = false  // So it's display only
        textView.text = remainingText
        textView.font = remainingFont
        
        let dropCapLabel = DropCapLabel()
        dropCapLabel.text = dropCap
        dropCapLabel.font = firstCharacterFont
        dropCapLabel.sizeToFit()
        textView.addSubview(dropCapLabel)
        
        textView.textContainer.exclusionPaths = [UIBezierPath(rect: dropCapLabel.frame)] // The key to excluding the dropcap path.
        
        return textView
    }
    
    func updateUIView(_ uiView: UITextView, context: UIViewRepresentableContext<Self>) {
        // No updates to the state.
    }
}

And here is how you reproduce this in Preview


struct DropCappedTextViewPreview: View {
    let sample = "yay reading was interesting because... of the multitude of things that can occur as a result. Lorem ipsum dolor.....<add more here>"
    
    var body: some View {
        if !sample.isEmpty {
            let dropCap = String(sample[sample.startIndex])
            let remainingText = String(sample[sample.index(after: sample.startIndex)...])
            DropCappedTextView(dropCap: dropCap, remainingText: remainingText)
        }
    }
}


#Preview {
    DropCappedTextViewPreview()
}

2. (easy mode) How to do a Drop Cap-esque thing in SwiftUI only.

Shouldn't be that bad to do now. It's not a true drop cap as it extends upwards, but that's fine for my case.

// have two computed properties
   let myText = "Blah blah blah"

    var firstCharacter: Character {
        myText.removeFirst()
    }
    
    var remainingText: Substring {
        myText.dropFirst(0)
    }

// ...in the body...
VStack {
  (Text(String(firstCharacter))
        .font(.custom("CosmicSolace-Regular", size: 64))
     + Text(remainingText)
        .font(.custom("Subjectivity-Regular", size: 16))
        .fontWeight(.light)
    )
    .foregroundStyle(.bodyText)
    .frame(maxWidth: .infinity)
}

looks like this

Kelcy answered 27/1, 2024 at 13:24 Comment(4)
This doesn't answer the question that was asked. This only shows how to make part of a string in a bigger font.Skirmish
When you google "SwiftUI how to do drop cap" this is the search result. The first search result should have something a seeking developer can use. If you use a little intuition, you can see the question from 11 years ago is asking "How accomplish the visual effect of a drop cap in my iOS app?". The snippet I posted answers "How to accomplish the visual effect of a drop cap in iOS app in 2024."Kelcy
But your solution does not provide a drop cap at all.Skirmish
@Skirmish I've added a UIViewRepresentable version doing a technically-correct Drop Cap. It uses UITextView, UILabel, and UIBezierPath to establish an exclusion path. Building off the other solutions provided in this stack overflow, but updated to use UIViewRepresentable for plug-n-play into SwiftUI.Kelcy

© 2022 - 2025 — McMap. All rights reserved.