How to add SSL to Azure Container Instance App?
Asked Answered
G

4

21

As the title says, I need to setup SSL for an app hosted in Azure Container Instances, however, I'm not quite sure where I need to start.

I have a containerized app hosted via Azure Container Instances at the address http://myApp.northamerica.azurecontainer.io. This address is masked by the 'official' address at http://api.myApp.com.

Is there any reason why I can't just add SSL to the superficial domain @ http://api.myApp.com, that redirects to the real domain @ http://myApp.northamerica.azurecontainer.io? Or do I need to add SSL to both domains?

Furthermore, if I need to secure both domains with SSL, do I need to get separate certificates for each?

Azure provides SSL cert services but I just need to know the best route to take. Thanks.

Gabbro answered 31/3, 2020 at 19:5 Comment(3)
were you able to setup SSL to your Azure Container instance? Can you provide any resources?Suppurate
@VishwasNavadaK I ended up using Azure API Management, and adding a custom domain w/ preconfigured SSL on it. So all users of the app hit the custom domain @ Azure API Management, which then points to our backend API address. I contacted MS about this to see if there was another way of doing it, and they suggested setting up a VNET and doing it that way, but APIM was simpler. Hope this helps, let me know if you have more questions.Gabbro
@VishwasNavadaK Another way of doing it is to use Azure App Services for hosted Web Containers (I believe that's the offical name). You can go into the Azure Portal and setup a new hosted container inside the App Services section, just click "Create New" and deploy your container that way. It will give you an option to add a custom domain to your container directly.Gabbro
O
14

As far as I know, currently, there is still no built-in support for enabling SSL on Azure Container Instances refer to this.

However, you could have multiple choices for enabling SSL connections for your ACI application.

If you deploy your container group in an Azure virtual network, you can consider other options to enable an SSL endpoint for a backend container instance, including:

The standard SSL certificate maps to a unique domain name, so you need separate certificates for each domain.

You can get started to set up Nginx as an SSL provider in a sidecar container and you need an SSL certificate for the domain api.myApp.com. If you want separate secure access with domain myApp.northamerica.azurecontainer.io, you could configure extra server block in the Nginx config file. Refer to configuring HTTPS server in Nginx.

server {
    listen              443 ssl;
    server_name         www.example.com;
    ssl_certificate     www.example.com.crt;
    ssl_certificate_key www.example.com.key;
    ssl_protocols       TLSv1 TLSv1.1 TLSv1.2;
    ssl_ciphers         HIGH:!aNULL:!MD5;
    ...
}
Oneiric answered 1/4, 2020 at 7:37 Comment(4)
Thanks for this. The first link to azure link only explains on self-signed certificate. Is there a documentation on how to set it up using certificate from lets encrypt on nginx or caddy and setup auto renewal. The solutions I found to manually upload the certificate seemed hackySuppurate
Any resource to setup Lets Encrypt for ACI?Suppurate
Any idea how to do this for windows containers?Carlottacarlovingian
This article describes setting up HTTPS with Caddy for ACI: itnext.io/…Susceptible
S
20

After going through the pain of researching around this, we finally figured how to use Caddy Docker image as sidecar to add SSL to Container Instances. Caddy makes it easy to auto renew and verify the ownership to issue SSL.

We wrote a blog post to help others who have same problem. Hope this helps.

https://www.antstack.com/blog/how-to-enable-tls-for-hasura-graphql-engine-in-azure-caddy/

Suppurate answered 12/6, 2020 at 5:11 Comment(3)
Exactly my use case! I'm also deploying Hasura and facing the same TLS questions. Thanks for the blog post!Nonprofessional
The s3_stream_architecture.png image is missing. Please add the relevant code in this answer.Aggrandize
Fixed it now. @AggrandizeSuppurate
O
14

As far as I know, currently, there is still no built-in support for enabling SSL on Azure Container Instances refer to this.

However, you could have multiple choices for enabling SSL connections for your ACI application.

If you deploy your container group in an Azure virtual network, you can consider other options to enable an SSL endpoint for a backend container instance, including:

The standard SSL certificate maps to a unique domain name, so you need separate certificates for each domain.

You can get started to set up Nginx as an SSL provider in a sidecar container and you need an SSL certificate for the domain api.myApp.com. If you want separate secure access with domain myApp.northamerica.azurecontainer.io, you could configure extra server block in the Nginx config file. Refer to configuring HTTPS server in Nginx.

server {
    listen              443 ssl;
    server_name         www.example.com;
    ssl_certificate     www.example.com.crt;
    ssl_certificate_key www.example.com.key;
    ssl_protocols       TLSv1 TLSv1.1 TLSv1.2;
    ssl_ciphers         HIGH:!aNULL:!MD5;
    ...
}
Oneiric answered 1/4, 2020 at 7:37 Comment(4)
Thanks for this. The first link to azure link only explains on self-signed certificate. Is there a documentation on how to set it up using certificate from lets encrypt on nginx or caddy and setup auto renewal. The solutions I found to manually upload the certificate seemed hackySuppurate
Any resource to setup Lets Encrypt for ACI?Suppurate
Any idea how to do this for windows containers?Carlottacarlovingian
This article describes setting up HTTPS with Caddy for ACI: itnext.io/…Susceptible
T
2

Did a write up here: https://dev.to/kedzior_io/net-core-api-in-azure-container-instances-secured-with-https-using-caddy2-32jm

Here is the copy/paste:

  1. Create your Web API project let's call it MyApp.Image.Api and let's say it depends on another project MyApp.Core
  2. Add Dockerfile to your MyApp.Image.Api project
FROM mcr.microsoft.com/dotnet/aspnet:5.0 AS base
WORKDIR /app
ARG ENVIRONMENT

ENV ASPNETCORE_URLS http://*:5000
ENV ENVIRONMENT_NAME "${ENVIRONMENT}"

FROM mcr.microsoft.com/dotnet/sdk:5.0 AS build
WORKDIR /src

# copy project dependencies 
COPY ["src/MyApp.Core/MyApp.Core.csproj", "src/MyApp.Core/"]
COPY ["src/MyApp.Image.Api/MyApp.Image.Api.csproj", "src/MyApp.Image.Api/"]

RUN dotnet restore "src/MyApp.Image.Api/MyApp.Image.Api.csproj"
COPY . .

RUN dotnet build "src/MyApp.Image.Api/MyApp.Image.Api.csproj" -c Release -o /app/build

FROM build AS publish
RUN dotnet publish "src/MyApp.Image.Api/MyApp.Image.Api.csproj" -c Release -o /app/publish

FROM base AS final
WORKDIR /app
COPY --from=publish /app/publish .
ENTRYPOINT ["dotnet", "MyApp.Image.Api.dll"]
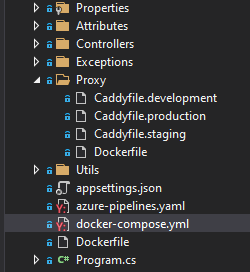
  1. Next within the same project create directory called Proxyin it you will need 4 files:

  2. Caddyfile.development - this will create proxy when running locally with self-signed certificate

{
    email [email protected]
}

https://localhost {
    reverse_proxy localhost:5000
}

  1. Caddyfile.staging
{
    email [email protected]
}

https://myapp-image-api-staging.eastus.azurecontainer.io {
    reverse_proxy localhost:5000
}

  1. Caddyfile.production
{
    email [email protected]
}

https://myapp-image-api.eastus.azurecontainer.io {
    reverse_proxy localhost:5000
}

  1. Dockerfile - we will set environment prior to executing this
FROM caddy:latest
ARG ENVIRONMENT

COPY "src/MyApp.Image.Api/Proxy/Caddyfile.${ENVIRONMENT}" /etc/caddy/Caddyfile

*if you don't have multiple environments you know what to skip :-)

  1. Now you need to add docker-compose.yml to the project
version: '3.4'

services:

  proxy:
    image: myapp-image-api-proxy:${CONTAINER_VERSION}-${ENVIRONMENT}
    build:
      context: ../../
      args:
        ENVIRONMENT: ${ENVIRONMENT}
      dockerfile:  src/MyApp.Image.Api/Proxy/Dockerfile
  api:
    image:  myapp-image-api:${CONTAINER_VERSION}-${ENVIRONMENT}
    depends_on:
      - proxy
    build:
        context: ../../
        args:
          ENVIRONMENT: ${ENVIRONMENT}
        dockerfile: src/MyApp.Image.Api/Dockerfile

You should end up with this structure:

image

  1. Now you are ready to go! I use that powershell script to build my images. If you are building to locally just run this:
# set azure environment
$env:ENVIRONMENT = 'development'
$env:CONTAINER_VERSION = 'latest'

# builds images
docker-compose build

If you want to build and push images to Azure Container Registry go for commands below but before make sure you have created registry:

az provider register --namespace Microsoft.ContainerInstance`
az acr create --resource-group EastUS--name myapp --sku Basic // *enable admin user in azure portal once Azure Container Registry is created
# logs to azure
az login

# set azure environment
$env:ENVIRONMENT = 'staging'
$env:CONTAINER_VERSION = 'latest'

# builds images
docker-compose build

# logs to Azure Container Registry
az acr login --name myapp

# tag images
docker tag myapp-image-api-proxy:latest-staging myapp.azurecr.io/myapp-image-api-proxy:latest-staging
docker tag myapp-image-api:latest-staging myapp.azurecr.io/myapp-image-api:latest-staging

# push images
docker push myapp.azurecr.io/myapp-image-api-proxy:latest-staging
docker push myapp.azurecr.io/myapp-image-api:latest-staging

# clean up
docker rmi myapp-image-api-proxy:latest-staging
docker rmi myapp-image-api:latest-staging
docker rmi myapp.azurecr.io/myapp-image-api-proxy:latest-staging
docker rmi myapp.azurecr.io/myapp-image-api:latest-staging

Cool! You are ready to fire it up!##

  1. You will need two packages:

Microsoft.Azure.Management.ContainerInstance.Fluent Microsoft.Azure.Management.Fluent

  1. Let's start from connecting to Azure using C# Fluent API
private IAzure GetAzureContext()
{
    Log.Information("[Container] Getting Service Principal");
    var creds = new AzureCredentialsFactory().FromServicePrincipal(
        _config["AppSettings:ImageApi:ServicePrincipalClientId"],
        _config["AppSettings:ImageApi:ServicePrincipalSecretId"],
        _config["AppSettings:ImageApi:ServicePrincipalTenat"],
        AzureEnvironment.AzureGlobalCloud);

    Log.Information("[Container] Getting subscribtion");
    var azure = Microsoft.Azure.Management.Fluent.Azure.Authenticate(creds).WithSubscription(_config["AppSettings:ImageApi:SubscribtionId"]);

    return azure;
}

Where do you get these service principal ids?

In Azure CLI do:

az ad sp create-for-rbac --name myapp-containers --sdk-auth > my.azureauth

That file will have all service principal data needed.

  1. Now the main part:
private string CreateContainer()
{
    Log.Information("[Container] Authenticating with Azure");

    var azureContext = GetAzureContext();`
    
    // Get azure container registry for my resource group named 'EastUS' and registry 'myapp'
    var azureRegistry = azureContext.ContainerRegistries.GetByResourceGroup(
        _config["AppSettings:ImageApi:ResourceGroupName"],
        _config["AppSettings:ImageApi:ContainerRegistryName"]);

    var acrCredentials = azureRegistry.GetCredentials();

    // Get container group for my resource group named 'EastUS' and container group i.e 'myapp-image-api-staging'
    var containerGroup = azureContext.ContainerGroups.GetByResourceGroup(
        _config["AppSettings:ImageApi:ResourceGroupName"],
        _config["AppSettings:ImageApi:ContainerGroupName"]
        );

    if (containerGroup is null)
    {
        Log.Information("[Container] Creating with fluent API");

        // ContainerGroupName = 'myapp-image-api-staging'
        // ResourceGroupName = 'EastUS'
        // VolumeName = 'image-api-volume'
        // FileShare = 'containers' 
        //      # yes you need to have storage account with file share, we need it so that proxy (caddy2) can store Let's Encrypt certs in there
        //      az storage share create --name myapp-staging-containers-share --account-name myappstaging
        // 
        // StorageAccountName = 'myappstaging'
        // StorageAccountKey = 'well-that-key-here'
        // ProxyContainerName = 'image-api-proxy'
        // ProxyImageName = 'myapp.azurecr.io/myapp-image-api-proxy:latest-staging'
        // VolumeMountPath = '/data/'
        // ApiContainerName 'image-api'
        // ApiImageName 'myapp.azurecr.io/myapp-image-api:latest-staging'

        containerGroup = azureContext.ContainerGroups.Define(_config["AppSettings:ImageApi:ContainerGroupName"])
                .WithRegion(Region.USEast)
                .WithExistingResourceGroup(_config["AppSettings:ImageApi:ResourceGroupName"])
                .WithLinux()
                .WithPrivateImageRegistry(azureRegistry.LoginServerUrl, acrCredentials.Username, acrCredentials.AccessKeys[AccessKeyType.Primary])
                .DefineVolume(_config["AppSettings:ImageApi:VolumeName"])
                    .WithExistingReadWriteAzureFileShare(_config["AppSettings:ImageApi:FileShare"])
                    .WithStorageAccountName(_config["AppSettings:ImageApi:StorageAccountName"])
                    .WithStorageAccountKey(_config["AppSettings:ImageApi:StorageAccountKey"])
                    .Attach()
                .DefineContainerInstance(_config["AppSettings:ImageApi:ProxyContainerName"])
                    .WithImage(_config["AppSettings:ImageApi:ProxyImageName"])
                    .WithExternalTcpPort(443)
                    .WithExternalTcpPort(80)
                    .WithCpuCoreCount(1.0)
                    .WithMemorySizeInGB(0.5)
                    .WithVolumeMountSetting(
                        _config["AppSettings:ImageApi:VolumeName"],
                        _config["AppSettings:ImageApi:VolumeMountPath"])
                    .Attach()
                .DefineContainerInstance(_config["AppSettings:ImageApi:ApiContainerName"])
                    .WithImage(_config["AppSettings:ImageApi:ApiImageName"])
                    .WithExternalTcpPort(5000)
                    .WithCpuCoreCount(1.0)
                    .WithMemorySizeInGB(3.5)
                    .Attach()
                .WithDnsPrefix(_config["AppSettings:ImageApi:ContainerGroupName"])
                .WithRestartPolicy(ContainerGroupRestartPolicy.Always)
                .Create();
    }

    Log.Information("[Container] created {fqdn}", containerGroup.Fqdn);
    return containerGroup.Fqdn;
}

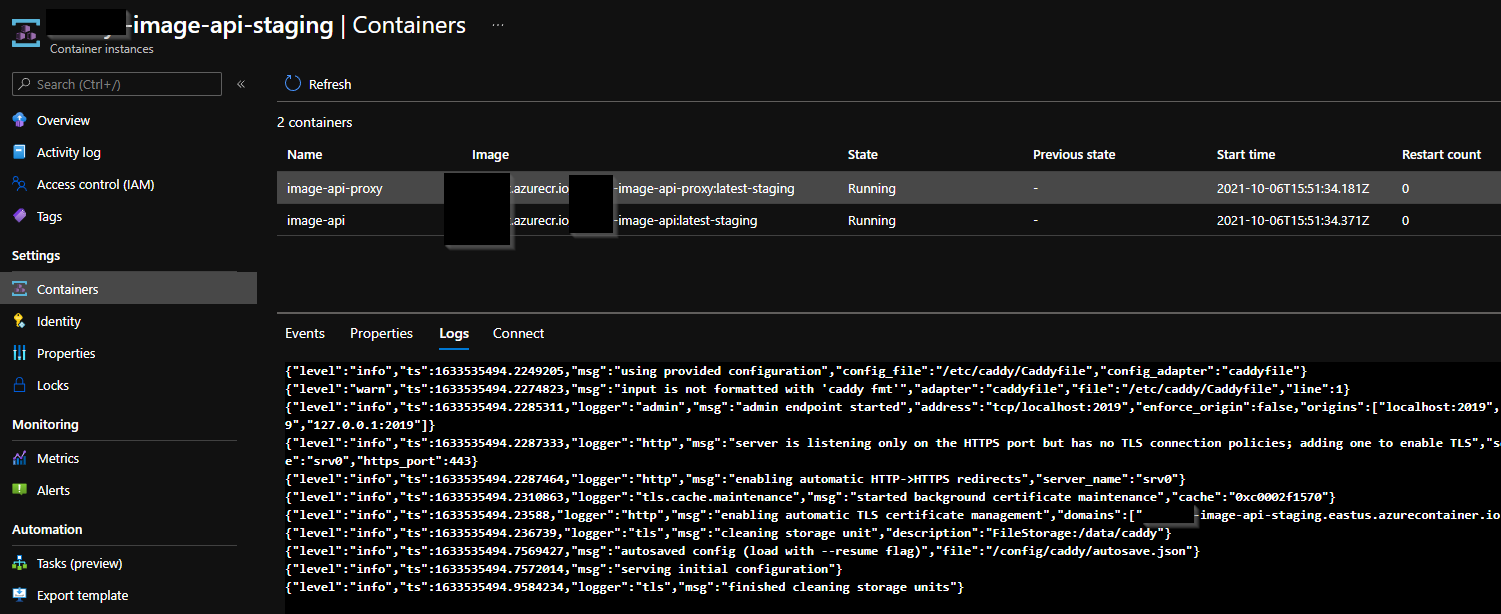
Containers are running!

It takes around 2:50 min to have them fully available.

image

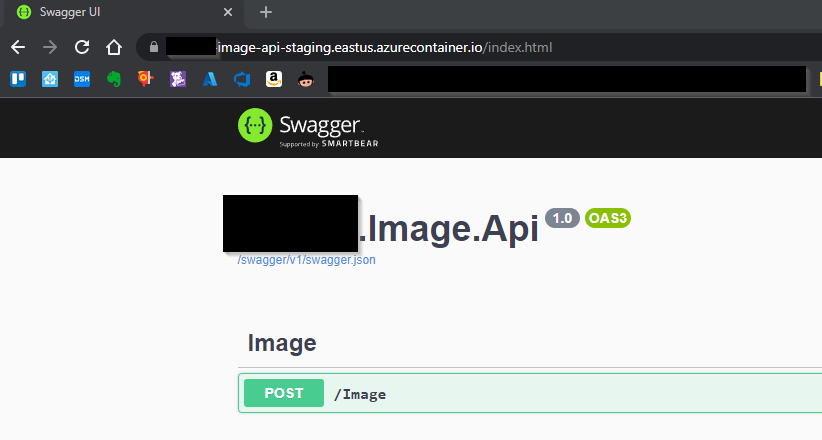
Hitting fqdn given in the code above gives me my swagger index page:

image

Tiffanitiffanie answered 6/10, 2021 at 16:52 Comment(2)
Should this be the folder and not the csproj file? Looks to me like that will only copy the file and not everything else with it. COPY ["src/MyApp.Core/MyApp.Core.csproj", "src/MyApp.Core/"] COPY ["src/MyApp.Image.Api/MyApp.Image.Api.csproj", "src/MyApp.Image.Api/"]Homology
@JasonBert You don't need this section if you don't want to. This basically optimises the process slightly. It copies csproj first to restore nuget packages. If all good it copies the rest with COPY . . below and then builds. If nuget restore fails for some reason (because of using official nuget package or your own) having the whole thing copied beforehand is well ... not so useful.Tiffanitiffanie
A
1

I found the answer in this article: https://www.raeffs.dev/blog/2021/05-mai/25-autogenerate-ssl-certificates-for-aci/

I had a service that was reachable through port 80 on other-service.francecentral.azurecontainer.io.

I added the following proxy that respond to ports 80 and 443 on the URL caddy-example.francecentral.azurecontainer.io.

Here is the content of the file azure_container_caddy.yaml:

# https://www.raeffs.dev/blog/2021/05-mai/25-autogenerate-ssl-certificates-for-aci/
name: acicaddynonprod
apiVersion: '2021-10-01'
location: francecentral
properties:
    containers:
        - name: caddy
          properties:
              image: docker.io/caddy:2
              command:
                [
                    'caddy',
                    'reverse-proxy',
                    '--from',
                    'caddy-example.francecentral.azurecontainer.io',
                    '--to',
                    'other-service.francecentral.azurecontainer.io',
                ]
              ports:
                  - port: 80
                    protocol: TCP
                  - port: 443
                    protocol: TCP
              resources:
                  requests:
                      cpu: 0.5
                      memoryInGB: 0.5
    ipAddress:
        ports:
            - port: 80
              protocol: TCP
            - port: 443
              protocol: TCP
        type: Public
        dnsNameLabel: caddy-example
    osType: Linux
tags: null
type: Microsoft.ContainerInstance/containerGroups

You'll have to update the 2 instances of caddy-example and the instance of other-service, and change the location and the region in the hostnames.

Then I only had to deploy it:

az container create --resource-group [something] --file azure_container_caddy.yaml
Aggrandize answered 2/9, 2022 at 17:35 Comment(0)

© 2022 - 2024 — McMap. All rights reserved.