How to replace Swagger UI header logo in Swashbuckle
Asked Answered
B

9

21

I am using the Swashbuckle package for WebAPI and am attempting to customize the look and feel of the swagger UI default page. I would like to customize the default swagger logo/header. I have added the following to SwaggerConfig:

.EnableSwaggerUi(c =>
 {
  c.InjectJavaScript(thisAssembly, 
    typeof(SwaggerConfig).Namespace + ".SwaggerExtensions.custom-js.js");
  }

The contents of custom-js.js are as follows:

$("#logo").replaceWith("<span id=\"test\">test</span>");

This works for the most part but the visual is a bit jarring, in that the default swagger header is visible while the page loads and after a brief delay the jQuery below kicks and the content of the #logo element is updated.

Is there a way to avoid this so that the jQuery kicks in as part of the initial load/render and it appears seamless?

Brendis answered 2/8, 2016 at 7:3 Comment(0)
B
3

I ended up adding a new "index.html" based off this version instead of trying to modify the behavior of the default generated one

Brendis answered 3/8, 2016 at 2:59 Comment(1)
sir, please help where I need to put this "index.html" in my asp.net mvc or asp.net core web api project.Prenatal
W
24

Here are the steps instead of using the index.html

Step 1: Create your logo en put it into a folder, in my case I created a separate folder(I am not using the wwwroot) and I named Content. Use StaticFiles for stream content from this folder access via /Content

app.UseStaticFiles(); // For the wwwroot folder if you need it
app.UseStaticFiles(new StaticFileOptions()
{
    FileProvider = new PhysicalFileProvider(
    Path.Combine(Directory.GetCurrentDirectory(), "Content")),
    RequestPath = "/Content"
});

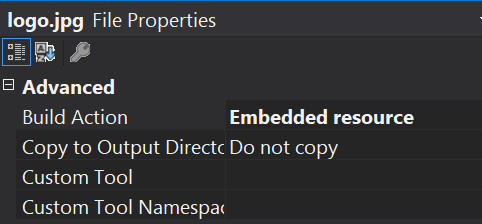
Stem #2: Create an image folder inside Content and place your logo.jpg file. Right-click over the file and change the Build Action to Embedded resource

enter image description here

Step #3: Create a css folder inside Content and place a new file swagger-mycustom.css and change the Build Action to Content

enter image description here

On your Startup Configure method add this code

app.UseSwaggerUI(setupAction =>
{
    ....
    setupAction.InjectStylesheet("/Content/css/swagger-mycustom.css");
    ...
}

Step #4: Add this to your css:

img[alt="Swagger UI"] {
    display: block;
    -moz-box-sizing: border-box;
    box-sizing: border-box;
    content: url('/Content/images/logo.jpg');
    max-width: 100%;
    max-height: 100%;
}

The output looks like this:

enter image description here

Willing answered 9/7, 2020 at 15:7 Comment(4)
I recommend using EmbeddedFileProvider instead. See: https://mcmap.net/q/659199/-serve-static-files-from-external-libraryDeccan
I will give it a try when I have a chance and will update the answer, thanks for the suggestionWilling
Under wwwroot you don't need to change the build action, just add the content. And you don't need that special folder, so the url for the logo would be "/images/logo.png"Fixate
You are correct. In my solution I had it with this structure and I was not grouping it as part of the wwwrootWilling
W
8

This worked for me with the last version of Swagger UI in Swashbuckle

.swagger-ui img {
     content: url([logo_path]);
     width: 140px; /* width of your logo */
     height: 40px; /* height of your logo */
}
Wheeler answered 23/1, 2020 at 1:23 Comment(2)
This worked for me!Carmine
Works for me as well. I even use data:image/jpeg;base64 css url path. Hide swagger branding .swagger-ui .topbar span { display: none; }Shoreline
B
6

To replace logo in swagger in api for .net core, you have to add the custom.js file.

Follow below steps to change logo.

Step 1 - Create custom.js file and add following code in it

(function () {
window.addEventListener("load", function () {
    setTimeout(function () {

        var logo = document.getElementsByClassName('link');

        logo[0].children[0].alt = "Logo";
        logo[0].children[0].src = "/logo.png";
    });
}); })();

Step 2 - Inject thar custom.js file in startup.cs file. See below

app.UseSwaggerUI(c =>
        {
            c.InjectJavascript("/custom.js");

        });

Step 3 - Enable static file in the api if not enabled. Add below line of code in Configure method of startup.cs.

app.UseStaticFiles();
Beaded answered 10/4, 2020 at 15:18 Comment(1)
Worked for me just now, thanks! here's how it looks for me: github.com/rswag/rswag/issues/616#issuecomment-1493073432Espresso
J
5

If you don't want to create the index.html, you can also update the logo with injected css, this is a lot faster than js injection.

In swagger config enable the c.InjectStylesheet and point to the css you created

In the css itself:

.logo__img {
 background: url([PathToLogo]) no-repeat;
 display: block;
 -moz-box-sizing: border-box;
 box-sizing: border-box;
 width: 64px; /* Width of new image */
 height: 25px; /* Height of new image */
 padding-left: 64px; /* Equal to width of new image */
}

credits for css trick: https://css-tricks.com/replace-the-image-in-an-img-with-css/

Jacintha answered 18/8, 2017 at 7:57 Comment(0)
B
3

I ended up adding a new "index.html" based off this version instead of trying to modify the behavior of the default generated one

Brendis answered 3/8, 2016 at 2:59 Comment(1)
sir, please help where I need to put this "index.html" in my asp.net mvc or asp.net core web api project.Prenatal
S
2

@MichaelD can simply do the following instead:

.logo__img {
    content: url([PathToLogo]);
    width: 72px; /* Width of new image */
    height: 31px; /* Height of new image */
}
Swaney answered 8/11, 2017 at 17:24 Comment(0)
D
1

I was using the @Zinov CSS trick for NSwag but it stopped working with the new Swagger UI version. After looking into this thread, I wrote a reply with a working solution:

.swagger-ui svg:not(:root) {
  display: none;
}
.topbar-wrapper .link:before {
  content: url('yourlogo.png');
}
Dovekie answered 16/4 at 14:34 Comment(2)
This was helpful. Thank you.Chuu
I had to modify the first line, otherwise, it hides the copy-to-clipboard icons, rendering the functionality inoperative: .swagger-ui .topbar svg:not(:root) {Langham
S
0

The custom-js.js need to be placed after all js file.

Subscapular answered 2/8, 2016 at 7:10 Comment(0)
L
0

@marco-martins's solution worked for me, but I needed to resize the image, so I ended up with the following:

.swagger-ui .topbar svg:not(:root) {
    display: none;
}

.topbar-wrapper .link:before {
    background-image: url(yourlogo.png);
    background-size: 50px 50px;
    display: inline-block;
    width: 50px;
    height: 50px;
    content: "";
}
Langham answered 18/7 at 19:9 Comment(0)

© 2022 - 2024 — McMap. All rights reserved.