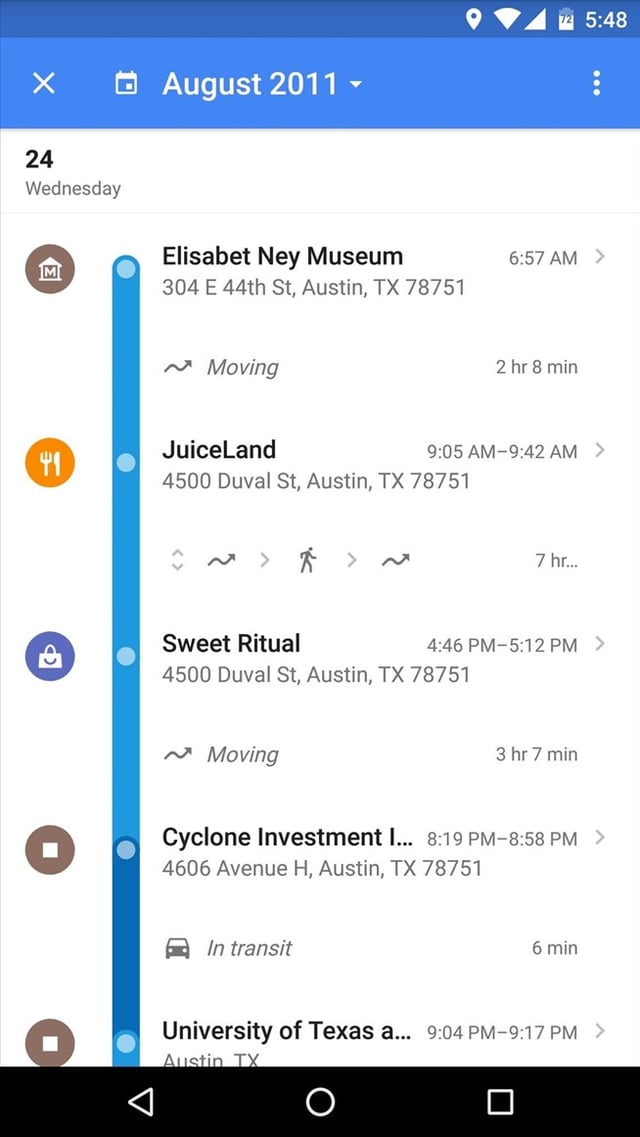
I want to design user interface like Google location history.
I had to replicate this UI for an application I worked on using RecyclerView.
Every row is a horizontal LinearLayout which contains the icon, the line and the views at the right. The line is a FrameLayout with a rounded background and the semi transparent circles are Views.
Because there is no space between rows the single pieces of the line appear joined.
The item layout looks like this:
<LinearLayout
    xmlns:android="http://schemas.android.com/apk/res/android"
    android:orientation="horizontal"
    android:layout_width="match_parent"
    android:layout_height="wrap_content">

    <!-- the circular icon on the left -->
    <ImageView
        android:layout_width="wrap_content"
        android:layout_height="wrap_content"
        android:src="@drawable/ic_place"
        android:tint="@android:color/white"
        android:layout_marginRight="24dp"
        android:padding="4dp"
        android:background="@drawable/circle_bg"/>

    <!-- the blue line -->
    <FrameLayout
        android:layout_width="15dp"
        android:layout_height="match_parent"
        android:padding="2dp"
        android:id="@+id/item_line">

        <!-- the semi transparent circle on the line -->
        <View
            android:layout_width="11dp"
            android:layout_height="11dp"
            android:background="@drawable/circle"/>

    </FrameLayout>

    <!-- views at the right of the blue line -->
    <LinearLayout
        android:layout_width="0dp"
        android:layout_weight="1"
        android:layout_height="wrap_content"
        android:orientation="vertical"
        android:paddingLeft="24dp"
        android:paddingBottom="32dp"
        android:clickable="true"
        android:background="?android:attr/selectableItemBackground">

        <TextView
            android:layout_width="match_parent"
            android:layout_height="wrap_content"
            android:singleLine="true"
            android:ellipsize="end"
            android:textAppearance="@style/TextAppearance.AppCompat.Title"
            android:id="@+id/item_title"/>

        <TextView
            android:layout_width="match_parent"
            android:layout_height="wrap_content"
            android:id="@+id/item_subtitle"/>

        <!-- other views -->

    </LinearLayout>
</LinearLayout>
A convenient way to render differently the line's caps for the top one, the middle ones and the last is to use position-related itemViewTypes in the Adapter:
private static final int VIEW_TYPE_TOP = 0;
private static final int VIEW_TYPE_MIDDLE = 1;
private static final int VIEW_TYPE_BOTTOM = 2;
private List<Item> mItems;

// ...

class ViewHolder extends RecyclerView.ViewHolder {

    TextView mItemTitle;
    TextView mItemSubtitle;
    FrameLayout mItemLine;

    public ViewHolder(View itemView) {
        super(itemView);
        mItemTitle = (TextView) itemView.findViewById(R.id.item_title);
        mItemSubtitle = (TextView) itemView.findViewById(R.id.item_subtitle);
        mItemLine = (FrameLayout) itemView.findViewById(R.id.item_line);
    }
}

@Override
public void onBindViewHolder(final ViewHolder holder, final int position) {
    Item item = mItems.get(position);
    // Populate views...
    switch(holder.getItemViewType()) {
        case VIEW_TYPE_TOP:
            // The top of the line has to be rounded
            holder.mItemLine.setBackground(R.drawable.line_bg_top);
            break;
        case VIEW_TYPE_MIDDLE:
            // Only the color could be enough
            // but a drawable can be used to make the cap rounded also here
            holder.mItemLine.setBackground(R.drawable.line_bg_middle);
            break;
        case VIEW_TYPE_BOTTOM:
            holder.mItemLine.setBackground(R.drawable.line_bg_bottom);
            break;
    }
}

@Override
public int getItemViewType(int position) {
    if(position == 0) {
        return VIEW_TYPE_TOP;
    else if(position == mItems.size() - 1) {
        return VIEW_TYPE_BOTTOM;
    }
    return VIEW_TYPE_MIDDLE;
}
The background drawables can be defined like this:
<!-- line_bg_top.xml -->
<shape xmlns:android="http://schemas.android.com/apk/res/android">
    <solid android:color="@color/colorPrimary"/>
    <corners
        android:topLeftRadius="15dp"
        android:topRightRadius="15dp"/>
    <!-- this has to be at least half of line FrameLayout's
         width to appear completely rounded -->
</shape>

<!-- line_bg_middle.xml -->
<shape xmlns:android="http://schemas.android.com/apk/res/android">
    <solid android:color="@color/colorPrimary"/>
</shape>

<!-- line_bg_bottom.xml -->
<shape xmlns:android="http://schemas.android.com/apk/res/android">
    <solid android:color="@color/colorPrimary"/>
    <corners
        android:bottomLeftRadius="15dp"
        android:bottomRightRadius="15dp"/>
</shape>
Of course you can also use ListView or if you know that the steps will always be just a few, a simple vertical LinearLayout will be enough.
Sadly the Google Maps Android app is not open source, it's not that easy to know the official way so... Material Design interpretations!
© 2022 - 2024 — McMap. All rights reserved.

