AWS Certificate Manager (ACM) provides SSL/TLS certificates for AWS users. Does it apply to Lightsail users as well?
If not, is there any instructions or advises on setting up SSL certificates on Lightsail server?
AWS Certificate Manager (ACM) provides SSL/TLS certificates for AWS users. Does it apply to Lightsail users as well?
If not, is there any instructions or advises on setting up SSL certificates on Lightsail server?
As per the other answers, you cannot use AWS Certificate Manager to create and install certificates for Amazon Lightsail instances, or any other EC2 instances. However, you can create your own SSL/TLS certificates and install them manually. The Lightsail instance for WordPress is powered by Bitnami and Bitnami give exact instructions on how to create and install a free SSL/TLS certificate with LetsEncrypt.
https://docs.bitnami.com/aws/how-to/generate-install-lets-encrypt-ssl/
I completed this process successfully for lukejanicke.com but didn’t immediately get it working for www.lukejanicke.com
There is currently no mechanism for using ACM certificates with Lightsail instances.
But, there's also no mechanism for using ACM certificates directly on EC2 instances. They have to be behind a load balancer because ACM doesn't provide you with access to the certificate's private key.
You can only use ACM certificates with ELB/ALB and CloudFront.
Information visible in the instance metadata on Lightsail suggests that ELB/ALB might be a future feature there, which suggests it might be possible in the future... but for now, it isn't.
Of course, CloudFront works with any origin server -- EC2, Lightsail, even origin servers that aren't in AWS at all. (I have a server in my living room that works behind CloudFront). If you don't need encryption between CloudFront and your Lightsail machine -- just between the browser and CloudFront -- then you can configure this today, and use an ACM cert on CloudFront, with Lightsail as the origin server. The only issue there is that you would not be using the free outbound bandwidth allowance from Lightsail to the Internet -- you'd be using CloudFront outbound Internet bandwidth, which does not have a large free quota like Lightsail.
How To Enable HTTPS Support With SSL Certificates?
NOTE: The steps below assume that you are using a custom domain name and that you have already configured the custom domain name to point to your cloud server.
Bitnami images come with SSL support already pre-configured and with a dummy certificate in place. Although this dummy certificate is fine for testing and development purposes, you will usually want to use a valid SSL certificate for production use. You can either generate this on your own (explained here) or you can purchase one from a commercial certificate authority.
Once you obtain the certificate and certificate key files, you will need to update your server to use them. Follow these steps to activate SSL support:
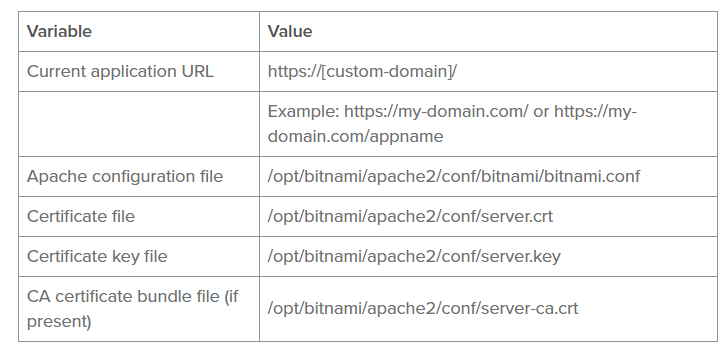
Use the table below to identify the correct locations for your certificate and configuration files.
 Copy your SSL certificate and certificate key file to the specified locations.
NOTE: If you use different names for your certificate and key files, you should reconfigure the SSLCertificateFile and SSLCertificateKeyFile directives in the corresponding Apache configuration file to reflect the correct file names.
If your certificate authority has also provided you with a PEM-encoded Certificate Authority (CA) bundle, you must copy it to the correct location in the previous table. Then, modify the Apache configuration file to include the following line below the SSLCertificateKeyFile directive. Choose the correct directive based on your scenario and Apache version:
NOTE: If you use a different name for your CA certificate bundle, you should reconfigure the SSLCertificateChainFile or SSLCACertificateFile directives in the corresponding Apache configuration file to reflect the correct file name.
Once you have copied all the server certificate files, you may make them readable by the root user only with the following commands:
sudo chown root:root /opt/bitnami/apache2/conf/server*
sudo chmod 600 /opt/bitnami/apache2/conf/server*
Open port 443 in the server firewall. Refer to the FAQ for more information.
Restart the Apache server.
You should now be able to access your application using an HTTPS URL.
How To Create An SSL Certificate?
You can create your own SSL certificate with the OpenSSL binary. A certificate request can then be sent to a certificate authority (CA) to get it signed into a certificate, or if you have your own certificate authority, you may sign it yourself, or you can use a self-signed certificate (because you just want a test certificate or because you are setting up your own CA).
Create your private key (if you haven't created it already):
sudo openssl genrsa -out /opt/bitnami/apache2/conf/server.key 2048
Create a certificate:
sudo openssl req -new -key /opt/bitnami/apache2/conf/server.key -out /opt/bitnami/apache2/conf/cert.csr
IMPORTANT: Enter the server domain name when the above command asks for the "Common Name".
Send cert.csr to the certificate authority. When the certificate authority completes their checks (and probably received payment from you), they will hand over your new certificate to you.
Until the certificate is received, create a temporary self-signed certificate:
sudo openssl x509 -in /opt/bitnami/apache2/conf/cert.csr -out /opt/bitnami/apache2/conf/server.crt -req -signkey /opt/bitnami/apache2/conf/server.key -days 365
Back up your private key in a safe location after generating a password-protected version as follows:
sudo openssl rsa -des3 -in /opt/bitnami/apache2/conf/server.key -out privkey.pem
Note that if you use this encrypted key in the Apache configuration file, it will be necessary to enter the password manually every time Apache starts. Regenerate the key without password protection from this file as follows:
sudo openssl rsa -in privkey.pem -out /opt/bitnami/apache2/conf/server.key
Find more information about certificates at http://www.openssl.org.
The answer is copied from https://docs.bitnami.com/aws/apps/wordpress/#how-to-enable-https-support-with-ssl-certificates in order to be available if the page expires or is changed.
© 2022 - 2024 — McMap. All rights reserved.