Navigation Drawer: Add Titles to Groups, Not Items
Asked Answered
R

5

24

I have a standard Navigation Drawer, pre-created by Android Studio and want to populate it with number of groups. I started with this:

<?xml version="1.0" encoding="utf-8"?>
<menu xmlns:android="http://schemas.android.com/apk/res/android">

    <group android:checkableBehavior="single">
        <item
            android:id="@+id/nav_mode_person"
            android:icon="@drawable/ic_person_black_24dp"
            android:title="Person" />
        <item
            android:id="@+id/nav_mode_group"
            android:icon="@drawable/ic_group_black_24dp"
            android:title="Community" />
    </group>

    <item android:title="Communicate">
        <menu>
            <item
                android:id="@+id/nav_share"
                android:icon="@drawable/ic_menu_share"
                android:title="Share" />
            <item
                android:id="@+id/nav_send"
                android:icon="@drawable/ic_menu_send"
                android:title="Send" />
        </menu>
    </item>

</menu>

But what I didn't get is if it even possible to give each group a title? I mean there is an android:title option available for <item>s, but it is unavailable for <group>s and if I try to wrap groups around items, what I get is a messy entries behavior.

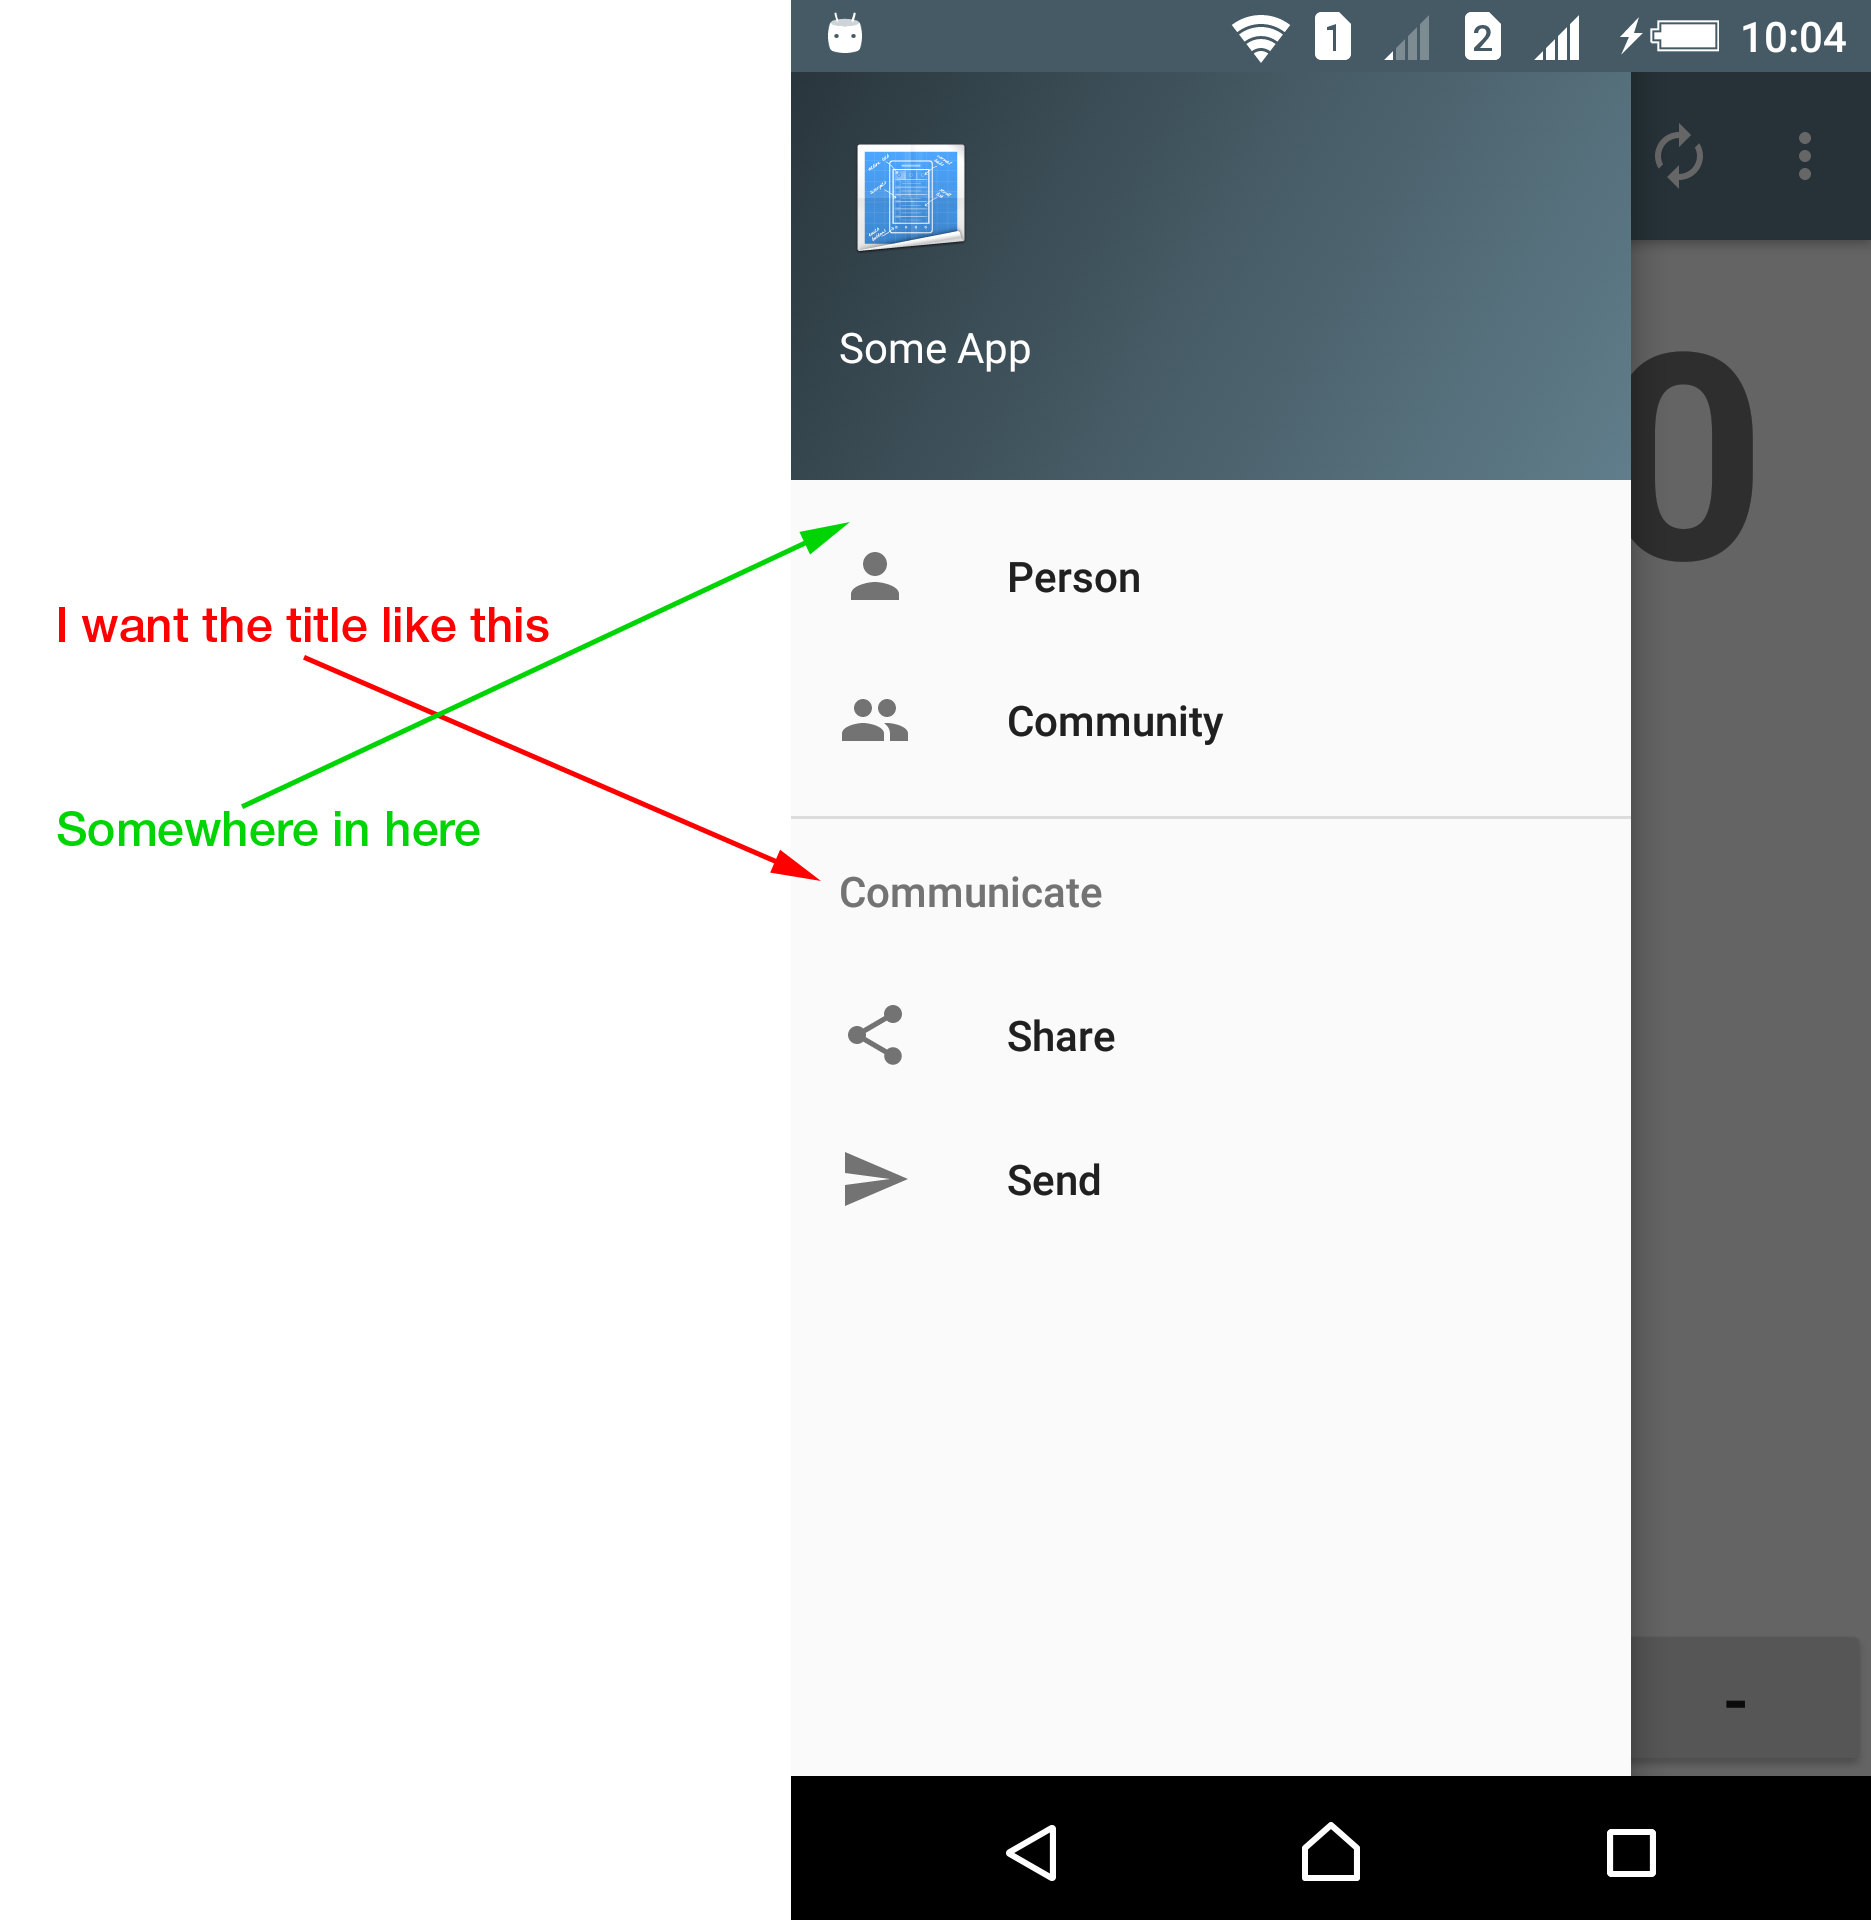
I read through Google's design guideline on Navigation Drawer, but missed the point if groups should have its own names or they should not. Here is a picture of what I want to achieve:

enter image description here

Is it possible without adding random <TextView>s? By the way, I want to do it via XML, not programmatically.

Ropy answered 11/4, 2016 at 7:25 Comment(4)
did u forget picture?Favourite
Possible duplicate of Navigation-drawer group header - how to set up?Telemetry
@TranslucentCloud did you later solve this?Shirleneshirley
Nope. Haven't fired up Android Studio for a while, though.Ropy
N
46

You are right, it's not possible to give groups a title. The only option seems to be to wrap groups into <item> and <menu> tags like this

<?xml version="1.0" encoding="utf-8"?>
<menu xmlns:android="http://schemas.android.com/apk/res/android">

    <item android:title="General">
        <menu>
            <group android:checkableBehavior="single">
                <item
                    android:id="@+id/nav_camera"
                    android:icon="@drawable/ic_menu_camera"
                    android:title="Import" />
                <item
                    android:id="@+id/nav_gallery"
                    android:icon="@drawable/ic_menu_gallery"
                    android:title="Gallery" />
            </group>
        </menu>
    </item>

    <item android:title="Communicate">
        <menu>
            <item
                android:id="@+id/nav_share"
                android:icon="@drawable/ic_menu_share"
                android:title="Share" />
            <item
                android:id="@+id/nav_send"
                android:icon="@drawable/ic_menu_send"
                android:title="Send" />
        </menu>
    </item>

</menu>

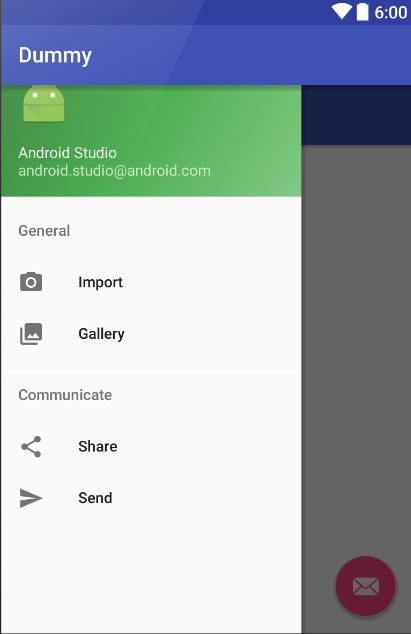
Resulting in a navigation drawer menu like this

Navigation Drawer

Newsdealer answered 11/4, 2016 at 7:55 Comment(6)
I tried that but unfortunately things get messy if you try to check some item programmatically at the activity creation time. When setting item pre-checked this way (Import for example), if user taps different item (Gallery), the first stay checked. User should additionally tap Import and Gallery multiple times to get first entry unchecked. This is why I rejected this workaround.Ropy
You didn't write about this initially, so no reason to downvote my answer. If the groups checkableBehavior does not work for you, then you have to do it programmatically. Check the selected item and uncheck all others on Activity creation and on every item click.Newsdealer
Actually I wrote about it, but not in details: if I try to wrap groups around items, what I get is a messy entries behavior. The downvote is legit, since your answer totally ignores this.Ropy
@Newsdealer This is exactly what I wanted,thanks! My another concern is I want to hide/unhide menu items dynamically,which I achieved with menuItem.setVisible(true); .But it is not working for the items which are inside another item, like Import in the above example.How do I achieve this ?Suffer
@Suffer I had the same problem setting items to visible/invisible. I need to use findItem() on the menu instead of iterating through all items (where the nested items are not found).Senaidasenalda
Should be the accepted answer. It worked perfectly for me in 2021.Loni
I
16

You also required to have an outer group with android:checkableBehavior="single" so that no two item is selected one from First Category and other from Second Category. Here is the working code.

<?xml version="1.0" encoding="utf-8"?>
<menu xmlns:android="http://schemas.android.com/apk/res/android">
<group android:checkableBehavior="single">
<item
    android:title="First Category">
    <menu>
        <group
            android:id="@+id/menu_top"
            android:checkableBehavior="single">
            <item
                android:id="@+id/id1"
                android:icon="@drawable/drawable1"
                android:title="Title1" />

            <item
                android:id="@+id/id2"
                android:icon="@drawable/drawable2"
                android:title="Title2" />
        </group>
    </menu>
</item>
<item
    android:title="Second Category">
    <menu>
        <group
            android:id="@+id/menu_bottom"
            android:checkableBehavior="single">
            <item
                android:id="@+id/id3"
                android:icon="@drawable/drawable3"
                android:title="Title3" />

            <item
                android:id="@+id/id4"
                android:icon="@drawable/drawable4"
                android:title="Title4" />
        </group>
    </menu>
</item>
</group>
</menu>
Intangible answered 16/12, 2016 at 18:15 Comment(1)
Why is the first category not clickable any more? I used this example, looks pretty nice and is what I exactly was looking for. I have up to four categories in my Navigation Drawer and now only items in one category is clickable. I tried to play with android:checkableBehavior="single", moving, removing and pasting in different places in groups, but no success, only in one category are menu items clickable. Any Ideas? Many thanks in advanced!Walkyrie
F
6

Here is well defined how to create menus.

http://developer.android.com/guide/topics/ui/menus.html

So in your case create your list in this order item->menu->group. that is to say:

 <item android:title="Title">
     <menu>
         <group android:checkableBehavior="single">
             <item android:id="@+id/nav_share"
                android:icon="@drawable/ic_menu_share"
                android:title="Share" />
            <item
                android:id="@+id/nav_send"
                android:icon="@drawable/ic_menu_send"
                android:title="Send" />
                .   .   .
                .   .   . 
Favourite answered 11/4, 2016 at 7:47 Comment(1)
The same problem I described in the comment to the answer of @Saenic.Ropy
H
1

For someone out there, that still struggling. Especially on DrawerLayout + Jetpack Navigation. I'm gonna drop my own implementation. After messing up with menu, NavigationView, and Jetpack Navigation. Just do a basic setup for Drawer Navigation and use this menu as NavigationView menus for 'named group'.

<?xml version="1.0" encoding="utf-8"?>
<menu xmlns:android="http://schemas.android.com/apk/res/android"
    xmlns:tools="http://schemas.android.com/tools"
    tools:showIn="navigation_view">

    <!-- Group for menu item without title -->
    <group android:checkableBehavior="single">
        <item
            android:id="@+id/yourFragment1"
            android:title="Fragment 1"/>
    </group>


    <item android:title="Group 1">
        <menu>
            <group
                android:checkableBehavior="single">
                <item
                    android:id="@+id/yourFragment2"
                    android:title="Fragment 2"/>

                <item
                    android:id="@+id/yourFragment3"
                    android:title="Fragment 3"/>
            </group>
        </menu>
    </item>

    <item android:title="Group 2">
        <menu>
            <group
                android:checkableBehavior="single">
                <item
                    android:id="@+id/yourFragment4"
                    android:title="Fragment 4"/>

                <item
                    android:id="@+id/yourFragment5"
                    android:title="Fragment 5"/>

                <item
                    android:id="@+id/yourFragment6"
                    android:title="Fragment 6"/>
            </group>
        </menu>
    </item>
</menu>

You can also add options other than navigating to another fragment, for example for the logout option. Just do like down below.

navigationView.setNavigationItemSelectedListener { dest ->

    if (dest.itemId == R.id.yourMenuIdOfLogoutInMenuXML) {
        logoutUser();
    } else {
        // This will navigate to a corresponding fragments
        NavigationUI.onNavDestinationSelected(dest, navController)

        // drawerLayout is reference to DrawerLayout widget component
        drawerLayout.closeDrawer(GravityCompat.START)
    }

    true
}

And if you want to check a certain menu programmatically you can just call

// navigationView is a reference to your NavigationView component.
navigationView.setCheckedItem(R.id.idOfMenuThatYouWantToCheck)

PS. For those of you that don't know how to set up DrawerLayout with Jetpack Navigation please refer to this example Setup Jetpack Navigation with DrawerLayout.

Haply answered 12/11, 2021 at 14:41 Comment(0)
B
0

add xml class navigation_drawer_title:

<?xml version="1.0" encoding="utf-8"?>
<TextView
        xmlns:android="http://schemas.android.com/apk/res/android"
        android:layout_width="wrap_content"
        android:text="communicate"
        android:layout_height="wrap_content"/>

and change your navigationAdapter like this

private static final int TYPE_HEADER = 0; 
    private static final int TYPE_ITEM = 1;
    private static final int TYPE_SEPARATOR = 2;
    private static final int TYPE_TITLE = 3;
    @Override
        public ViewHolder onCreateViewHolder(ViewGroup parent, int viewType)
        {
            View v = null;
            switch (viewType)
            {
                case TYPE_HEADER:
                    v = LayoutInflater.from(parent.getContext()).inflate(R.layout.navigation_drawer_header, parent, false); //Inflating the layout
                    break;
                case TYPE_ITEM:
                    v = LayoutInflater.from(parent.getContext()).inflate(R.layout.navigation_drawer_item, parent, false); //Inflating the layout
                    break;
                case TYPE_SEPARATOR:
                    v = LayoutInflater.from(parent.getContext()).inflate(R.layout.navigation_drawer_separator, parent, false); //Inflating the layout
                    break;

                case TYPE_TITLE:
                    v = LayoutInflater.from(parent.getContext()).inflate(R.layout.navigation_drawer_title, parent, false); //Inflating the layout
                    break;
            }
            return new ViewHolder(v, viewType); // Returning the created object

        }

and

@Override
    public int getItemViewType(int position)
    {
        if (position == 0)
            return TYPE_HEADER;
        if (navMenuItems.get(position - 1).getItemType() == NavItemType.Group)
            return TYPE_SEPARATOR;
        if (navMenuItems.get(position - 2).getItemType() == NavItemType.Group)
            return TYPE_TITLE

        return TYPE_ITEM;
    }
Bushed answered 11/4, 2016 at 8:2 Comment(2)
I stated in my question, that I don't want to try to resolve this programmatically.Ropy
i have no idea.i just did it in adapter.Bushed

© 2022 - 2024 — McMap. All rights reserved.