Inner PreferenceScreen does not open with PreferenceFragmentCompat
Asked Answered
R

8

25

My inner PreferenceScreen of PreferenceFragmentCompat is not showing, or seems to ignore tapping events.

I created MyPreferenceFragment that extends PreferenceFragmentCompat

public class MyPreferenceFragment extends PreferenceFragmentCompat {
 @Override
  public void onCreatePreferences(Bundle savedInstanceState, String rootKey) {
    addPreferencesFromResource(R.xml.preferences);
  }
}

then I changed my theme at styles.xml like

<style name="AppTheme" parent="@style/Theme.AppCompat.Light">
  <item name="preferenceTheme">@style/PreferenceThemeOverlay</item>
</style>

And finally create my preferences.xml file like

<PreferenceScreen xmlns:android="http://schemas.android.com/apk/res/android">
    <CheckBoxPreference android:title="Check Me"/>
    <PreferenceScreen android:title="My Screen"> <!-- This is not opening -->
        <EditTextPreference android:title="Edit text" />
    </PreferenceScreen>
</PreferenceScreen>

At the build.gradle I have added both:

compile 'com.android.support:appcompat-v7:23.0.1'
compile 'com.android.support:preference-v7:23.0.1'

code of the Activity

public class MainActivity extends AppCompatActivity {

    @Override
    protected void onCreate(Bundle savedInstanceState) {
        super.onCreate(savedInstanceState);
        setContentView(R.layout.activity_main);
    }
}

activity_main.xml

<fragment xmlns:android="http://schemas.android.com/apk/res/android"
    android:id="@+id/fragment"
    android:name="com.mando.preferenceapp.MyPreferenceFragment"
    android:layout_width="match_parent"
    android:layout_height="match_parent" />

Testing the above code I cannot open / get into the preference screen. Am I missing something? Why this isn't working?

Repose answered 9/9, 2015 at 18:55 Comment(3)
Added the activity, but note that it has no difference if I add the activity at the xml or use FragmentManager and replace. The same behavior happens and if the preference fragment is part of a ViewPager.Repose
If I get it right, you are supposed to handle nested PreferenceScreens yourself. For example, if you add this to your PreferenceFragmentCompat, it will work: @Override public void onNavigateToScreen(PreferenceScreen preferenceScreen) {setPreferenceScreen(preferenceScreen);}, although this will obviously not add the new screen to the back button. I assume they want us to create Intents or swap Fragments using this method or OnPreferenceStartFragmentCallback.Stairwell
The implementation of method onNavigateToScreen worked and switched the screen! But I cannot really understand how to use the OnPreferenceStartFragmentCallback and OnPreferenceStartScreenCallback to make it work as it should. I can achieve my wanted functionality with the hacky way of overriding the back button and a stack that keeps my PreferenceScreens. But I would prefer the right way, I've tried some wild guesses of possible implementations for these interface but it's not my night tonight! So any demonstration example will be appreciated.Repose
R
40

After spending many many hours with tries, searching and thankfully with some assistance from the creators of the support library. I've managed to make it work.

Step 1. Activity

public class MyActivity extends AppCompatActivity implements
        PreferenceFragmentCompat.OnPreferenceStartScreenCallback {

    @Override
    protected void onCreate(Bundle savedInstanceState) {
        super.onCreate(savedInstanceState);
        setContentView(R.layout.activity_main);

        if (savedInstanceState == null) {
            // Create the fragment only when the activity is created for the first time.
            // ie. not after orientation changes
            Fragment fragment = getSupportFragmentManager().findFragmentByTag(MyPreferenceFragment.FRAGMENT_TAG);
            if (fragment == null) {
                fragment = new MyPreferenceFragment();
            }

            FragmentTransaction ft = getSupportFragmentManager().beginTransaction();
            ft.replace(R.id.fragment_container, fragment, MyPreferenceFragment.FRAGMENT_TAG);
            ft.commit();
        }
    }

    @Override
    public boolean onPreferenceStartScreen(PreferenceFragmentCompat preferenceFragmentCompat,
                                           PreferenceScreen preferenceScreen) {
        FragmentTransaction ft = getSupportFragmentManager().beginTransaction();
        MyPreferenceFragment fragment = new MyPreferenceFragment();
        Bundle args = new Bundle();
        args.putString(PreferenceFragmentCompat.ARG_PREFERENCE_ROOT, preferenceScreen.getKey());
        fragment.setArguments(args);
        ft.replace(R.id.fragment_container, fragment, preferenceScreen.getKey());
        ft.addToBackStack(preferenceScreen.getKey());
        ft.commit();
        return true;
    }
}

Tips.

  • Do not add the fragment by xml you will have crashes on orientation changes.
  • Handle the recreations of activity / fragment add in onCreate so as to avoid losing your fragment when inside a preference screen.
  • The host activity of the fragment should implement the PreferenceFragmentCompat.OnPreferenceStartScreenCallback and recreate fragments of the same instance.

Step 2. PreferenceFragment

public class MyPreferenceFragment extends PreferenceFragmentCompat {

    public static final String FRAGMENT_TAG = "my_preference_fragment";

    public MyPreferenceFragment() {
    }

    @Override
    public void onCreatePreferences(Bundle bundle, String rootKey) {
        setPreferencesFromResource(R.xml.preferences, rootKey);
    }

}

Tips.

  • Use the method setPreferencesFromResource and take advantage of the rootKey of each screen. This way your code will be reused properly.
  • Keep in mind that if you have code like findPreference in your fragment it should have null checks as when you were in inner screens this will give you nothing.

The thing that is missing now is the implementation of the back arrow in the actionbar (home action) but this never works by itself ;-)

I' also created a demo app wrapping all this code you can find it on github.

Repose answered 12/9, 2015 at 15:15 Comment(6)
Thanks for your minimal workable code. I had extended your work, by adding a back arrow. I tend to change the action bar look, when entering inner preference screen. But, I don't know the correct way, to restore back action bar look, when exiting from inner preference screen. My current method work but it looks kinda hackish. github.com/yccheok/PreferenceApp/commits/master Please feel free to provide some input. Thanks :)Menstruation
@CheokYanCheng I checked the code. The only think to avoid the hackish (if it is) onBackPressed is to implement the title in onResume of the fragment. I am not sure if this is straight forward or you need to use it along with the onUserVisible method.Repose
Thanks, by only overriding onViewCreated() and painting the view's background to white helped me to get rid of black background.Giraffe
You can use ft.replace(..) instead of ft.add(...) in your MyActivity. This will prevent the overlapping fragments, so that you won't need to use view.setBackgroundColor(..) in MyPreferenceFragment.Moldboard
@Repose with this solution PreferenceScreen can't have android:dependency on parent preference! any idea about that?Hoffert
@Repose can you help me here --> #59713470Heavy
L
8

Solution is to start another fragment of the same class but with different root key. No Activity actions involved.

@Override
public void onCreatePreferences(Bundle savedInstanceState, String rootKey){
    if(getArguments() != null){
        String key = getArguments().getString("rootKey");
        setPreferencesFromResource(R.xml.preferences, key);
    }else{
        setPreferencesFromResource(R.xml.preferences, rootKey);
    }
}

@Override
public void onNavigateToScreen(PreferenceScreen preferenceScreen){
    ApplicationPreferencesFragment applicationPreferencesFragment = new ApplicationPreferencesFragment();
    Bundle args = new Bundle();
    args.putString("rootKey", preferenceScreen.getKey());
    applicationPreferencesFragment.setArguments(args);
    getFragmentManager()
            .beginTransaction()
            .replace(getId(), applicationPreferencesFragment)
            .addToBackStack(null)
            .commit();
}
Lewd answered 12/9, 2017 at 14:45 Comment(3)
What does R.id.container reference in this example?Enticement
I've updated the example to use getId() as that makes more sense IMHO. I've implemented the above example and it works really well - including back button support.Enticement
Who's setting "rootKey" in arguments? In my case it's always null and it simply doesn't work. Something is missing in this example. Should I setup rootKey manually somewhere? In XML all my PreferenceScreen elements do have "android:key" attribute set.Immunochemistry
S
5

I did it slightly differently, I'm launching a new activity for each screen. This seems to require less hacks: no need to mess with swapping fragments and background colors. You also get activity change animation as a bonus!

public class PreferencesActivity extends AppCompatActivity implements PreferenceFragmentCompat.OnPreferenceStartScreenCallback {
    final static private String KEY = "key";

    @Override protected void onCreate(Bundle savedInstanceState) {
        super.onCreate(savedInstanceState);

        setContentView(R.layout.preferences);

        setSupportActionBar((Toolbar) findViewById(R.id.toolbar));
        ActionBar actionBar = getSupportActionBar();
        if (actionBar != null) actionBar.setDisplayHomeAsUpEnabled(true);

        if (savedInstanceState != null)
            return;

        Fragment p = new PreferencesFragment();

        String key = getIntent().getStringExtra(KEY);
        if (key != null) {
            Bundle args = new Bundle();
            args.putString(PreferenceFragmentCompat.ARG_PREFERENCE_ROOT, key);
            p.setArguments(args);
        }

        getSupportFragmentManager().beginTransaction()
                .add(R.id.preferences, p, null)
                .commit();
    }

    @Override public boolean onPreferenceStartScreen(PreferenceFragmentCompat preferenceFragmentCompat, PreferenceScreen preferenceScreen) {
        Intent intent = new Intent(PreferencesActivity.this, PreferencesActivity.class);
        intent.putExtra(KEY, preferenceScreen.getKey());
        startActivity(intent);
        return true;
    }

    @Override public boolean onOptionsItemSelected(MenuItem item) {
        if (item.getItemId() == android.R.id.home) {
            onBackPressed();
            return true;
        }
        return super.onOptionsItemSelected(item);
    }

    public static class PreferencesFragment extends PreferenceFragmentCompat implements ... {

        private static final String FRAGMENT_DIALOG_TAG = "android.support.v7.preference.PreferenceFragment.DIALOG";
        private String key;


        @Override public void onCreatePreferences(Bundle bundle, String key) {
            setPreferencesFromResource(R.xml.preferences, this.key = key);
        }

        // this only sets the title of the action bar
        @Override public void onActivityCreated(Bundle savedInstanceState) {
            ActionBar actionBar = ((AppCompatActivity) getActivity()).getSupportActionBar();
            if (actionBar != null) actionBar.setTitle((key == null) ? "Settings" : findPreference(key).getTitle());
            super.onActivityCreated(savedInstanceState);
        }
    }
}

xml:

<?xml version="1.0" encoding="utf-8"?>
<LinearLayout xmlns:android="http://schemas.android.com/apk/res/android"
    android:layout_width="match_parent"
    android:layout_height="match_parent"
    android:layout_margin="0dp"
    android:orientation="vertical"
    android:padding="0dp"
    android:id="@+id/preferences">

    <android.support.v7.widget.Toolbar
        android:id="@+id/toolbar"
        android:layout_width="match_parent"
        android:layout_height="?attr/actionBarSize"
        android:background="?attr/colorPrimary" />

    <!-- preference fragment will be inserted here programmatically -->

</LinearLayout>
Stairwell answered 22/9, 2015 at 17:37 Comment(0)
A
2

Another solution is to track the preference screens yourself and use the PreferenceFragmentCompat api

Here's the basic solution. (It doesn't cover all the edge cases, see advanced solution below)

Ensure you have configChanges="orientation" to prevent create/destroy

    <activity
        android:name=".MyPreferencesActivity"
        android:configChanges="orientation" />

In the Activity you want to keep a Stack of PreferenceScreens and push/pop as needed

    /* track the screens as a Stack */
    private Stack<PreferenceScreen> preferenceScreens = new Stack<>();

    // ensure your Activity implements PreferenceFragmentCompat.OnPreferenceStartScreenCallback
    @Override
    public boolean onPreferenceStartScreen(PreferenceFragmentCompat preferenceFragmentCompat, PreferenceScreen preferenceScreen) {
        preferenceScreens.push(preferenceFragmentCompat.getPreferenceScreen());
        preferenceFragmentCompat.setPreferenceScreen(preferenceScreen);
        return true;
    }

    @Override
    public void onBackPressed() {
        if (preferenceScreens.empty()) {
            super.onBackPressed();
        } else {
            prefsFragment.setPreferenceScreen(preferenceScreens.pop());
        }
    }

Optional: In your Fragment that extends PreferenceFragmentCompat, add setRetainInstance(true). (Note that without this it will likely work also, but it 'could' break occasionally. If you set 'Don't keep Activities' to true, and you'll see that it will get collected)

    @Override
    public void onCreatePreferences(Bundle savedInstanceState, String rootKey) {

        setRetainInstance(true);

        // Load the preferences from an XML resource
        setPreferencesFromResource(R.xml.preferences, rootKey);
    ...

That's it! Except that if you want to cover edge cases...

Advanced Solution (If you set 'Don't Keep Activities to True, you'll need to ensure you can rebuild everything from savedInstanceState)

Note that the accepted answer doesn't actually preserve state.

  1. set 'Don't Keep Activities' to True
  2. navigate to a nested PreferenceScreen
  3. Press home and then navigate back to the app
  4. It 'should' still be on the Nested PreferenceScreen, but it's actually on the root one

Full Advanced Solution using PreferenceFragmentCompat api and preserving the PreferenceScreen stack

import android.os.Bundle;
import android.support.v7.app.AppCompatActivity;
import android.support.v7.preference.PreferenceFragmentCompat;
import android.support.v7.preference.PreferenceScreen;
import java.util.ArrayList;
import java.util.Objects;
import java.util.Stack;

/**
 * Class to Show the preference screen with Activity keeping state
 * @author Aaron Vargas
 */
public class MyPreferencesActivityStateful extends AppCompatActivity implements PreferenceFragmentCompat.OnPreferenceStartScreenCallback {
    private static final String PREFERENCE_SCREENS = "PREFERENCE_SCREENS";
    private PrefsFragment prefsFragment;
    private Stack<PreferenceScreen> preferenceScreens = new Stack<>();

    @Override
    protected void onCreate(Bundle savedInstanceState) {
        super.onCreate(savedInstanceState);

        // Display the fragment as the main content. Re-Use if possible
        String tag = PrefsFragment.class.getName();
        prefsFragment = (PrefsFragment) getSupportFragmentManager().findFragmentByTag(tag);
        if (prefsFragment == null) prefsFragment = new PrefsFragment();

        getSupportFragmentManager().beginTransaction().replace(android.R.id.content,
                prefsFragment, tag).commit();
    }

    @Override
    protected void onRestoreInstanceState(Bundle savedInstanceState) {
        super.onRestoreInstanceState(savedInstanceState);

        // rebuild preferenceScreen stack
        for (String screenKey : Objects.requireNonNull(savedInstanceState.getStringArrayList(PREFERENCE_SCREENS))) {
            preferenceScreens.push((PreferenceScreen) prefsFragment.findPreference(screenKey));
        }

        PreferenceScreen preferenceScreen = preferenceScreens.pop();
        if (preferenceScreen != prefsFragment.getPreferenceScreen()) { // optimize if same
            prefsFragment.setPreferenceScreen(preferenceScreen);
        }
    }

    @Override
    public boolean onPreferenceStartScreen(PreferenceFragmentCompat preferenceFragmentCompat, PreferenceScreen preferenceScreen) {
        preferenceScreens.push(preferenceFragmentCompat.getPreferenceScreen());
        preferenceFragmentCompat.setPreferenceScreen(preferenceScreen);
        return true;
    }

    @Override
    public void onBackPressed() {
        // account for onRestore not getting called equally to onSave
        while (preferenceScreens.contains(prefsFragment.getPreferenceScreen())) {
            preferenceScreens.remove(prefsFragment.getPreferenceScreen());
        }

        if (preferenceScreens.empty()) {
            super.onBackPressed();
        } else {
            prefsFragment.setPreferenceScreen(preferenceScreens.pop());
        }
    }

    @Override
    protected void onSaveInstanceState(Bundle outState) {
        super.onSaveInstanceState(outState);
        preferenceScreens.push(prefsFragment.getPreferenceScreen());

        ArrayList<String> keys = new ArrayList<>(preferenceScreens.size());
        for (PreferenceScreen screen : preferenceScreens) {
            keys.add(screen.getKey());
        }
        outState.putStringArrayList(PREFERENCE_SCREENS, keys);
    }

    public static class PrefsFragment extends PreferenceFragmentCompat {

        @Override
        public void onCreatePreferences(Bundle savedInstanceState, String rootKey) {

            setRetainInstance(true); // ensure in manifest - android:configChanges="orientation"

            // Load the preferences from an XML resource
            setPreferencesFromResource(R.xml.preferences, rootKey);
        }
    }

}

You can also handle all this in your Fragment instead of the Activity. Here's a gist of that https://gist.github.com/aaronvargas/0f210ad8643b512efda4acfd524e1232

Arda answered 2/11, 2018 at 20:6 Comment(0)
T
2

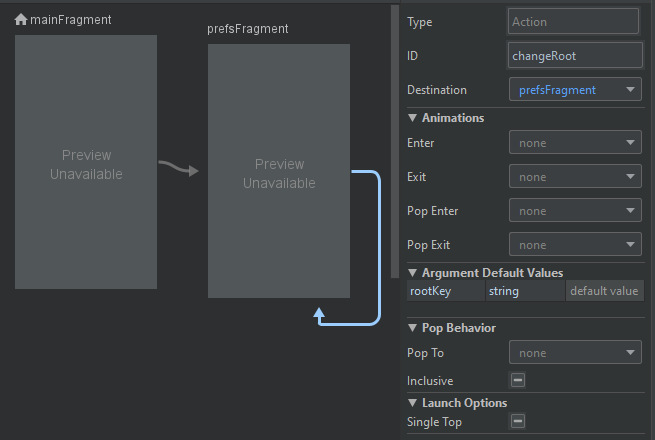
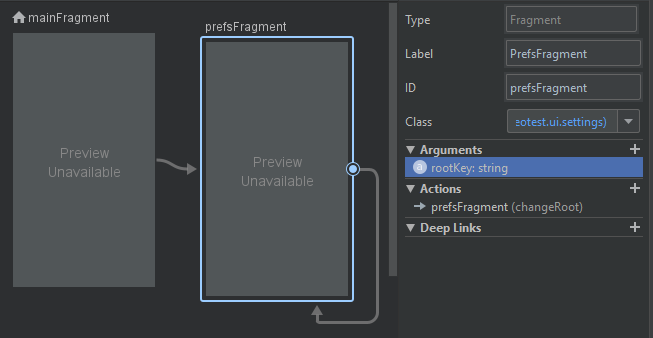
Using Navigation Component (Android Jetpack) and Kotlin it's very easy now:

class PrefsFragment : PreferenceFragmentCompat() {
    private val args: PrefsFragmentArgs by navArgs()

    override fun onCreatePreferences(state: Bundle?, rootKey: String?) {
        setPreferencesFromResource(R.xml.prefs, args.rootKey)
    }

    override fun onNavigateToScreen(preferenceScreen: PreferenceScreen?) {
        findNavController().navigate(
            PrefsFragmentDirections.changeRoot(preferenceScreen!!.key)
        )
    }
}

enter image description here

enter image description here

Trainer answered 31/12, 2019 at 20:54 Comment(0)
G
0

Based on @squirrel Intent solution, I made it work this way. It requires even less hacking.
Activity:

import android.support.v7.app.AppCompatActivity;

public class SettingsActivity extends AppCompatActivity {

    public static final String TARGET_SETTING_PAGE = "target";

    @Override
    protected void onCreate(Bundle savedInstanceState) {
        super.onCreate(savedInstanceState);

        SettingsFragment settingsFragment = new SettingsFragment();
        Intent intent = getIntent();
        if (intent != null) {
            String rootKey = intent.getStringExtra(TARGET_SETTING_PAGE);
            if (rootKey != null) {
                settingsFragment.setArguments(Bundler.single(TARGET_SETTING_PAGE, rootKey));
            }
        }

        getFragmentManager().beginTransaction()
                .replace(android.R.id.content, settingsFragment)
                .commit();
    }
}

Fragment:

import android.support.v14.preference.PreferenceFragment;

public class SettingsFragment extends PreferenceFragment {

    @Override
    public void onCreate(Bundle savedInstanceState) {
        super.onCreate(savedInstanceState);

        Bundle arguments = getArguments();
        if (arguments != null && arguments.getString(TARGET_SETTING_PAGE) != null) {
            setPreferencesFromResource(R.xml.preferences, arguments.getString(TARGET_SETTING_PAGE));
        } else {
            addPreferencesFromResource(R.xml.preferences);
        }
    }

    @Override
    public void onNavigateToScreen(PreferenceScreen preferenceScreen) {
        Intent intent = new Intent(getActivity(), SettingsActivity.class)
                .putExtra(TARGET_SETTING_PAGE, preferenceScreen.getKey());
        startActivity(intent);

        super.onNavigateToScreen(preferenceScreen);
    }
}

It is sad you need so much hacks in the support appcompat libraries for something that works flawlessly out-of-the-box in standard android.

Geomancy answered 7/5, 2017 at 9:19 Comment(0)
R
0

Alternative using Navigation component + androidx.appcomat: https://mcmap.net/q/536809/-how-to-open-a-new-preferencefragment-from-current-one-using-the-new-android-x-api

With this, you wont loose the back stack and go back to main page settings when you press back button.

Rothermere answered 14/1, 2020 at 11:10 Comment(0)
S
0

Here is a simple solution from android documentation. To implement inner preference screen navigation with PreferenceFragmentCompact all you have to do is add fragment attribute to the embedded preference screen giving the fragment full path to navigate to eg. com.example.FragmentName.

Sample code:

 <PreferenceCategory app:title="@string/choose_theme"
        android:icon="@drawable/ic_baseline_color_lens_24">
        <SwitchPreference
            android:title="@string/apply_night_mode"
            android:key="@string/key_enable_night_mode"/>
        <PreferenceScreen
            android:fragment="com.example.simbokeyboard.BlankFragment"
            android:title="Custom Theme"
            android:summary="@string/theme_summary">
            <Preference
                android:key="@string/choose_theme"
                android:title="@string/choose_theme"
                android:layout="@layout/theme_chooser"/>
        </PreferenceScreen>
    </PreferenceCategory>
Sapodilla answered 24/7, 2021 at 22:39 Comment(0)

© 2022 - 2024 — McMap. All rights reserved.