Is there an addHeaderView equivalent for RecyclerView?
Asked Answered
B

21

330

I'm looking for an equivalent to addHeaderView for a recycler view. Basically I want to have an image with 2 buttons be added as a header to the listview. Is there a different way to add a header view to a recycler view? An example for guidance would be helpful

EDIT 2 (added fragment layouts):

After adding log statements, it seems as though getViewType only ever receives a position of 0. This leads to onCreateView only loading the one layout:

10-26 16:32:53.766    5449-5449/co.testapp I/logger info﹕ Adapter-> getItemCount: 5
10-26 16:32:53.766    5449-5449/co.testapp I/logger info﹕ Adapter-> getItemViewType position: 0
10-26 16:32:53.766    5449-5449/co.testapp I/logger info﹕ Adapter-> onCreateViewHolder, viewtype: 0
10-26 16:32:53.766    5449-5449/co.testapp I/logger info﹕ Adapter-> onBindViewHolder, viewType: 0

The fragment transition to load the CommentFragment:

@Override
public void onPhotoFeedItemClick(View view, int position) {
    if (fragmentManager == null)
        fragmentManager = getSupportFragmentManager();

FragmentTransaction fragmentTransaction = fragmentManager.beginTransaction();

    if (view.getId() == R.id.button_comment){
        CommentFragment commentFragment = CommentFragment.newInstance("","", position);
        fragmentTransaction.add(R.id.main_activity, commentFragment,"comment_fragment_tag");
        fragmentTransaction.addToBackStack(Constants.TAG_COMMENTS);
        fragmentTransaction.commit();
    }
}

The Fragment's onCreateView:

@Override
public View onCreateView(LayoutInflater inflater, ViewGroup container,
                         Bundle savedInstanceState) {

    View view = inflater.inflate(R.layout.fragment_comment, container, false);
    mRecyclerView = (RecyclerView) view.findViewById(R.id.list_recylclerview);
    mRecyclerView.setLayoutManager(new LinearLayoutManager(_context));
    mRecyclerView.setItemAnimator(new DefaultItemAnimator());
    mAdapter = new CommentAdapter(R.layout.row_list_comments, R.layout.row_header_comments, _context, comments);
    mRecyclerView.setAdapter(mAdapter);
    return view;
}

The fragment containing the recycleview:

<RelativeLayout xmlns:android="http://schemas.android.com/apk/res/android"
    xmlns:tools="http://schemas.android.com/tools"
    android:layout_width="fill_parent"
    android:layout_height="fill_parent"
    tools:context="co.testapp.fragments.CommentFragment"
    android:background="@color/white">
        <RelativeLayout
            android:layout_width="fill_parent"
            android:layout_height="fill_parent"
            android:orientation="vertical">
            <android.support.v7.widget.RecyclerView
                xmlns:android="http://schemas.android.com/apk/res/android"
                android:id="@+id/list_recylclerview"
                android:layout_width="match_parent"
                android:layout_height="200dp" />
        </RelativeLayout>
</RelativeLayout>

The comments row layout:

<?xml version="1.0" encoding="utf-8"?>

<RelativeLayout xmlns:android="http://schemas.android.com/apk/res/android"
    android:orientation="vertical" android:layout_width="match_parent"
    android:layout_height="match_parent" android:layout_margin="10dp"
    android:background="@color/white">
    <!--Profile Picture-->
    <ImageView
        android:layout_width="80dp"
        android:layout_height="80dp"
        android:id="@+id/profile_picture"
        android:background="@color/blue_testapp"/>
    <!--Name-->
    <TextView
        android:layout_width="wrap_content"
        android:layout_height="wrap_content"
        android:layout_marginLeft="10dp"
        android:text="First Name Last Name"
        android:textSize="16dp"
        android:textColor="@color/blue_testapp"
        android:id="@+id/name_of_poster"
        android:layout_toRightOf="@id/profile_picture"
        />
    <!--Comment-->
    <TextView
        android:layout_width="wrap_content"
        android:layout_height="wrap_content"
        android:layout_margin="10dp"
        android:layout_marginTop="-5dp"
        android:text="This is a test comment"
        android:textSize="14dp"
        android:textColor="@color/black"
        android:id="@+id/comment"
        android:layout_below="@id/name_of_poster"
        android:layout_toRightOf="@id/profile_picture"/>
</RelativeLayout>

The header

<LinearLayout xmlns:android="http://schemas.android.com/apk/res/android"
              android:orientation="vertical"
              android:layout_width="match_parent"
              android:layout_height="match_parent">
    <ImageView
        android:layout_width="wrap_content"
        android:layout_height="300dp"
        android:id="@+id/header_photo"
        android:layout_gravity="center_horizontal"/>
</LinearLayout>

The Adapter code (thanks to hister for getting me started):

public class CommentAdapter extends RecyclerView.Adapter<ViewHolder>{

    private final int rowCardLayout;
    public static Context mContext;
    private final int headerLayout;
    private final String [] comments;
    private static final int HEADER = 0;
    private static final int OTHER = 1;

    public CommentAdapter(int rowCardLayout, int headerLayout, Context context, String [] comments) {
        this.rowCardLayout = rowCardLayout;
        this.mContext = context;
        this.comments = comments;
        this.headerLayout = headerLayout;
    }

    @Override
    public ViewHolder onCreateViewHolder(ViewGroup viewGroup, int i) {
        logger.i("onCreateViewHolder, viewtype: " + i); //viewtype always returns 0 so OTHER layout is never inflated
        if (i == HEADER) {
            View v = LayoutInflater.from(viewGroup.getContext()).inflate(headerLayout, viewGroup, false);
            return new ViewHolderHeader(v);
        }
        else if (i == OTHER){
            View v = LayoutInflater.from(viewGroup.getContext()).inflate(rowCardLayout, viewGroup, false);
            return new ViewHolderComments(v);
        }
        else 
          throw new RuntimeException("Could not inflate layout");
    }

    @Override
    public void onBindViewHolder(ViewHolder viewHolder, int i) {
        logger.i("onBindViewHolder, viewType: " + i);

        if (viewHolder instanceof ViewHolderComments)
            ((ViewHolderComments) viewHolder).comment.setText(comments[i].toString());
        if (viewHolder instanceof ViewHolderHeader)
           ((ViewHolderHeader) viewHolder).header.setImageResource(R.drawable.image2);
        else {
            logger.e("no instance of viewholder found");
        }
    }

    @Override
    public int getItemCount() {
        int count = comments.length + 1;
        logger.i("getItemCount: " + count);
        return count;
    }

    @Override
    public int getItemViewType(int position) {
        logger.i("getItemViewType position: " + position);
        if (position == HEADER)
            return HEADER;
        else
            return OTHER;
    }

    public static class ViewHolderComments extends RecyclerView.ViewHolder {
        public TextView comment;
        public ImageView image;

        public ViewHolderComments(View itemView) {
            super(itemView);
            comment = (TextView) itemView.findViewById(R.id.comment);
            image = (ImageView) itemView.findViewById(R.id.image);
        }
    }

    public static class ViewHolderHeader extends RecyclerView.ViewHolder {
        public final ImageView header;

        public ViewHolderHeader(View itemView){
            super(itemView);
            header = (ImageView) itemView.findViewById(R.id.header_photo);
        }
    }
}

Using the above code, only the header layout is displayed as viewType is always 0. It looks like this. If I force the other layout it looks like this:

Beverie answered 23/10, 2014 at 14:39 Comment(4)
possible duplicate of Android 5.0 - Add header/footer to a RecyclerViewIllinium
As this is a duplicate of the question here, I posted my answer there:Illinium
An elegant solution: #33580300Stanchion
I am late but there is a bit of correction in yout code.change private static final int HEADER = 0; to private static final int HEADER = 1;Altis
F
488

There isn't an easy way like listview.addHeaderView() but you can achieve this by adding a type to your adapter for header.

Here is an example

public class HeaderAdapter extends RecyclerView.Adapter<RecyclerView.ViewHolder> {
    private static final int TYPE_HEADER = 0;
    private static final int TYPE_ITEM = 1;
    String[] data;

    public HeaderAdapter(String[] data) {
        this.data = data;
    }

    @Override
    public RecyclerView.ViewHolder onCreateViewHolder(ViewGroup parent, int viewType) {
        if (viewType == TYPE_ITEM) {
            //inflate your layout and pass it to view holder
            return new VHItem(null);
        } else if (viewType == TYPE_HEADER) {
            //inflate your layout and pass it to view holder
            return new VHHeader(null);
        }

        throw new RuntimeException("there is no type that matches the type " + viewType + " + make sure your using types correctly");
    }

    @Override
    public void onBindViewHolder(RecyclerView.ViewHolder holder, int position) {
        if (holder instanceof VHItem) {
            String dataItem = getItem(position);
            //cast holder to VHItem and set data
        } else if (holder instanceof VHHeader) {
            //cast holder to VHHeader and set data for header.
        }
    }

    @Override
    public int getItemCount() {
        return data.length + 1;
    }

    @Override
    public int getItemViewType(int position) {
        if (isPositionHeader(position))
            return TYPE_HEADER;

        return TYPE_ITEM;
    }

    private boolean isPositionHeader(int position) {
        return position == 0;
    }

    private String getItem(int position) {
        return data[position - 1];
    }

    class VHItem extends RecyclerView.ViewHolder {
        TextView title;

        public VHItem(View itemView) {
            super(itemView);
        }
    }

    class VHHeader extends RecyclerView.ViewHolder {
        Button button;

        public VHHeader(View itemView) {
            super(itemView);
        }
    }
}

link to gist -> here

Filature answered 26/10, 2014 at 13:10 Comment(33)
Thanks for the example! One issue I was having is that onCreateViewHolder only gets called with viewType = 0. Same goes for getItemViewType which always gets a position of 0. Any ideas?Beverie
i'm not sure i need more detail to say anything. how much does getItemCount return ?Filature
getItemCount return 5. If you have a chance to take a look the code is here: pastebin.com/7GMMxNTKBeverie
i don't see any problems, i'm using something similar to that and its working yours should too put some logs and try again if you could give me a screenshot tooFilature
Hmm strange I wonder what is different then. I edited my first post with log statements. Is there a different place to set the position before it gets to getItemViewType? Thanks for the help btw!Beverie
add your recycler view layout and the code where you instantiate the adapterFilature
Added layouts and onCreate methods for loading the adapter. Please take a look. Thanks!Beverie
everything seems to be OK and it should work, but however make the recycler view MATCH_PARENT see if anything changes. also if its possible make the recycler view the root of that layout (its good for performance).Filature
Sun of a gun, cleaning up the recyclerview and adding match parent worked.... Thanks so much for the help! I will upvote you as soon as I can.Beverie
I am using this example to add a footer to my recycler view. Everything works fine but my footer view (the bottom view in my case), is way to small and hardly visible. It consists of RelativeLayout with match parent width, and fixed height and inside I have a TextView. Do you know what may be the problem? :(Pieplant
i need to see your layout. but try changing it to linearlayout, also add multiple view in it to see if the problem is from the footer layout or not.Filature
Yes, the problem was the layout. When I set fixed height on my TextView also, the item appeared just fine. Thank you very much for the example, I was looking something like this for the past couple of days now..!Pieplant
I'm getting errors when by having two different ViewHolders. The adapter expects my 'Generic' in the class title and my return statement from onCreateViewHolder to match. However it won't use inheritance on the two ViewHolders, and is requiring I either give it my item or my header/footer. Anyone else have this issue?Cropper
Refer to my original post. onCreateViewHolder returns 2 different viewholders, both of which extend RecyclerView.ViewHolder.Beverie
maybe your list is empty or item in that position is null, check your code again you must've missed something, and if can you provide your code i can help you better.Filature
private String getItem(int position) { return data[position + 1]; } Causes an NPE. Since our position has been increased by one, due to the header, we have to subtract 1 to get the correct item from our data[]. private String getItem(int position) { return data[position - 1]; }Handshaker
how would be the approach for a recyclerview with a GridLayoutManager? Because with this trick the header is actually one of the items, but in the grid layout the header would be placed in the item number 0 position, which doesnt look like a header. Any ideas?Chintzy
if your grid is just a simple grid just use LinearLayoutManager and show to item in one row. its called bucket row i've seen google uses it in some of their apps.Filature
@Chintzy you can use this approach and additionally add setSpanSizeLookup for GridLayoutManager, so your header will take all of the columnsCapel
@DmitryZaitsev oh, looks nice, i will give it a try. thanks ;)Chintzy
@hister I used this template and created a adapter but had a prob! I geting only one header with child view! remaining header are not displayed!Quan
Wauw, just wauw, at first I was skeptical, but really, it works like I would want to. Saved the day! Could someone give some background knowledge about why the viewType is 0 or 1? Something I'm really wondering.Overtire
listView adapter used to have a method named getViewTypeCount witch you would return number of types you have and your types must have been between 0 and viewTypeCount. so i guess it comes from that ! at least im used to itFilature
It's pretty ugly, but on a StaggeredGrid with 2 columns, with both header and footer I had to add 4 to getItemCount()Chantay
you could also add them as models(objec) into your data set and use them then no need to increase the getItemCount and maybe determine their view type by checking using instance ofFilature
This will screw up all of the RecyclerView optimizations regarding dataset changes because notifyItem* methods are final and can't be overridden so as long as the header is active all the positions passed into them will be wrong.Haemophiliac
this is a just a simple example you can look at you headers as items, add them into your data set and check for them by their type. that way your positions won't be messed upFilature
how can i set TextView title; in my fragment. title.setText("text"); It is not working just by inflating the layout in my fragment.Natividadnativism
I would avoid the use of "instanceof" during onBindViewHolder. Those "ifs" will be run a lot of times if the user flings the RecyclerView.Parget
how do i remove item from recyclerview which has header with it?Hardigg
in onBindViewHolder you can check holder type to avoid instance ofDarsey
you can also use this kotlin dsl library that makes recyclerview setup simple. github.com/shahab-yousefi/simple-listGrandmother
insert an object in the begining of your list data. myItems.add(0, new Object()); then in adapter getItemViewType(), return the header type for when position is 0. This way you won't have to do -1 etc to track the index.Sleight
H
70

Easy and reusable ItemDecoration

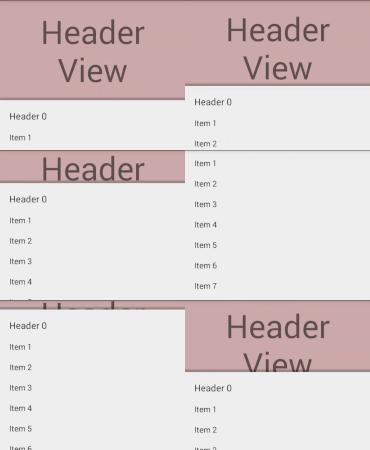
Static headers can easily be added with an ItemDecoration and without any further changes.

// add the decoration. done.
HeaderDecoration headerDecoration = new HeaderDecoration(/* init */);
recyclerView.addItemDecoration(headerDecoration);

The decoration is also reusable since there is no need to modify the adapter or the RecyclerView at all.

The sample code provided below will require a view to add to the top which can just be inflated like everything else. It can look like this:

HeaderDecoration sample

Why static?

If you just have to display text and images this solution is for you—there is no possibility for user interaction like buttons or view pagers, since it will just be drawn to top of your list.

Empty list handling

If there is no view to decorate, the decoration will not be drawn. You will still have to handle an empty list yourself. (One possible workaround would be to add a dummy item to the adapter.)

The code

You can find the full source code here on GitHub including a Builder to help with the initialization of the decorator, or just use the code below and supply your own values to the constructor.

Please be sure to set a correct layout_height for your view. e.g. match_parent might not work properly.

public class HeaderDecoration extends RecyclerView.ItemDecoration {

    private final View mView;
    private final boolean mHorizontal;
    private final float mParallax;
    private final float mShadowSize;
    private final int mColumns;
    private final Paint mShadowPaint;

    public HeaderDecoration(View view, boolean scrollsHorizontally, float parallax, float shadowSize, int columns) {
        mView = view;
        mHorizontal = scrollsHorizontally;
        mParallax = parallax;
        mShadowSize = shadowSize;
        mColumns = columns;

        if (mShadowSize > 0) {
            mShadowPaint = new Paint();
            mShadowPaint.setShader(mHorizontal ?
                    new LinearGradient(mShadowSize, 0, 0, 0,
                            new int[]{Color.argb(55, 0, 0, 0), Color.argb(55, 0, 0, 0), Color.argb(3, 0, 0, 0)},
                            new float[]{0f, .5f, 1f},
                            Shader.TileMode.CLAMP) :
                    new LinearGradient(0, mShadowSize, 0, 0,
                            new int[]{Color.argb(55, 0, 0, 0), Color.argb(55, 0, 0, 0), Color.argb(3, 0, 0, 0)},
                            new float[]{0f, .5f, 1f},
                            Shader.TileMode.CLAMP));
        } else {
            mShadowPaint = null;
        }
    }

    @Override
    public void onDraw(Canvas c, RecyclerView parent, RecyclerView.State state) {
        super.onDraw(c, parent, state);
        // layout basically just gets drawn on the reserved space on top of the first view
        mView.layout(parent.getLeft(), 0, parent.getRight(), mView.getMeasuredHeight());

        for (int i = 0; i < parent.getChildCount(); i++) {
            View view = parent.getChildAt(i);
            if (parent.getChildAdapterPosition(view) == 0) {
                c.save();
                if (mHorizontal) {
                    c.clipRect(parent.getLeft(), parent.getTop(), view.getLeft(), parent.getBottom());
                    final int width = mView.getMeasuredWidth();
                    final float left = (view.getLeft() - width) * mParallax;
                    c.translate(left, 0);
                    mView.draw(c);
                    if (mShadowSize > 0) {
                        c.translate(view.getLeft() - left - mShadowSize, 0);
                        c.drawRect(parent.getLeft(), parent.getTop(), mShadowSize, parent.getBottom(), mShadowPaint);
                    }
                } else {
                    c.clipRect(parent.getLeft(), parent.getTop(), parent.getRight(), view.getTop());
                    final int height = mView.getMeasuredHeight();
                    final float top = (view.getTop() - height) * mParallax;
                    c.translate(0, top);
                    mView.draw(c);
                    if (mShadowSize > 0) {
                        c.translate(0, view.getTop() - top - mShadowSize);
                        c.drawRect(parent.getLeft(), parent.getTop(), parent.getRight(), mShadowSize, mShadowPaint);
                    }
                }
                c.restore();
                break;
            }
        }
    }

    @Override
    public void getItemOffsets(Rect outRect, View view, RecyclerView parent, RecyclerView.State state) {
        if (parent.getChildAdapterPosition(view) < mColumns) {
            if (mHorizontal) {
                if (mView.getMeasuredWidth() <= 0) {
                    mView.measure(View.MeasureSpec.makeMeasureSpec(parent.getMeasuredWidth(), View.MeasureSpec.AT_MOST),
                            View.MeasureSpec.makeMeasureSpec(parent.getMeasuredHeight(), View.MeasureSpec.AT_MOST));
                }
                outRect.set(mView.getMeasuredWidth(), 0, 0, 0);
            } else {
                if (mView.getMeasuredHeight() <= 0) {
                    mView.measure(View.MeasureSpec.makeMeasureSpec(parent.getMeasuredWidth(), View.MeasureSpec.AT_MOST),
                            View.MeasureSpec.makeMeasureSpec(parent.getMeasuredHeight(), View.MeasureSpec.AT_MOST));
                }
                outRect.set(0, mView.getMeasuredHeight(), 0, 0);
            }
        } else {
            outRect.setEmpty();
        }
    }
}

Please note: The GitHub project is my personal playground. It is not thorougly tested, which is why there is no library yet.

What does it do?

An ItemDecoration is additional drawing to an item of a list. In this case, a decoration is drawn to the top of the first item.

The view gets measured and laid out, then it is drawn to the top of the first item. If a parallax effect is added it will also be clipped to the correct bounds.

Hyperacidity answered 1/11, 2015 at 1:44 Comment(20)
looks a elegant solution, but, I have a question: when should i call recyclerView.addItemDecoration ?Botelho
@Botelho you just have to call it once. Probably best in onCreate together with the rest of the initialization.Hyperacidity
Wow thats a clean solution. Its possible to add a Fragment instead of a layout?Hanleigh
@PhilipGiuliani I know, right? I don't see why not. Just add a FrameLayout, measure it properly and do the fragmentManager magic :) With some minor changes that should be possible, I don't know how though from the top of my headHyperacidity
Thank you, it worked fine! The only downside on using this method, is that you need to have at least 1 row in the RecyclerView.Hanleigh
And how can I use this solution to make header decoration be always on top of recyclerview even if I set setStackFromEnd(true) ?Granvillegranvillebarker
How to onClickListener for the header?Wiser
@DavidMedenjak great solution, but it not support horizontal scroll now. I try to fix it but I think you can make it faster and better. :)Syllogize
@Syllogize yes, it currently as it is does not support user interaction. I like to use it for parallax effect with images, since you can just easily add it and don't need weird listenersHyperacidity
@DavidMedenjak I see that and it is great for me. But I have RecyclerView with LinearLayoutManager.HORIZONTAL and the first item (not header) is below header and rest items are on right side of header.Syllogize
I added support for horizontal :)Syllogize
A very elegant solution. Decoration pattern.Ostiole
I've downloaded from github - doesn't work as shown in animation. Header just contains textParnassian
@PavelBiryukov Please make sure that you are correclty supplying values to the constructor and/or Builder. You will have to set elevation and parallax for any effects to take place. If this still is an issue, please open an issue on Github and provide the code you tried to useHyperacidity
@DavidMedenjak I've just downloaded and ran your project - isn't it supposed to look like shown in animation? :)Parnassian
@PavelBiryukov No :) This is my test project, in which I try all sorts of decorations, it is not a showcase or demo project. You will have to add the decoration to the recyclerview, or uncomment the code.Hyperacidity
I'm getting following exception: java.lang.NullPointerException: Attempt to invoke virtual method 'boolean android.support.v7.widget.RecyclerView$ViewHolder.shouldIgnore()' on a null object referenceMange
Is there any way to access the views in the decoration? I want to set text dynamically.Arica
@Arica Keep the reference to the view, then update it. Or let the adapter implement an interface, get the information, and update the view before drawing itHyperacidity
@DavidMedenjak can you please offer an example?Arica
J
46

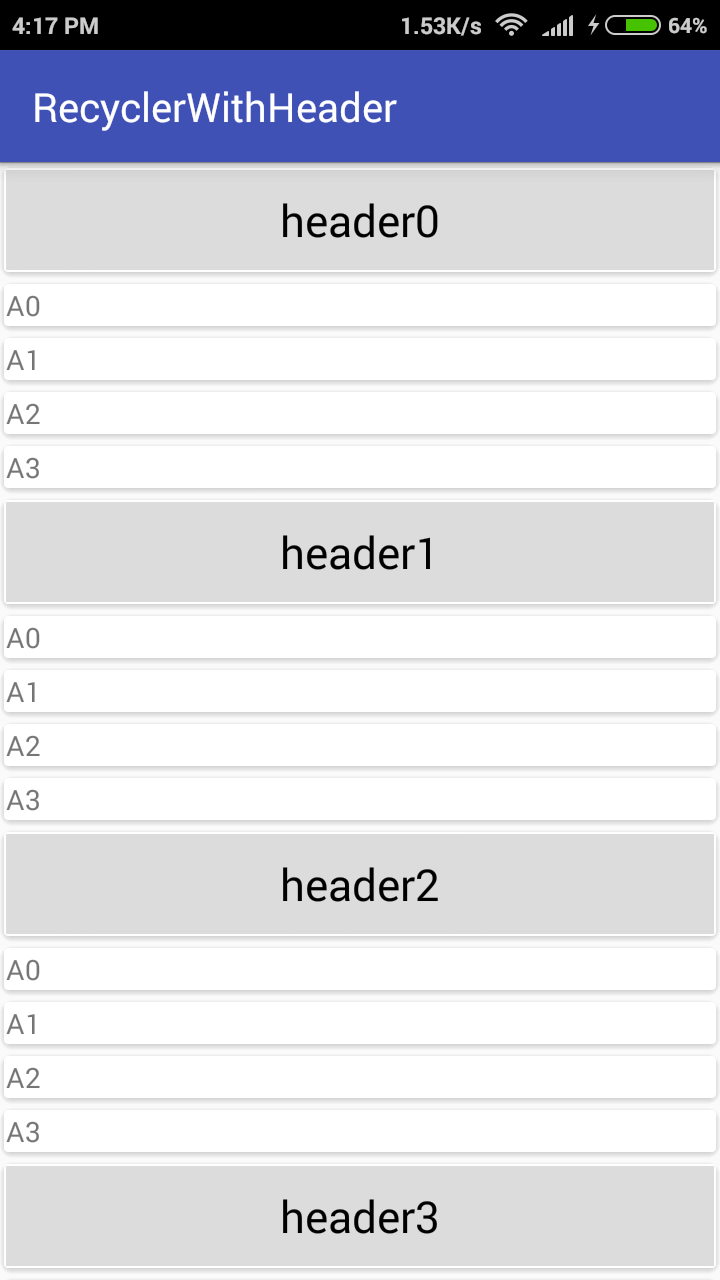
Going to show you to make header with items in a Recycler view.Recycler view with Header

Step 1- Add dependency into your gradle file.

compile 'com.android.support:recyclerview-v7:23.2.0'
// CardView
compile 'com.android.support:cardview-v7:23.2.0'

Cardview is used for decoration purpose.

Step2- Make three xml files. One for main activity.Second for Header layout.Third for list item layout.

activity_main.xml

<android.support.v7.widget.RecyclerView
    xmlns:android="http://schemas.android.com/apk/res/android"
    xmlns:tools="http://schemas.android.com/tools"
    android:id="@+id/my_recycler_view"
    android:scrollbars="vertical"
    android:layout_width="match_parent"
    android:layout_height="match_parent" />

header.xml

<android.support.v7.widget.CardView
    xmlns:android="http://schemas.android.com/apk/res/android"
    xmlns:app="http://schemas.android.com/apk/res-auto"
    android:layout_width="match_parent"
    android:layout_height="wrap_content"
    app:cardElevation="2dp">

    <TextView
        android:id="@+id/txtHeader"
        android:gravity="center"
        android:textColor="#000000"
        android:textSize="@dimen/abc_text_size_large_material"
        android:background="#DCDCDC"
        android:layout_width="match_parent"
        android:layout_height="50dp" />

</android.support.v7.widget.CardView>

list.xml

<LinearLayout xmlns:android="http://schemas.android.com/apk/res/android"
    xmlns:card_view="http://schemas.android.com/apk/res-auto"
    xmlns:app="http://schemas.android.com/tools"
    android:orientation="vertical"
    android:layout_width="match_parent"
    android:layout_height="wrap_content">

    <android.support.v7.widget.CardView
        android:layout_width="match_parent"
        android:layout_height="wrap_content"
        app:cardElevation="1dp">

        <TextView
            android:id="@+id/txtName"
            android:text="abc"
            android:layout_width="match_parent"
            android:layout_height="wrap_content" />

    </android.support.v7.widget.CardView>

</LinearLayout>

Step 3- Create three bean classes.

Header.java

public class Header extends ListItem {
    private String header;

    public String getHeader() {
        return header;
    }
    public void setHeader(String header) {
        this.header = header;
    }
}

ContentItem.java

public class ContentItem extends ListItem {

    private String name;
    private String rollnumber;

    @Override
    public String getName() {
        return name;
    }

    @Override
    public void setName(String name) {
        this.name = name;
    }

    public String getRollnumber() {
        return rollnumber;
    }

    public void setRollnumber(String rollnumber) {
        this.rollnumber = rollnumber;
    }
}

ListItem.java

public class ListItem {
    private String name;

    public String getName() {
        return name;
    }

    public void setName(String name) {
        this.name = name;
    }

    private int id;

    public int getId() {
        return id;
    }

    public void setId(int id) {
        this.id = id;
    }
}

Step 4- Create an adapter named MyRecyclerAdapter.java

public class MyRecyclerAdapter extends  RecyclerView.Adapter<RecyclerView.ViewHolder> {
    private static final int TYPE_HEADER = 0;
    private static final int TYPE_ITEM = 1;

    //Header header;
    List<ListItem> list;
    public MyRecyclerAdapter(List<ListItem> headerItems) {
        this.list = headerItems;
    }

    @Override
    public RecyclerView.ViewHolder onCreateViewHolder(ViewGroup parent, int viewType) {
        LayoutInflater inflater = LayoutInflater.from(parent.getContext());
        if (viewType == TYPE_HEADER) {
            View v = inflater.inflate(R.layout.header, parent, false);
            return  new VHHeader(v);
        } else {
            View v = inflater.inflate(R.layout.list, parent, false);
            return new VHItem(v);
        }
        throw new IllegalArgumentException();
    }

    @Override
    public void onBindViewHolder(RecyclerView.ViewHolder holder, int position) {
        if (holder instanceof VHHeader) {
           // VHHeader VHheader = (VHHeader)holder;
            Header  currentItem = (Header) list.get(position);
            VHHeader VHheader = (VHHeader)holder;
            VHheader.txtTitle.setText(currentItem.getHeader());
        } else if (holder instanceof VHItem) 
            ContentItem currentItem = (ContentItem) list.get(position);
            VHItem VHitem = (VHItem)holder;
            VHitem.txtName.setText(currentItem.getName());
        }
    }

    @Override
    public int getItemViewType(int position) {
        if (isPositionHeader(position))
            return TYPE_HEADER;
        return TYPE_ITEM;
    }

    private boolean isPositionHeader(int position) {
        return list.get(position) instanceof Header;
    }

    @Override
    public int getItemCount() {
        return list.size();
    }

    class VHHeader extends RecyclerView.ViewHolder{
        TextView txtTitle;
        public VHHeader(View itemView) {
            super(itemView);
            this.txtTitle = (TextView) itemView.findViewById(R.id.txtHeader);
        }
    }
    class VHItem extends RecyclerView.ViewHolder{
        TextView txtName;
        public VHItem(View itemView) {
            super(itemView);
            this.txtName = (TextView) itemView.findViewById(R.id.txtName);
        }
    }
}

Step 5- In MainActivity add the following code:

public class MainActivity extends AppCompatActivity {
    RecyclerView recyclerView;
    List<List<ListItem>> arraylist;
    MyRecyclerAdapter adapter;

    @Override
    protected void onCreate(Bundle savedInstanceState) {
        super.onCreate(savedInstanceState);
        setContentView(R.layout.activity_main);
        recyclerView = (RecyclerView)findViewById(R.id.my_recycler_view);
        LinearLayoutManager linearLayoutManager = new LinearLayoutManager(this);
        adapter = new MyRecyclerAdapter(getList());
        recyclerView.setLayoutManager(linearLayoutManager);
        recyclerView.setAdapter(adapter);
    }

    private ArrayList<ListItem> getList() {
        ArrayList<ListItem> arrayList = new ArrayList<>();
        for(int j = 0; j <= 4; j++) {
            Header header = new Header();
            header.setHeader("header"+j);
            arrayList.add(header);
            for (int i = 0; i <= 3; i++) {
                ContentItem item = new ContentItem();
                item.setRollnumber(i + "");
                item.setName("A" + i);
                arrayList.add(item);
            }
        }
        return arrayList;
    }

}

The function getList() is dynamically generating the data for the headers and for list items.

Jewel answered 23/3, 2017 at 12:28 Comment(3)
One of the best answer. I used it in navigationView for navigation menuPhaeton
This is a good simple answer - I couldn't think of a trick to easily combine 2 data items into a single ListItem - inheritance made it easy and achievable - duh!Yamamoto
@Anshul Aggarwal Thanks for you answer. I have a problem. you have a class like ContentItem.java and it extends ListItem. and you pass the ListItem data model to recyclerAdapter. When I want to get access to some property in ContentItem, it is not recognized. what should I do ? for example in ContentItem class I have to set property like Price to my textview in adapter.Clockwise
D
44

Feel free to use my library, available here.

It let's you create header View for any RecyclerView that uses LinearLayoutManager or GridLayoutManager with just a simple method call.

enter image description here

Dino answered 2/4, 2015 at 11:7 Comment(8)
how to change height of header?Reggiereggis
I have used this for showing header in bottom or you can say that as footer, but i getting a problem that my when my view load for first time it shows last position and all list items showing in reverse order. @blipinskHeated
Do you think that the issue you're describing can be related to this: github.com/blipinsk/RecyclerViewHeader/issues/16?Dino
Lipinski has retired this library and suggests using this one instead: github.com/Karumi/HeaderRecyclerViewProtohuman
I'm retiring this library to be exact. I'm still providing a mild support for it, but indeed I am suggesting to go with the specialized adapter instead (e.g. the one from Karumi).Dino
@BartekLipinski very helpful. is there a way to add parallax?Clavicembalo
in my case i am able to add the header(an auto slide view pager), but it imparts too much on the performance of the recyclerview.Hebraize
It seems this library uses ItemDecoration. Does this works even there is no item in RecyclerView?Lemures
Y
12

If you want the header to be easily reused across multiple lists, take a look at the version 1.2.0 of recyclerview library. It introduces ConcatAdapter class which concatenates multiple adapters into a single one. So you can create a header adapter and easily combine it with any other adapter, like:

myRecyclerView.adapter = ConcatAdapter(headerAdapter, listAdapter)

The announcement article contains a sample how to display a loading progress in header and footer using ConcatAdapter.

For the moment when I post this answer the version 1.2.0 of the library is in alpha stage, so the api might change. You can check the status here.

Yare answered 8/8, 2020 at 12:53 Comment(1)
I knew scrolling all the way down here would be worth it. All the outdated answers were giving me a headacheScupper
C
10

You can just place your header and your RecyclerView in a NestedScrollView:

<android.support.v4.widget.NestedScrollView
    android:layout_width="match_parent"
    android:layout_height="wrap_content"
    >

    <LinearLayout
        android:layout_width="match_parent"
        android:layout_height="wrap_content"
        android:orientation="vertical"
        >

        <include
            layout="@layout/your_header"/>

        <android.support.v7.widget.RecyclerView
            android:id="@+id/list_recylclerview"
            android:layout_width="match_parent"
            android:layout_height="wrap_content"
            />

    </LinearLayout>

</android.support.v4.widget.NestedScrollView>

In order for scrolling to work correctly, you need to disable nested scrolling on your RecyclerView:

myRecyclerView.setNestedScrollingEnabled(false);
Crowfoot answered 22/2, 2017 at 10:33 Comment(5)
or use android:nestedScrollingEnabled="false"Protohuman
android:nestedScrollingEnabled="false" requires api level 21, which sucks. Anyway great solution! The same you have to add another footer or maybe even second recyclerview?Mange
NEVER do this. This will seem to be working fine. But what it actually does is it passes the scroll to srollView. So recyclerView doesn't do anything on its own. No view recycling. The app will crash if you get too many items in your recyclerView because now it's acting like a simple scrollView.Weinert
@VipulKumar's comment is completely true. When you use recyclerview inside another scrollview there won't be any recycling and it will create all item.Guanabara
you can do this if your items in recyclerView is less than 10. 😄Hubble
A
8

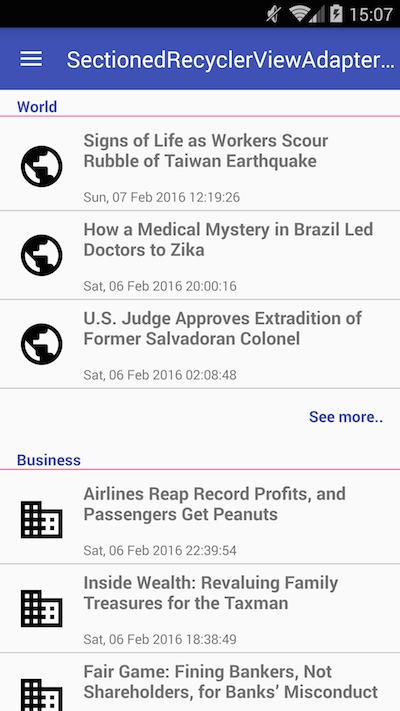
You can achieve it using the library SectionedRecyclerViewAdapter, it has the concept of "Sections", where which Section has a Header, Footer and Content (list of items). In your case you might only need one Section but you can have many:

enter image description here

1) Create a custom Section class:

class MySection extends StatelessSection {

    List<String> myList = Arrays.asList(new String[] {"Item1", "Item2", "Item3" });

    public MySection() {
        // call constructor with layout resources for this Section header, footer and items 
        super(R.layout.section_header, R.layout.section_footer,  R.layout.section_item);
    }

    @Override
    public int getContentItemsTotal() {
        return myList.size(); // number of items of this section
    }

    @Override
    public RecyclerView.ViewHolder getItemViewHolder(View view) {
        // return a custom instance of ViewHolder for the items of this section
        return new MyItemViewHolder(view);
    }

    @Override
    public void onBindItemViewHolder(RecyclerView.ViewHolder holder, int position) {
        MyItemViewHolder itemHolder = (MyItemViewHolder) holder;

        // bind your view here
        itemHolder.tvItem.setText(myList.get(position));
    }
}

2) Create a custom ViewHolder for the items:

class MyItemViewHolder extends RecyclerView.ViewHolder {

    private final TextView tvItem;

    public MyItemViewHolder(View itemView) {
        super(itemView);

        tvItem = (TextView) itemView.findViewById(R.id.tvItem);
    }
}

3) Set up your ReclyclerView with the SectionedRecyclerViewAdapter

// Create an instance of SectionedRecyclerViewAdapter 
SectionedRecyclerViewAdapter sectionAdapter = new SectionedRecyclerViewAdapter();

MySection mySection = new MySection();

// Add your Sections
sectionAdapter.addSection(mySection);

// Set up your RecyclerView with the SectionedRecyclerViewAdapter
RecyclerView recyclerView = (RecyclerView) findViewById(R.id.recyclerview);
recyclerView.setLayoutManager(new LinearLayoutManager(getContext()));
recyclerView.setAdapter(sectionAdapter);
Arrhenius answered 5/3, 2016 at 22:22 Comment(1)
this is easy to use but how to use it for horizontal scroll.. whenever i change orientation to horizontal then whole recyclerview changes to horizontal scroll but i want item part to be horizontal scroll only.. please help me out to doAnamorphism
Z
6

I know it is an old question, but want to provide an answer anyways.

There is a ConcatAdapter (docs here) that solves the problem for you. All you have to do is to define your header view layout and create a dummy Adapter with a single item In Kotlin it takes literally a few lines

class HeaderAdapter(private val inflater: LayoutInflater) : RecyclerView.Adapter<RecyclerView.ViewHolder>() {
    
    override fun onCreateViewHolder(parent: ViewGroup, viewType: Int) = object : RecyclerView.ViewHolder(inflater.inflate(yourViewLayoutId, parent, false)) {}

    override fun onBindViewHolder(viewHolder: RecyclerView.ViewHolder, position: Int) {}

    override fun getItemCount() = 1
}

After that all you have to do is to add your header adapter and original adapter to the ConcatAdapter

recyclerView.adapter = ConcatAdapter(headerAdapter, adapter)

See documentation for more details and advanced cases.

Zilber answered 28/7, 2021 at 18:58 Comment(0)
E
5

Based on this post, I created a subclass of RecyclerView.Adapter that supports an arbitrary number of headers and footers.

https://gist.github.com/mheras/0908873267def75dc746

Although it seems to be a solution, I also think this thing should be managed by the LayoutManager. Unfortunately, I need it now and I don't have time to implement a StaggeredGridLayoutManager from scratch (nor even extend from it).

I'm still testing it, but you can try it out if you want. Please let me know if you find any issues with it.

Embryologist answered 28/11, 2014 at 21:26 Comment(0)
W
5

Native API doesn't have such "addHeader" feature, but has the concept of "addItem".

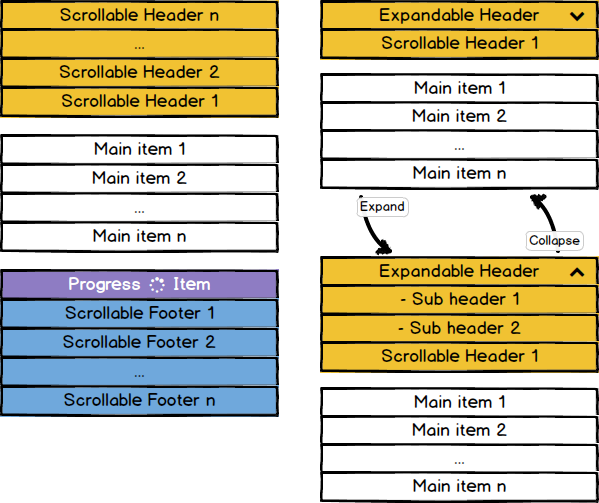
I was able to include this specific feature of headers and extends for footers as well in my FlexibleAdapter project. I called it Scrollable Headers and Footers.

Here how they work:

Scrollable Headers and Footers are special items that scroll along with all others, but they don't belongs to main items (business items) and they are always handled by the adapter beside the main items. Those items are persistently located at the first and last positions.

enter image description here

There's a lot to say about them, better to read the detailed wiki page.

Moreover the FlexibleAdapter allows you to create headers/sections, also you can have them sticky and tens of others features like expandable items, endless scroll, UI extensions etc... all in one library!

Workingwoman answered 22/2, 2016 at 18:27 Comment(0)
A
2
First - extends RecyclerView.Adapter<RecyclerView.ViewHolder>

public class MenuAdapter extends RecyclerView.Adapter<RecyclerView.ViewHolder> {

After - Override the method getItemViewTpe ***More Important

@Override
public int getItemViewType(int position) {
    return position;
}

method onCreateViewHolder

@Override
public RecyclerView.ViewHolder onCreateViewHolder(ViewGroup parent, int viewType) {
    View view = LayoutInflater.from(parent.getContext()).inflate(R.layout.menu_item, parent, false);
    View header = LayoutInflater.from(parent.getContext()).inflate(R.layout.menu_header_item, parent, false);
    Log.d("onCreateViewHolder", String.valueOf(viewType));

    if (viewType == 0) {
        return new MenuLeftHeaderViewHolder(header, onClickListener);
    } else {
        return new MenuLeftViewHolder(view, onClickListener);
    }
}

method onBindViewHolder

@Override
public void onBindViewHolder(RecyclerView.ViewHolder holder, int position) {
    if (position == 0) {
        MenuHeaderViewHolder menuHeaderViewHolder = (MenuHeaderViewHolder) holder;
        menuHeaderViewHolder.mTitle.setText(sMenuTitles[position]);
        menuHeaderViewHolder.mImage.setImageResource(sMenuImages[position]);
    } else {
        MenuViewHolder menuLeftViewHolder = (MenuLeftViewHolder) holder;
        menuViewHolder.mTitle.setText(sMenuTitles[position]);
        menuViewHolder.mImage.setImageResource(sMenuImages[position]);
    }
}

in finish implements the ViewHolders class static

public static class MenuViewHolder extends RecyclerView.ViewHolder 

public static class MenuLeftHeaderViewHolder extends RecyclerView.ViewHolder 
Argeliaargent answered 5/7, 2015 at 22:43 Comment(0)
L
2

There is one more solution that covers all the use cases above: CompoundAdapter: https://github.com/negusoft/CompoundAdapter-android

You can create a AdapterGroup that holds your Adapter as it is, along with an adapter with a single item to represent the header. The code is easy and readable:

AdapterGroup adapterGroup = new AdapterGroup();
adapterGroup.addAdapter(SingleAdapter.create(R.layout.header));
adapterGroup.addAdapter(new CommentAdapter(...));

recyclerView.setAdapter(adapterGroup);

AdapterGroup allows nesting too, so for a adapter with sections, you may create a AdapterGroup per section. Then put all the sections in a root AdapterGroup.

Longitude answered 17/8, 2016 at 7:43 Comment(0)
N
2

Maybe wrap header and recyclerview into a coordinatorlayout:

<android.support.design.widget.CoordinatorLayout
xmlns:android="http://schemas.android.com/apk/res/android"
xmlns:app="http://schemas.android.com/apk/res-auto"
android:layout_width="match_parent"
android:layout_height="match_parent">

<android.support.design.widget.AppBarLayout
    android:layout_width="match_parent"
    android:layout_height="wrap_content"
    app:elevation="0dp">

    <View
        android:id="@+id/header"
        android:layout_width="match_parent"
        android:layout_height="wrap_content"
        app:layout_scrollFlags="scroll" />

</android.support.design.widget.AppBarLayout>

<android.support.v7.widget.RecyclerView
    android:id="@+id/list"
    android:layout_width="match_parent"
    android:layout_height="match_parent"
    app:layout_behavior="@string/appbar_scrolling_view_behavior" />

Nessus answered 16/7, 2018 at 13:50 Comment(1)
The problem with this is that it will always allow scrolling for the height of the AppBarLayout, even if the list is shorter than the screen. To fix that you can do as explained hereArchaeological
H
1

HeaderView depends on the LayoutManager. None of the default LayoutManagers support this and probably wont. HeaderView in ListView creates a lot of complexity without any significant benefit.

I would suggest creating a base adapter class that adds items for Headers if provided. Don't forget to override notify* methods to offset them properly depending on whether header is present or not.

Hercegovina answered 23/10, 2014 at 17:6 Comment(5)
Is there an example you could point me to that uses a recycler view with a base adapter? Thanks!Beverie
There's one really significant benefit for Header/Footer in a list: you can scroll it out of the view. See this example where the amount of visible rows almost doubles as soon as the pinguins are out, I'm not aware of any other way to do this, but ListView.addHeaderView or the answer to this question.Raid
I don't think i get it right. If it is the first item in the adapter, why cant it scroll like the one in the example ?Hercegovina
You cannot override notify* methods, as they are marked as final.Embryologist
hmm i didn't check that sorry. Instead, you can create an adapter wrapper which adds an observable to the wrapped adapter and dispatches shifted events from itself.Hercegovina
J
1

here some itemdecoration for recyclerview

public class HeaderItemDecoration extends RecyclerView.ItemDecoration {

private View customView;

public HeaderItemDecoration(View view) {
    this.customView = view;
}

@Override
public void onDraw(Canvas c, RecyclerView parent, RecyclerView.State state) {
    super.onDraw(c, parent, state);
    customView.layout(parent.getLeft(), 0, parent.getRight(), customView.getMeasuredHeight());
    for (int i = 0; i < parent.getChildCount(); i++) {
        View view = parent.getChildAt(i);
        if (parent.getChildAdapterPosition(view) == 0) {
            c.save();
            final int height = customView.getMeasuredHeight();
            final int top = view.getTop() - height;
            c.translate(0, top);
            customView.draw(c);
            c.restore();
            break;
        }
    }
}

@Override
public void getItemOffsets(Rect outRect, View view, RecyclerView parent, RecyclerView.State state) {
    if (parent.getChildAdapterPosition(view) == 0) {
        customView.measure(View.MeasureSpec.makeMeasureSpec(parent.getMeasuredWidth(), View.MeasureSpec.AT_MOST),
                View.MeasureSpec.makeMeasureSpec(parent.getMeasuredHeight(), View.MeasureSpec.AT_MOST));
        outRect.set(0, customView.getMeasuredHeight(), 0, 0);
    } else {
        outRect.setEmpty();
    }
}
}      
Jolenejolenta answered 12/10, 2016 at 17:50 Comment(0)
M
1

I made an implementation based on @hister's one for my personal purposes, but using inheritance.

I hide the implementation details mechanisms (like add 1 to itemCount, subtract 1 from position) in an abstract super class HeadingableRecycleAdapter, by implementing required methods from Adapter like onBindViewHolder, getItemViewType and getItemCount, making that methods final, and providing new methods with hidden logic to client:

  • onAddViewHolder(RecyclerView.ViewHolder holder, int position),
  • onCreateViewHolder(ViewGroup parent),
  • itemCount()

Here are the HeadingableRecycleAdapter class and a client. I left the header layout a bit hard-coded because it fits my needs.

public abstract class HeadingableRecycleAdapter extends RecyclerView.Adapter<RecyclerView.ViewHolder> {

    private static final int HEADER_VIEW_TYPE = 0;

    @LayoutRes
    private int headerLayoutResource;
    private String headerTitle;
    private Context context;

    public HeadingableRecycleAdapter(@LayoutRes int headerLayoutResourceId, String headerTitle, Context context) {
        this.headerLayoutResource = headerLayoutResourceId;
        this.headerTitle = headerTitle;
        this.context = context;
    }

    public Context context() {
        return context;
    }

    @Override
    public final RecyclerView.ViewHolder onCreateViewHolder(ViewGroup parent, int viewType) {
        if (viewType == HEADER_VIEW_TYPE) {
            return new HeaderViewHolder(LayoutInflater.from(context).inflate(headerLayoutResource, parent, false));
        }
        return onCreateViewHolder(parent);
    }

    @Override
    public final void onBindViewHolder(RecyclerView.ViewHolder holder, int position) {
        int viewType = getItemViewType(position);
        if (viewType == HEADER_VIEW_TYPE) {
            HeaderViewHolder vh = (HeaderViewHolder) holder;
            vh.bind(headerTitle);
        } else {
            onAddViewHolder(holder, position - 1);
        }
    }

    @Override
    public final int getItemViewType(int position) {
        return position == 0 ? 0 : 1;
    }

    @Override
    public final int getItemCount() {
        return itemCount() + 1;
    }

    public abstract int itemCount();

    public abstract RecyclerView.ViewHolder onCreateViewHolder(ViewGroup parent);

    public abstract void onAddViewHolder(RecyclerView.ViewHolder holder, int position);

}


@PerActivity
public class IngredientsAdapter extends HeadingableRecycleAdapter {
    public static final String TITLE = "Ingredients";
    private List<Ingredient> itemList;


    @Inject
    public IngredientsAdapter(Context context) {
        super(R.layout.layout_generic_recyclerview_cardified_header, TITLE, context);
    }

    public void setItemList(List<Ingredient> itemList) {
        this.itemList = itemList;
    }

    @Override
    public RecyclerView.ViewHolder onCreateViewHolder(ViewGroup parent) {
        return new ViewHolder(LayoutInflater.from(context()).inflate(R.layout.item_ingredient, parent, false));
    }

    @Override
    public void onAddViewHolder(RecyclerView.ViewHolder holder, int position) {
        ViewHolder vh = (ViewHolder) holder;
        vh.bind(itemList.get(position));
    }

    @Override
    public int itemCount() {
        return itemList == null ? 0 : itemList.size();
    }

    private String getQuantityFormated(double quantity, String measure) {
        if (quantity == (long) quantity) {
            return String.format(Locale.US, "%s %s", String.valueOf(quantity), measure);
        } else {
            return String.format(Locale.US, "%.1f %s", quantity, measure);
        }
    }


    class ViewHolder extends RecyclerView.ViewHolder {
        @BindView(R.id.text_ingredient)
        TextView txtIngredient;

        ViewHolder(View itemView) {
            super(itemView);
            ButterKnife.bind(this, itemView);
        }

        void bind(Ingredient ingredient) {
            String ingredientText = ingredient.getIngredient();
            txtIngredient.setText(String.format(Locale.US, "%s %s ", getQuantityFormated(ingredient.getQuantity(),
                    ingredient.getMeasure()), Character.toUpperCase(ingredientText.charAt(0)) +
                    ingredientText
                            .substring(1)));
        }
    }
}
Massorete answered 7/9, 2017 at 22:11 Comment(0)
D
0

Probably http://alexzh.com/tutorials/multiple-row-layouts-using-recyclerview/ will help. It uses only RecyclerView and CardView. Here is an adapter:

public class DifferentRowAdapter extends RecyclerView.Adapter<RecyclerView.ViewHolder> {
    private List<CityEvent> mList;
    public DifferentRowAdapter(List<CityEvent> list) {
        this.mList = list;
    }
    @Override
    public RecyclerView.ViewHolder onCreateViewHolder(ViewGroup parent, int viewType) {
        View view;
        switch (viewType) {
            case CITY_TYPE:
                view = LayoutInflater.from(parent.getContext()).inflate(R.layout.item_city, parent, false);
                return new CityViewHolder(view);
            case EVENT_TYPE:
                view = LayoutInflater.from(parent.getContext()).inflate(R.layout.item_event, parent, false);
                return new EventViewHolder(view);
        }
        return null;
    }
    @Override
    public void onBindViewHolder(RecyclerView.ViewHolder holder, int position) {
        CityEvent object = mList.get(position);
        if (object != null) {
            switch (object.getType()) {
                case CITY_TYPE:
                    ((CityViewHolder) holder).mTitle.setText(object.getName());
                    break;
                case EVENT_TYPE:
                    ((EventViewHolder) holder).mTitle.setText(object.getName());
                    ((EventViewHolder) holder).mDescription.setText(object.getDescription());
                    break;
            }
        }
    }
    @Override
    public int getItemCount() {
        if (mList == null)
            return 0;
        return mList.size();
    }
    @Override
    public int getItemViewType(int position) {
        if (mList != null) {
            CityEvent object = mList.get(position);
            if (object != null) {
                return object.getType();
            }
        }
        return 0;
    }
    public static class CityViewHolder extends RecyclerView.ViewHolder {
        private TextView mTitle;
        public CityViewHolder(View itemView) {
            super(itemView);
            mTitle = (TextView) itemView.findViewById(R.id.titleTextView);
        }
    }
    public static class EventViewHolder extends RecyclerView.ViewHolder {
        private TextView mTitle;
        private TextView mDescription;
        public EventViewHolder(View itemView) {
            super(itemView);
            mTitle = (TextView) itemView.findViewById(R.id.titleTextView);
            mDescription = (TextView) itemView.findViewById(R.id.descriptionTextView);
        }
    }
}

And here's an entity:

public class CityEvent {
    public static final int CITY_TYPE = 0;
    public static final int EVENT_TYPE = 1;
    private String mName;
    private String mDescription;
    private int mType;
    public CityEvent(String name, String description, int type) {
        this.mName = name;
        this.mDescription = description;
        this.mType = type;
    }
    public String getName() {
        return mName;
    }
    public void setName(String name) {
        this.mName = name;
    }
    public String getDescription() {
        return mDescription;
    }
    public void setDescription(String description) {
        this.mDescription = description;
    }
    public int getType() {
        return mType;
    }
    public void setType(int type) {
        this.mType = type;
    }
}
Dispensable answered 26/8, 2016 at 13:33 Comment(0)
W
0

you can create addHeaderView and use

adapter.addHeaderView(View).

This code build the addHeaderView for more then one header. the headers should have:

android:layout_height="wrap_content"

public class MyAdapter extends RecyclerView.Adapter<RecyclerView.ViewHolder> {
    private static final int TYPE_ITEM = -1;
    public class MyViewSHolder extends RecyclerView.ViewHolder {
        public MyViewSHolder (View view) {
            super(view);
        }
        // put you code. for example:
        View mView;
        ...
    }

    public class ViewHeader extends RecyclerView.ViewHolder {
        public ViewHeader(View view) {
            super(view);
        }
    }

    private List<View> mHeaderViews = new ArrayList<>();
    public void addHeaderView(View headerView) {
        mHeaderViews.add(headerView);
    }

    @Override
    public int getItemCount() {
       return ... + mHeaderViews.size();
    }

    @Override
    public int getItemViewType(int position) {
        if (mHeaderViews.size() > position) {
            return position;
        }

        return TYPE_ITEM;
    }
    @Override
    public RecyclerView.ViewHolder onCreateViewHolder(ViewGroup parent, int viewType) {
        if (viewType != TYPE_ITEM) {
            //inflate your layout and pass it to view holder
            return new ViewHeader(mHeaderViews.get(viewType));
        }
        ...
    }
    @Override
    public void onBindViewHolder(RecyclerView.ViewHolder holder, int basePosition1) {
        if (holder instanceof ViewHeader) {
            return;
        }
        int basePosition = basePosition1 -  mHeaderViews.size();
        ...
    }
}
Waiver answered 8/5, 2017 at 8:8 Comment(0)
B
0

It's been a few years, but just in case anyone is reading this later...

Using the above code, only the header layout is displayed as viewType is always 0.

The problem is in the constant declaration:

private static final int HEADER = 0;
private static final int OTHER = 0;  <== bug 

If you declare them both as zero, then you'll always get zero!

Badinage answered 15/8, 2019 at 12:39 Comment(0)
S
0

I have implemented the same approach proposed by EC84B4 answer, but I abstracted RecycleViewAdapter and make it easily resuable by means of interfaces.

So in order to use my approach you should add following base classes and interfaces to your project:

1) Interface that provides data for Adapter (collection of generic type T, and additional parameters (if needed) of generic type P)

public interface IRecycleViewListHolder<T,P>{
            P getAdapterParameters();
            T getItem(int position);
            int getSize();
    }

2) Factory for binding your items (header/item):

public interface IViewHolderBinderFactory<T,P> {
        void bindView(RecyclerView.ViewHolder holder, int position,IRecycleViewListHolder<T,P> dataHolder);
}

3) Factory for viewHolders (header/items):

public interface IViewHolderFactory {
    RecyclerView.ViewHolder provideInflatedViewHolder(int viewType, LayoutInflater layoutInflater,@NonNull ViewGroup parent);
}

4) Base class for Adapter with Header:

public class RecycleViewHeaderBased<T,P> extends RecyclerView.Adapter<RecyclerView.ViewHolder>{

    public final static int HEADER_TYPE = 1;
    public final static int ITEM_TYPE = 0;
    private final IRecycleViewListHolder<T, P> dataHolder;
    private final IViewHolderBinderFactory<T,P> binderFactory;
    private final IViewHolderFactory viewHolderFactory;

    public RecycleViewHeaderBased(IRecycleViewListHolder<T,P> dataHolder, IViewHolderBinderFactory<T,P> binderFactory, IViewHolderFactory viewHolderFactory) {
        this.dataHolder = dataHolder;
        this.binderFactory = binderFactory;
        this.viewHolderFactory = viewHolderFactory;
    }

    @NonNull
    @Override
    public RecyclerView.ViewHolder onCreateViewHolder(@NonNull ViewGroup parent, int viewType) {
        LayoutInflater layoutInflater = LayoutInflater.from(parent.getContext());
        return viewHolderFactory.provideInflatedViewHolder(viewType,layoutInflater,parent);
    }

    @Override
    public void onBindViewHolder(@NonNull RecyclerView.ViewHolder holder, int position) {
            binderFactory.bindView(holder, position,dataHolder);
    }

    @Override
    public int getItemViewType(int position) {
        if(position == 0)
            return HEADER_TYPE;
        return ITEM_TYPE;
    }

    @Override
    public int getItemCount() {
        return dataHolder.getSize()+1;
    }
}

Usage example:

1) IRecycleViewListHolder implementation:

public class AssetTaskListData implements IRecycleViewListHolder<Map.Entry<Integer, Integer>, GroupedRecord> {
    private List<Map.Entry<Integer, Integer>> assetCountList;
    private GroupedRecord record;

    public AssetTaskListData(Map<Integer, Integer> assetCountListSrc, GroupedRecord record) {
        this.assetCountList =  new ArrayList<>();
        for(Object  entry: assetCountListSrc.entrySet().toArray()){
            Map.Entry<Integer,Integer> entryTyped = (Map.Entry<Integer,Integer>)entry;
            assetCountList.add(entryTyped);
        }
        this.record = record;
    }

    @Override
    public GroupedRecord getAdapterParameters() {
        return record;
    }

    @Override
    public Map.Entry<Integer, Integer> getItem(int position) {
        return assetCountList.get(position-1);
    }

    @Override
    public int getSize() {
        return assetCountList.size();
    }
}

2) IViewHolderBinderFactory implementation:

public class AssetTaskListBinderFactory implements IViewHolderBinderFactory<Map.Entry<Integer, Integer>, GroupedRecord> {
    @Override
    public void bindView(RecyclerView.ViewHolder holder, int position, IRecycleViewListHolder<Map.Entry<Integer, Integer>, GroupedRecord> dataHolder) {
        if (holder instanceof AssetItemViewHolder) {
            Integer assetId = dataHolder.getItem(position).getKey();
            Integer assetCount = dataHolder.getItem(position).getValue();
            ((AssetItemViewHolder) holder).bindItem(dataHolder.getAdapterParameters().getRecordId(), assetId, assetCount);
        } else {
            ((AssetHeaderViewHolder) holder).bindItem(dataHolder.getAdapterParameters());
        }
    }
}

3) IViewHolderFactory implementation:

public class AssetTaskListViewHolderFactory implements IViewHolderFactory {
    private IPropertyTypeIconMapper iconMapper;
    private ITypeCaster caster;

    public AssetTaskListViewHolderFactory(IPropertyTypeIconMapper iconMapper, ITypeCaster caster) {
        this.iconMapper = iconMapper;
        this.caster = caster;
    }

    @Override
    public RecyclerView.ViewHolder provideInflatedViewHolder(int viewType, LayoutInflater layoutInflater, @NonNull ViewGroup parent) {
        if (viewType == RecycleViewHeaderBased.HEADER_TYPE) {
            AssetBasedHeaderItemBinding item = DataBindingUtil.inflate(layoutInflater, R.layout.asset_based_header_item, parent, false);
            return new AssetHeaderViewHolder(item.getRoot(), item, caster);
        }
        AssetBasedListItemBinding item = DataBindingUtil.inflate(layoutInflater, R.layout.asset_based_list_item, parent, false);
        return new AssetItemViewHolder(item.getRoot(), item, iconMapper, parent.getContext());
    }
}

4) Deriving adapter

public class AssetHeaderTaskListAdapter extends RecycleViewHeaderBased<Map.Entry<Integer, Integer>, GroupedRecord> {
   public AssetHeaderTaskListAdapter(IRecycleViewListHolder<Map.Entry<Integer, Integer>, GroupedRecord> dataHolder,
                                      IViewHolderBinderFactory binderFactory,
                                      IViewHolderFactory viewHolderFactory) {
        super(dataHolder, binderFactory, viewHolderFactory);
    }
}

5) Instantiate adapter class:

private void setUpAdapter() {
        Map<Integer, Integer> objectTypesCountForGroupedTask = groupedTaskRepository.getObjectTypesCountForGroupedTask(this.groupedRecordId);
        AssetTaskListData assetTaskListData = new AssetTaskListData(objectTypesCountForGroupedTask, getGroupedRecord());
        adapter = new AssetHeaderTaskListAdapter(assetTaskListData,new AssetTaskListBinderFactory(),new AssetTaskListViewHolderFactory(iconMapper,caster));
        assetTaskListRecycler.setAdapter(adapter);
    }

P.S.: AssetItemViewHolder, AssetBasedListItemBinding, etc. my application own structures that should be swapped by your own, for your own purposes.

Sniff answered 4/12, 2019 at 17:53 Comment(0)
Y
0

This is my solution, which uses an abstract class that will extend your adapter

abstract class HeaderAdapter<T : RecyclerView.ViewHolder>(headerView: View)
    : RecyclerView.Adapter<RecyclerView.ViewHolder>() {

    var headerView: View = headerView
        set(value) {
            notifyItemChanged(HEADER_POSITION)
            field = value
        }
    
    companion object {
        const val TYPE_HEADER = -1
        const val HEADER_POSITION = 0
    }

    abstract val itemCountWithoutHeader: Int
    abstract fun getViewHolder(parent: ViewGroup, viewType: Int): T
    abstract fun onBindItemViewHolder(holder: T, position: Int)

    open fun getItemsItemViewType(position: Int): Int {
        return super.getItemViewType(position)
    }

    final override fun getItemCount(): Int = itemCountWithoutHeader + 1

    final override fun onCreateViewHolder(parent: ViewGroup, viewType: Int): RecyclerView.ViewHolder {
        return if (viewType == TYPE_HEADER) HeaderHolder(headerView) else getViewHolder(parent, viewType)
    }

    final override fun getItemViewType(position: Int): Int {
        return if (position == HEADER_POSITION) TYPE_HEADER else getItemsItemViewType(position)
    }

    final override fun onBindViewHolder(holder: RecyclerView.ViewHolder, position: Int) {
        if (position != HEADER_POSITION) onBindItemViewHolder(holder as T, position-1)
    }

    class HeaderHolder(itemView: View) : RecyclerView.ViewHolder(itemView)
}
Yusem answered 16/7, 2022 at 0:23 Comment(0)

© 2022 - 2024 — McMap. All rights reserved.