Android - How to create a transition from an item in listview to a whole activity?
Asked Answered
W

4

28

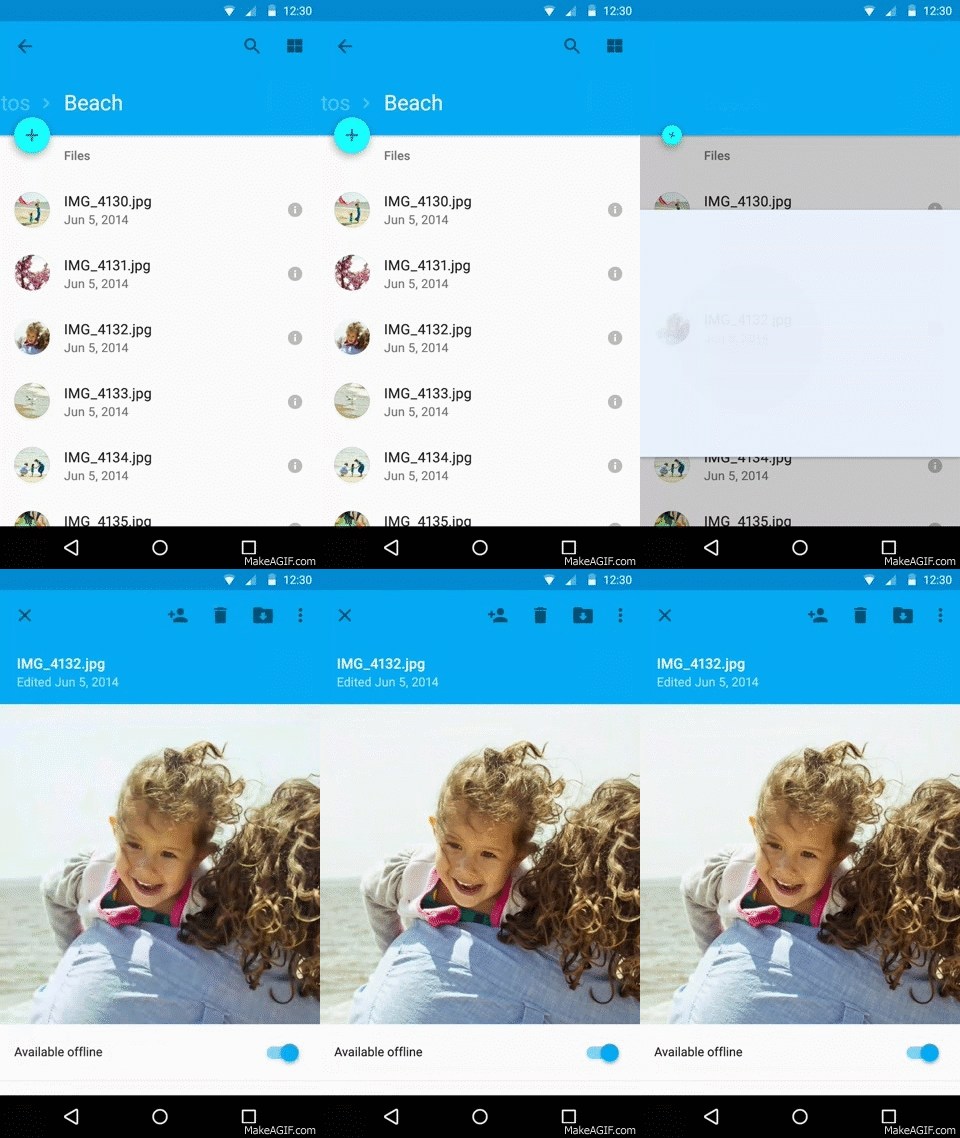
What I want is that when the user clicks a list item in a ListView, it converts to a whole activity (as you can see in the following example), but I was not able to find a tutorial explaining this and, actually, I do not know how this movement is called.

In other words, what I want to achieve is:

  1. Increase List Item elevation when it is clicked (as you can see in the right gif)

  2. Expand and transform list item to the next fragment/activity layout that contains detailed information about the clicked item

enter image description here

I have tried a lot of transitions but with no luck. Can anyone help me out to accomplish this?

Witkin answered 28/10, 2015 at 15:19 Comment(4)
Have you considered using ActivityOptions.makeSceneTransitionAnimation?Bondmaid
Actually, I am using the following code: ActivityOptions options = ActivityOptions.makeSceneTransitionAnimation(this, view, getString(R.string.transition_name));Witkin
You can find about transition here developer.android.com/training/material/…Arlyne
Hey @Antonio, if you have done this, could you please share your code or any sample in achieving this..Homophonous
L
18

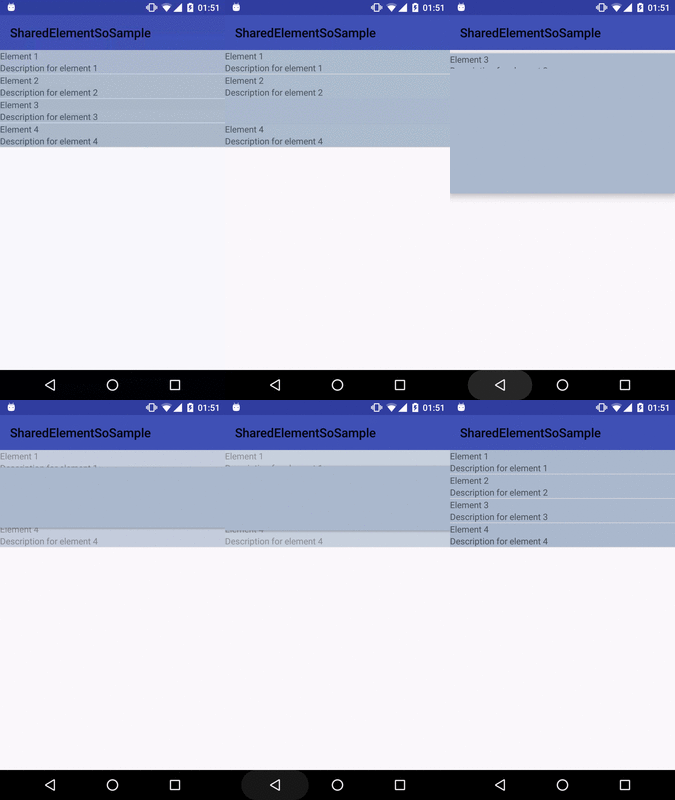
I build a small sample application that transitions between two activities with the desired effect: Sample Application

However the transitions in the provided gifs are slightly different. The transition in the gif on the left side transitions the list element into the content area of the second activity (Toolbar stays in place). In the gif on the right side the transition transforms the list element into the complete screen of the second activity. The following code provides the effect in the left gif. However it should be possible to adapt the solution with minor modifications to achieve the transition in the right gif.

Note this only works on Lollipop. However it is possible to mock a different effect on older devices. Furthermore the sole purpose of the provided code is to show how it could be done. Don't use this directly in your app.

MainActivity:

public class MainActivity extends AppCompatActivity {

    MyAdapter myAdapter;

    @Override
    protected void onCreate(Bundle savedInstanceState) {
        super.onCreate(savedInstanceState);
        setContentView(R.layout.activity_main);

        setSupportActionBar((Toolbar) findViewById(R.id.toolbar));
        ListView listView = (ListView) findViewById(R.id.list_view);

        myAdapter = new MyAdapter(this, 0, DataSet.get());

        listView.setAdapter(myAdapter);

        listView.setOnItemClickListener(new AdapterView.OnItemClickListener() {
            @Override
            public void onItemClick(AdapterView<?> parent, final View view, final int position, long id) {
                startTransition(view, myAdapter.getItem(position));
            }
        });
    }

    private void startTransition(View view, Element element) {
        Intent i = new Intent(MainActivity.this, DetailActivity.class);
        i.putExtra("ITEM_ID", element.getId());

        Pair<View, String>[] transitionPairs = new Pair[4];
        transitionPairs[0] = Pair.create(findViewById(R.id.toolbar), "toolbar"); // Transition the Toolbar
        transitionPairs[1] = Pair.create(view, "content_area"); // Transition the content_area (This will be the content area on the detail screen)

        // We also want to transition the status and navigation bar barckground. Otherwise they will flicker
        transitionPairs[2] = Pair.create(findViewById(android.R.id.statusBarBackground), Window.STATUS_BAR_BACKGROUND_TRANSITION_NAME);
        transitionPairs[3] = Pair.create(findViewById(android.R.id.navigationBarBackground), Window.NAVIGATION_BAR_BACKGROUND_TRANSITION_NAME);
        Bundle b = ActivityOptionsCompat.makeSceneTransitionAnimation(MainActivity.this, transitionPairs).toBundle();

        ActivityCompat.startActivity(MainActivity.this, i, b);
    }
}

activity_main.xml:

<LinearLayout xmlns:android="http://schemas.android.com/apk/res/android"
    android:layout_width="match_parent"
    android:layout_height="match_parent"
    android:orientation="vertical">

    <android.support.v7.widget.Toolbar
        android:id="@+id/toolbar"
        android:layout_width="match_parent"
        android:layout_height="?attr/actionBarSize"
        android:background="@color/colorPrimary"
        android:transitionName="toolbar" />

    <ListView
        android:id="@+id/list_view"
        android:layout_width="match_parent"
        android:layout_height="match_parent" />

</LinearLayout>

DetailActivity:

public class DetailActivity extends AppCompatActivity {

    @Override
    protected void onCreate(Bundle savedInstanceState) {
        super.onCreate(savedInstanceState);
        setContentView(R.layout.activity_detail);

        setSupportActionBar((Toolbar) findViewById(R.id.toolbar));

        long elementId = getIntent().getLongExtra("ITEM_ID", -1);
        Element element = DataSet.find(elementId);


        ((TextView) findViewById(R.id.title)).setText(element.getTitle());
        ((TextView) findViewById(R.id.description)).setText(element.getDescription());

        // if we transition the status and navigation bar we have to wait till everything is available
        TransitionHelper.fixSharedElementTransitionForStatusAndNavigationBar(this);
        // set a custom shared element enter transition
        TransitionHelper.setSharedElementEnterTransition(this, R.transition.detail_activity_shared_element_enter_transition);
    }
}

activity_detail.xml:

<LinearLayout xmlns:android="http://schemas.android.com/apk/res/android"
    android:layout_width="match_parent"
    android:layout_height="match_parent"
    android:orientation="vertical">

    <android.support.v7.widget.Toolbar
        android:id="@+id/toolbar"
        android:layout_width="match_parent"
        android:layout_height="?attr/actionBarSize"
        android:background="@color/colorPrimary"
        android:transitionName="toolbar" />

    <LinearLayout
        android:layout_width="match_parent"
        android:layout_height="wrap_content"
        android:background="#abc"
        android:orientation="vertical"
        android:paddingBottom="200dp"
        android:transitionName="content_area"
        android:elevation="10dp">

        <TextView
            android:id="@+id/title"
            android:layout_width="match_parent"
            android:layout_height="wrap_content" />

        <TextView
            android:id="@+id/description"
            android:layout_width="match_parent"
            android:layout_height="wrap_content" />
    </LinearLayout>
</LinearLayout>

detail_activity_shared_element_enter_transition.xml (/res/transition/):

<?xml version="1.0" encoding="utf-8"?>
<transitionSet xmlns:android="http://schemas.android.com/apk/res/android"
    android:transitionOrdering="together">
    <changeBounds/>
    <changeTransform/>
    <changeClipBounds/>
    <changeImageTransform/>
    <transition class="my.application.transitions.ElevationTransition"/>
</transitionSet>

my.application.transitions.ElevationTransition:

@TargetApi(Build.VERSION_CODES.LOLLIPOP)
public class ElevationTransition extends Transition {

    private static final String PROPNAME_ELEVATION = "my.elevation:transition:elevation";

    public ElevationTransition() {
    }

    public ElevationTransition(Context context, AttributeSet attrs) {
        super(context, attrs);
    }

    @Override
    public void captureStartValues(TransitionValues transitionValues) {
        captureValues(transitionValues);
    }

    @Override
    public void captureEndValues(TransitionValues transitionValues) {
        captureValues(transitionValues);
    }

    private void captureValues(TransitionValues transitionValues) {
        Float elevation = transitionValues.view.getElevation();
        transitionValues.values.put(PROPNAME_ELEVATION, elevation);
    }

    @Override
    public Animator createAnimator(ViewGroup sceneRoot, TransitionValues startValues, TransitionValues endValues) {
        if (startValues == null || endValues == null) {
            return null;
        }

        Float startVal = (Float) startValues.values.get(PROPNAME_ELEVATION);
        Float endVal = (Float) endValues.values.get(PROPNAME_ELEVATION);
        if (startVal == null || endVal == null || startVal.floatValue() == endVal.floatValue()) {
            return null;
        }

        final View view = endValues.view;
        ValueAnimator a = ValueAnimator.ofFloat(startVal, endVal);
        a.addUpdateListener(new ValueAnimator.AnimatorUpdateListener() {
            @Override
            public void onAnimationUpdate(ValueAnimator animation) {
                view.setElevation((float)animation.getAnimatedValue());
            }
        });

        return a;
    }
}

TransitionHelper:

public class TransitionHelper {

    public static void fixSharedElementTransitionForStatusAndNavigationBar(final Activity activity) {
        if (Build.VERSION.SDK_INT < Build.VERSION_CODES.LOLLIPOP)
            return;

        final View decor = activity.getWindow().getDecorView();
        if (decor == null)
            return;
        activity.postponeEnterTransition();
        decor.getViewTreeObserver().addOnPreDrawListener(new ViewTreeObserver.OnPreDrawListener() {
            @TargetApi(Build.VERSION_CODES.LOLLIPOP)
            @Override
            public boolean onPreDraw() {
                decor.getViewTreeObserver().removeOnPreDrawListener(this);
                activity.startPostponedEnterTransition();
                return true;
            }
        });
    }

    public static void setSharedElementEnterTransition(final Activity activity, int transition) {
        if (Build.VERSION.SDK_INT < Build.VERSION_CODES.LOLLIPOP)
            return;
        activity.getWindow().setSharedElementEnterTransition(TransitionInflater.from(activity).inflateTransition(transition));
    }
}

So what are the different parts here: We have two activities. During the transition four views are transitioned between the activities.

  • Toolbar: like in the left gif the toolbar doesn't move with the rest of the content.

  • ListView element View -> becomes the content view of the DetailActivity

  • StatusBar and NavigationBar Background: If we don't add these views to the set of transitioned views they will fade out and back in during the transition. This however requires to delay the enter transition (see: TransitionHelper.fixSharedElementTransitionForStatusAndNavigationBar)

In the MainActivity the transitioned views are added to the Bundle that is used to start the DetailActivity. Furthermore the transitioned views need to be named (transitionName) in both activities. This can be done in the layout xml as well as programatically.

The default set of transitions, that is used during the shared element transition, affects different aspects of the view(for example: view bounds - see 2). However differences in the elevation of a view are not animated. This is why the presented solution utilizes the custom ElevationTransition.

Lacy answered 6/11, 2015 at 1:14 Comment(6)
Amazing answer. You have earned the bounty! Congrats. I just want to add a comment: I have had some problems using findViewById(android.R.id.navigationBarBackground) because it was null. The way I solve it: Adding the following code into transition xml <targets> <target android:excludeId="@android:id/statusBarBackground"/> <target android:excludeId="@android:id/navigationBarBackground"/> </targets>Witkin
Happy to hear that the answer was helpful. Doesn't this cause flickering in the status and navigationbar during the transition? Another solution could be to only add these views to the bundle if they are not null. I could imagine the navigationBarBackground becoming null because it is not available on all devices?Lacy
Actually, you're right. I hadn't noticed that the navigation bar is flickering during transition. I will try to figure out why is this happening.Witkin
Solved, @Andreas Wenger! It was due to another transition I was running. Now it works like a charm! ThanksWitkin
what needed to import for Element used in the code?Flavorful
@SouravRoy Element is just a DTO for the different items in the list. Each element has a id, title and description in this sample. The static DataSet provides the available Elements. However for a real application the DataSet would be for example a database and Element would be the rows in this database.Lacy
D
6

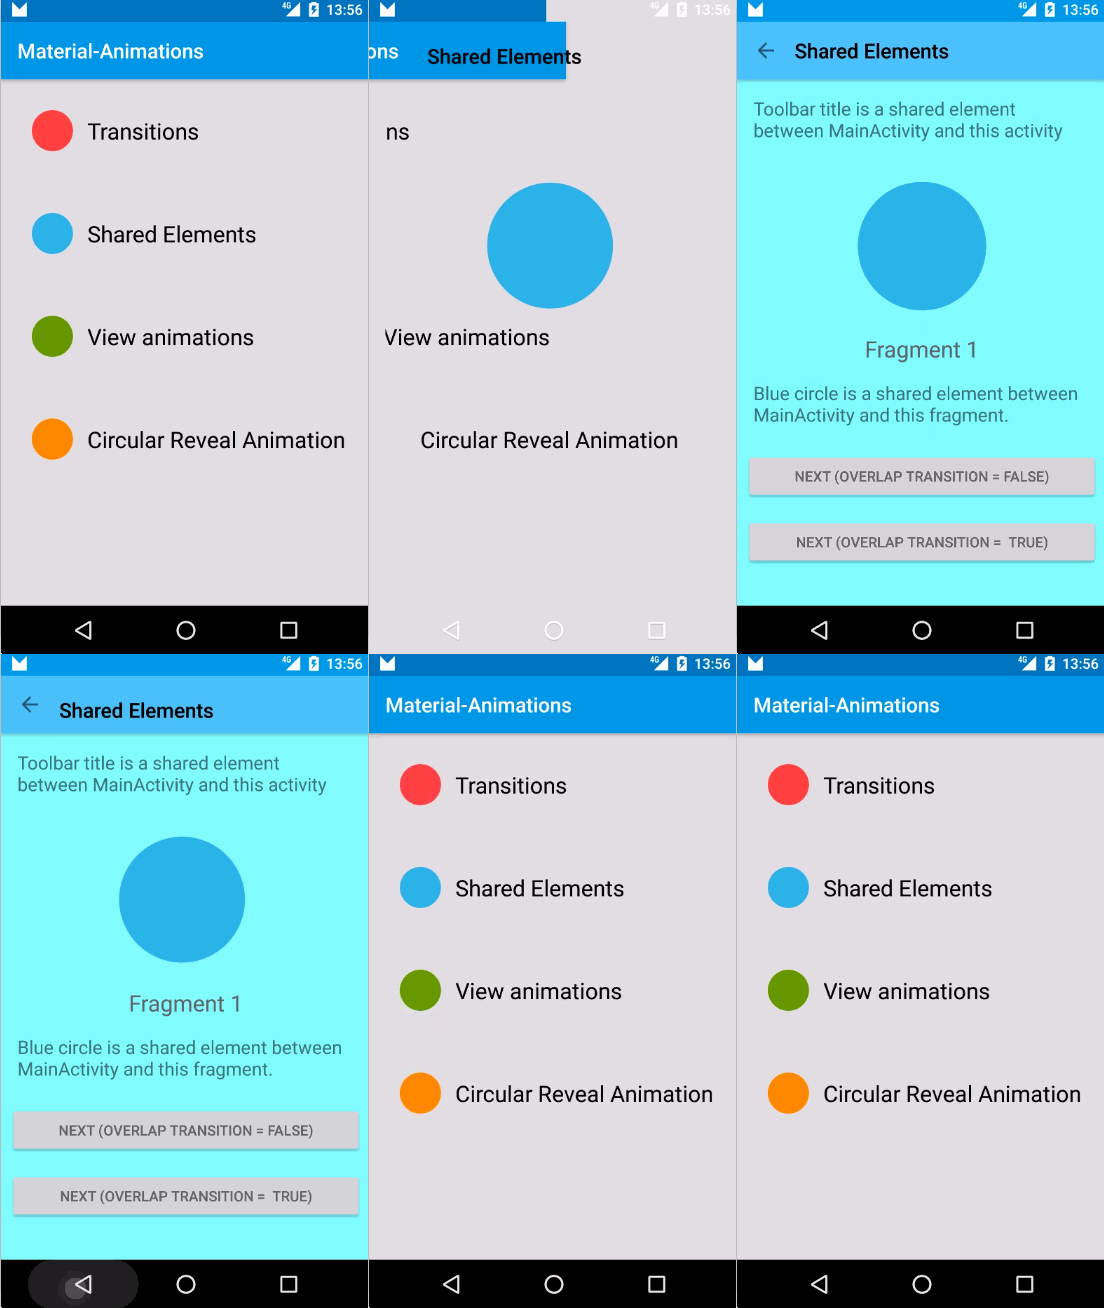
try this.. Material-Animations

blueIconImageView.setOnClickListener(new View.OnClickListener() {
    @Override
    public void onClick(View v) {
        Intent i = new Intent(MainActivity.this, SharedElementActivity.class);

        View sharedView = blueIconImageView;
        String transitionName = getString(R.string.blue_name);

        ActivityOptions transitionActivityOptions = ActivityOptions.makeSceneTransitionAnimation(MainActivity.this, sharedView, transitionName);
        startActivity(i, transitionActivityOptions.toBundle());
    }
});

SharedElements

Doings answered 28/10, 2015 at 17:17 Comment(3)
Thanks for your answer, Carlos. But what I want to accomplish is exactly the example's transition, where a list item becomes an activity. I have tried setting the same transitionName for my list item and my most-outside parent but no luck.Witkin
You should see the source code example and see what's different.. github.com/lgvalle/Material-Animations/archive/master.zipDoings
I have added a gif example that shows exactly what I want. Thanks for your response. It is really interesting but I cannot see what I am wanting to doWitkin
P
0

The Animation you need is called Activity Transitions between shared elements. By Research I found that you should:

  1. Put your ListView view in a relativeLayout
  2. OnClick, inflate a copy of your renderer
  3. Find the global coordinates for where the renderer sits in relationship to the parent of the ListView
  4. Add the copied renderer to the RelativeLayout (parent of ListView)
  5. Animate the listView away
  6. On the end of that animate, animate your new renderer
  7. Profit!

     public class MainActivity extends Activity {
    
     private RelativeLayout layout;
            private ListView listView;
            private MyRenderer selectedRenderer;
    
            @Override
            protected void onCreate(Bundle savedInstanceState) {
                super.onCreate(savedInstanceState);
                layout = new RelativeLayout(this);
                setContentView(layout);
                listView = new ListView(this);
                RelativeLayout.LayoutParams rlp = new RelativeLayout.LayoutParams(
                        RelativeLayout.LayoutParams.MATCH_PARENT, RelativeLayout.LayoutParams.MATCH_PARENT);
                layout.addView(listView, rlp);
    
                listView.setAdapter(new MyAdapter());
                listView.setOnItemClickListener(new AdapterView.OnItemClickListener() {
                    @Override
                    public void onItemClick(AdapterView<?> parent, View view, int position, long id) {
    
                        // find out where the clicked view sits in relationship to the
                        // parent container
                        int t = view.getTop() + listView.getTop();
                        int l = view.getLeft() + listView.getLeft();
    
                        // create a copy of the listview and add it to the parent
                        // container
                        // at the same location it was in the listview
                        selectedRenderer = new MyRenderer(view.getContext());
                        RelativeLayout.LayoutParams rlp = new RelativeLayout.LayoutParams(view.getWidth(), view
                                .getHeight());
                        rlp.topMargin = t;
                        rlp.leftMargin = l;
                        selectedRenderer.textView.setText(((MyRenderer) view).textView.getText());
                        layout.addView(selectedRenderer, rlp);
                        view.setVisibility(View.INVISIBLE);
    
                        // animate out the listView
                        Animation outAni = new TranslateAnimation(Animation.RELATIVE_TO_SELF, 0f,
                                Animation.RELATIVE_TO_SELF, -1f, Animation.RELATIVE_TO_SELF, 0f,
                                Animation.RELATIVE_TO_SELF, 0f);
                        outAni.setDuration(1000);
                        outAni.setFillAfter(true);
                        outAni.setAnimationListener(new Animation.AnimationListener() {
                            @Override
                            public void onAnimationStart(Animation animation) {
                            }
    
                            @Override
                            public void onAnimationRepeat(Animation animation) {
                            }
    
                            @Override
                            public void onAnimationEnd(Animation animation) {
                                ScaleAnimation scaleAni = new ScaleAnimation(1f, 
                                        1f, 1f, 2f, 
                                        Animation.RELATIVE_TO_SELF, 0.5f,
                                        Animation.RELATIVE_TO_SELF, 0.5f);
                                scaleAni.setDuration(400);
                                scaleAni.setFillAfter(true);
                                selectedRenderer.startAnimation(scaleAni);
                            }
                        });
    
                        listView.startAnimation(outAni);
                    }
                });
            }
    
            public class MyAdapter extends BaseAdapter {
                @Override
                public int getCount() {
                    return 10;
                }
    
                @Override
                public String getItem(int position) {
                    return "Hello World " + position;
                }
    
                @Override
                public long getItemId(int position) {
                    return position;
                }
    
                @Override
                public View getView(int position, View convertView, ViewGroup parent) {
                    MyRenderer renderer;
                    if (convertView != null)
                        renderer = (MyRenderer) convertView;
                    else
                        renderer = new MyRenderer(MainActivity.this);
                    renderer.textView.setText(getItem(position));
                    return renderer;
                }
            }
    
            public class MyRenderer extends RelativeLayout {
    
                public TextView textView;
    
                public MyRenderer(Context context) {
                    super(context);
                    setPadding(20, 20, 20, 20);
                    setBackgroundColor(0xFFFF0000);
    
                    RelativeLayout.LayoutParams rlp = new RelativeLayout.LayoutParams(
                            RelativeLayout.LayoutParams.WRAP_CONTENT, RelativeLayout.LayoutParams.WRAP_CONTENT);
                    rlp.addRule(CENTER_IN_PARENT);
                    textView = new TextView(context);
                    addView(textView, rlp);
                }
    
            }        }
    
Pfeffer answered 3/11, 2015 at 17:30 Comment(1)
Thanks for your answer, @Vishavjeet but in your example the item is just being scaled. But what I need is a new window that has a toolbar, other views, etc.Witkin
R
0

Try this spectacular webpage @ Getting Started with Activity & Fragment Transitions (part 1). Here they talked about Activity and Fragment Transitions. I have not tried it. My view is that Fragment Transitions is better and less computer intensive, so it's a good start. And you may not need to change Toolbars, you can show/hide them.

Another good SO link is @ Animate the transition between fragments, look at the best answer. In that post, they talked about objectAnimator.

Another opinion is about the sample animation you posted, it does not show a smooth animation from one art to another. It is less impressive when the animation is not smooth.

Good luck, have fun, keep us all posted.

Ramonramona answered 3/11, 2015 at 18:49 Comment(1)
Thanks for your response. I have worked with shared elements but I do not know how to apply them in the animation I want to achieve. I have modified my post adding more information about what I want to reach.Witkin

© 2022 - 2024 — McMap. All rights reserved.