requires ext-fileinfo. How do I add that into my composer.json file?
Asked Answered
K

5

28

I am trying to install intervention/image. After running the composer update, I get:

enter image description here

This is my composer file:

{
    "name": "laravel/laravel",
    "description": "The Laravel Framework.",
    "keywords": ["framework", "laravel"],
    "license": "MIT",
    "require": {
        "laravel/framework": "4.1.*",
        "intervention/image": "2.*"
    },
    "autoload": {
        "classmap": [
            "app/commands",
            "app/controllers",
            "app/models",
            "app/database/migrations",
            "app/database/seeds",
            "app/tests/TestCase.php"
        ]
    },
    "scripts": {
        "post-install-cmd": [
            "php artisan clear-compiled",
            "php artisan optimize"
        ],
        "post-update-cmd": [
            "php artisan clear-compiled",
            "php artisan optimize"
        ],
        "post-create-project-cmd": [
            "php artisan key:generate"
        ]
    },
    "config": {
        "preferred-install": "dist"
    },
    "minimum-stability": "stable"
}
Kindling answered 20/5, 2014 at 22:36 Comment(0)
P
74

Nothing to do with your composer.json.

You need to install & enable FileInfo PHP extension, which is installed by default starting with PHP 5.3.0. Versions prior to 5.3+ may use the discontinued PECL extension.

To enable FileInfo extension, you need to edit your php.ini and change a single line.

  1. Locate the line:

    ;extension=php_fileinfo.dll
    
  2. Remove the starting comment:

    extension=php_fileinfo.dll
    

To find out where your php.ini is located, you can run the following command from a terminal:

$ php --ini

and search for "Loaded Configuration File".

Please note that the PHP CLI can load a different php.ini file than the web, so don't rely on the path provided in phpinfo(). Run the command specified above in a terminal to find out the file loaded by PHP CLI.

Porphyry answered 21/5, 2014 at 9:21 Comment(5)
PHP versions prior to 5.3 cannot run Composer.Attitude
@Attitude Technically you can't, although there are some workarounds.Porphyry
In the chance that this might help someone: I tried the above solution (along with re-installing everything through composer) all to no avail.. in the end my problem was simply that I'd forgotton to restart my XAMPP server after updating my php.ini file! so remember to restart your server after you make this change :)Twosome
Running "$php --ini" in the terminal made me find out the problem. Everyone: do not use phpinfo() because it might be misleading. Very good tip, thanks.Subir
in new php versions it seems the php_ prefix is gone. I found the line like this in my php.ini: extension=fileinfoUnreflective
O
17

We dont need to do anything in composer.json

Windows

Enable fileinfo extension in php.ini

extension= php_fileinfo.dll

In Linux

1) Download and untar the package

wget http://pecl.php.net/get/Fileinfo-1.0.4.tgz

tar -zxf Fileinfo-1.0.4.tgz

cd Fileinfo-1.0.4

2) Generate the extension for compiling

phpize

3) Configure the module

./configure

4) generate the install files and install it

make

make install

5) Now the extension will be available under the /usr/lib64/php/modules directory. You now need to add the extension somewhere in the php configuration file. Edit /etc/php.ini and add the following: extension=fileinfo.so 6) Save the file and restart the webserver

service httpd restart

To verify fileinfo module is enabled properly, execute:

php -i | grep fileinfo

fileinfo support => enabled

Alternate method

Just an FYI, the module can also be installed using the PECL command i.e.

pecl install fileinfo

Once done, just follow steps 5 and 6 mentioned above to enable it. That’s it.

Offenseless answered 1/6, 2014 at 12:16 Comment(4)
This looks like the correct answer to me. I don't understand why another answer is marked. Simply go to whatever php-xyz.ini is being used and remove the ; and restart the server.Deglutition
@Zehelvion True, but timus2001 could edit my answer and add this information ; you could also do that. I updated my answer with short information about how to enable the extension. If you still think that could be better, feel free to edit it and improve it.Porphyry
"AlexandruGuzinschi who cares, your answer is more complete now. :)" @Zehelvion Nice comeback with your edit. Initial comment would not look nice :)Porphyry
@AlexandruGuzinschi, :) I guess, I wasn't sure it was clear that I meant both answers are good so I worded it differently to emphasize that.Deglutition
B
4

If anyone else is on DreamHost (like me) or finds that the php.ini edits don't do what you want, you can try another route.

Here's the DreamHost Wiki page on PHP.ini, but I'll list the steps below as well.

Step 1: Create a PHP configuration file (phprc)

  1. In your user's home folder (/home/your_user_name), create a new folder called .php (notice the leading period)
  2. Inside this new folder, create another folder based on the version of PHP that you're using. You can find this (and change it) on the hosting panel (DreamHost's is at panel.dreamhost.com under Domains > Manage Domains). So if you're using PHP version 5.6, create a folder called 5.6.
  3. Inside this new folder, create a new file called phprc (no extension). If there's already a phprc file in this folder, you can back it up by changing the filename to phprc.old.

Step 2: Edit phprc to include the extension

  1. Open your new phprc file.
  2. Add this line to the end: extension = fileinfo.so
  3. Save the file

Step 3: Restart PHP and/or your web server

Via Panel

If you have shared hosting, or you aren't comfortable with SSH or the command line, you can force DreamHost to pick up your new phprc settings.

  1. Navigate back to your Panel, and go to Domains > Manage Domains.
  2. Click Edit next to the domain you're working on.
  3. Don't make any changes here. Simply scroll down and click Change Settings at the bottom of the first section.
  4. Within about 10 minutes, DreamHost will pull in your changes.
  5. If you don't see updates after 10 minutes (be patient!), contact support for help.
Via SSH

If you're comfortable with the command line (and you're not using shared hosting), SSH into your server and run the following commands:

For Apache web servers
sudo /etc/init.d/httpd2 restart
For Nginx web servers
sudo /etc/init.d/nginx stop
pkill -9 php
sudo /etc/init.d/nginx start

Your specific commands may be slightly different, but if you're comfortable with CLI then you probably know your specific command.

Buzzard answered 22/9, 2015 at 14:11 Comment(0)
G
1

For people with WAMP

Left click the tray icon -> PHP -> PHP extension -> php_fileinfo

It will restart your server and you're done.

If that does not work, try editing the php.ini inside: C:\wamp\bin\php\php5.4.12 (last part depends on your version of php)

Look for the line: ;extension=php_fileinfo.dll and remove the ;

Save and restart WAMP services.

Gemoets answered 6/8, 2014 at 12:9 Comment(0)
G
1

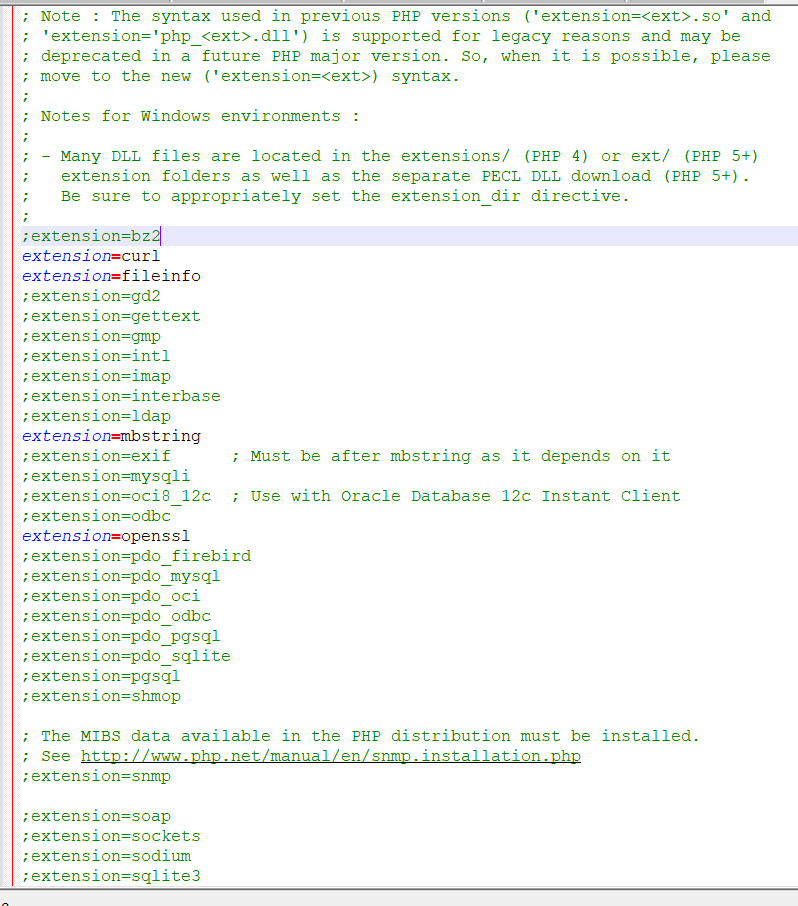
For new versions. In my case it in here.

FileInfo position

Let search this key extension=fileinfo to find it in php.ini file. My php version 7.3.32

Gonium answered 10/11, 2021 at 2:37 Comment(2)
Please don't duplicate existing answers, unless you want to share new insights. If this is the case here, please share more detailsIdiolect
This one actually worked for me, looks like the name differs for my version it's fileinfo rather than php_fileinfo.dll. I'm using for microsoft windows and php 8.2.10Assizes

© 2022 - 2024 — McMap. All rights reserved.