Press-and-hold button for "repeat fire"
Asked Answered
S

7

30

I have referred to countless other questions about a press-and-hold button but there aren't many related to Swift. I have one function connected to a button using the touchUpInside event:

@IBAction func singleFire(sender: AnyObject){
    //code
}

...and another function that is meant to call the function above repeatedly while the same button is held down, and stop when the button is no longer pressed:

@IBAction func speedFire(sender: AnyObject){

    button.addTarget(self, action: "buttonDown:", forControlEvents: .TouchDown)
    button.addTarget(self, action: "buttonUp:", forControlEvents: .TouchUpOutside)

    func buttonDown(sender: AnyObject){
        timer = NSTimer.scheduledTimerWithTimeInterval(0.3, target: self, selector: "singleFire", userInfo: nil, repeats: true)     
    }

    func buttonUp(sender: AnyObject){
        timer.invalidate()
    }
}

I'm not sure what I'm doing wrong, and I don't know how to setup touch events to the same button for a different function.

Schnurr answered 12/12, 2015 at 3:28 Comment(0)
P
50

You want rapid repeat fire when your button is held down.

Your buttonDown and buttonUp methods need to be defined at the top level, and not inside of another function. For demonstration purposes, it is clearer to forgo wiring up @IBActions from the Storyboard and just set up the button in viewDidLoad:

class ViewController: UIViewController {

    @IBOutlet weak var button: UIButton!
    var timer: Timer?
    var speedAmmo = 20

    @objc func buttonDown(_ sender: UIButton) {
        singleFire()
        timer = Timer.scheduledTimer(timeInterval: 0.3, target: self, selector: #selector(rapidFire), userInfo: nil, repeats: true)
    }

    @objc func buttonUp(_ sender: UIButton) {
        timer?.invalidate()
    }

    func singleFire() {
        print("bang!")
    }

    @objc func rapidFire() {
        if speedAmmo > 0 {
            speedAmmo -= 1
            print("bang!")
        } else {
            print("out of speed ammo, dude!")
            timer?.invalidate()
        }
    }

    override func viewDidLoad() {
        super.viewDidLoad()

        // These could be added in the Storyboard instead if you mark
        // buttonDown and buttonUp with @IBAction
        button.addTarget(self, action: #selector(buttonDown), for: .touchDown)
        button.addTarget(self, action: #selector(buttonUp), for: [.touchUpInside, .touchUpOutside])
    }
}

Also, I changed .touchUpOutside to [.touchUpInside, .touchUpOutside] (to catch both touch up events) and call singleFire on the initial buttonDown for single fire. With these changes, pressing the button fires immediately, and then fires every 0.3 seconds for as long as the button is held down.


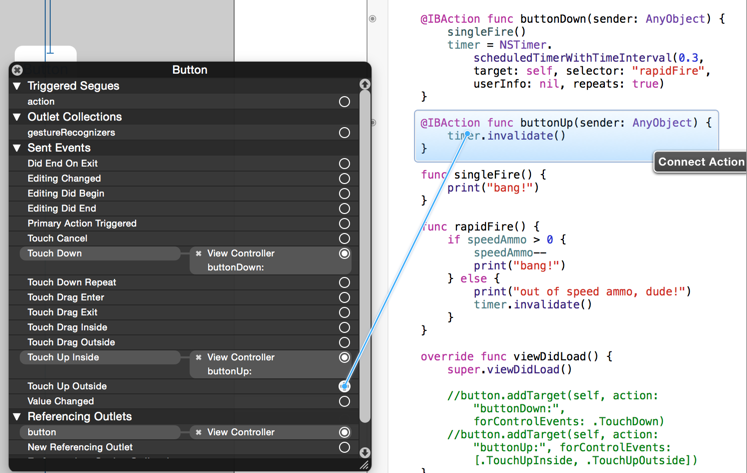
The button can be wired up in the Storyboard instead of setting it up in viewDidLoad. In this case, add @IBAction to buttonDown and buttonUp. Then Control-click on your button in the Storyboard and drag from the circle next to Touch Down to func buttonDown, and drag from the circles next to Touch Up Inside and Touch Up Outside to func buttonUp.

enter image description here

Pommard answered 12/12, 2015 at 4:3 Comment(13)
Awesome, thanks a lot! Just wondering though, it seems necessary to move singleFire as an @IBAction func to a regular func at the top level. Is this because buttonDown() and IBAction singleFire would occur at the same time? Thanks againSchnurr
The selector for the function singleFire as passed to the timer indicates that it take no parameters, so it didn't make sense to call it as an @IBAction and from the timer. I think it is clearer to just have the one .TouchDown handling function and let it call singleFire.Pommard
Quick question: if I had a variable holding 'speed ammo' how would I decrement it at each 0.3 interval?Schnurr
singleFire will be called every 0.3 seconds. Just decrement your variable there first checking if you have enough ammo to fire. If you're out of ammo, you can play an out of ammo sound, or you could just terminate your timer to stop firing.Pommard
Great though how would I decrement it for quick fire and not regular fire? At the moment it decrements for bothSchnurr
@Tim, just separate the firing in two functions. Have the timer call rapidFire which decrements the speed ammo, and have the regular shot call singleFire which doesn't.Pommard
And buttonDown needs to be wired to touchDownInside, while buttonUp needs to be tied to touchUpInside. (Better to state this explicitly as some readers may not understand it.)Evelynneven
@DuncanC, there is no such thing as .TouchDownInside. Also, no wiring is done in the Storyboard. That is all setup in viewDidLoad in this case.Pommard
My mistake. The event is simply called "touchDown". I should have looked it up rather than typing from memory. And to be clear, you can wire up IBActions to the specific events in IB. I do it all the time. You can certainly also do it in code as you're doing in your answer. My suggestion was to add that to the commentary of your answer.Evelynneven
(Understand I think your answer is very good. I'm making a suggestion that would make it clearer to your readers what needs to be done.)Evelynneven
@DuncanC, I updated it with a description and picture of how the button needs to be setup from the Storyboard. Thanks for your suggestions.Pommard
Rather than [.TouchUpInside, .TouchUpOutside], you might want [.TouchUpInside, .TouchDragExit] (i.e. if user drags finger off the fire button, do you really want to continue firing?). It just depends upon the desired UX.Stlaurent
.touchUpOutside was what I was missing (got stuck "firing", or in my case driving), brilliant!Bolshevist
S
23

In my original answer, I answered the question of how to have a button recognize both a tap and a long press. In the clarified question, it appears you want this button to continuously "fire" as long as the user holds their finger down. If that's the case, only one gesture recognizer is needed.

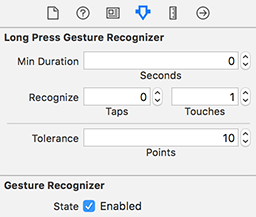
For example, in Interface Builder, drag a long press gesture recognizer from the object library onto the button and then set the "Min Duration" to zero:

enter image description here

Then you can control-drag from the long press gesture recognizer to your code in the assistant editor and add an @IBAction to handle the long press:

weak var timer: Timer?

@IBAction func handleLongPress(_ gesture: UILongPressGestureRecognizer) {
    if gesture.state == .began {
        timer?.invalidate()
        timer = Timer.scheduledTimer(withTimeInterval: 0.3, repeats: true) { [weak self] timer in
            guard let self = self else {
                timer.invalidate()
                return
            }
            self.handleTimer(timer)
        }
    } else if gesture.state == .ended || gesture.state == .cancelled {
        timer?.invalidate()
    }
}

func handleTimer(_ timer: Timer) {
    print("bang")
}

Or, if you also want to stop firing when the user drags their finger off of the button, add a check for the location of the gesture:

@IBAction func handleLongPress(_ gesture: UILongPressGestureRecognizer) {
    if gesture.state == .began {
        timer?.invalidate()
        timer = Timer.scheduledTimer(withTimeInterval: 0.3, repeats: true) { [weak self] timer in
            guard let self = self else {
                timer.invalidate()
                return
            }
            self.handleTimer(timer)
        }
    } else if gesture.state == .ended || gesture.state == .cancelled || (gesture.state == .changed && !gesture.view!.bounds.contains(gesture.location(in: gesture.view))) {
        timer?.invalidate()
    }
}

My original answer, answering the different question of how to recognize both taps and long presses on a button, is below:


Personally, I'd use tap and long press gesture recognizers, e.g.:

override func viewDidLoad() {
    super.viewDidLoad()

    let longPress = UILongPressGestureRecognizer(target: self, action: #selector(handleLongPress(_:)))
    button.addGestureRecognizer(longPress)

    let tap = UITapGestureRecognizer(target: self, action: #selector(handleTap(_:)))
    tap.shouldRequireFailure(of: longPress)
    button.addGestureRecognizer(tap)
}

@objc func handleTap(_ gesture: UITapGestureRecognizer) {
    print("tap")
}

@objc func handleLongPress(_ gesture: UILongPressGestureRecognizer) {
    if gesture.state == .Began {
        print("long press")
    }
}

If you want, with the long press gesture, you could perform your action upon .Ended, too. It just depends upon the desired UX.

FYI, you can also add these two gesture recognizers right in Interface Builder, too, (just drag the respective gestures from the object library on to the button and then control-drag from the gesture recognizer to @IBAction functions) but it was easier to illustrate what's going on by showing it programmatically.

Stlaurent answered 12/12, 2015 at 3:57 Comment(5)
Thanks for the reply. This seems like an elegant solution, though timer = NSTimer.scheduledTimerWithTimeInterval(0.3, target: self, selector: "singleFire", userInfo: nil, repeats: true) in speedFire() causes it to crash for some reason.Schnurr
@Schnurr - If you're going to go that road, you need "singleFire:" (with colon, which designates that the method has a parameter). Also, you probably should define that as func singleFire(timer: NSTimer) { ... } because that parameter is going to be the timer, not just a "sender", so you might as well make that clear. And note that I did not make this an @IBAction, either, as that's solely intended for methods that you're going to be connecting to actions via Interface Builder, which isn't the case with this timer handler. But the virtue of the gesture recognizers is that no timer is needed.Stlaurent
Cheers Rob, that clarifies a lot. I'll give that a go as well.Schnurr
Thank you for the edit, this and the other answer have helped me a lot - I wish I could tick them both.Schnurr
Kind of you to say. No worries.Stlaurent
S
4

I took a different approach when coming up with my own solution. I created a UIButton subclass and enclosed all the solution inside. The difference is that instead of using an IBAction for the handler I created a property in the UIButton

class RapidFireButton: UIButton {

    private var rapidFireTimer: Timer?
    override init(frame: CGRect) {
        super.init(frame: frame)
        commonInit()
    }

    required init?(coder aDecoder: NSCoder) {
        super.init(coder: aDecoder)
        commonInit()
    }

    init() {
        super.init(frame: .zero)
        commonInit()
    }

    private func commonInit() {
        addTarget(self, action: #selector(touchDownHandler), for: .touchDown)
        addTarget(self, action: #selector(touchUpHandler), for: .touchUpOutside)
        addTarget(self, action: #selector(touchUpHandler), for: .touchUpInside)
    }

    @objc private func touchDownHandler() {
        rapidFireTimer?.invalidate()
        rapidFireTimer = nil
        tapHandler(self)
        rapidFireTimer = Timer.scheduledTimer(withTimeInterval: 0.1, repeats: true, block: { [unowned self] (timer) in
            self.tapHandler(self)
        })
    }

    @objc private func touchUpHandler() {
        rapidFireTimer?.invalidate()
        rapidFireTimer = nil
    }

    var tapHandler: (RapidFireButton) -> Void = { button in

    } 
}

Usage is basically creating an outlet for the button and implementing the handler like so

rapidFireButton.tapHandler = { button in
    //do stuff
}
Singlebreasted answered 30/5, 2019 at 9:36 Comment(0)
C
2

I updated @vacawama example codes to swift 3. Thanks.

@IBOutlet var button: UIButton!

var timer: Timer!
var speedAmmo = 100

@IBAction func buttonDown(sender: AnyObject) {
    singleFire()
    timer = Timer.scheduledTimer(timeInterval: 0.1, target: self, selector:#selector(rapidFire), userInfo: nil, repeats: true)
}

@IBAction func buttonUp(sender: AnyObject) {
    timer.invalidate()
}

func singleFire() {
    if speedAmmo > 0 {
        speedAmmo -= 1
        print("bang!")
    } else {
        print("out of speed ammo, dude!")
        timer.invalidate()
    }
}

func rapidFire() {
    if speedAmmo > 0 {
        speedAmmo -= 1
        print("bang!")
    } else {
        print("out of speed ammo, dude!")
        timer.invalidate()
    }
}

override func viewDidLoad() {
    super.viewDidLoad()

    button.addTarget(self, action:#selector(buttonDown(sender:)), for: .touchDown)
    button.addTarget(self, action:#selector(buttonUp(sender:)), for: [.touchUpInside, .touchUpOutside])
}
Cremate answered 17/1, 2017 at 8:57 Comment(0)
D
2

Swift 5+

Based on rob's answer there is a nicer way to do this now.

Add the long press gesture recognizer by dragging it on-top of the button in the storyboard and then ...

Then you can control-drag from the long press gesture recognizer to your code in the assistant editor and add an @IBAction to handle the long press: - Quote from Rob's Answer

The difference is in the code which is listed below:

var timer: Timer?

@IBAction func downButtonLongPressHandler(_ sender: UILongPressGestureRecognizer) {
        if sender.state == .began {
            timer = Timer.scheduledTimer(withTimeInterval: 0.2, repeats: true, block: {_ in
                self.downButtonPressedLogic()
                self.doCalculations()
            })
        } else if sender.state == .ended || sender.state == .cancelled {
            print("FINISHED UP LONG PRESS")
            timer?.invalidate()
            timer = nil
        }
}

You no longer need to use NSTimer, you can just use Timer now and you can just put the code for the timer in the block which is much more compact and no need for selectors.

In my case I had another function that handles the logic for what to do when the downButton was pressed, but you can put your code you want to handle in there.

You can control the speed of the repeat fire by changing the withTimeInterval parameter value.

You can change the timing for the timer to start by finding the longPressGesture in your storyboard and changing it's Min Duration value. I usually set mine at 0.5 so that your normal button press actions can still work (unless you don't care about that). If you set it to 0 this will ALWAYS override your normal button press actions.

Drachm answered 7/2, 2020 at 20:59 Comment(0)
M
0

You can use Timer

follow this example on github

https://github.com/sadeghgoo/RunCodeWhenUIbuttonIsHeld

Muscle answered 8/12, 2019 at 7:39 Comment(0)
V
0

viewDidLoad

let longPressGesture = UILongPressGestureRecognizer(target: self, action: #selector(self.touchHoldView(sender:)))
    longPressGesture.minimumPressDuration = 2
    myUIView.addGestureRecognizer(longPressGesture)


@objc func touchHoldView(sender: UITapGestureRecognizer) { 
    if sender.state == .began {
      //code..
    }
}
Victorvictoria answered 2/9, 2022 at 8:30 Comment(0)

© 2022 - 2024 — McMap. All rights reserved.