Publish web project from JetBrains Rider
Asked Answered
S

2

31

I am giving Rider a try, and so far, quite like it.

One feature I use in Visual Studio quite often is right click on a web project and publish to our testing server.

I cannot find a similar option in Rider, so what I have done is, create a run configuration, with the following settings:

  • Exe path: C:/Program Files (x86)/Microsoft Visual Studio/2017/Enterprise/MSBuild/15.0/Bin/amd64/msbuild.exe
  • Arguments: MySolution.sln /m /p:DeployOnBuild=True /p:PublishProfile=My-Project "/p:platform=Any CPU" /p:configuration=Release /p:VisualStudioVersion=15.0 /p:Password=****
  • Working Directory: C:\SolutionFolder

When I want to publish, I select it from the drop-down and click run.
This works 100%.

My question is, is this the best way to do it, sans setting up a CI pipeline? Am I missing an option or setting in the IDE?

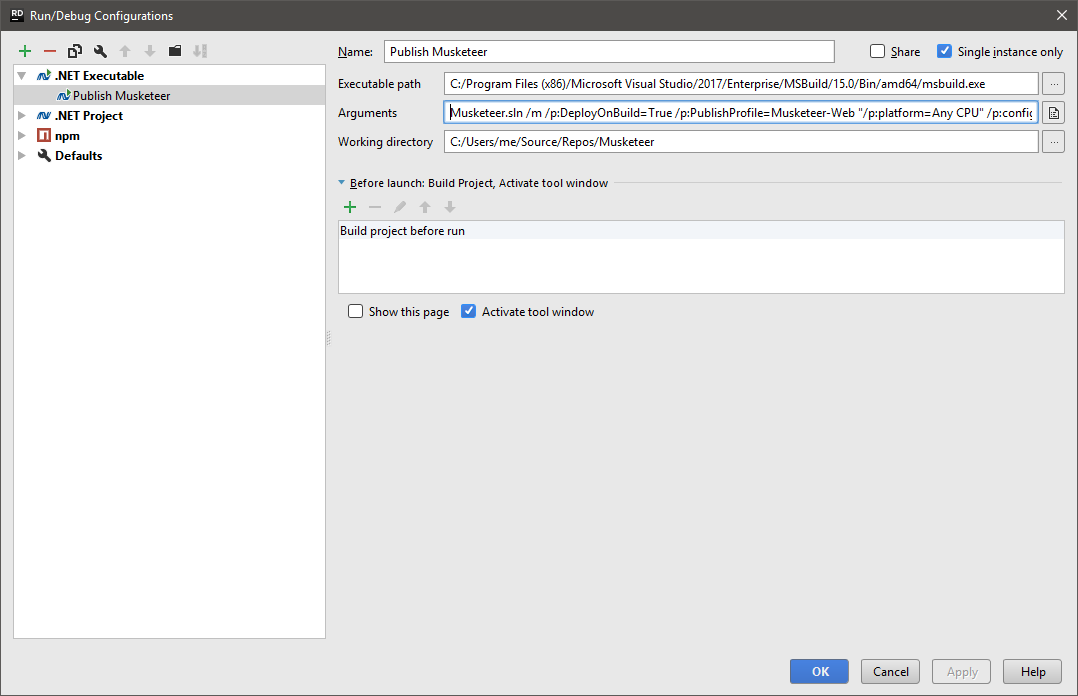
Settings

Stairwell answered 27/5, 2017 at 9:47 Comment(7)
I try your solution by got Warning: unparsed command line arguments:Newland
Does it seem to a warning from Rider or MSBuild? I have never checked if I got any warnings, if it still works, maybe some arguments are not necessary.Stairwell
I think from RiderNewland
This is still working for me. a few things you can check. 1) check the bath of MSBuild. 2) Make sure you have a publish profile. This is an XML file under .My Project\PublishProfiles (it can be created with Visual Studio)Stairwell
You can also try running this from the command line, from the solution folder use "C:\Program Files (x86)\Microsoft Visual Studio\2017\Enterprise\MSBuild\15.0\Bin\amd64\msbuild.exe" Musketeer.sln /m /p:DeployOnBuild=True /p:PublishProfile=Musketeer-Web "/p:platform=Any CPU" /p:configuration=Release /p:VisualStudioVersion=15.0 /p:Password=mYuBeRpAsS just replacing SLN, publish profile, password, etc.Stairwell
I have also added a screenshot as a reference to you.Stairwell
Thanks for this, I had to add allowuntrusted to mine: Your.sln /p:DeployOnBuild=true /p:PublishProfile="Your Profile" /p:Password=PasswordInProfile /p:AllowUntrustedCertificate=trueGrapnel
C
17

As of June 2018, Rider doesn't have UI for publishing.

There is a feature request which you can vote for, once logged in YouTrack.

As a workaround, one can create a '.NET Executable' configuration like you did, and run it when you want to publish your project.

More detailed instructions follows:

  1. Run > Edit Configuration
  2. Add new configuration > .NET Executable
  3. Name = your project name
  4. Exe path = path to your MSBuild (for example C:/Program Files (x86)/Microsoft Visual Studio/2017/Professional/MSBuild/15.0/Bin/amd64/MSBuild.exe)
  5. Program arguments = YourSolution.sln /t:"Your_Project" /p:PublishProfile=YourPublishProfile.pubxml /p:Configuration=Debug /p:DeployOnBuild=true /m
  6. Working directory = C:/path/to/solution/dir/

Notes:

  • the project publish profile is usually located in the project folder, under Properties/PublishProfiles. If you don't have one you can start with the example reported below;
  • you need to replace the dots (.) in the project name with underscores (_). In the example above Your.Project was passed as Your_Project;
  • you can specify a different publishing directory, if not already specified in the publish profile, by adding the argument /p:PublishDir="C:/path/to/publish/dir/";
  • if you don't have Visual Studio installed on your machine, you can use the MSBuild bundled with the Build Tools for Visual Studio 2017.

Example of publish profile:

<?xml version="1.0" encoding="utf-8"?>
<Project ToolsVersion="4.0" xmlns="http://schemas.microsoft.com/developer/msbuild/2003">
  <PropertyGroup>
    <WebPublishMethod>FileSystem</WebPublishMethod>
    <LastUsedBuildConfiguration>Debug</LastUsedBuildConfiguration>
    <LastUsedPlatform>Any CPU</LastUsedPlatform>
    <SiteUrlToLaunchAfterPublish />
    <LaunchSiteAfterPublish>True</LaunchSiteAfterPublish>
    <ExcludeApp_Data>False</ExcludeApp_Data>
    <publishUrl>..\YourPublishDirectory</publishUrl>
    <DeleteExistingFiles>True</DeleteExistingFiles>
    <ExcludeFilesFromDeployment>bin\*.dll.config</ExcludeFilesFromDeployment>
  </PropertyGroup>
</Project>
Cyclopropane answered 11/7, 2018 at 9:18 Comment(5)
I found the same approach working in Rider for Mac for publishing a WebJob project to Azure WebJob. I've used "Native Executable" instead of ".NET Executable" and the following MSBuild path: /Library/Frameworks/Mono.framework/Versions/Current/bin/msbuild. Also, had to specify the publishing profile password using /p:Password=$PublishingProfilePasswordHere$Stavros
@Stavros where can I find this password if I downloaded a *.PublishSettings file directly fro Azure? VS never asked for a password and can deploy to the specific slot without issues.Prakash
The password should be inside the .PublishSettings file.Stavros
"the Publish option should be in the right-click menu of your solution in the Solution Explorer tool window" -- rider-support.jetbrains.com/hc/en-us/community/posts/…Terrific
Rider DOES now have a UI for publishing (For those reading this older post).Desrosiers
P
2

Latest versions of Rider support publishing via UI. If you don't have Visual Studio installed on your machine, make sure the web project has Build.Microsoft.VisualStudio.Web.targets nuget package installed.

Pesthouse answered 16/12, 2020 at 10:38 Comment(1)
please add a more detailed description and a link to official documentationDaltondaltonism

© 2022 - 2024 — McMap. All rights reserved.