Plotting labeled intervals in matplotlib/gnuplot
Asked Answered
O

4

31

I have a data sample which looks like this:

a 10:15:22 10:15:30 OK
b 10:15:23 10:15:28 OK
c 10:16:00 10:17:10 FAILED
b 10:16:30 10:16:50 OK

What I want is to plot the above data in the following way:

captions ^
  |
c |         *------*
b |   *---*    *--*
a | *--*
  |___________________
                     time >

With the color of lines depending on the OK/FAILED status of the data point. Labels (a/b/c/...) may or may not repeat.

As I've gathered from documentation for gnuplot and matplotlib, this type of a plot should be easier to do in the latter as it's not a standard plot and would require some preprocessing.

The question is:

  1. Is there a standard way to do plots like this in any of the tools?
  2. If not, how should I go about plotting this data (pointers to relevant tools/documentation/functions/examples which do something-kinda-like the thing described here)?
Overmantel answered 7/10, 2011 at 7:54 Comment(0)
T
28

Updated: Now includes handling the data sample and uses mpl dates functionality.

import matplotlib.pyplot as plt
from matplotlib.dates import DateFormatter, MinuteLocator, SecondLocator
import numpy as np
from StringIO import StringIO
import datetime as dt

### The example data
a=StringIO("""a 10:15:22 10:15:30 OK
b 10:15:23 10:15:28 OK
c 10:16:00 10:17:10 FAILED
b 10:16:30 10:16:50 OK
""")

#Converts str into a datetime object.
conv = lambda s: dt.datetime.strptime(s, '%H:%M:%S')

#Use numpy to read the data in. 
data = np.genfromtxt(a, converters={1: conv, 2: conv},
                     names=['caption', 'start', 'stop', 'state'], dtype=None)
cap, start, stop = data['caption'], data['start'], data['stop']

#Check the status, because we paint all lines with the same color 
#together
is_ok = (data['state'] == 'OK')
not_ok = np.logical_not(is_ok)

#Get unique captions and there indices and the inverse mapping
captions, unique_idx, caption_inv = np.unique(cap, 1, 1)

#Build y values from the number of unique captions.
y = (caption_inv + 1) / float(len(captions) + 1)

#Plot function
def timelines(y, xstart, xstop, color='b'):
    """Plot timelines at y from xstart to xstop with given color."""   
    plt.hlines(y, xstart, xstop, color, lw=4)
    plt.vlines(xstart, y+0.03, y-0.03, color, lw=2)
    plt.vlines(xstop, y+0.03, y-0.03, color, lw=2)

#Plot ok tl black    
timelines(y[is_ok], start[is_ok], stop[is_ok], 'k')
#Plot fail tl red
timelines(y[not_ok], start[not_ok], stop[not_ok], 'r')

#Setup the plot
ax = plt.gca()
ax.xaxis_date()
myFmt = DateFormatter('%H:%M:%S')
ax.xaxis.set_major_formatter(myFmt)
ax.xaxis.set_major_locator(SecondLocator(interval=20)) # used to be SecondLocator(0, interval=20)

#To adjust the xlimits a timedelta is needed.
delta = (stop.max() - start.min())/10

plt.yticks(y[unique_idx], captions)
plt.ylim(0,1)
plt.xlim(start.min()-delta, stop.max()+delta)
plt.xlabel('Time')
plt.show()

Resulting image

Trampoline answered 7/10, 2011 at 9:25 Comment(5)
Thanks. I've successfully drawn a graph using your solution as a basis. Will accept your answer if no one proposes a better solution.Overmantel
I updated my answer, i always wanted to learn the matplotlibs date functionality.Trampoline
For different end symbols you replace the vlines with scatter symbols. plt.scatter(xstart,y,s=100,c=color,marker='x',lw=2,edgecolor=color)Trampoline
This example does not work with matplotlib 1.2 (python 2.7, Fedora 19) - it seems that the code is stuck in an infinite loop.Special
Works for me with matplotlib 1.4.0 Python 2.7 on Mac OS 10.10.Sigurd
P
1

the answer for @tillsten is not working for Python3 any more I did some modification I hope it will helps.

import matplotlib.pyplot as plt
from matplotlib.dates import DateFormatter, MinuteLocator, SecondLocator
import numpy as np
import pandas as pd
import datetime as dt
import io

### The example data
a=io.StringIO("""
caption start stop state
a 10:15:22 10:15:30 OK
b 10:15:23 10:15:28 OK
c 10:16:00 10:17:10 FAILED
b 10:16:30 10:16:50 OK""")

data = pd.read_table(a, delimiter=" ")

data["start"] = pd.to_datetime(data["start"])
data["stop"] = pd.to_datetime(data["stop"])

cap, start, stop = data['caption'], data['start'], data['stop']

#Check the status, because we paint all lines with the same color 
#together
is_ok = (data['state'] == 'OK')
not_ok = np.logical_not(is_ok)

#Get unique captions and there indices and the inverse mapping
captions, unique_idx, caption_inv = np.unique(cap, 1, 1)

#Build y values from the number of unique captions.
y = (caption_inv + 1) / float(len(captions) + 1)

#Plot function
def timelines(y, xstart, xstop, color='b'):
    """Plot timelines at y from xstart to xstop with given color."""   
    plt.hlines(y, xstart, xstop, color, lw=4)
    plt.vlines(xstart, y+0.03, y-0.03, color, lw=2)
    plt.vlines(xstop, y+0.03, y-0.03, color, lw=2)

#Plot ok tl black    
timelines(y[is_ok], start[is_ok], stop[is_ok], 'k')
#Plot fail tl red
timelines(y[not_ok], start[not_ok], stop[not_ok], 'r')

#Setup the plot
ax = plt.gca()
ax.xaxis_date()
myFmt = DateFormatter('%H:%M:%S')
ax.xaxis.set_major_formatter(myFmt)
ax.xaxis.set_major_locator(SecondLocator(interval=20)) # used to be SecondLocator(0, interval=20)

#To adjust the xlimits a timedelta is needed.
delta = (stop.max() - start.min())/10

plt.yticks(y[unique_idx], captions)
plt.ylim(0,1)
plt.xlim(start.min()-delta, stop.max()+delta)
plt.xlabel('Time')
plt.show()
Pejoration answered 5/1, 2022 at 4:42 Comment(0)
F
0

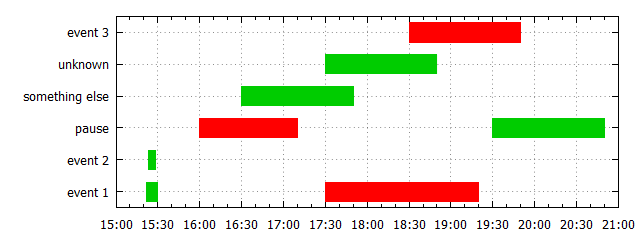
gnuplot 5.2 version with creating a unique key list

The main difference to @CiroSantilli's solution is that a list of unique keys is created automatically from column 1 and the index can be accessed via the defined function Lookup(). The referenced gnuplot demo already uses a list of unique items, however, in the OP's case there are duplicates.

Creating such a list of unique items does not exist in gnuplot right away, so you have to implement it yourself. The code requires gnuplot >=5.2. It is probably difficult to get a solution which works under gnuplot 4.4 (the time of OP's question) because a few useful features were not implemented at that time: do for-loops, summation, datablocks, ... (a version for gnuplot 4.6 might be possible with some workarounds).

Edit: the earlier version used with vectors and linewidth 20 to plot the bars, however, linewidth 20 also extends in x-direction which is not desired here. Therefore, with boxxyerror is now used.


Yes, it can be done shorter and clearer.

Script:

### Time chart with gnuplot (requires gnuplot>=5.0)
reset session

$Data <<EOD
# category        start      end        status
"event 1"         10:15:22   10:15:30   OK
"event 2"         10:15:23   10:15:28   OK
pause             10:16:00   10:17:10   FAILED
"something else"  10:16:30   10:17:50   OK
unknown           10:17:30   10:18:50   OK
"event 3"         10:18:30   10:19:50   FAILED
pause             10:19:30   10:20:50   OK
"event 1"         10:17:30   10:19:20   FAILED
EOD

# create list of unique items
uniqueList = ''
item(col)           = ' "'.strcol(col).'"'
isInList(list,col)  = strstrt(uniqueList,item(col))  # returns a number >0 if found
addToList(list,col) = list.item(col)
stats $Data u (!isInList(uniqueList,1) ? uniqueList = addToList(uniqueList,1) : 0) nooutput

timeCenter(col1,col2) = (timecolumn(col1,myTimeFmt)+timecolumn(col2,myTimeFmt))*0.5 
timeDeltaT(col1,col2) = (timecolumn(col1,myTimeFmt)-timecolumn(col2,myTimeFmt))*0.5 
Lookup(col)           = int(sum [i=1:words(uniqueList)] (strcol(col) eq word(uniqueList,i)) ? i : 0)
myColor(col)          = strcol(col) eq "OK" ? 0x00cc00 : 0xff0000
myBoxWidth            = 0.6

myTimeFmt = "%H:%M:%S"
set format x "%M:%S" timedate
set yrange [0.5:words(uniqueList)+0.5]
set grid x,y

plot $Data u (timeCenter(2,3)):(Lookup(1)):(timeDeltaT(2,3)):(0.5*myBoxWidth): \
             (myColor(4)):ytic(1) w boxxyerror fill solid 1.0 lc rgb var notitle
### end of script

Result:

enter image description here

Flounder answered 22/6, 2019 at 6:53 Comment(0)
P
-1

gnuplot with vector solution

Minimized from: http://gnuplot.sourceforge.net/demo_5.2/gantt.html

main.gnuplot

#!/usr/bin/env gnuplot

$DATA << EOD
1 1 5
1 11 13
2 3 10
3 4 8
4 7 13
5 6 15
EOD

set terminal png size 512,512
set output "main.png"
set xrange [-1:]
set yrange [0:]
unset key
set border 3
set xtics nomirror
set ytics nomirror
set style arrow 1 nohead linewidth 3
plot $DATA using 2 : 1 : ($3-$2) : (0.0) with vector as 1, \
     $DATA using 2 : 1 : 1 with labels right offset -2

GitHub upstream.

Output:

enter image description here

You can remove the labels by removing the second plot command line, I added them because they are useful in many applications to more easily identify the intervals.

The Gantt example I linked to shows how to handle date formats instead of integers.

Tested in gnuplot 5.2 patchlevel 2, Ubuntu 18.04.

Phytobiology answered 21/6, 2019 at 10:45 Comment(0)

© 2022 - 2024 — McMap. All rights reserved.