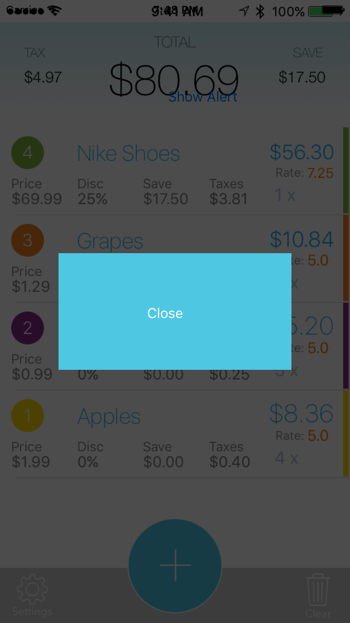
Custom Alert (UIAlertView) with swift
Asked Answered
M

7

29

How can i create a custom alert with Swift? I try translating a guide from Objective c but loads a full screen layout

for do it easy i can load a new layout with the transparent background i try this:

listaalertviewcontroller.view.backgroundColor = UIColor.clearColor()
let purple = UIColor.purpleColor() // 1.0 alpha
let semi = purple.colorWithAlphaComponent(0.5)

listaalertviewcontroller.view.backgroundColor = semi

presentingViewController.modalPresentationStyle = UIModalPresentationStyle.CurrentContext
self.presentViewController(listaalertviewcontroller, animated: true, completion: nil)

in the animation it's transparent but when the animation ends it's opaque... and i turn off opaque option in the view... what i'm doing wrong?

Matthia answered 19/8, 2014 at 9:8 Comment(1)
You can not customize UIAlertView since iOS 7. As stated in the documentation: The UIAlertView class is intended to be used as-is and does not support subclassing. The view hierarchy for this class is private and must not be modified.Decarbonate
U
57

Code tested in Swift 5 and Xcode 10

How to make your own custom Alert

I was wanting to do something similar. First of all, UIAlertView is deprecated in favor of UIAlertController. See this answer for the standard way to display an alert:

And both UIAlertView and UIAlertController do not really allow much customization. One option is to use some third party code. However, I discovered that it isn't that difficult to create your own Alert by displaying another view controller modaly.

The example here is just a proof-of-concept. You can design your alert any way you want.

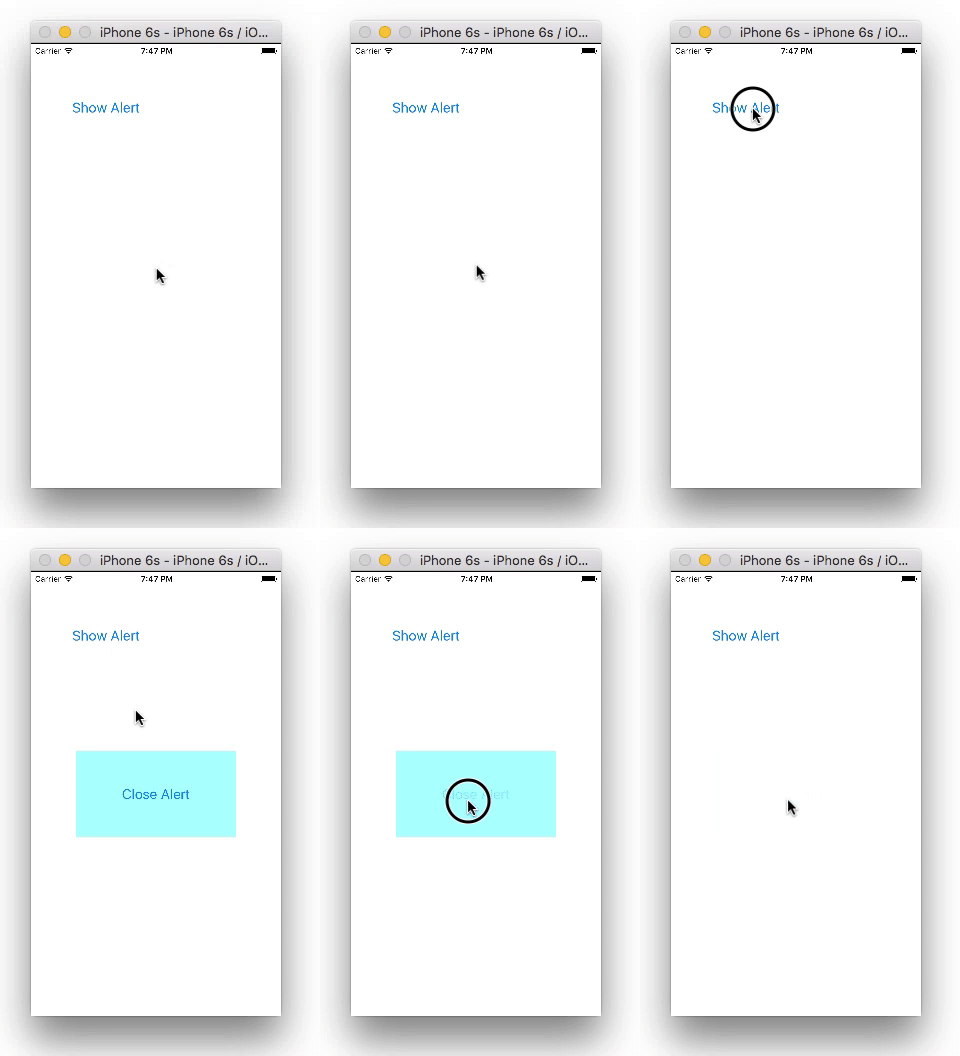
enter image description here

Storyboard

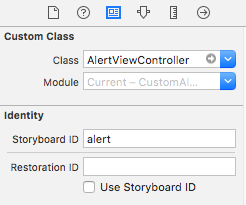
You should have two View Controllers. Your second view controller will be your alert. Set the class name to AlertViewContoller and the Storyboard ID to alert. (Both of these are names that we defined ourselves in the code below, nothing special about them. You can add the code first if you want. It might actually be easier if you add the code first.)

enter image description here

Set the background color for the root view (in your Alert View Controller) to clear (or translucent black is nice for an alert). Add another UIView and center it with constraints. Use that as your alert background and put whatever you want inside. For my example, I added a UIButton.

enter image description here

Code

ViewController.swift

import UIKit
class ViewController: UIViewController {

    @IBAction func showAlertButtonTapped(_ sender: UIButton) {
        
        let storyboard = UIStoryboard(name: "Main", bundle: nil)
        let myAlert = storyboard.instantiateViewController(withIdentifier: "alert")
        myAlert.modalPresentationStyle = UIModalPresentationStyle.overCurrentContext
        myAlert.modalTransitionStyle = UIModalTransitionStyle.crossDissolve
        self.present(myAlert, animated: true, completion: nil)
    }
}

AlertViewController.swift

import UIKit
class AlertViewController: UIViewController {
    
    @IBAction func dismissButtonTapped(_ sender: UIButton) {
        self.dismiss(animated: true, completion: nil)
    }
}

Don't forget to hook up the outlets.

You can add an onTouchUp event listener to the background view to dismiss the popup when the user clicks outside of it.

That's it. You should be able to make any sort of alert that you can imagine now. No need for third party code.

Here is another custom alert I made. Still ugly, but it shows more things you can do.

enter image description here

Other options

Sometimes there is no need to reinvent the wheel, though. I'm impressed with the third party project SDCAlertView (MIT license). It is written in Swift but you can use it with Objective-C projects as well. It offers a wide range of customability.

Upbow answered 17/5, 2016 at 12:11 Comment(9)
that going to exception Unknown class AlertViewContoller in Interface Builder file.Extrados
@suragch where to write code of if i want to set dynamic title of button?Olivenite
@Jasmit, add an @IBOutlet for the button and then change the button text to whatever you want when the AlertViewController loads.Upbow
If anyone ever gets a problem doing this and gets a SIGBRT error its because you also need to tick the 'Inherit Module from Target' checkbox.Bastogne
was looking for "myAlert.modalPresentationStyle = UIModalPresentationStyle.overCurrentContext". Thank you.Nonunion
Your alertViewController appear without alert effects. When alertVC showing, I change to another tab on Tab Bar Home controller, after I change back original tab, then click on button OK or cancel, problem start...Gravestone
Finally, I decided to use alert sheet. But I think your solution is great for some caseGravestone
@Upbow how would you get the result of the selected switches back in the main view?Quoin
@IlianFelinto, sorry, I switched (no pun intended) to Flutter so I can't remember how to do things in native iOS anymore.Upbow
S
19

Here is the Swift 3 code. Thanks a lot @Suragch for the awesome approach to create a custom AlertView.

ViewController.swift

import UIKit
class ViewController: UIViewController {

@IBAction func showAlertButtonTapped(sender: UIButton) {

        let storyboard = UIStoryboard(name: "Main", bundle: nil)
        let myAlert = storyboard.instantiateViewController(withIdentifier: "storyboardID")
        myAlert.modalPresentationStyle = UIModalPresentationStyle.overCurrentContext
        myAlert.modalTransitionStyle = UIModalTransitionStyle.crossDissolve
        self.present(myAlert, animated: true, completion: nil)

}

AlertViewController.swift

import UIKit
class AlertViewController: UIViewController {

    @IBAction func dismissButtonTapped(sender: UIButton) {
        self.dismiss(animated: true, completion: nil)
    }
}

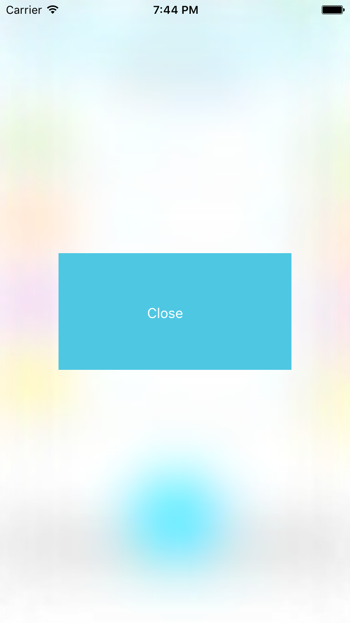
To make it a little more interesting or to make the default effect in iOS, you could add either a VisualEffectView or change the color of the main UIView to a dark color and set its alpha to 70%. I prefer the second approach since the blur effect is not as smooth as the one with the view with 70 alpha.

Effect with VisualEffectView:

enter image description here

Effect using a UIView with 70 Alpha:

enter image description here

Selfgratification answered 26/10, 2016 at 0:31 Comment(1)
let blurFx = UIBlurEffect(style: UIBlurEffectStyle.dark) let blurFxView = UIVisualEffectView(effect: blurFx) blurFxView.frame = view.bounds blurFxView.autoresizingMask = [.flexibleWidth, .flexibleHeight] view.insertSubview(blurFxView, at: 0)Opiumism
X
4

Nowadays, an alert is merely a simple presented view controller. You can write a presented view controller that behaves similarly to an alert — that is, it pops onto the screen and dims whatever is behind it — but it's your view controller and you are free to give it any interface you like.

To get you started, I've written a github project that you can download and run, and modify to suit your actual needs.

I'll show the key part of the code. The "alert" view controller, in its initializers, sets its own modal presentation style as custom and sets a transitioning delegate:

class CustomAlertViewController : UIViewController {
    let transitioner = CAVTransitioner()

    override init(nibName: String?, bundle: Bundle?) {
        super.init(nibName: nibName, bundle: bundle)
        self.modalPresentationStyle = .custom
        self.transitioningDelegate = self.transitioner
    }

    convenience init() {
        self.init(nibName:nil, bundle:nil)
    }

    required init?(coder: NSCoder) {
        fatalError("NSCoding not supported")
    }
}

All the work is done by the transitioning delegate:

class CAVTransitioner : NSObject, UIViewControllerTransitioningDelegate {
    func presentationController(
        forPresented presented: UIViewController,
        presenting: UIViewController?,
        source: UIViewController)
        -> UIPresentationController? {
            return MyPresentationController(
                presentedViewController: presented, presenting: presenting)
    }
}

class MyPresentationController : UIPresentationController {

    func decorateView(_ v:UIView) {
        // iOS 8 doesn't have this
//        v.layer.borderColor = UIColor.blue.cgColor
//        v.layer.borderWidth = 2
        v.layer.cornerRadius = 8

        let m1 = UIInterpolatingMotionEffect(
            keyPath:"center.x", type:.tiltAlongHorizontalAxis)
        m1.maximumRelativeValue = 10.0
        m1.minimumRelativeValue = -10.0
        let m2 = UIInterpolatingMotionEffect(
            keyPath:"center.y", type:.tiltAlongVerticalAxis)
        m2.maximumRelativeValue = 10.0
        m2.minimumRelativeValue = -10.0
        let g = UIMotionEffectGroup()
        g.motionEffects = [m1,m2]
        v.addMotionEffect(g)
    }

    override func presentationTransitionWillBegin() {
        self.decorateView(self.presentedView!)
        let vc = self.presentingViewController
        let v = vc.view!
        let con = self.containerView!
        let shadow = UIView(frame:con.bounds)
        shadow.backgroundColor = UIColor(white:0, alpha:0.4)
        shadow.alpha = 0
        con.insertSubview(shadow, at: 0)
        shadow.autoresizingMask = [.flexibleWidth, .flexibleHeight]
        let tc = vc.transitionCoordinator!
        tc.animate(alongsideTransition: { _ in
            shadow.alpha = 1
        }) { _ in
            v.tintAdjustmentMode = .dimmed
        }
    }

    override func dismissalTransitionWillBegin() {
        let vc = self.presentingViewController
        let v = vc.view!
        let con = self.containerView!
        let shadow = con.subviews[0]
        let tc = vc.transitionCoordinator!
        tc.animate(alongsideTransition: { _ in
            shadow.alpha = 0
        }) { _ in
            v.tintAdjustmentMode = .automatic
        }
    }

    override var frameOfPresentedViewInContainerView : CGRect {
        // we want to center the presented view at its "native" size
        // I can think of a lot of ways to do this,
        // but here we just assume that it *is* its native size
        let v = self.presentedView!
        let con = self.containerView!
        v.center = CGPoint(x: con.bounds.midX, y: con.bounds.midY)
        return v.frame.integral
    }

    override func containerViewWillLayoutSubviews() {
        // deal with future rotation
        // again, I can think of more than one approach
        let v = self.presentedView!
        v.autoresizingMask = [
            .flexibleTopMargin, .flexibleBottomMargin,
            .flexibleLeftMargin, .flexibleRightMargin
        ]
        v.translatesAutoresizingMaskIntoConstraints = true
    }

}

extension CAVTransitioner { // UIViewControllerTransitioningDelegate
    func animationController(
        forPresented presented:UIViewController,
        presenting: UIViewController,
        source: UIViewController)
        -> UIViewControllerAnimatedTransitioning? {
            return self
    }

    func animationController(
        forDismissed dismissed: UIViewController)
        -> UIViewControllerAnimatedTransitioning? {
            return self
    }
}

extension CAVTransitioner : UIViewControllerAnimatedTransitioning {
    func transitionDuration(
        using transitionContext: UIViewControllerContextTransitioning?)
        -> TimeInterval {
            return 0.25
    }

    func animateTransition(
        using transitionContext: UIViewControllerContextTransitioning) {

        let con = transitionContext.containerView

        let v1 = transitionContext.view(forKey: .from)
        let v2 = transitionContext.view(forKey: .to)

        // we are using the same object (self) as animation controller
        // for both presentation and dismissal
        // so we have to distinguish the two cases

        if let v2 = v2 { // presenting
            con.addSubview(v2)
            let scale = CGAffineTransform(scaleX: 1.6, y: 1.6)
            v2.transform = scale
            v2.alpha = 0
            UIView.animate(withDuration: 0.25, animations: {
                v2.alpha = 1
                v2.transform = .identity
            }) { _ in
                transitionContext.completeTransition(true)
            }
        } else if let v1 = v1 { // dismissing
            UIView.animate(withDuration: 0.25, animations: {
                v1.alpha = 0
            }) { _ in
                transitionContext.completeTransition(true)
            }
        }

    }
}

It looks like a lot of code, and I suppose it is, but it's almost entire confined to a single class, which is entirely boilerplate; just copy and paste. All you have to do is write the internal interface and behavior of your "alert" view controller, giving it buttons and text and whatever else you want, just as you would do for any other view controller.

Xylotomous answered 18/6, 2019 at 17:7 Comment(1)
Nice post. I ran the code and I commented out the UIInterpolatingMotionEffect. I couldn't see any difference adding this motion effect. Am I missing something?Lax
W
1

Custom Alert UIView Class in swift 4. And Usage ##

import UIKit


    class Dialouge: UIView {
    @IBOutlet weak var lblTitle: UILabel!
    @IBOutlet weak var lblDescription: UILabel!
    @IBOutlet weak var btnLeft: UIButton!
    @IBOutlet weak var btnRight: UIButton!
    @IBOutlet weak var viewBg: UIButton!

    var leftAction  = {}
    var rightAction  = {}


    override func draw(_ rect: CGRect)
    {

        self.btnRight.layer.cornerRadius = self.btnRight.frame.height/2
        self.btnLeft.layer.cornerRadius = self.btnLeft.frame.height/2
        self.btnLeft.layer.borderWidth = 1.0
        self.btnLeft.layer.borderColor = #colorLiteral(red: 0.267678082, green: 0.2990377247, blue: 0.7881471515, alpha: 1)
    }
    @IBAction func leftAction(_ sender: Any) {

        leftAction()
    }

    @IBAction func rightAction(_ sender: Any) {
        rightAction()
    }
    @IBAction func bgTapped(_ sender: Any) {
        self.removeFromSuperview()
    }
    }

strong text
## Usage Of Custom Alert with Tabbar.

    let custView = Bundle.main.loadNibNamed("Dialouge", owner: self, options: 
     nil)![0] as? Dialouge
        custView?.lblDescription.text = "Are you sure you want to delete post?"
        custView?.lblTitle.text = "Delete Post"
        custView?.btnLeft.setTitle("Yes", for: .normal)
        custView?.btnRight.setTitle("No", for: .normal)
        custView?.leftAction = {
            self.deletePost(postId: self.curr_post.id,completion: {
                custView?.removeFromSuperview()
            })
        }
        custView?.rightAction = {
            custView?.removeFromSuperview()
        }
        if let tbc = self.parentt?.tabBarController {
            custView?.frame = tbc.view.frame
            DispatchQueue.main.async {
                tbc.view.addSubview(custView!)
            }
        }else if let tbc = self.parView?.parenttprof {
            custView?.frame = tbc.view.frame
            DispatchQueue.main.async {
                tbc.view.addSubview(custView!)
            }
        }
        else
        {
            custView?.frame = self.parView?.view.frame ?? CGRect.zero
            DispatchQueue.main.async {
                self.parView?.view.addSubview(custView!)
            }
            }
Weasand answered 15/10, 2019 at 14:22 Comment(0)
T
1

add this class to your project

import UIKit
class CustomAlertController:UIViewController {
        
    private var cornerRadius: CGFloat = 8
    
    override func viewDidLoad() {
        super.viewDidLoad()
        view.backgroundColor = UIColor.black.withAlphaComponent(0.2)
        setupLayout()
    }
    //MARK: - setupLayout
    private func setupLayout() {
        
        // add alertView to view
        view.addSubview(alertView)
        // add UI Element to alertView
        alertView.addSubview(messageTitle)
        alertView.addSubview(lineUnderTitleIfNeeded)
        alertView.addSubview(containerView)
        alertView.addSubview(lineViewBeforeButtons)
        alertView.addSubview(actionButtonsContainer)
        
        
        NSLayoutConstraint.activate([
            
            // set constraints to set alertView in center of view
            // centerX and centerY of view
            // 250 width
            alertView.centerXAnchor.constraint(equalTo: view.centerXAnchor),
            alertView.centerYAnchor.constraint(equalTo: view.centerYAnchor),
            alertView.widthAnchor.constraint(equalToConstant: 250),

            
            // set constraints to set messageTitle in alertView
            // 20 from top of alertView
            // 20 from leading trailing
            // hight constraint should be dynamic
            messageTitle.topAnchor.constraint(equalTo: alertView.topAnchor, constant: 20),
            messageTitle.leadingAnchor.constraint(equalTo: alertView.leadingAnchor, constant: 20),
            messageTitle.trailingAnchor.constraint(equalTo: alertView.trailingAnchor, constant: -20),
            
            
            // constraint from top of messageTitle is 0 , from leading and trailing of alertView 0
            lineUnderTitleIfNeeded.topAnchor.constraint(equalTo: messageTitle.bottomAnchor, constant: 0),
            lineUnderTitleIfNeeded.leadingAnchor.constraint(equalTo: alertView.leadingAnchor, constant: 0),
            lineUnderTitleIfNeeded.trailingAnchor.constraint(equalTo: alertView.trailingAnchor, constant: 0),
            lineUnderTitleIfNeeded.heightAnchor.constraint(equalToConstant: 0.0) ,// adjust hight if need line under a title
            
            
            // set constraints  for a containerView
            // from top with lineUnderTitleIfNeeded
            // set leading and trailing is 20  with a alertView
            containerView.topAnchor.constraint(equalTo: lineUnderTitleIfNeeded.topAnchor, constant: 8),
            containerView.leadingAnchor.constraint(equalTo: alertView.leadingAnchor, constant: 20),
            containerView.trailingAnchor.constraint(equalTo: alertView.trailingAnchor, constant: -20),
            
            
            // Set constraints
            // 16 from top of containerView
            // 0 from leading and trailing of alertView ,
            // height is 0.3
            lineViewBeforeButtons.topAnchor.constraint(equalTo: containerView.bottomAnchor, constant: 16),
            lineViewBeforeButtons.leadingAnchor.constraint(equalTo: alertView.leadingAnchor ,constant: 0),
            lineViewBeforeButtons.trailingAnchor.constraint(equalTo: alertView.trailingAnchor,constant: 0),
            lineViewBeforeButtons.heightAnchor.constraint(equalToConstant: 0.3),
            
            
            // Set constraints
            // 0.4 from top of containerView
            // 0 from leading and trailing of alertView ,
            // -1 from bottom of alertView
            actionButtonsContainer.topAnchor.constraint(equalTo: lineViewBeforeButtons.bottomAnchor, constant: 0.4),
            actionButtonsContainer.leadingAnchor.constraint(equalTo: alertView.leadingAnchor, constant: 0),
            actionButtonsContainer.trailingAnchor.constraint(equalTo: alertView.trailingAnchor, constant: 0),
            actionButtonsContainer.bottomAnchor.constraint(equalTo: alertView.bottomAnchor, constant: -1)
            
        ])
    }


    // MARK: - show Alert
    func showAlert() {
        
        modalPresentationStyle = .overFullScreen
        view.alpha = 0.0
        
        // Get the current scene's key window
        if let windowScene = UIApplication.shared.connectedScenes.first as? UIWindowScene,
           let viewController = windowScene.windows.first?.rootViewController {
            viewController.present(self, animated: false) {
                UIView.animate(withDuration: 0.2) {
                    self.view.alpha = 1.0
                }
            }
        }
    }
    
    
    func setTitleWithMessage(title:String , message: String) {
        
        self.messageTitle.text = title
        self.messageText.text = message
        
        //add Message To Container View
        containerView.addSubview(messageText)
        // set constraints for a customView
        // 0 from top ,leading , trailing and bottom of containerView
        NSLayoutConstraint.activate([
            messageText.topAnchor.constraint(equalTo: containerView.topAnchor, constant: 0),
            messageText.leadingAnchor.constraint(equalTo: containerView.leadingAnchor, constant: 0),
            messageText.trailingAnchor.constraint(equalTo: containerView.trailingAnchor, constant: 0),
            messageText.bottomAnchor.constraint(equalTo: containerView.bottomAnchor, constant: 0)
        ])
    }
    
    
    func setTitleWithCustomView(title:String , customView:UIView){
        
        self.messageTitle.text = title
        
        //add customView To Container View
        containerView.addSubview(customView)
        
        // set constraints for a customView
        // 0 from top ,leading , trailing and bottom of containerView
        NSLayoutConstraint.activate([
            customView.topAnchor.constraint(equalTo: containerView.topAnchor, constant: 0),
            customView.leadingAnchor.constraint(equalTo: containerView.leadingAnchor, constant: 0),
            customView.trailingAnchor.constraint(equalTo: containerView.trailingAnchor, constant: 0),
            customView.bottomAnchor.constraint(equalTo: containerView.bottomAnchor, constant: 0)
        ])
        
    }
    
    
    func setTitleAttribute(font:UIFont,textColor:UIColor = .black){
        messageTitle.font = font
        messageTitle.textColor = textColor
    }
    
    
    func setMessageAttribute(font:UIFont,textColor:UIColor = .black){
        messageText.font = font
        messageText.textColor = textColor
    }


    // MARK: - Custom Action
    
    typealias AlertActionHandler = () -> Void
    private var actions: [AlertAction] = []
    
    struct AlertAction {
        let title: String
        let handler: AlertActionHandler?
    }
    

    func addAction(_ action:AlertAction, font: UIFont, textColor: UIColor = .black){


        actions.append(action)
        
        let hasLongTitles = actions.contains { $0.title.count > 8 }
        if hasLongTitles { actionButtonsContainer.axis = .vertical
        } else { actionButtonsContainer.axis = .horizontal }
        
        let alertActionButton = UIButton(type: .system)
        alertActionButton.setTitle(action.title, for: .normal)
        alertActionButton.titleLabel?.font = font
        alertActionButton.setTitleColor(textColor, for: .normal)
        alertActionButton.backgroundColor = .white
        alertActionButton.addTarget(self, action: #selector(actionButtonTapped(_:)), for: .touchUpInside)
        alertActionButton.heightAnchor.constraint(equalToConstant: 44).isActive = true
        actionButtonsContainer.addArrangedSubview(alertActionButton)
        
    }
    
    @objc private func actionButtonTapped(_ sender: UIButton) {
           guard let index = actionButtonsContainer.arrangedSubviews.firstIndex(of: sender) else { return }
           let action = actions[index]
           action.handler?()
        // Fade out animation
        UIView.animate(withDuration: 0.2, animations: {
            self.view.alpha = 0.0
        }) { _ in
            self.dismiss(animated: false, completion: nil)
        }
       }


    //MARK: - UI Element
    
    // View for the alert
    private lazy var alertView :UIView = {
        let view = UIView()
        view.backgroundColor = .white
        view.layer.cornerRadius = cornerRadius
        view.translatesAutoresizingMaskIntoConstraints = false
        return view
    }()
    
    
    // Title label for the alert
    private var messageTitle: UILabel = {
        let label = UILabel()
        label.textAlignment = .center
        label.font = UIFont.boldSystemFont(ofSize: 18)
        label.numberOfLines = 0
        label.translatesAutoresizingMaskIntoConstraints = false
        return label
    }()
    
    
    // Container view for the alert content
    private var containerView: UIView = {
        let view = UIView()
        view.translatesAutoresizingMaskIntoConstraints = false
        return view
    }()
    
    
    // Message label for the alert
    var messageText: UILabel = {
        let label = UILabel()
        label.numberOfLines = 0
        label.textAlignment = .center
        label.translatesAutoresizingMaskIntoConstraints = false
        return label
    }()
    
    
    // Stack view for action buttons
    private lazy var actionButtonsContainer: UIStackView = {
        let stackView = UIStackView()
        stackView.axis = .vertical
        stackView.backgroundColor = .gray
        stackView.distribution = .fillEqually
        stackView.spacing = 0.2
        stackView.clipsToBounds = true
        stackView.layer.cornerRadius = cornerRadius
        stackView.translatesAutoresizingMaskIntoConstraints = false
        return stackView
    }()
    
    
    private lazy var lineUnderTitleIfNeeded: UIView = {
        let view = UIView()
        view.backgroundColor = .gray
        view.translatesAutoresizingMaskIntoConstraints = false
        return view
    }()
    
    
    private lazy var lineViewBeforeButtons: UIView = {
        let view = UIView()
        view.backgroundColor = .gray // Customize line color
        view.translatesAutoresizingMaskIntoConstraints = false
        return view
    }()
    
}


usage

    @IBAction func showAlert(_ sender: Any) {
        
        let view =  UIView(frame: CGRect(x: 0, y: 0, width: 210, height: 200))
        view.backgroundColor = .red
        
        
        let alert = CustomAlertController()
        
        alert.setTitleWithMessage(title: "title", message: "test message test message  test message test message  ")
        
        
        alert.setTitleAttribute(font: UIFont(name: "Arial", size: 24)!,textColor: .red)
        alert.setMessageAttribute(font: UIFont(name: "Arial", size: 22)!, textColor: .green)
        
        let customAction = CustomAlertController.AlertAction(title: "Action1") {
            print("Custom action 1  tapped")
        }
        let customAction2 = CustomAlertController.AlertAction(title: "Actssdddewo") {
            print("Custom action 2  tapped")
        }
        
        alert.addAction(customAction, font: UIFont(name: "Arial", size: 18)!,textColor: .blue)
        alert.addAction(customAction2,font: UIFont(name: "Arial", size: 18)!,textColor: .brown)
        alert.showAlert()
        
        
    }

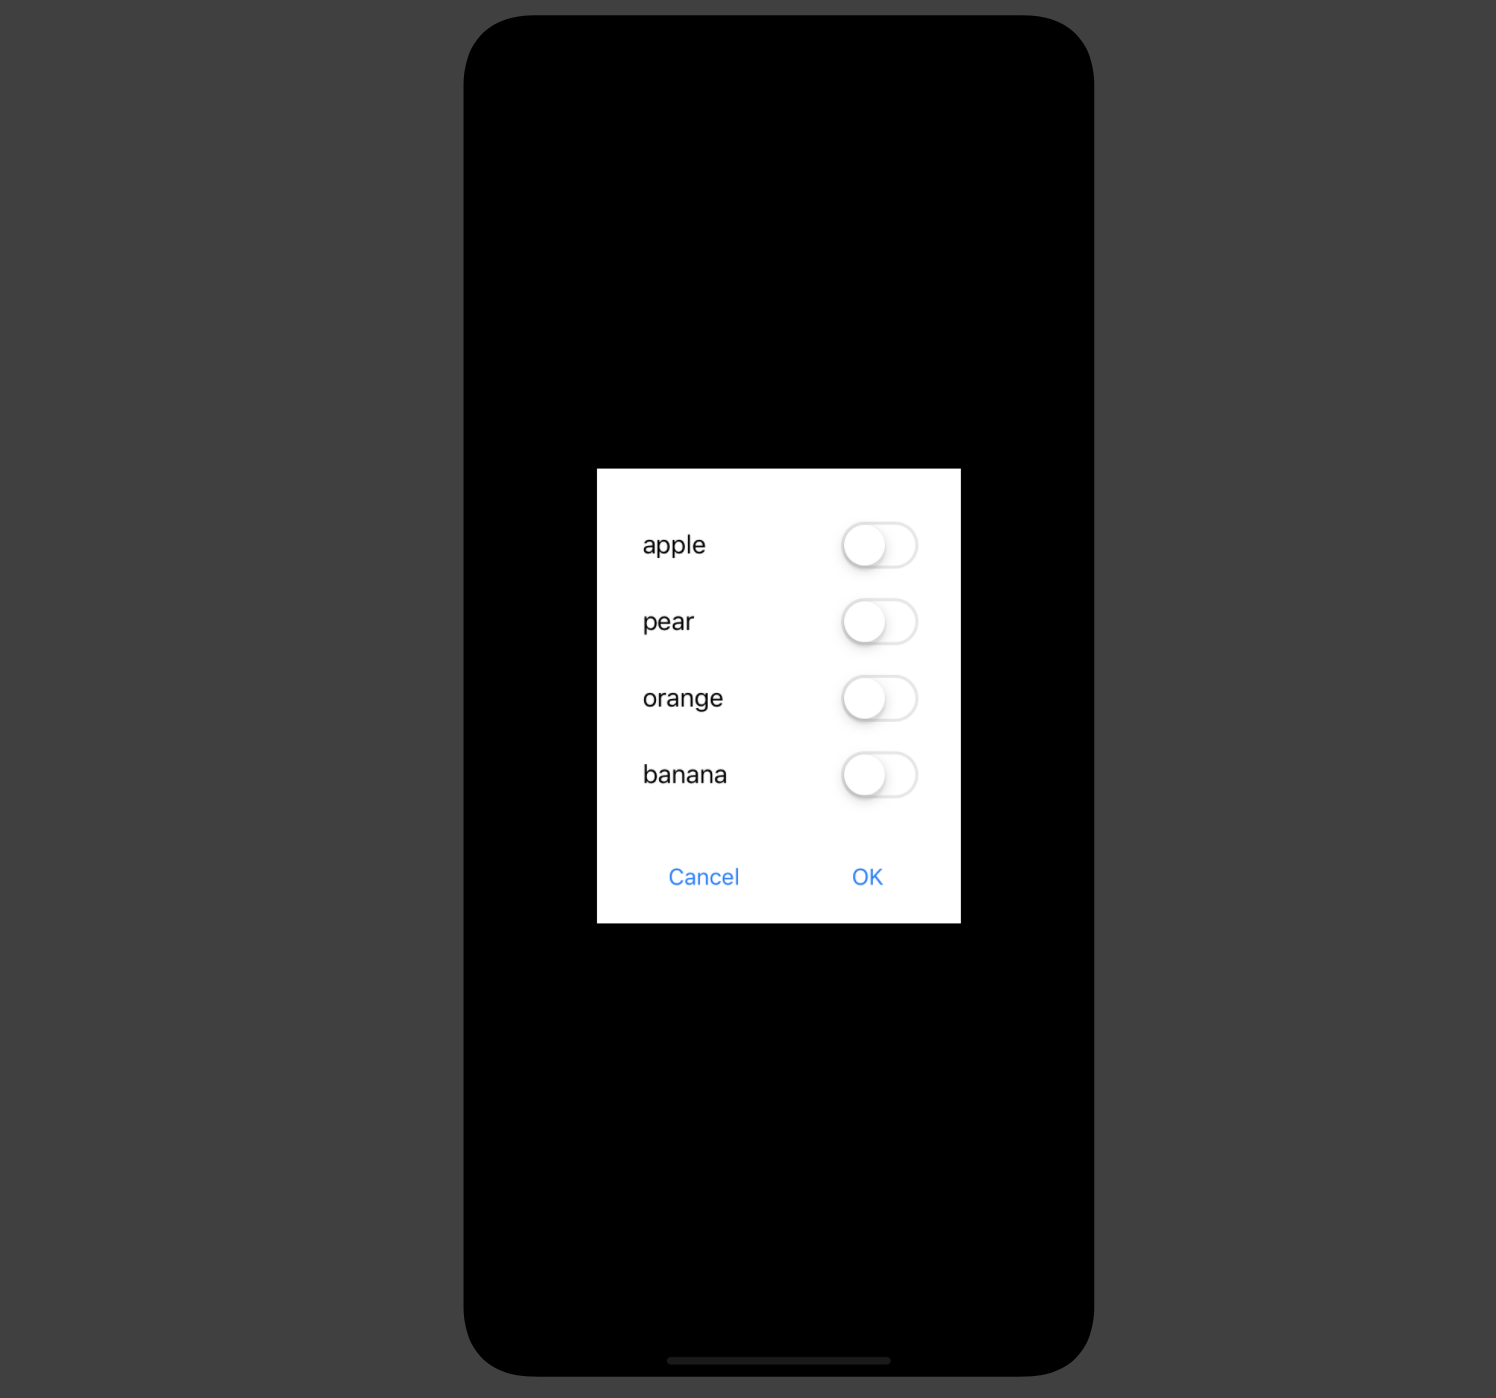
result enter image description here

Thorndike answered 5/5 at 13:23 Comment(0)
B
0

Use https://github.com/shantaramk/Custom-Alert-View

It is effortless to implement this. Follow the steps below:

  1. Drag down the AlertView folder in project directory

  2. Show AlertView Popup

func showUpdateProfilePopup(_ message: String) {
    let alertView = AlertView(title: AlertMessage.success, message: message, okButtonText: LocalizedStrings.okay, cancelButtonText: "") { (_, button) in
            if button == .other {
                self.navigationController?.popViewController(animated: true)
        }
    }
    alertView.show(animated: true)
}


Batt answered 11/1, 2019 at 6:12 Comment(3)
I had a look at your GitHub link, the project is broken. It is referencing fonts and also colours that do not exist.Automate
If you fix your project and get it working I'll upvote your answer.Automate
@PeterSuwara I have updated the git repository. your valuable feedback gives us to motivation to do more and more open source project. Thank youBatt
E
0
import UIKit

class CustomViewController: UIViewController {

// MARK: - Properties

private let imageView = UIImageView()
private let titleLabel = UILabel()
private let descriptionLabel = UILabel()
private let firstButton = UIButton()
private let secondButton = UIButton()

// MARK: - Initialization

init(image: UIImage?, title: String, description: String, button1Title: String, button2Title: String) {
    super.init(nibName: nil, bundle: nil)
    
    imageView.image = image
    titleLabel.text = title
    descriptionLabel.text = description
    firstButton.setTitle(button1Title, for: .normal)
    secondButton.setTitle(button2Title, for: .normal)
    
    configureUI()
}

required init?(coder aDecoder: NSCoder) {
    fatalError("init(coder:) has not been implemented")
}

// MARK: - Configuration

private func configureUI() {
    // Set up imageView
    imageView.contentMode = .scaleAspectFit
    imageView.translatesAutoresizingMaskIntoConstraints = false
    
    // Set up titleLabel
    titleLabel.font = UIFont.boldSystemFont(ofSize: 20)
    titleLabel.translatesAutoresizingMaskIntoConstraints = false
    
    // Set up descriptionLabel
    descriptionLabel.textAlignment = .center
    descriptionLabel.numberOfLines = 0
    descriptionLabel.translatesAutoresizingMaskIntoConstraints = false
    
    // Set up buttons
    firstButton.backgroundColor = .blue
    firstButton.setTitleColor(.white, for: .normal)
    firstButton.translatesAutoresizingMaskIntoConstraints = false
    
    secondButton.backgroundColor = .green
    secondButton.setTitleColor(.white, for: .normal)
    secondButton.translatesAutoresizingMaskIntoConstraints = false
    
    // Add subviews
    view.addSubview(imageView)
    view.addSubview(titleLabel)
    view.addSubview(descriptionLabel)
    view.addSubview(firstButton)
    view.addSubview(secondButton)
    
    // Set constraints
    NSLayoutConstraint.activate([
        imageView.topAnchor.constraint(equalTo: view.topAnchor, constant: 20),
        imageView.centerXAnchor.constraint(equalTo: view.centerXAnchor),
        imageView.widthAnchor.constraint(equalToConstant: 100),
        imageView.heightAnchor.constraint(equalToConstant: 100),
        
        titleLabel.topAnchor.constraint(equalTo: imageView.bottomAnchor, constant: 20),
        titleLabel.leadingAnchor.constraint(equalTo: view.leadingAnchor, constant: 20),
        titleLabel.trailingAnchor.constraint(equalTo: view.trailingAnchor, constant: -20),
        
        descriptionLabel.topAnchor.constraint(equalTo: titleLabel.bottomAnchor, constant: 10),
        descriptionLabel.leadingAnchor.constraint(equalTo: view.leadingAnchor, constant: 20),
        descriptionLabel.trailingAnchor.constraint(equalTo: view.trailingAnchor, constant: -20),
        
        firstButton.topAnchor.constraint(equalTo: descriptionLabel.bottomAnchor, constant: 20),
        firstButton.centerXAnchor.constraint(equalTo: view.centerXAnchor, constant: -50),
        firstButton.widthAnchor.constraint(equalToConstant: 100),
        
        secondButton.topAnchor.constraint(equalTo: descriptionLabel.bottomAnchor, constant: 20),
        secondButton.centerXAnchor.constraint(equalTo: view.centerXAnchor, constant: 50),
        secondButton.widthAnchor.constraint(equalToConstant: 100)
    ])
}

// MARK: - Public Methods

func set(image: UIImage?) {
    imageView.image = image
}

func set(title: String) {
    titleLabel.text = title
}

func set(description: String) {
    descriptionLabel.text = description
}

func set(button1Title: String) {
    firstButton.setTitle(button1Title, for: .normal)
}

func set(button2Title: String) {
    secondButton.setTitle(button2Title, for: .normal)
}

}

use as

let customVC = CustomViewController(image: UIImage(named: "yourImage"), title: "Title", description: "Description", button1Title: "Button 1", button2Title: "Button 2")
self.present(customVC, animated: true, completion: nil)
Elisa answered 17/8, 2023 at 10:46 Comment(0)

© 2022 - 2024 — McMap. All rights reserved.