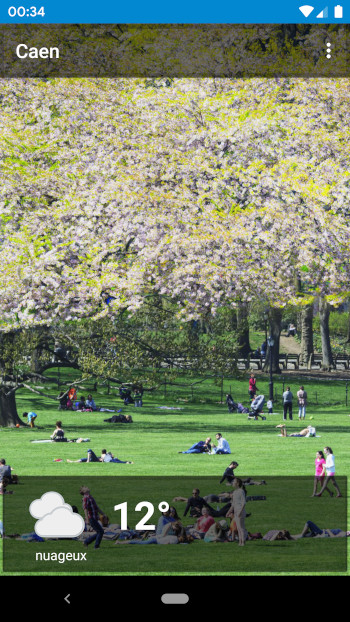
Show ImageView partly behind transparent ActionBar
Asked Answered
B

4

36

The Google Maps application has a transparent ActionBar, through which the map is visible.

enter image description here

I am able to set the transparency of the ActionBar using this:

<style name="Theme.MyTheme" parent="android:style/Theme.Holo.Light">
    <item name="android:actionBarStyle">@style/ActionBar</item>
</style>

<style name="ActionBar" parent="@android:style/Widget.Holo.ActionBar">
    <item name="android:background">#64000000</item>
</style>

But how can I show my ImageView behind the ActionBar?

Bryon answered 14/11, 2012 at 15:14 Comment(1)
@ Niek: Have you made it?Minesweeper
M
43

You can enable overlay mode of the ActionBar. To do it you have to set (android:)windowActionBarOverlay item in the theme to true.

<style name="MyTheme" parent="Theme.Sherlock">
    ...
    <item name="windowActionBarOverlay">true</item> <!-- for ActionBarSherlock -->
    <item name="android:windowActionBarOverlay">true</item>
</style>
Matheny answered 14/11, 2012 at 15:25 Comment(1)
i tried this but I'm only getting a grey bar (used to be white), content won't appear behind the bar. My content is this layout, what am I missing? thanks <LinearLayout xmlns:android="schemas.android.com/apk/res/android" android:layout_width="match_parent" android:layout_height="match_parent" android:orientation="vertical" > <ScrollView android:id="@+id/documentPickerGridViewScroll" android:layout_width="match_parent" android:layout_height="match_parent" >Simulcast
G
26

You can also set it at run-time:

requestWindowFeature(Window.FEATURE_ACTION_BAR_OVERLAY);

This will the ActionBar a semi-transparent floating bar.

Like any requestWindowFeature..., this should be called before adding content.

After the setContentView, you can then set a background from your Drawable with this:

getActionBar().setBackgroundDrawable(getResources().getDrawable(R.drawable.actionbar_bg));

Change getActionBar with getSupportActionBar for ActionBarSherlock

actionbar_bg.xml with the root element of shape:

<solid android:color="#64000000" />

Although I find Tomik's solution great, this will be useful for those one-off cases for a few activities rather than an across the board style.

Guarantee answered 14/11, 2012 at 15:38 Comment(6)
Though Tomik's solution is exactly what I'm looking for, this is surely worth mentioning! Thanks!Bryon
This is correct and I had tried this, but for some reason this didn't work on a custom action bar sherlock based actionbar on 2.3. Wierd.Azal
you can do this also form the manifest by creating a no-window-overlay style extending your default one and assigning it to the activities you don't want the window overlay on.Simulcast
@MarianoLatorre: Thanks for pointing that out for me. ;-) That being said, my suggestion was when you have that one odd activity or maybe a couple of them that did not really warrant creating a Style. Hence the Java solutions. But thanks anyway. :-)Guarantee
that makes sense, in my case I needed to quickly switch between windowoverlay to no-windowoverlay through many different activities and though it was going to be nice to share this option with other people.Simulcast
@MarianoLatorre: I agree. In certain cases, what you suggest might be a better way of implementing the required feature. When this question was asked, though, I was merely offering an alternative to the accepted answer. I think, as you observed correctly, the requirement would dictate the solution. You should consider posting your alternative as an answer too. ;-)Guarantee
S
10

If someone needs the transparent bar but only for certain activities while using a solid one in the rest of them, it might be worth creating two different styles and using the manifest to get control over it:

<style name="MyThemeOverlay" parent="Theme.Sherlock">
    ...
    <item name="windowActionBarOverlay">true</item> <!-- for ActionBarSherlock -->
    <item name="android:windowActionBarOverlay">true</item>
    <!-- any stuff common here, colours, etc -->

    <!-- define the style for native ActionBar for Android 4 and higher -->
    <item name="android:actionBarStyle">@style/myActionbarTransparent</item>
    <!-- define the style for ActionBarSherlock -->
    <item name="actionBarStyle">@style/myActionbarTransparent</item>
</style>

<style name="MyThemeNoOverlay" parent="MyTheme">
    <item name="windowActionBarOverlay">false</item> <!-- for ActionBarSherlock -->
    <item name="android:windowActionBarOverlay">false</item>
    <!-- any stuff specific for no overlay activity action bars -->

    <!-- define the style for native ActionBar for Android 4 and higher -->
    <item name="android:actionBarStyle">@style/myActionbar</item>
    <!-- define the style for ActionBarSherlock -->
    <item name="actionBarStyle">@style/myActionbar</item>
</style>

<style name="myActionbar" parent="@android:style/Widget.Holo.ActionBar">
    <item name="android:background">@color/white</item>
</style>
<style name="myActionbarTransparent" parent="@android:style/Widget.Holo.ActionBar">
    <item name="android:background">@color/transparent</item>
</style>

and then in your AndroidManifest.xml you can either use one of them as default and the other one for some specific activities by doing something like:

<application
    ...
    android:theme="@style/MyThemeOverlay">
    ...
    <activity
      android:name=".Activity1"       
      />
    <activity
      android:name=".Activity2"    
      android:theme="@style/MyThemeNoOverlay"   
      />
    <activity
      android:name=".Activity3"       
      />
    <activity
      android:name=".Activity4"       
      android:theme="@style/MyThemeNoOverlay"
      />

...

Simulcast answered 24/7, 2013 at 15:36 Comment(1)
Good one. +1 for the effort. :-)Guarantee
P
1

enter image description here

in styles.xml:

<style name="AppTheme.AppBarOverlay" parent="ThemeOverlay.AppCompat.Dark.ActionBar">
    <item name="colorPrimary">@color/semiTransparent5</item>
</style>

<style name="AppTheme.PopupOverlay" parent="ThemeOverlay.AppCompat.Light" >
    <item name="windowActionBarOverlay">true</item>
</style>

in activity_main.xml:

<androidx.coordinatorlayout.widget.CoordinatorLayout xmlns:android="http://schemas.android.com/apk/res/android"
xmlns:app="http://schemas.android.com/apk/res-auto"
android:layout_width="match_parent"
android:layout_height="match_parent">

<com.google.android.material.appbar.AppBarLayout
    android:layout_width="match_parent"
    android:layout_height="wrap_content"
    android:theme="@style/AppTheme.AppBarOverlay">

    <androidx.appcompat.widget.Toolbar
        android:id="@+id/toolbar"
        android:layout_width="match_parent"
        android:layout_height="?attr/actionBarSize"
        app:layout_scrollFlags="scroll|enterAlways"
        app:popupTheme="@style/AppTheme.PopupOverlay" />

</com.google.android.material.appbar.AppBarLayout>

<include layout="@layout/content_main" />

Pollaiuolo answered 14/1, 2020 at 22:47 Comment(0)

© 2022 - 2024 — McMap. All rights reserved.