How to create custom pin annotation view
Asked Answered
G

3

0

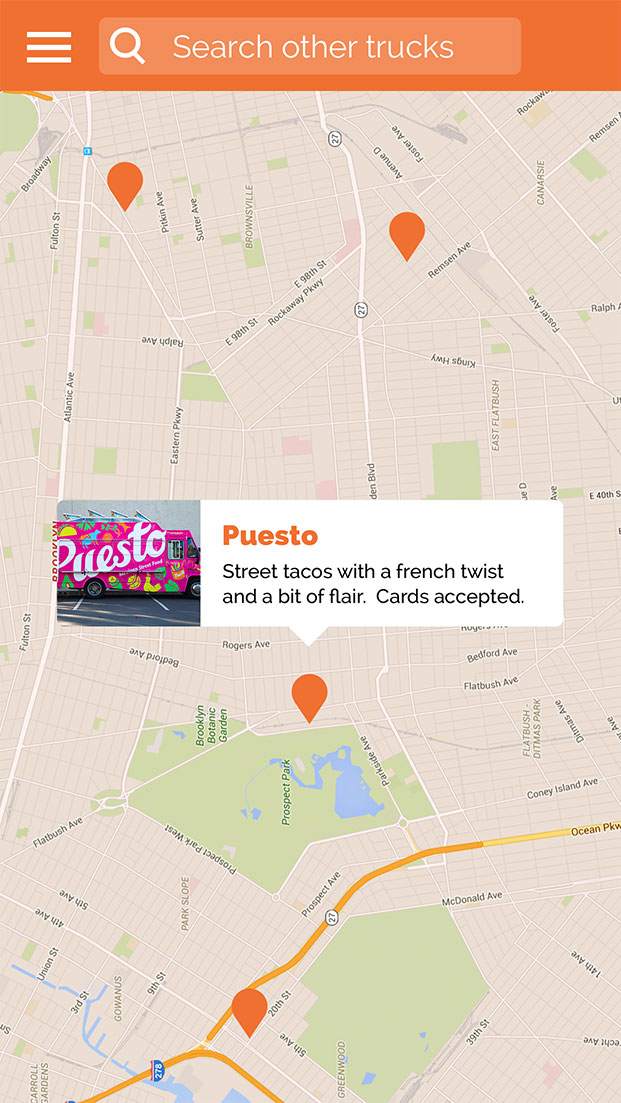
I have a map I'm populating with a list of food trucks, and I'd like to implement a custom callout like the one shown below, when an annotation is selected. Currently I have the standard annotation callout implemented with a title and subtitle.

I've done some reading and am guessing it'll require a custom .xib file, but I don't really know anything about this as I only started developing for iOS as a recently. How would I go about creating this custom popup, and how can I make it perform a navigation action when clicked?

Thanks!

enter image description here

Glossectomy answered 3/8, 2016 at 5:13 Comment(1)
follow this link #16253264Dubitable
C
2

First to change the pin image you need to use viewForAnnotation method of MKMapViewDelegate and set the image porperty of MKAnnotationView also to show your own view set canShowCallout property to false.

func mapView(mapView: MKMapView, viewForAnnotation annotation: MKAnnotation) -> MKAnnotationView? {
    if (annotation.isKindOfClass(MKPointAnnotation.classForCoder())) {
        var annotationView = mapView.dequeueReusableAnnotationViewWithIdentifier("AnnotationView")
        if annotationView == nil {
            annotationView = MKAnnotationView(annotation: annotation, reuseIdentifier: "AnnotationView")
        }
        else {
            annotationView!.annotation = annotation
        }
        annotationView!.image = UIImage(named: "Marker")
        annotationView!.canShowCallout = false
        return annotationView
    }
    return nil
}

Now to show your own view use didSelectAnnotationView method of MKMapViewDelegate.

    func mapView(mapView: MKMapView, didSelectAnnotationView view: MKAnnotationView) {
    mapView.deselectAnnotation(view.annotation, animated: true)

    let viewController = self.storyboard?.instantiateViewControllerWithIdentifier("AnnotationInfoViewController") as! AnnotationInfoViewController

    //If you want to show view from XIB file you can create viewController instance like this
    //let viewController = UIViewController()
    //let myView = NSBundle.mainBundle().loadNibNamed("AnnotationInfoView", owner: self, options: nil)[0] as! AnnotationInfoView
    //viewController.view = myView

    //Pass the information that you want to show
    viewController.data = passdata

    //Set the viewController for popoverPresentationController 
    viewController.modalPresentationStyle = .Popover
    viewController.preferredContentSize = CGSize(width: viewController.view.frame.size.width, height: 80)
    viewController.popoverPresentationController!.delegate = self;
    viewController.popoverPresentationController!.permittedArrowDirections = [.Up , .Down]
    viewController.popoverPresentationController!.sourceView = view.superview!
    viewController.popoverPresentationController!.sourceRect = view.frame
    self.presentViewController(viewController, animated: true, completion: nil)
}

Now to show a popup view implement adaptivePresentationStyleForPresentationController method of UIPopoverPresentationControllerDelegate.

func adaptivePresentationStyleForPresentationController(controller: UIPresentationController) -> UIModalPresentationStyle {
    return .None;
}

Note: Now if you want to handle the tap event for this popup, you can use UITapGestureRecognizer.

Catchword answered 3/8, 2016 at 10:29 Comment(0)
C
0

Seems like you need a custom pop up view, but you don't know how to create one.

Here a sample to create a pop view like the picture you post.

This is the code, ViewController.m:

#import "ViewController.h"
#import "AnnotationView.h"

@interface ViewController ()

@end

@implementation ViewController

- (void)viewDidLoad {
[super viewDidLoad];
// Do any additional setup after loading the view, typically from a nib.
self.view.backgroundColor = [UIColor grayColor];

AnnotationView* popUp = [[AnnotationView alloc] initWithFrame:CGRectMake(50, 100, 200, 80)];
[self.view addSubview:popUp];
}

@end

AnnotationView.m:

#import "AnnotationView.h"

@interface AnnotationView ()

@property float bottomHeight;
@property float topHeight;
@property float cornerRadius;
@property float triangleWidth;

@property UIImageView* pictureView;
@property UILabel* lbTitle;
@property UILabel* lbInfo;

@end

@implementation AnnotationView

-(id)initWithFrame:(CGRect)frame{
_bottomHeight = 20;
_topHeight = frame.size.height-_bottomHeight;
_cornerRadius = 5;
_triangleWidth = 30;

self = [super initWithFrame:frame];
self.backgroundColor = [UIColor clearColor];

self.layer.cornerRadius = _cornerRadius;
self.layer.masksToBounds = YES;

_pictureView = [[UIImageView alloc] initWithFrame:CGRectMake(0, 0, _topHeight, _topHeight)];
_pictureView.image = [UIImage imageNamed:@"test.png"];
_pictureView.layer.cornerRadius = _cornerRadius;
_pictureView.layer.masksToBounds = YES;
[self addSubview:_pictureView];

float insidePadding = 10;
float lbWidth = (frame.size.width-_topHeight-2*insidePadding);

_lbTitle = [[UILabel alloc] initWithFrame:CGRectMake(_topHeight+insidePadding, 0, lbWidth, _topHeight/2)];
_lbTitle.text = @"I'm title.";
[self addSubview:_lbTitle];

_lbInfo = [[UILabel alloc] initWithFrame:CGRectMake(_topHeight+insidePadding, _topHeight/2, lbWidth, _topHeight/2)];
_lbInfo.numberOfLines = 2;
_lbInfo.font = [UIFont systemFontOfSize:10];
_lbInfo.text = @"I'm content........I'm content........";
[self addSubview:_lbInfo];

return self;
}

-(void)drawRect:(CGRect)rect{

CGContextRef con = UIGraphicsGetCurrentContext();
CGContextSetFillColorWithColor(con, [UIColor whiteColor].CGColor);
UIBezierPath* roundRect = [UIBezierPath bezierPathWithRoundedRect:CGRectMake(0, 0, rect.size.width, _topHeight) cornerRadius:_cornerRadius];
CGContextAddPath(con, roundRect.CGPath);
CGContextFillPath(con);

CGContextMoveToPoint(con, (rect.size.width-_triangleWidth)/2, _topHeight);
CGContextAddLineToPoint(con,(rect.size.width+_triangleWidth)/2, _topHeight);
CGContextAddLineToPoint(con,rect.size.width/2, rect.size.height);
CGContextClosePath(con);
CGContextFillPath(con);
}

@end

Hope it can help you. Any more question just left it here.

Collinsworth answered 3/8, 2016 at 8:0 Comment(2)
Thanks for your reply! Any chance you (or another user) could convert this over to swift?Glossectomy
It's a very simple code, you should do it yourself.Collinsworth
C
0

What I did was to create a UIViewController to show the details of annotation. Then when an annotation is selected I show the UIViewController as a Popover.

func mapView(_: MKMapView, didSelect view: MKAnnotationView) {
    view.setSelected(true, animated: true)
    if let annotation = view.annotation as? BranchAnnotation {
        showDetails(from: view, with: annotation.branch)
    }
}

private func showDetails(from view: UIView, with branch: Branch) {
    let annotationDetailsPopover = AnnotationDetaisPopover(branch: branch)
    let popOver = annotationDetailsPopover.popoverPresentationController
    popOver?.sourceView = view
    popOver?.delegate = self
    present(annotationDetailsPopover, animated: true, completion: nil)
}

The advantage of doing this way is that besides having a lot of control over the UI layout, the popover is displayed on the screen accordingly based on where the selected annotation is (if the selected annotation is at the edge of the screen the popover is adjusted to show from there. You can see from the screenshots)

https://i.sstatic.net/QUNB6.jpg

https://i.sstatic.net/FCRiv.jpg

Confined answered 8/12, 2021 at 15:33 Comment(0)

© 2022 - 2024 — McMap. All rights reserved.