How to make a GridLayout fit screen size
Asked Answered
V

10

38

The GridLayout API docs is very difficult to learn ......
is there any one who can teach me how to set child Views to have something like "weight" of LinearLayout ?

Right now it looks like all are placed on the left hand side,
I have tried many times and still can not make it like each one the half width of the screen.

Edited : I don't know what can I do for when the childen are all wrap_content ...... even if I want to set some image in specific size , this class helps me to make ImageView wrap_content .........it cannot operate normal , did I miss some setting ?!?

Vedda answered 27/4, 2012 at 9:6 Comment(0)
R
66

Note: The information below the horizontal line is no longer accurate with the introduction of Android 'Lollipop' 5, as GridLayout does accommodate the principle of weights since API level 21.

Quoted from the Javadoc:

Excess Space Distribution

As of API 21, GridLayout's distribution of excess space accomodates the principle of weight. In the event that no weights are specified, the previous conventions are respected and columns and rows are taken as flexible if their views specify some form of alignment within their groups. The flexibility of a view is therefore influenced by its alignment which is, in turn, typically defined by setting the gravity property of the child's layout parameters. If either a weight or alignment were defined along a given axis then the component is taken as flexible in that direction. If no weight or alignment was set, the component is instead assumed to be inflexible.

Multiple components in the same row or column group are considered to act in parallel. Such a group is flexible only if all of the components within it are flexible. Row and column groups that sit either side of a common boundary are instead considered to act in series. The composite group made of these two elements is flexible if one of its elements is flexible.

To make a column stretch, make sure all of the components inside it define a weight or a gravity. To prevent a column from stretching, ensure that one of the components in the column does not define a weight or a gravity.

When the principle of flexibility does not provide complete disambiguation, GridLayout's algorithms favour rows and columns that are closer to its right and bottom edges. To be more precise, GridLayout treats each of its layout parameters as a constraint in the a set of variables that define the grid-lines along a given axis. During layout, GridLayout solves the constraints so as to return the unique solution to those constraints for which all variables are less-than-or-equal-to the corresponding value in any other valid solution.

It's also worth noting that android.support.v7.widget.GridLayout contains the same information. Unfortunately it doesn't mention which version of the support library it was introduced with, but the commit that adds the functionality can be tracked back to July 2014. In November 2014, improvements in weight calculation and a bug was fixed.

To be safe, make sure to import the latest version of the gridlayout-v7 library.


The principle of 'weights', as you're describing it, does not exist with GridLayout. This limitation is clearly mentioned in the documentation; excerpt below. That being said, there are some possibilities to use 'gravity' for excess space distribution. I suggest you have read through the linked documentation.

Limitations

GridLayout does not provide support for the principle of weight, as defined in weight. In general, it is not therefore possible to configure a GridLayout to distribute excess space in non-trivial proportions between multiple rows or columns. Some common use-cases may nevertheless be accommodated as follows. To place equal amounts of space around a component in a cell group; use CENTER alignment (or gravity). For complete control over excess space distribution in a row or column; use a LinearLayout subview to hold the components in the associated cell group. When using either of these techniques, bear in mind that cell groups may be defined to overlap.

For an example and some practical pointers, take a look at last year's blog post introducing the GridLayout widget.


Edit: I don't think there's an xml-based approach to scaling the tiles like in the Google Play app to 'squares' or 'rectangles' twice the length of those squares. However, it is certainly possible if you build your layout programmatically. All you really need to know in order two accomplish that is the device's screen dimensions.

Below a (very!) quick 'n dirty approximation of the tiled layout in the Google Play app.

Point size = new Point();
getWindowManager().getDefaultDisplay().getSize(size);
int screenWidth = size.x;
int screenHeight = size.y;
int halfScreenWidth = (int)(screenWidth *0.5);
int quarterScreenWidth = (int)(halfScreenWidth * 0.5);

Spec row1 = GridLayout.spec(0, 2);
Spec row2 = GridLayout.spec(2);
Spec row3 = GridLayout.spec(3);
Spec row4 = GridLayout.spec(4, 2);

Spec col0 = GridLayout.spec(0);
Spec col1 = GridLayout.spec(1); 
Spec colspan2 = GridLayout.spec(0, 2);

GridLayout gridLayout = new GridLayout(this);
gridLayout.setColumnCount(2);
gridLayout.setRowCount(15);

TextView twoByTwo1 = new TextView(this);
GridLayout.LayoutParams first = new GridLayout.LayoutParams(row1, colspan2);
first.width = screenWidth;
first.height = quarterScreenWidth * 2;
twoByTwo1.setLayoutParams(first);
twoByTwo1.setGravity(Gravity.CENTER);
twoByTwo1.setBackgroundColor(Color.RED);
twoByTwo1.setText("TOP");
twoByTwo1.setTextAppearance(this, android.R.style.TextAppearance_Large);
gridLayout.addView(twoByTwo1, first);

TextView twoByOne1 = new TextView(this);
GridLayout.LayoutParams second = new GridLayout.LayoutParams(row2, col0);
second.width = halfScreenWidth;
second.height = quarterScreenWidth;
twoByOne1.setLayoutParams(second);
twoByOne1.setBackgroundColor(Color.BLUE);
twoByOne1.setText("Staff Choices");
twoByOne1.setTextAppearance(this, android.R.style.TextAppearance_Large);
gridLayout.addView(twoByOne1, second);

TextView twoByOne2 = new TextView(this);
GridLayout.LayoutParams third = new GridLayout.LayoutParams(row2, col1);
third.width = halfScreenWidth;
third.height = quarterScreenWidth;
twoByOne2.setLayoutParams(third);
twoByOne2.setBackgroundColor(Color.GREEN);
twoByOne2.setText("Games");
twoByOne2.setTextAppearance(this, android.R.style.TextAppearance_Large);
gridLayout.addView(twoByOne2, third);

TextView twoByOne3 = new TextView(this);
GridLayout.LayoutParams fourth = new GridLayout.LayoutParams(row3, col0);
fourth.width = halfScreenWidth;
fourth.height = quarterScreenWidth;
twoByOne3.setLayoutParams(fourth);
twoByOne3.setBackgroundColor(Color.YELLOW);
twoByOne3.setText("Editor's Choices");
twoByOne3.setTextAppearance(this, android.R.style.TextAppearance_Large_Inverse);
gridLayout.addView(twoByOne3, fourth);

TextView twoByOne4 = new TextView(this);
GridLayout.LayoutParams fifth = new GridLayout.LayoutParams(row3, col1);
fifth.width = halfScreenWidth;
fifth.height = quarterScreenWidth;
twoByOne4.setLayoutParams(fifth);
twoByOne4.setBackgroundColor(Color.MAGENTA);
twoByOne4.setText("Something Else");
twoByOne4.setTextAppearance(this, android.R.style.TextAppearance_Large);
gridLayout.addView(twoByOne4, fifth);

TextView twoByTwo2 = new TextView(this);
GridLayout.LayoutParams sixth = new GridLayout.LayoutParams(row4, colspan2);
sixth.width = screenWidth;
sixth.height = quarterScreenWidth * 2;
twoByTwo2.setLayoutParams(sixth);
twoByTwo2.setGravity(Gravity.CENTER);
twoByTwo2.setBackgroundColor(Color.WHITE);
twoByTwo2.setText("BOTOM");
twoByTwo2.setTextAppearance(this, android.R.style.TextAppearance_Large_Inverse);
gridLayout.addView(twoByTwo2, sixth);

The result will look somewhat like this (on my Galaxy Nexus):

Tiled layout using GridLayout

Romeyn answered 27/4, 2012 at 9:28 Comment(13)
i have read it , but i want to ask is there some other things can do the same thing , i just want to made something similar the play store tiles layout .Vedda
@rex: I updated my answer with a very crude example. Hope that will at least give you some pointers for further development.Romeyn
Thanks a lot, I think a lot time ,still trap at the childen wrap content problem, now you save me! !Vedda
I believe it is possible to achieve this kind of layout using the rowSpan and columnSpan attributes...Renettarenew
@Justin: Feel free to mock up an example. We couldn't get it to work with a pure xml-based approach, so I'm sure there'd be interest in a 'proper' solution. I know I'd like to see it.Romeyn
@MH I will see what I can doRenettarenew
Is it truly necessary to set the LayoutParams twice for a given widget? (First in setLayoutParams, then in addView)Allotment
@Didia: no, that's probably not necessary. It's more likely I just overlooked that when I came up with the sample code. As mentioned in the answer, it is a "(very!) quick 'n dirty" proof of concept; not suitable for production code or copy-and-paste. That was never the intention too. :)Romeyn
i am new to grid view but i need to creat above grid view can you please share you whole example code.Fifine
@simmant: there's not much more to show. Just copy-paste the code into i.e. the onCreate() method of your activity and call setContentView(gridLayout) to set the GridLayout as content view. If that doesn't make sense, I suggest you have a read through the Training section on d.android.com.Romeyn
@Romeyn can you please help me in this #49945127Roca
@Nikson: Gridlayout and GridView are two completely unrelated viewgroups. Looks like you already have some good pointers in answers to your question.Romeyn
This answer could have been abbreviated to "Use layout_rowWeight and layout_columnWeight in the items inside the GridLayout" but it's still goodCherise
N
13

After many attempts I found what I was looking for in this layout. Even spaced LinearLayouts with automatically fitted ImageViews, with maintained aspect ratio. Works with landscape and portrait with any screen and image resolution.

Nexus 7 Nexus 5 Nexus 10

<FrameLayout xmlns:android="http://schemas.android.com/apk/res/android"
    android:layout_width="match_parent"
    android:layout_height="match_parent"
    android:background="#ffcc5d00" >

    <LinearLayout
        android:layout_width="fill_parent"
        android:layout_height="fill_parent"
        android:orientation="vertical">


        <LinearLayout
            android:orientation="vertical"
            android:layout_width="fill_parent"
            android:layout_height="fill_parent">

            <LinearLayout
                android:orientation="horizontal"
                android:layout_width="fill_parent"
                android:layout_weight="1"
                android:layout_height="wrap_content">

                <LinearLayout
                    android:orientation="vertical"
                    android:layout_width="0dp"
                    android:layout_weight="1"
                    android:padding="10dip"
                    android:layout_height="fill_parent">

                    <ImageView
                        android:id="@+id/image1"
                        android:layout_height="fill_parent"
                        android:adjustViewBounds="true"
                        android:scaleType="fitCenter"
                        android:src="@drawable/stackoverflow"
                        android:layout_width="fill_parent"
                        android:layout_gravity="center" />
                </LinearLayout>

                <LinearLayout
                    android:orientation="vertical"
                    android:layout_width="0dp"
                    android:layout_weight="1"
                    android:padding="10dip"
                    android:layout_height="fill_parent">

                    <ImageView
                        android:id="@+id/image2"
                        android:layout_height="fill_parent"
                        android:adjustViewBounds="true"
                        android:scaleType="fitCenter"
                        android:src="@drawable/stackoverflow"
                        android:layout_width="fill_parent"
                        android:layout_gravity="center" />
                </LinearLayout>
            </LinearLayout>

            <LinearLayout
                android:orientation="horizontal"
                android:layout_weight="1"
                android:layout_width="fill_parent"
                android:layout_height="wrap_content">

                <LinearLayout
                    android:orientation="vertical"
                    android:layout_width="0dp"
                    android:layout_weight="1"
                    android:padding="10dip"
                    android:layout_height="fill_parent">

                    <ImageView
                        android:id="@+id/image3"
                        android:layout_height="fill_parent"
                        android:adjustViewBounds="true"
                        android:scaleType="fitCenter"
                        android:src="@drawable/stackoverflow"
                        android:layout_width="fill_parent"
                        android:layout_gravity="center" />
                </LinearLayout>

                <LinearLayout
                    android:orientation="vertical"
                    android:layout_width="0dp"
                    android:layout_weight="1"
                    android:padding="10dip"
                    android:layout_height="fill_parent">

                    <ImageView
                        android:id="@+id/image4"
                        android:layout_height="fill_parent"
                        android:adjustViewBounds="true"
                        android:scaleType="fitCenter"
                        android:src="@drawable/stackoverflow"
                        android:layout_width="fill_parent"
                        android:layout_gravity="center" />
                </LinearLayout>
            </LinearLayout>
        </LinearLayout>
    </LinearLayout>
</FrameLayout>
Nord answered 28/2, 2014 at 2:1 Comment(2)
can u pls tell me will it work if i want to make collage type layout ..... bacause i m setting images from gallery not from drawable or may i need to adjust size dynamically ?Tetrasyllable
the whole idea of using GridLayout is avoiding nested LinearLayouts, which are not good for performance (findViewById)Fecund
S
11

Starting in API 21 the notion of weight was added to GridLayout.

To support older android devices, you can use the GridLayout from the v7 support library.

compile 'com.android.support:gridlayout-v7:22.2.1'

The following XML gives an example of how you can use weights to fill the screen width.

<?xml version="1.0" encoding="utf-8"?>
<android.support.v7.widget.GridLayout
    xmlns:android="http://schemas.android.com/apk/res/android"
    xmlns:grid="http://schemas.android.com/apk/res-auto"

    android:id="@+id/choice_grid"
    android:layout_width="fill_parent"
    android:layout_height="wrap_content"
    android:layout_centerHorizontal="true"
    android:padding="4dp"

    grid:alignmentMode="alignBounds"
    grid:columnCount="2"
    grid:rowOrderPreserved="false"
    grid:useDefaultMargins="true">

    <TextView
        android:layout_width="0dp"
        android:layout_height="100dp"
        grid:layout_columnWeight="1"
        grid:layout_gravity="fill_horizontal"
        android:gravity="center"
        android:background="#FF33B5E5"
        android:text="Tile1" />

    <TextView
        android:layout_width="0dp"
        android:layout_height="100dp"
        grid:layout_columnWeight="1"
        grid:layout_gravity="fill_horizontal"
        android:gravity="center"
        android:background="#FF33B5E5"
        android:text="Tile2" />

    <TextView
        android:layout_width="0dp"
        android:layout_height="100dp"
        grid:layout_columnWeight="1"
        grid:layout_gravity="fill_horizontal"
        android:gravity="center"
        android:background="#FF33B5E5"
        android:text="Tile3" />

    <TextView
        android:layout_width="0dp"
        android:layout_height="100dp"
        grid:layout_columnWeight="1"
        grid:layout_gravity="fill_horizontal"
        android:gravity="center"
        android:background="#FF33B5E5"
        android:text="Tile4" />

</android.support.v7.widget.GridLayout>
Stockholm answered 20/12, 2015 at 13:2 Comment(8)
Dude, I was looking for compile 'com.android.support:gridlayout-v7:22.2.1' really long! Even reinstalled whole SDK thinking why it isn't resolved by building tools. Helped a lot!Boatyard
preview is showing grid layout everything as supposed to be but when I run it cant see grid layout, what may be the problem?Aerobiology
Thanks for this example, although I am unable to achieve this programmatically, any ideas?Liu
I have the same issue as @MirlanMaksitalievSawtoothed
@MirlanMaksitaliev , follow my answer .Stockholm
@adnan9011 forgot to write that the problem was solved that day. Just include please tag of grid layout <android.support.v7.widget.GridLayout/> in your answer, beginners like me may confuseAerobiology
@Sawtoothed Are you using <android.support.v7.widget.GridLayout/> as tag of grid layout?Aerobiology
Fast forward to 2020, compile 'com.android.support:gridlayout-v7:22.2.1' has changed to implementation 'androidx.gridlayout:gridlayout:1.0.0' and android.support.v7.widget.GridLayout to androidx.gridlayout.widget.GridLayout.Calcicole
Q
3

If you use fragments you can prepare XML layout and than stratch critical elements programmatically

int thirdScreenWidth = (int)(screenWidth *0.33);

View view = inflater.inflate(R.layout.fragment_second, null);
View _container = view.findViewById(R.id.rim1container);
_container.getLayoutParams().width = thirdScreenWidth * 2;

_container = view.findViewById(R.id.rim2container);
_container.getLayoutParams().width = screenWidth - thirdScreenWidth * 2;

_container = view.findViewById(R.id.rim3container);
_container.getLayoutParams().width = screenWidth - thirdScreenWidth * 2;

This layout for 3 equal columns. First element takes 2x2 Result in the picture enter image description here

Qualified answered 21/12, 2012 at 16:36 Comment(0)
R
1

Just a quick follow up and note that it is possible now to use the support library with weighted spacing in GridLayout to achieve what you want, see:

As of API 21, GridLayout's distribution of excess space accomodates the principle of weight. In the event that no weights are specified, the previous conventions are respected and columns and rows are taken as flexible if their views specify some form of alignment within their groups. The flexibility of a view is therefore influenced by its alignment which is, in turn, typically defined by setting the gravity property of the child's layout parameters. If either a weight or alignment were defined along a given axis then the component is taken as flexible in that direction. If no weight or alignment was set, the component is instead assumed to be inflexible.

Redcap answered 18/2, 2015 at 8:48 Comment(0)
W
1

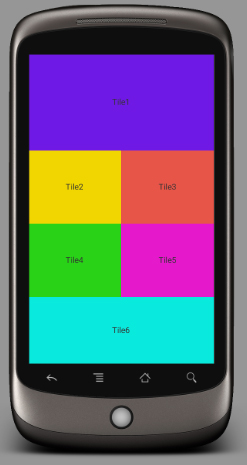
I archive this using LinearLayout

<?xml version="1.0" encoding="utf-8"?>
<LinearLayout android:layout_width="match_parent"
    android:layout_height="wrap_content"
    android:orientation="vertical"
    xmlns:android="http://schemas.android.com/apk/res/android">

    <LinearLayout
        android:layout_width="fill_parent"
        android:layout_height="wrap_content">
        <TextView
            android:layout_width="fill_parent"
            android:layout_height="wrap_content"
            android:height="166dp"
            android:text="Tile1"
            android:gravity="center"
            android:background="#6f19e5"/>
    </LinearLayout>
    <LinearLayout
        android:layout_width="match_parent"
        android:layout_height="wrap_content">
        <TextView
            android:text="Tile2"
            android:layout_width="0dp"
            android:layout_height="wrap_content"
            android:height="126dp"
            android:gravity="center"
            android:layout_weight=".50"
            android:background="#f1d600"/>

        <TextView
            android:text="Tile3"
            android:layout_width="0dp"
            android:layout_height="wrap_content"
            android:height="126dp"
            android:gravity="center"
            android:layout_weight=".50"
            android:background="#e75548"/>

    </LinearLayout>
    <LinearLayout
        android:layout_width="match_parent"
        android:layout_height="wrap_content">
        <TextView
            android:text="Tile4"
            android:layout_width="0dp"
            android:layout_height="wrap_content"
            android:height="126dp"
            android:gravity="center"
            android:layout_weight=".50"
            android:background="#29d217"/>

        <TextView
            android:text="Tile5"
            android:layout_width="0dp"
            android:layout_height="wrap_content"
            android:height="126dp"
            android:gravity="center"
            android:layout_weight=".50"
            android:background="#e519cb"/>

    </LinearLayout>
    <LinearLayout
        android:layout_width="fill_parent"
        android:layout_height="fill_parent">
        <TextView
            android:layout_width="fill_parent"
            android:layout_height="wrap_content"
            android:height="176dp"
            android:text="Tile6"
            android:gravity="center"
            android:background="#09eadd"/>
    </LinearLayout>
</LinearLayout>

Here the modal

Whipsaw answered 3/8, 2016 at 8:47 Comment(0)
B
1

For other peeps: If you have to use GridLayout due to project requirements then use it but I would suggest trying out TableLayout as it seems much easier to work with and achieves a similar result.

Docs: https://developer.android.com/reference/android/widget/TableLayout.html

Example:

<TableLayout
    android:layout_width="match_parent"
    android:layout_height="wrap_content">

    <TableRow>

        <Button
            android:id="@+id/test1"
            android:layout_width="wrap_content"
            android:layout_height="90dp"
            android:text="Test 1"
            android:drawableTop="@mipmap/android_launcher"
            />

        <Button
            android:id="@+id/test2"
            android:layout_width="wrap_content"
            android:layout_height="90dp"
            android:text="Test 2"
            android:drawableTop="@mipmap/android_launcher"
            />

        <Button
            android:id="@+id/test3"
            android:layout_width="wrap_content"
            android:layout_height="90dp"
            android:text="Test 3"
            android:drawableTop="@mipmap/android_launcher"
            />

        <Button
            android:id="@+id/test4"
            android:layout_width="wrap_content"
            android:layout_height="90dp"
            android:text="Test 4"
            android:drawableTop="@mipmap/android_launcher"
            />

    </TableRow>

    <TableRow>

        <Button
            android:id="@+id/test5"
            android:layout_width="wrap_content"
            android:layout_height="90dp"
            android:text="Test 5"
            android:drawableTop="@mipmap/android_launcher"
            />

        <Button
            android:id="@+id/test6"
            android:layout_width="wrap_content"
            android:layout_height="90dp"
            android:text="Test 6"
            android:drawableTop="@mipmap/android_launcher"
            />

    </TableRow>

</TableLayout>
Budwig answered 12/6, 2017 at 19:56 Comment(0)
P
1

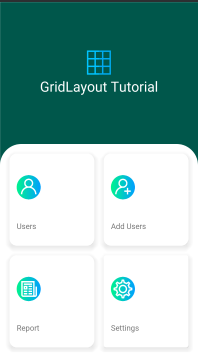
Grid Layout

       <GridLayout
        android:layout_width="match_parent"
        android:layout_weight="3"
        android:columnCount="2"
        android:padding="10dp"
        android:rowCount="3"
        android:background="@drawable/background_down"
        android:layout_height="0dp">


        <androidx.cardview.widget.CardView
            android:layout_height="0dp"
            android:layout_width="0dp"
            android:layout_columnWeight="1"
            android:layout_rowWeight="1"
            android:layout_margin="10dp"
            android:elevation="10dp"
            app:cardCornerRadius="15dp"
            >
            <LinearLayout
                android:weightSum="3"
                android:layout_width="match_parent"
                android:layout_height="match_parent"
                android:orientation="vertical"
                >

                <ImageView
                    android:layout_weight="2"
                    android:layout_width="50dp"
                    android:layout_height="50dp"
                    android:layout_margin="15dp"
                    android:src="@drawable/user" />

                <TextView
                    android:layout_width="wrap_content"
                    android:layout_height="wrap_content"
                    android:text="Users"
                    android:textSize="16sp"
                    android:layout_marginStart="15dp"
                    android:layout_marginLeft="15dp" />
            </LinearLayout>

        </androidx.cardview.widget.CardView>
        <androidx.cardview.widget.CardView
            android:layout_height="0dp"
            android:layout_width="0dp"
            android:layout_columnWeight="1"
            android:layout_rowWeight="1"
            android:layout_margin="10dp"
            android:elevation="10dp"
            app:cardCornerRadius="15dp"
            >
            <LinearLayout
                android:weightSum="3"
                android:layout_width="match_parent"
                android:layout_height="match_parent"
                android:orientation="vertical"
                >

                <ImageView
                    android:layout_weight="2"
                    android:layout_width="50dp"
                    android:layout_height="50dp"
                    android:layout_margin="15dp"
                    android:src="@drawable/addusers" />

                <TextView
                    android:layout_width="wrap_content"
                    android:layout_height="wrap_content"
                    android:text="Add Users"
                    android:textSize="16sp"
                    android:layout_marginStart="15dp"
                    android:layout_marginLeft="15dp" />
            </LinearLayout>


        </androidx.cardview.widget.CardView>

        <androidx.cardview.widget.CardView
            android:layout_height="0dp"
            android:layout_width="0dp"
            android:layout_columnWeight="1"
            android:layout_rowWeight="1"
            android:layout_margin="10dp"
            android:elevation="10dp"
            app:cardCornerRadius="15dp"
            >
            <LinearLayout
                android:weightSum="3"
                android:layout_width="match_parent"
                android:layout_height="match_parent"
                android:orientation="vertical"
                >

                <ImageView
                    android:layout_weight="2"
                    android:layout_width="50dp"
                    android:layout_height="50dp"
                    android:layout_margin="15dp"
                    android:src="@drawable/newspaper" />

                <TextView
                    android:layout_width="wrap_content"
                    android:layout_height="wrap_content"
                    android:text="Report"
                    android:textSize="16sp"
                    android:layout_marginStart="15dp"
                    android:layout_marginLeft="15dp" />
            </LinearLayout>


        </androidx.cardview.widget.CardView>
        <androidx.cardview.widget.CardView
            android:layout_height="0dp"
            android:layout_width="0dp"
            android:layout_columnWeight="1"
            android:layout_rowWeight="1"
            android:layout_margin="10dp"
            android:elevation="10dp"
            app:cardCornerRadius="5dp"
            >
            <LinearLayout
                android:weightSum="3"
                android:layout_width="match_parent"
                android:layout_height="match_parent"
                android:orientation="vertical"
                >

                <ImageView
                    android:layout_weight="2"
                    android:layout_width="50dp"
                    android:layout_height="50dp"
                    android:layout_margin="15dp"
                    android:src="@drawable/settings" />

                <TextView
                    android:layout_width="wrap_content"
                    android:layout_height="wrap_content"
                    android:text="Settings"
                    android:textSize="16sp"
                    android:layout_marginStart="15dp"
                    android:layout_marginLeft="15dp" />
            </LinearLayout>


        </androidx.cardview.widget.CardView>

    </GridLayout>

Full tutorials can be found here .

[Android Grid Layout With CardView and OnItemClickListener][2]
Photolysis answered 15/5, 2020 at 7:50 Comment(0)
I
0

Giving match_parent to inflated items will do the trick. GridLayout will automatically divide max parent length based on given column number and inflate those items fitting the whole screen.give match_parent to the item

Intercommunicate answered 12/1, 2021 at 8:33 Comment(0)
I
-1

Do you know View.getViewTreeObserver().addOnGlobalLayoutListener()

By this you can calculate the sizes.

I achieve your UI effect by GridView:

GridView g;
g.setNumColumns(2);
g.setStretchMode(GridView.STRETCH_SPACING_UNIFORM);
Irons answered 4/6, 2014 at 3:55 Comment(1)
The post was about GridLayout and not GridView. Maybe you have made a mistake reading.Crosslegged

© 2022 - 2024 — McMap. All rights reserved.