SKSpriteNode - create a round corner node?
Asked Answered
N

8

38

Is there a way to make a SKSpriteNode round cornered? I am trying to create a Tile likesqaure blocks with color filled SKSpriteNode:

SKSpriteNode *tile = [SKSpriteNode spriteNodeWithColor:[UIColor colorWithRed:0.0/255.0
                                                                           green:128.0/255.0
                                                                            blue:255.0/255.0
                                                                           alpha:1.0] size:CGSizeMake(30, 30)];

How can I make it round cornered?

Thanks!

Noblesse answered 11/2, 2014 at 7:4 Comment(1)
Note you may be better off, just making the image have transparent corners - https://mcmap.net/q/410393/-crop-mask-circular-image-node-in-sprite-kit-gives-jagged-edgesProfiterole
T
53

To get a rounded corner node you can use 2 approaches, each of them requires use of SKShapeNode.

First way is to use SKShapeNode and set its path to be a rounded rectangle like this:

SKShapeNode* tile = [SKShapeNode node];
[tile setPath:CGPathCreateWithRoundedRect(CGRectMake(-15, -15, 30, 30), 4, 4, nil)];
tile.strokeColor = tile.fillColor = [UIColor colorWithRed:0.0/255.0
                                                    green:128.0/255.0
                                                     blue:255.0/255.0
                                                    alpha:1.0];

The other one uses sprite node,crop node and SKShapeNode with rounded rectangle as crop nodes mask:

SKSpriteNode *tile = [SKSpriteNode spriteNodeWithColor:[UIColor   colorWithRed:0.0/255.0
                                                                           green:128.0/255.0
                                                                            blue:255.0/255.0
                                                                           alpha:1.0] size:CGSizeMake(30, 30)];
SKCropNode* cropNode = [SKCropNode node];
SKShapeNode* mask = [SKShapeNode node];
[mask setPath:CGPathCreateWithRoundedRect(CGRectMake(-15, -15, 30, 30), 4, 4, nil)];
[mask setFillColor:[SKColor whiteColor]];
[cropNode setMaskNode:mask];
[cropNode addChild:tile];

If your tiles are one solid colour, i suggest you go with the first approach.

Tobe answered 11/2, 2014 at 8:2 Comment(6)
Even with SKShapeNode's current inconsistencies, the first method seems reliable and is pretty straight forward to implement.Kef
SKShapeNode now has a 'rectOfSize:, cornerRadius:' initializerSalutatory
If your tiles use textures, you can still go with the first approach, by setting the fillTexture of the SKShapeNode.Pedo
If you'd like to make the rounded rect one solid color, call setSetStrokeColor:Disillusion
Note that the new cornerRadius initializer will crash devices running anything less than iOS 8. Shouldn't Xcode warn you of these issues?Glassworker
I have to say, this is just wrong. In any game engine, any system, if you want a round sprite, you just make it round, a line of code. SKShapeNode is really unrelated here, it's for a totally unrelated problem.Profiterole
T
22

In Swift 3 you can create with:

let tile = SKShapeNode(rect: CGRect(x: 0, y: 0, width: 30, height: 30), cornerRadius: 10)
Tormoria answered 28/9, 2016 at 19:29 Comment(1)
How should I set the a physics body for this SKShapeNode?Flaggy
T
8

Hope this helps:

SKSpriteNode *make_rounded_rectangle(UIColor *color, CGSize size, float radius)
{
    UIGraphicsBeginImageContext(size);
    [color setFill];
    CGRect rect = CGRectMake(0, 0, size.width, size.height);
    UIBezierPath *path = [UIBezierPath bezierPathWithRoundedRect:rect cornerRadius:radius];
    [path fill];
    UIImage *image = UIGraphicsGetImageFromCurrentImageContext();
    UIGraphicsEndImageContext();
    SKTexture *texture = [SKTexture textureWithImage:image];
    return [SKSpriteNode spriteNodeWithTexture:texture];
}
Twain answered 14/3, 2015 at 11:24 Comment(0)
C
5

This is heavily inspired by the accepted answer, yet it uses a more readable way to create the SKShapeNode and also fixes the annoying pixel line around the crop. Seems like a minor detail, but it may cost someone a few minutes.

CGFloat cornerRadius = 15;
SKCropNode *cropNode = [SKCropNode node];
SKShapeNode *maskNode = [SKShapeNode shapeNodeWithRectOfSize:scoreNode.size cornerRadius:cornerRadius];
[maskNode setLineWidth:0.0];
[maskNode setFillColor:[UIColor whiteColor]];
[cropNode setMaskNode:maskNode];
[cropNode addChild:scoreNode];
Chalybite answered 2/3, 2016 at 1:25 Comment(2)
Sorry to repeat myself, but honestly, for the sake of anyone googling here, you just don't do this! You simply crop the PNG, it's that easyProfiterole
@Profiterole My answer is general and crops any node. I wasn't using PNGs and if I did, I surely wouldn't want to touch every single one of them. So it still has its value.Chalybite
P
5

It's really this simple.......

class YourSprite: SKSpriteNode {

    func yourSetupFunction() {

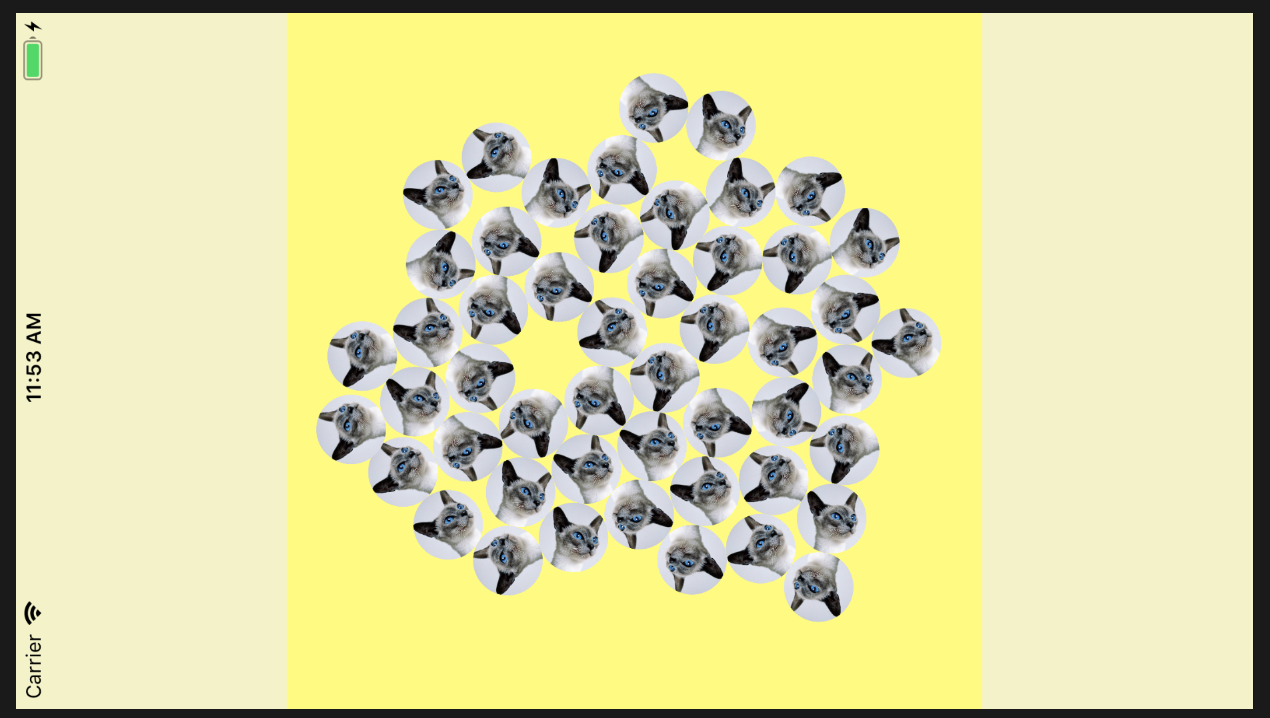
          texture = SKTexture( image: UIImage(named: "cat")!.circleMasked! )

There's nothing more to it.

You really can not use SKShapeNode.

It's just that simple. It's an insane performance hit using SKShapeNode, it's not the right solution, it's pointlessly difficult, and the purpose of SKShapeNode just has no relation to this problem.

enter image description here

Look at all them kitties!

The code for circleMasked is this simple:

(All projects that deal with images will need this anyway.)

extension UIImage {
    
    var isPortrait:  Bool    { return size.height > size.width }
    var isLandscape: Bool    { return size.width > size.height }
    var breadth:     CGFloat { return min(size.width, size.height) }
    var breadthSize: CGSize  { return CGSize(width: breadth, height: breadth) }
    var breadthRect: CGRect  { return CGRect(origin: .zero, size: breadthSize) }
    
    var circleMasked: UIImage? {
        
        UIGraphicsBeginImageContextWithOptions(breadthSize, false, scale)
        defer { UIGraphicsEndImageContext() }
        
        guard let cgImage = cgImage?.cropping(to: CGRect(origin:
            CGPoint(
                x: isLandscape ? floor((size.width - size.height) / 2) : 0,
                y: isPortrait  ? floor((size.height - size.width) / 2) : 0),
            size: breadthSize))
        else { return nil }
        
        UIBezierPath(ovalIn: breadthRect).addClip()
        UIImage(cgImage: cgImage, scale: 1, orientation: imageOrientation)
            .draw(in: breadthRect)
        return UIGraphicsGetImageFromCurrentImageContext()
    }

// classic 'circleMasked' stackoverflow fragment
// courtesy Leo Dabius /a/29047372/294884
}

That's all there is to it.

Profiterole answered 23/10, 2017 at 16:56 Comment(4)
Whilst this does circles well, and seems like you've walked through a series of glass walls to find this solution, how does this help make rounded rectangles as masks?Maintenon
hi @Confused. I have no idea, at all, what you mean? Can you explain what you're asking - I will try to help.Profiterole
You've used a circle, which I often jokingly refer to as a fully rounded square. The OP is asking about rounded squares/rectangles. How would you do your magic upon a rounded rectangle/square? As the glass walls, I'm talking about how you're thought outside the framework to solve the problem.Maintenon
hi @Maintenon - got you now. fortunately it's easy to modify UIBezierPath to give rounded corners rather than "round". i will try to put it in when I get a chance, but it is very easy: here's a great example by some excellent writer: https://mcmap.net/q/23634/-uibezierpath-how-to-add-a-border-around-a-view-with-rounded-cornersProfiterole
G
4

Swift 4:

A good solution could be created before you should add your sprite to his parent, I've maded a little extension that could be corrected as you wish:

extension SKSpriteNode {
    func addTo(parent:SKNode?, withRadius:CGFloat) {
        guard parent != nil else { return }
        guard  withRadius>0.0 else {
            parent!.addChild(self)
            return
        }
        let radiusShape = SKShapeNode.init(rect: CGRect.init(origin: CGPoint.zero, size: size), cornerRadius: withRadius)
        radiusShape.position = CGPoint.zero
        radiusShape.lineWidth = 2.0
        radiusShape.fillColor = UIColor.red
        radiusShape.strokeColor = UIColor.red
        radiusShape.zPosition = 2
        radiusShape.position = CGPoint.zero
        let cropNode = SKCropNode()
        cropNode.position = self.position
        cropNode.zPosition = 3
        cropNode.addChild(self)
        cropNode.maskNode = radiusShape
        parent!.addChild(cropNode)
    }
}

Usage:

let rootNode = SKSpriteNode(color: .white, size: self.size)
rootNode.alpha = 1.0
rootNode.anchorPoint = CGPoint.zero
rootNode.position = CGPoint.zero
rootNode.zPosition = 1
rootNode.name = "rootNode"
rootNode.addTo(parent: self, withRadius: 40.0)
Glitter answered 24/5, 2018 at 10:11 Comment(1)
great ! but my SKSpriteNode when i added radiusShape to it it wont center of mySKSpriteNode !Dill
E
2

from the class reference:

"An SKSpriteNode is a node that draws a textured image, a colored square, or a textured image blended with a color."

It seems the easiest way is to draw a block with rounded corners and then use one of these class methods:

  • spriteNodeWithImageNamed:
  • spriteNodeWithTexture:
  • spriteNodeWithTexture:size:
Edytheee answered 11/2, 2014 at 7:30 Comment(1)
+1: Sprite Kit is not a drawing API. It's an engine for managing the movement of predefined blocks of pixels (aka sprites).Unreligious
A
1

Here's a Swift 3 snippet based on the second solution of the accepted answer.

func createPlayerRoundedNode(){
    let tile = SKSpriteNode(color: .white, size: CGSize(width: 30, height: 30))
    tile.zPosition = 3
    tile.name = "tile node"
    let cropNode = SKCropNode()
    cropNode.zPosition = 2
    cropNode.name = "crop node"
    let mask = SKShapeNode(rect: CGRect(x: 0, y: 0, width: 30, height: 30), cornerRadius: 10)
    mask.fillColor = SKColor.darkGray
    mask.zPosition = 2
    mask.name = "mask node"
    cropNode.maskNode = mask
    self.addChild(cropNode)
    cropNode.addChild(tile)
}
Aghast answered 3/4, 2017 at 18:39 Comment(0)

© 2022 - 2024 — McMap. All rights reserved.