Controlling the Rasterize[] width for notebook-related expressions
Asked Answered
I

4

4

Update Mr Wizard's answer gives pixel-perfect results, but it is Windows-only and destroys the clipboard contents. My answer should work on any platform, but it's less precise: e.g. it omits In/Out labels. It does allow setting the rasterization width though.


This problem came up when I was trying to make a preview window for an image uploader (see the end of that answer).

I would like to create a palette button that will upload the current notebook selection as an image. Before uploading, I would like to show a preview of the image, to reduce the chance of something going awry before contacting the server.

This is what I have so far (includes only the preview code, not the uploader):

button = Button[
  "Preview",
  Module[
    {expr = NotebookRead@InputNotebook[]}, 
    If[expr =!= {},
      With[{img = Rasterize[expr]},
        MessageDialog[
          Column[{"Would you like to perform the action?", img}], 
          {"Do it!" :> doIt[img], "Cancel" :> Null}
        ]
      ]
    ]
  ]
]

In case you are wondering why I used a nested With inside the Module instead of making img a module-variable too: it's because by the time doIt[img] is evaluated, the local module variables will have been cleared, so I need to substitute the rasterized expression directly into the doIt function,

This button works (more or less). You can try it by creating a graphic in the same notebook (e.g. Graphics[Circle[]]), selecting it using a single click, then clicking the Preview button.

However, if I put it in a palette using CreatePalette[button], then the rasterization will happen for the window-width of the palette, and I get something like this:

Screenshot of the problem

How can I control the width of rasterization, or more generally, how can I create a preview dialog for the uploader that avoids this issue?

For an additional improvement, it would be nice to be able to size the message window so it fits the preview image (and still shows the button: the button disappears with WindowSize -> All).


Answers

Mr. Wizard's suggestion:

button = Button[
  "Preview", (FrontEndExecute[
    FrontEndToken[FrontEnd`SelectedNotebook[], "CopySpecial", "MGF"]];
    MessageDialog[
    First@Cases[NotebookGet@ClipboardNotebook[], 
      RasterBox[data_, ___] :> 
       Image[data, "Byte", ColorSpace -> "RGB", Magnification -> 1], 
      Infinity]])]

CreatePalette[button]

Problems: It (probably) only works on Windows, and it destroys the clipboard contents.

Ideally answered 2/12, 2011 at 8:53 Comment(6)
I tried extracting the WindowSize from the InputNotebook[] and passing that through to the ImageSize or RasterSize options of Rasterize. But I couldn't find the magic construction (I don't think that ImageSize->{{wmax},{hmax}} works quite like it claims in the documentation). Have you tried something like this?Decalcomania
@Decalcomania I tried, but didn't manage with ImageSize/RasterSizeIdeally
Is the preview of major importance, or would getting the save itself working be a reasonable answer?Bawbee
@Bawbee The whole point of the question is to get the preview. To catch potential errors before upload.Ideally
@Bawbee You found a way to save it to a file? BTW for my own personal use I think I'll be using your solution. Rasterize[] doesn't always give me exactly what I see in the notebook (elements are shifted).Ideally
I thought I was making progress, but no, I did not.Bawbee
I
1

I managed to do this by copying the selection to a new notebook, rasterizing the full notebook, then closing it.

CreatePalette@Button["Preview",
  Module[{target},
   target = 
    CreateDocument[{}, WindowSelected -> False, Visible -> False];
   NotebookWrite[target, NotebookRead[SelectedNotebook[]]];
   CreateDialog[{Rasterize[target], DefaultButton[]}];
   NotebookClose[target]
   ]
  ]

The WindowSize -> 500 option can be added to CreateDocument to set the rasterization width to 500 pixels.


Note some disadvantages (advantages in some cases) of this method compared to copying as bitmap:

  • Custom styles are lost
  • In/Out labels are lost
  • Notebook magnification value is lost

If there's a need, some of these can be remedied by explicitly transferring some notebook options from the SelectedNotebook to the newly created one.

Ideally answered 30/12, 2011 at 22:15 Comment(0)
B
2

If it is practical to use the clipboard in this operation you might use: FrontEnd`CopySpecial["MGF"] (copy as bitmap).

Bawbee answered 2/12, 2011 at 9:16 Comment(10)
Let's have a more complete example, as it's not clear from your answer how this would work: CreatePalette@Button["Copy", FrontEndExecute[ FrontEndToken[FrontEnd`SelectedNotebook[], "CopySpecial", "MGF"]]] My aim is to get the current selection of a notebook previewed in a window (before uploading it as an image). If I understand you right, you are suggesting using the clipboard for transferring the selection to the preview dialogue ...Ideally
... This has a couple of problems: 1. It will destroy the clipboard content even if I cancel the dialogue. 2. "MGF" only works on Windows according to the docs. Otherwise it works quite fine.Ideally
@Ideally I wrote that right before bed, and I didn't work anything out. I'll take another look at this whole problem today. Also I forgot to +1 the question but I just corrected that.Bawbee
Wow, what time zone are you in?Ideally
@Szabolcs, evidence indicates Martian.Bawbee
That explains a few things :)Hyacinthe
Although this is Windows-only, and destroys the clipboard even if I cancel the operation, it works great for personal use. Now I have a single-button StackOverflow image uploader on a Mathematica palette :-)Ideally
@Szabolcs, Mac OS has a clipboard too doesn't it? Why would your code break?Bawbee
@Bawbee I don't know that it breaks, but the docs say that "MGF" (i.e. copying in bitmap format) is Windows-only.Ideally
@Ideally that page (which I should have bothered to read before making baseless statements) seems to indicate that there is not a Copy As (raster image format) option on other systems. Can that be true?Bawbee
I
1

I managed to do this by copying the selection to a new notebook, rasterizing the full notebook, then closing it.

CreatePalette@Button["Preview",
  Module[{target},
   target = 
    CreateDocument[{}, WindowSelected -> False, Visible -> False];
   NotebookWrite[target, NotebookRead[SelectedNotebook[]]];
   CreateDialog[{Rasterize[target], DefaultButton[]}];
   NotebookClose[target]
   ]
  ]

The WindowSize -> 500 option can be added to CreateDocument to set the rasterization width to 500 pixels.


Note some disadvantages (advantages in some cases) of this method compared to copying as bitmap:

  • Custom styles are lost
  • In/Out labels are lost
  • Notebook magnification value is lost

If there's a need, some of these can be remedied by explicitly transferring some notebook options from the SelectedNotebook to the newly created one.

Ideally answered 30/12, 2011 at 22:15 Comment(0)
V
0

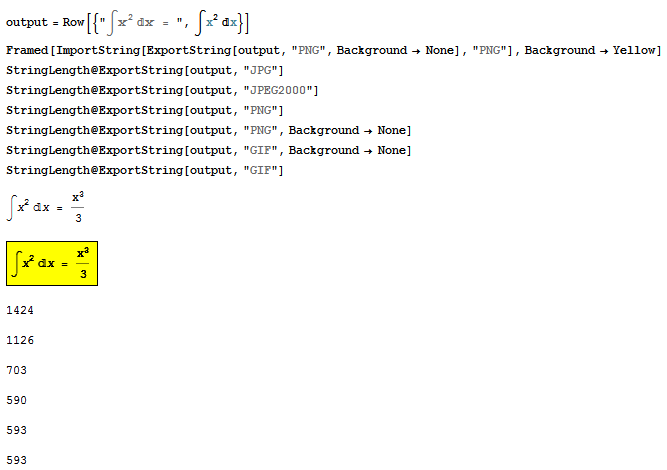
Have you tried using ExportString[] to create the graphic into memory? (technically into a temp file, but what do you care:] )

ExportString[your_mathematica_stuff_here,"PNG",Background->None]

See the output on a colored background to verify transparent BG:

Framed[ImportString[ExportString[x^2,"PNG",Background->None]
                    ,"PNG"]
       ,Background->Yellow]

For images with many color variations (like 3D plots), I recommend JPEG2000 format, and for solid-colored images where transparency is not necessary, use GIF to preserve color detail.

Yes, you can control ImageSize when you export string of the image.


ExportString output and image type/size comparison

Venial answered 5/12, 2011 at 0:55 Comment(1)
Have you tested this in a palette context? Please replace Rasterize in my code by ImportString@ExportString[..., "PNG], put the button on a palette, as I described, and you'll see that this is plagued by the same problem as plain Rasterize.Ideally
S
0

I think this should work without you needing to make a new notebook:

button = Button["Preview", 
   Module[{expr = NotebookRead@InputNotebook[]}, 
    If[expr =!= {}, 
     With[{img = 
        Rasterize[expr, 
         ImageFormattingWidth -> 
          First@(WindowSize /. 
             AbsoluteOptions[InputNotebook[], WindowSize])]}, 
      MessageDialog[
       Column[{"Would you like to perform the action?", 
         img}], {"Do it!" :> doIt[img], "Cancel" :> Null},
       WindowSize -> {First@ImageDimensions@img, All}]]]]];
CreateDialog[button,
 WindowFloating -> True,
 WindowClickSelect -> False,
 Selectable -> False
 ]

I used a little option searcher to find ImageFormattingWidth and by passing the image width as the window width you can make the dialog fit the picture nicely and still display the button.

Here's a demo of its results:

Rasterizing a cell from a pallete

Soukup answered 26/10, 2016 at 21:29 Comment(0)

© 2022 - 2024 — McMap. All rights reserved.