Remove line break in TabLayout
Asked Answered
C

10

55

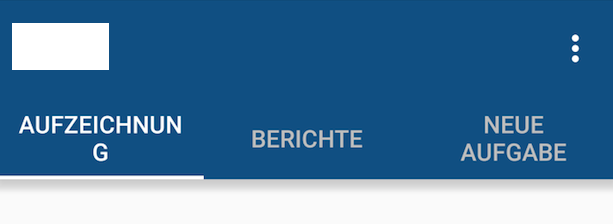
I just added the new TabLayout component to my app. As you may know there are two different modes for tabs app:tabMode="scrollable" and app:tabMode="fixed".

When I use app:tabMode="fixed" I get following result:

enter image description here

There's no margin/padding on the left and right side but the text is wrapped.

But when I use app:tabMode="scrollable" I get following result:

enter image description here

The text is not wrapped but here is a weird margin on the right side and I can't get rid of it.

I also tried setting the tabGravity to either app:tabGravity="center" or app:tabGravity="fill" but did not achieve any changes.

Would be nice if any of you smart guys and girls got a solution for me.

Cheers, Lukas

Cowage answered 29/7, 2015 at 11:9 Comment(2)
These are the two modes of the TabLayout. If you used fixed, then all tabs are the same size. Which means that there is less room for your tab 1 and 3. If you use scrollable, then the text is on a single line and the tab takes up the minimum amount of space and has a left gravity. For Android development, you shouldn't be concerning yourself with a single screen size anyway. Perhaps you should consider implementing something like: https://mcmap.net/q/193530/-android-support-design-tablayout-gravity-center-and-mode-scrollable.Zipporah
Why don't you try to create your own tab layout and manage accordingly. Use custom layout as your tab and give listeners to children layout.Motley
S
33

One solution here is to inflate a custom layout for each tab, which will give you more control over the appearance of each tab. This is done with the setCustomView() method.

Note that it will look different on different screen resolutions.

It's always tough to make it look perfect on every device, but at least using this method gives you more control, as you can use different custom layout xml files for different screen resolutions/sizes.

One approach would be to make the font size as big as possible without getting cut off on each screen size.

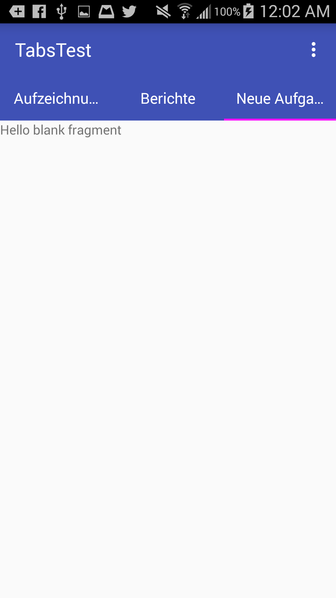
I got a simple example working, which restricts the text in each tab to one line, however in this simple example it also causes the long text in the side tabs to ellipsize without changing the font size. Your next step would be to figure out the optimal font size for each screen size, and create a specific tab layout xml for each.

Here is the custom_tab.xml file, with android:singleLine="true" specified:

<?xml version="1.0" encoding="utf-8"?>
<LinearLayout xmlns:android="http://schemas.android.com/apk/res/android"
    android:orientation="vertical" android:layout_width="match_parent"
    android:layout_height="match_parent">
    <TextView
        android:id="@+id/custom_text"
        android:layout_width="wrap_content"
        android:layout_height="match_parent"
        android:background="?attr/selectableItemBackground"
        android:gravity="center"
        android:textSize="16dip"
        android:textColor="#ffffff"
        android:singleLine="true"
        />
</LinearLayout>

Here is the layout for MainActivity:

<RelativeLayout
    android:id="@+id/main_layout"
    xmlns:android="http://schemas.android.com/apk/res/android"
    xmlns:app="http://schemas.android.com/apk/res-auto"
    xmlns:tools="http://schemas.android.com/tools"
    android:layout_width="match_parent"
    android:layout_height="match_parent"
    tools:context=".MainActivity">

    <android.support.v7.widget.Toolbar
        android:id="@+id/toolbar"
        android:layout_width="match_parent"
        android:layout_height="wrap_content"
        android:layout_alignParentTop="true"
        android:background="?attr/colorPrimary"
        android:elevation="6dp"
        android:minHeight="?attr/actionBarSize"
        android:theme="@style/ThemeOverlay.AppCompat.Dark.ActionBar"
        app:popupTheme="@style/ThemeOverlay.AppCompat.Light"/>

    <android.support.design.widget.TabLayout
        android:id="@+id/tab_layout"
        app:tabMode="fixed"
        android:layout_width="match_parent"
        android:layout_height="wrap_content"
        android:layout_below="@+id/toolbar"
        android:background="?attr/colorPrimary"
        android:elevation="6dp"
        app:tabTextColor="#d3d3d3"
        app:tabSelectedTextColor="#ffffff"
        app:tabIndicatorColor="#ff00ff"
        android:minHeight="?attr/actionBarSize"
        />

    <android.support.v4.view.ViewPager
        android:id="@+id/viewpager"
        android:layout_width="match_parent"
        android:layout_height="fill_parent"
        android:layout_below="@id/tab_layout"/>

</RelativeLayout>

Here is the Activity code, which includes the FragmentPagerAdapter:

public class MainActivity extends AppCompatActivity {

    @Override
    protected void onCreate(Bundle savedInstanceState) {
        super.onCreate(savedInstanceState);
        setContentView(R.layout.activity_main);

        Toolbar toolbar = (Toolbar) findViewById(R.id.toolbar);
        setSupportActionBar(toolbar);

        // Get the ViewPager and set it's PagerAdapter so that it can display items
        ViewPager viewPager = (ViewPager) findViewById(R.id.viewpager);
        PagerAdapter pagerAdapter =
                new PagerAdapter(getSupportFragmentManager(), MainActivity.this);
        viewPager.setAdapter(pagerAdapter);

        // Give the TabLayout the ViewPager
        TabLayout tabLayout = (TabLayout) findViewById(R.id.tab_layout);
        tabLayout.setupWithViewPager(viewPager);

        // Iterate over all tabs and set the custom view
        for (int i = 0; i < tabLayout.getTabCount(); i++) {
            TabLayout.Tab tab = tabLayout.getTabAt(i);
            tab.setCustomView(pagerAdapter.getTabView(i));
        }
    }


    class PagerAdapter extends FragmentPagerAdapter {

        String tabTitles[] = new String[] { "Aufzeichnung", "Berichte", "Neue Aufgabe", };
        Context context;

        public PagerAdapter(FragmentManager fm, Context context) {
            super(fm);
            this.context = context;
        }

        @Override
        public int getCount() {
            return tabTitles.length;
        }

        @Override
        public Fragment getItem(int position) {

            switch (position) {
                case 0:
                    return new BlankFragment();
                case 1:
                    return new BlankFragment();
                case 2:
                    return new BlankFragment();
            }

            return null;
        }

        @Override
        public CharSequence getPageTitle(int position) {
            // Generate title based on item position
            return tabTitles[position];
        }

        public View getTabView(int position) {
            View tab = LayoutInflater.from(MainActivity.this).inflate(R.layout.custom_tab, null);
            TextView tv = (TextView) tab.findViewById(R.id.custom_text);
            tv.setText(tabTitles[position]);
            return tab;
        }

    }
}

And here is the result with the code above:

enter image description here

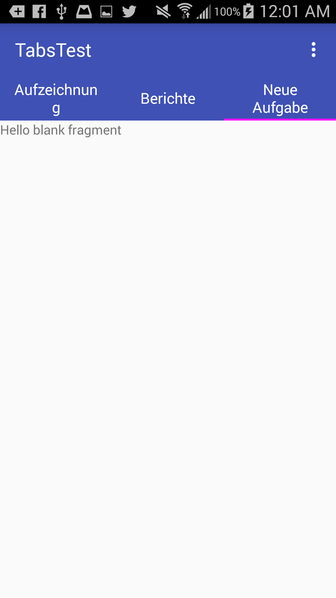
Note that if you remove android:singleLine="true", it looks like this, similar to how it looks in your question:

enter image description here

Sacci answered 13/9, 2015 at 7:28 Comment(2)
Note that it is recommended in the Material Design guidelines that text size is intended to be 14sp or 12sp if it takes up two lines: material.io/guidelines/components/tabs.html#tabs-specsElo
link is not working @w3bshark...Desalvo
S
43

Here's a quick hack, a lot shorter than using setCustomView(): use the android:theme attribute on your TabLayout:

<android.support.design.widget.TabLayout
    android:id="@+id/tab_layout"
    android:layout_width="match_parent"
    android:layout_height="wrap_content"
    android:theme="@style/TabLayout_Theme"
    app:tabMode="fixed"/>

Then in your themes XML:

<style name="TabLayout_Theme" parent="@style/AppTheme">
    <item name="android:singleLine">true</item>
</style>

We have to do it this way, because unfortunately the android:singleLine attribute is ignored on the app:tabTextAppearance set on the TabLayout. app:tabTextAppearance is really only useful for changing text size.

Suitcase answered 1/10, 2015 at 6:24 Comment(2)
I haven't tried, but since the Tab layout /design_layout_tab_text.xml is hardcoded with maxLines=2, I don't see how this helps.Alemanni
Simple solution and works even in cases where other solutions don't, unfortunately the singleLine attribute is also applied to the tooltip that appears when you long press a tab item. I tried to use tooltipStyle to set singleLine back to false but without success. Anyway this answer is the best workaround at the moment.Algebra
S
33

One solution here is to inflate a custom layout for each tab, which will give you more control over the appearance of each tab. This is done with the setCustomView() method.

Note that it will look different on different screen resolutions.

It's always tough to make it look perfect on every device, but at least using this method gives you more control, as you can use different custom layout xml files for different screen resolutions/sizes.

One approach would be to make the font size as big as possible without getting cut off on each screen size.

I got a simple example working, which restricts the text in each tab to one line, however in this simple example it also causes the long text in the side tabs to ellipsize without changing the font size. Your next step would be to figure out the optimal font size for each screen size, and create a specific tab layout xml for each.

Here is the custom_tab.xml file, with android:singleLine="true" specified:

<?xml version="1.0" encoding="utf-8"?>
<LinearLayout xmlns:android="http://schemas.android.com/apk/res/android"
    android:orientation="vertical" android:layout_width="match_parent"
    android:layout_height="match_parent">
    <TextView
        android:id="@+id/custom_text"
        android:layout_width="wrap_content"
        android:layout_height="match_parent"
        android:background="?attr/selectableItemBackground"
        android:gravity="center"
        android:textSize="16dip"
        android:textColor="#ffffff"
        android:singleLine="true"
        />
</LinearLayout>

Here is the layout for MainActivity:

<RelativeLayout
    android:id="@+id/main_layout"
    xmlns:android="http://schemas.android.com/apk/res/android"
    xmlns:app="http://schemas.android.com/apk/res-auto"
    xmlns:tools="http://schemas.android.com/tools"
    android:layout_width="match_parent"
    android:layout_height="match_parent"
    tools:context=".MainActivity">

    <android.support.v7.widget.Toolbar
        android:id="@+id/toolbar"
        android:layout_width="match_parent"
        android:layout_height="wrap_content"
        android:layout_alignParentTop="true"
        android:background="?attr/colorPrimary"
        android:elevation="6dp"
        android:minHeight="?attr/actionBarSize"
        android:theme="@style/ThemeOverlay.AppCompat.Dark.ActionBar"
        app:popupTheme="@style/ThemeOverlay.AppCompat.Light"/>

    <android.support.design.widget.TabLayout
        android:id="@+id/tab_layout"
        app:tabMode="fixed"
        android:layout_width="match_parent"
        android:layout_height="wrap_content"
        android:layout_below="@+id/toolbar"
        android:background="?attr/colorPrimary"
        android:elevation="6dp"
        app:tabTextColor="#d3d3d3"
        app:tabSelectedTextColor="#ffffff"
        app:tabIndicatorColor="#ff00ff"
        android:minHeight="?attr/actionBarSize"
        />

    <android.support.v4.view.ViewPager
        android:id="@+id/viewpager"
        android:layout_width="match_parent"
        android:layout_height="fill_parent"
        android:layout_below="@id/tab_layout"/>

</RelativeLayout>

Here is the Activity code, which includes the FragmentPagerAdapter:

public class MainActivity extends AppCompatActivity {

    @Override
    protected void onCreate(Bundle savedInstanceState) {
        super.onCreate(savedInstanceState);
        setContentView(R.layout.activity_main);

        Toolbar toolbar = (Toolbar) findViewById(R.id.toolbar);
        setSupportActionBar(toolbar);

        // Get the ViewPager and set it's PagerAdapter so that it can display items
        ViewPager viewPager = (ViewPager) findViewById(R.id.viewpager);
        PagerAdapter pagerAdapter =
                new PagerAdapter(getSupportFragmentManager(), MainActivity.this);
        viewPager.setAdapter(pagerAdapter);

        // Give the TabLayout the ViewPager
        TabLayout tabLayout = (TabLayout) findViewById(R.id.tab_layout);
        tabLayout.setupWithViewPager(viewPager);

        // Iterate over all tabs and set the custom view
        for (int i = 0; i < tabLayout.getTabCount(); i++) {
            TabLayout.Tab tab = tabLayout.getTabAt(i);
            tab.setCustomView(pagerAdapter.getTabView(i));
        }
    }


    class PagerAdapter extends FragmentPagerAdapter {

        String tabTitles[] = new String[] { "Aufzeichnung", "Berichte", "Neue Aufgabe", };
        Context context;

        public PagerAdapter(FragmentManager fm, Context context) {
            super(fm);
            this.context = context;
        }

        @Override
        public int getCount() {
            return tabTitles.length;
        }

        @Override
        public Fragment getItem(int position) {

            switch (position) {
                case 0:
                    return new BlankFragment();
                case 1:
                    return new BlankFragment();
                case 2:
                    return new BlankFragment();
            }

            return null;
        }

        @Override
        public CharSequence getPageTitle(int position) {
            // Generate title based on item position
            return tabTitles[position];
        }

        public View getTabView(int position) {
            View tab = LayoutInflater.from(MainActivity.this).inflate(R.layout.custom_tab, null);
            TextView tv = (TextView) tab.findViewById(R.id.custom_text);
            tv.setText(tabTitles[position]);
            return tab;
        }

    }
}

And here is the result with the code above:

enter image description here

Note that if you remove android:singleLine="true", it looks like this, similar to how it looks in your question:

enter image description here

Sacci answered 13/9, 2015 at 7:28 Comment(2)
Note that it is recommended in the Material Design guidelines that text size is intended to be 14sp or 12sp if it takes up two lines: material.io/guidelines/components/tabs.html#tabs-specsElo
link is not working @w3bshark...Desalvo
M
25

Showing "..." in tab titles will not make a good UI experience I suggest that you should set tabmode to scrollable and let tab titles take as much space they want.

  <android.support.design.widget.TabLayout
                android:id="@+id/htab_tabs"
                android:layout_width="wrap_content"
                android:layout_height="?attr/actionBarSize"
                android:layout_gravity="bottom"
                app:tabIndicatorColor="@android:color/white"
                app:tabMode="scrollable" />
Ministrant answered 14/2, 2016 at 10:41 Comment(2)
Perfect solution. Worked for me.Werby
The simplest solutionReassure
I
5

If it is an option you could center the tabs with a RelativeLayout and by setting android:layout_centerHorizontal="true"

This will give you an equal margin on both the left and right side.

e.g.

    <RelativeLayout
        android:layout_width="match_parent"
        android:layout_height="wrap_content">
        <android.support.design.widget.TabLayout
            android:id="@+id/tabs"
            android:layout_centerHorizontal="true"
            android:layout_width="wrap_content"
            android:layout_height="wrap_content"
            app:tabMode="scrollable" />
    </RelativeLayout>
Incombustible answered 31/1, 2017 at 23:18 Comment(1)
my TabLayout gone if i wrap it inside RelativeLayoutBuzzer
G
5

I have added:

app:tabMaxWidth="0dp"

in element.

Gradely answered 13/4, 2021 at 7:37 Comment(0)
E
0

With this code you are able to remove the default padding. For me it worked to make slightly longer texts within one line

<android.support.design.widget.TabLayout
app:tabPaddingStart="-1dp"
app:tabPaddingEnd="-1dp"

From here: http://panavtec.me/playing-with-the-new-support-tablayout

Enciso answered 10/2, 2018 at 20:38 Comment(1)
I don't know why this is downvoted, this is the great hack/workaround for handling different font sizes/accessibility options for fixed-width tabs. Thanks!Endsley
A
0

The simplest solution I found is by applying TextAppearance.Design.Tab style to app:tabTextAppearance. This will resize the font of that one tab, instead of breaking line.

Apply it to TabLayout:

<android.support.design.widget.TabLayout
        app:tabTextAppearance="@style/TextAppearance.Design.Tab"
        ...
        />
Affiche answered 2/3, 2022 at 12:14 Comment(0)
R
-2

In your layout XML, if You are usign TextView ,use android:maxLines="1" or android:singleLine="true" See if this works. And if Not TextView then please put your xml here.

Rabaul answered 7/9, 2015 at 5:11 Comment(3)
As i wrote above, i use the TabLayout component from the Design Support Library. Here's my XML if you wanna have a look: pastebin.com/cLCvYTw3Cowage
I think it has an attribute named "textAppearance", you can define the singleLine state in a style file and set it to your textAppearancePumpkinseed
@NguyễnHoàiNam TabLayout does have attribute app:tabTextAppearance, but it sadly ignores singleLine and maxLines. Instead it works for textSize, textAllCaps, etc.Suitcase
C
-2

Solved my problem by assigning style to app:tabTextAppearance

<android.support.design.widget.TabLayout
    android:layout_width="match_parent"
    android:layout_height="wrap_content"
    app:tabTextAppearance="@style/MyCustomTabTextAppearance">

style:

<style name="MyCustomTabTextAppearance" parent="@style/AppTheme">
    <item name="android:singleLine">true</item>
    <item name="android:textSize">@dimen/_5sdp</item>
</style>

You can set textSize also.

Calefaction answered 17/3, 2017 at 7:13 Comment(1)
It won't work as required. TextAppearance uses only style attrs, see "setTextAppearance" source code in TextView. singleLine won't be used, only text size will be reduced.Kowloon
S
-2
float myTabLayoutSize = 360;
if (DeviceInfo.getWidthDP(this) >= myTabLayoutSize ){
    tabLayout.setTabMode(TabLayout.MODE_FIXED);
} else {
    tabLayout.setTabMode(TabLayout.MODE_SCROLLABLE);
}
Stortz answered 16/5, 2018 at 7:20 Comment(1)
Basically, I have to calculate manually the width of my tabLayout and then I set the Tab Mode depending on if the tabLayout fits in the device or not. and its working fine for both cases.Stortz

© 2022 - 2024 — McMap. All rights reserved.