UIImage rounded corners
Asked Answered
B

16

70

I try to get rounded corners on a UIImage, what I read so far, the easiest way is to use a mask images. For this I used code from TheElements iPhone Example and some image resize code I found. My problem is that resizedImage is always nil and I don't find the error...

- (UIImage *)imageByScalingProportionallyToSize:(CGSize)targetSize
{
    CGSize imageSize = [self size];
    float width = imageSize.width;
    float height = imageSize.height;

    // scaleFactor will be the fraction that we'll
    // use to adjust the size. For example, if we shrink
    // an image by half, scaleFactor will be 0.5. the
    // scaledWidth and scaledHeight will be the original,
    // multiplied by the scaleFactor.
    //
    // IMPORTANT: the "targetHeight" is the size of the space
    // we're drawing into. The "scaledHeight" is the height that
    // the image actually is drawn at, once we take into
    // account the ideal of maintaining proportions

    float scaleFactor = 0.0; 
    float scaledWidth = targetSize.width;
    float scaledHeight = targetSize.height;

    CGPoint thumbnailPoint = CGPointMake(0,0);

    // since not all images are square, we want to scale
    // proportionately. To do this, we find the longest
    // edge and use that as a guide.

    if ( CGSizeEqualToSize(imageSize, targetSize) == NO )
    { 
        // use the longeset edge as a guide. if the
        // image is wider than tall, we'll figure out
        // the scale factor by dividing it by the
        // intended width. Otherwise, we'll use the
        // height.

        float widthFactor = targetSize.width / width;
        float heightFactor = targetSize.height / height;

        if ( widthFactor < heightFactor )
            scaleFactor = widthFactor;
        else
            scaleFactor = heightFactor;

        // ex: 500 * 0.5 = 250 (newWidth)

        scaledWidth = width * scaleFactor;
        scaledHeight = height * scaleFactor;

        // center the thumbnail in the frame. if
        // wider than tall, we need to adjust the
        // vertical drawing point (y axis)

        if ( widthFactor < heightFactor )
            thumbnailPoint.y = (targetSize.height - scaledHeight) * 0.5;

        else if ( widthFactor > heightFactor )
            thumbnailPoint.x = (targetSize.width - scaledWidth) * 0.5;
    }


    CGContextRef mainViewContentContext;
    CGColorSpaceRef colorSpace;

    colorSpace = CGColorSpaceCreateDeviceRGB();

    // create a bitmap graphics context the size of the image
    mainViewContentContext = CGBitmapContextCreate (NULL, targetSize.width, targetSize.height, 8, 0, colorSpace, kCGImageAlphaPremultipliedLast);

    // free the rgb colorspace
    CGColorSpaceRelease(colorSpace);    

    if (mainViewContentContext==NULL)
        return NULL;

    //CGContextSetFillColorWithColor(mainViewContentContext, [[UIColor whiteColor] CGColor]);
    //CGContextFillRect(mainViewContentContext, CGRectMake(0, 0, targetSize.width, targetSize.height));

    CGContextDrawImage(mainViewContentContext, CGRectMake(thumbnailPoint.x, thumbnailPoint.y, scaledWidth, scaledHeight), self.CGImage);

    // Create CGImageRef of the main view bitmap content, and then
    // release that bitmap context
    CGImageRef mainViewContentBitmapContext = CGBitmapContextCreateImage(mainViewContentContext);
    CGContextRelease(mainViewContentContext);

    CGImageRef maskImage = [[UIImage imageNamed:@"Mask.png"] CGImage];

    CGImageRef resizedImage = CGImageCreateWithMask(mainViewContentBitmapContext, maskImage);
    CGImageRelease(mainViewContentBitmapContext);

    // convert the finished resized image to a UIImage 
    UIImage *theImage = [UIImage imageWithCGImage:resizedImage];

    // image is retained by the property setting above, so we can 
    // release the original
    CGImageRelease(resizedImage);

    // return the image
    return theImage;
}
Biotype answered 4/11, 2008 at 15:25 Comment(1)
Any swift code?Limnetic
B
15

The problem was the use of CGImageCreateWithMask which returned an all black image. The solution I found was to use CGContextClipToMask instead:

CGContextRef mainViewContentContext;
CGColorSpaceRef colorSpace;

colorSpace = CGColorSpaceCreateDeviceRGB();

// create a bitmap graphics context the size of the image
mainViewContentContext = CGBitmapContextCreate (NULL, targetSize.width, targetSize.height, 8, 0, colorSpace, kCGImageAlphaPremultipliedLast);

// free the rgb colorspace
CGColorSpaceRelease(colorSpace);    

if (mainViewContentContext==NULL)
    return NULL;

CGImageRef maskImage = [[UIImage imageNamed:@"mask.png"] CGImage];
CGContextClipToMask(mainViewContentContext, CGRectMake(0, 0, targetSize.width, targetSize.height), maskImage);
CGContextDrawImage(mainViewContentContext, CGRectMake(thumbnailPoint.x, thumbnailPoint.y, scaledWidth, scaledHeight), self.CGImage);


// Create CGImageRef of the main view bitmap content, and then
// release that bitmap context
CGImageRef mainViewContentBitmapContext = CGBitmapContextCreateImage(mainViewContentContext);
CGContextRelease(mainViewContentContext);

// convert the finished resized image to a UIImage 
UIImage *theImage = [UIImage imageWithCGImage:mainViewContentBitmapContext];
// image is retained by the property setting above, so we can 
// release the original
CGImageRelease(mainViewContentBitmapContext);

// return the image
return theImage;
Biotype answered 30/3, 2009 at 20:0 Comment(0)
C
215

If you are using a UIImageView to display the image you can simply do the following:

imageView.layer.cornerRadius = 5.0;
imageView.layer.masksToBounds = YES;

And to add a border:

imageView.layer.borderColor = [UIColor lightGrayColor].CGColor;
imageView.layer.borderWidth = 1.0;

I believe that you'll have to import <QuartzCore/QuartzCore.h> and link against it for the above code to work.

Creatural answered 2/12, 2009 at 17:36 Comment(7)
Import and link against what?Selfrespect
sorry #import <QuartzCore/QuartzCore.h>Creatural
turns out it was there, but didn't display because of the less than/greater than.Creatural
Nice! Works great when the image is set UIViewModeContentModeScaleAspectFillManning
Super easy, but decreases scrolling performance of UITableView is custom cell has an UIImageView... I go with CG! :)Amethist
for UITableviewCell ... just overlay a png with a hole on the center... that will doKitti
@Amethist did you Profile your app and find out the CG has a noticeable performance over this method? Because I am using this for my UITableView and mine updates the cells in realtime so there is that overload too. Let me know if you did that test. thanksBlas
T
92

How about these lines...

// Get your image somehow
UIImage *image = [UIImage imageNamed:@"image.jpg"];

// Begin a new image that will be the new image with the rounded corners 
// (here with the size of an UIImageView)
UIGraphicsBeginImageContextWithOptions(imageView.bounds.size, NO, 1.0);

// Add a clip before drawing anything, in the shape of an rounded rect
[[UIBezierPath bezierPathWithRoundedRect:imageView.bounds 
                            cornerRadius:10.0] addClip];
// Draw your image
[image drawInRect:imageView.bounds];

// Get the image, here setting the UIImageView image
imageView.image = UIGraphicsGetImageFromCurrentImageContext();

// Lets forget about that we were drawing
UIGraphicsEndImageContext();
Trattoria answered 21/11, 2011 at 1:44 Comment(0)
S
37

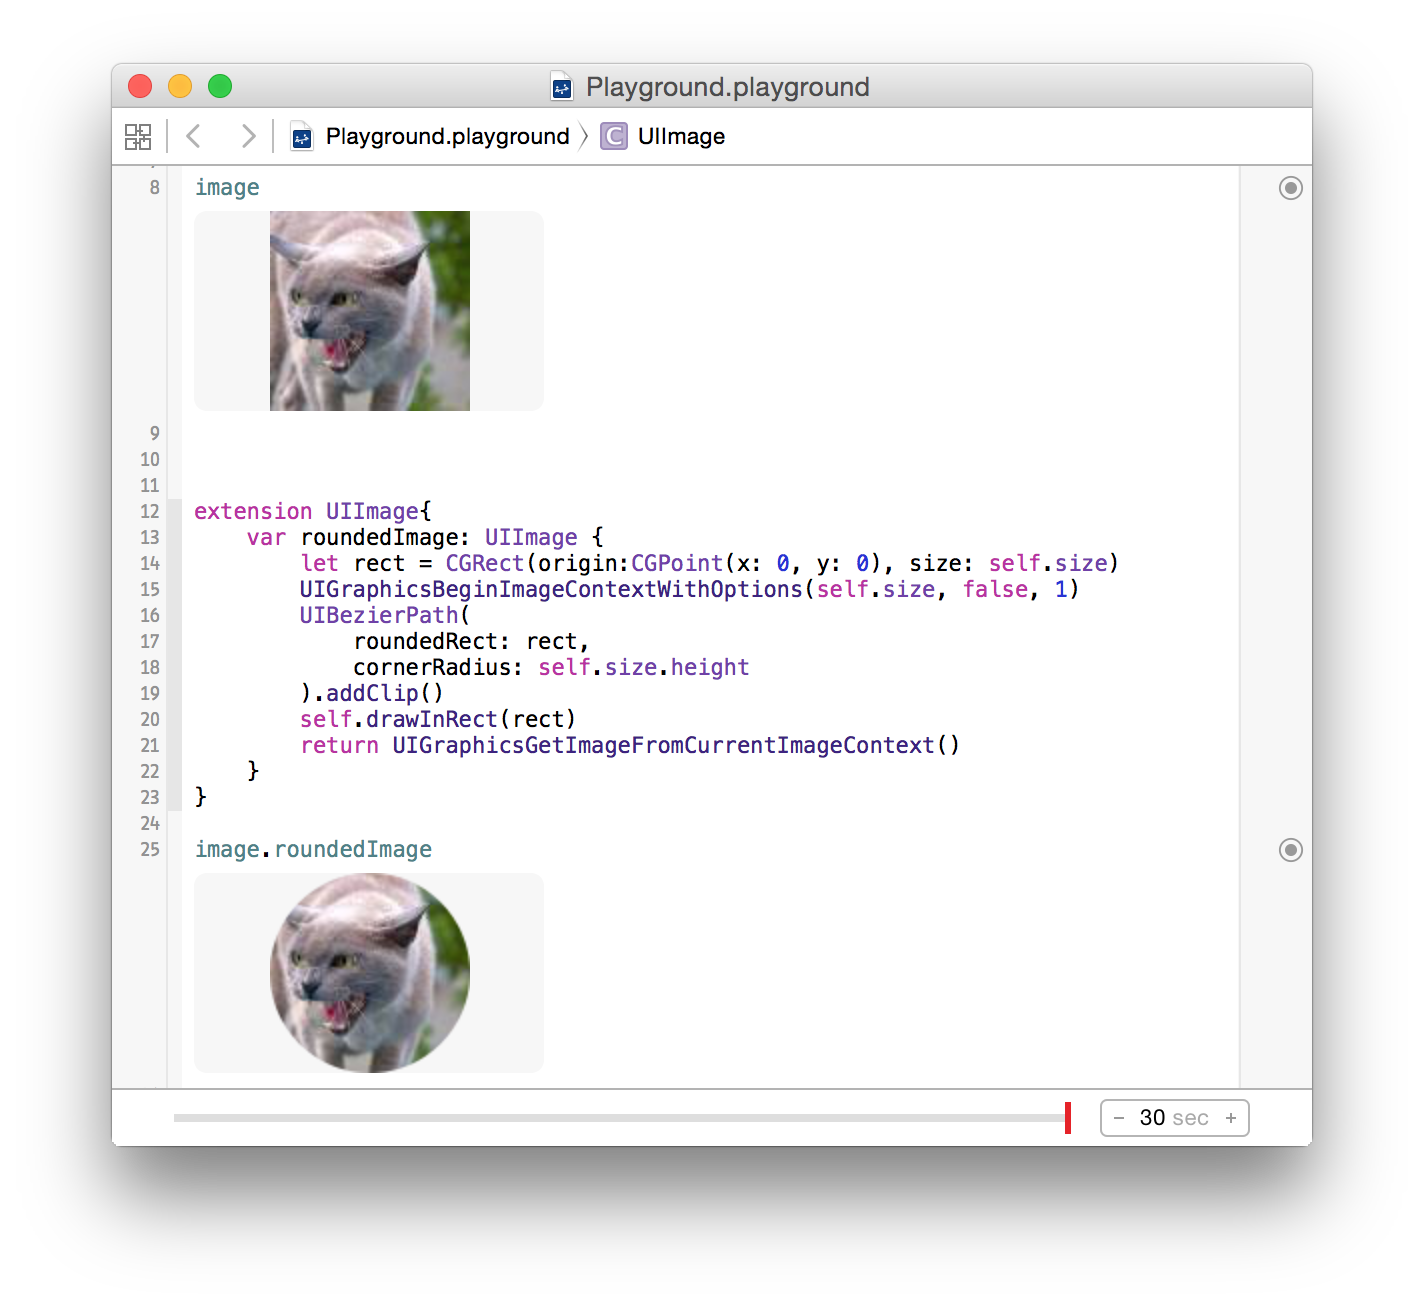
I created an UIImage-extension in swift, based on @epatel's great answer:

extension UIImage{
    var roundedImage: UIImage {
        let rect = CGRect(origin:CGPoint(x: 0, y: 0), size: self.size)
        UIGraphicsBeginImageContextWithOptions(self.size, false, 1)
        defer { 
            // End context after returning to avoid memory leak
            UIGraphicsEndImageContext() 
        }
       
        UIBezierPath(
            roundedRect: rect,
            cornerRadius: self.size.height
            ).addClip()
        self.drawInRect(rect)
        return UIGraphicsGetImageFromCurrentImageContext()
    }
}

Tested in a storyboard:

storyboard

Seidule answered 31/8, 2015 at 3:8 Comment(8)
Great.. I would like to make a small change regarding the scaling of rounded image. If you use the code as it is it will affect image resolution. So I made a small change in the code as given; let window = UIApplication.sharedApplication().windows[0]; UIGraphicsBeginImageContextWithOptions(self.size, false, window.screen.scale)Hartnett
Shouldn't the cornerRadius be self.size.height / 2?Spelter
@IulianOnofrei that makes perfect sense to me :)Differentiable
I have been searching for something like this forever. The only issue now is that, since I use it in an animated (by tvOS) UIImageView, I get a dark background outside the corners, but only when focused (which scales the image). Not sure from where it comes out, I checked both Storyboard and code.Szczecin
@AugustinePA according to the docs, you can just pass 0 in the scale option and the system will get current scale for you.Cinerarium
@ W1nged D0om - Thanks.Hartnett
Warning!!! It will cause a memory leak! You have to End the Context before "return" Instead of Line 21 (return UIGraphicsGetImageFromCurrentImageContext.......) let img = UIGraphicsGetImageFromCurrentImageContext()! UIGraphicsEndImageContext() return imgCinelli
@YuraBuyaroff I've edited the answer to fix the memory leak.Suspense
B
15

The problem was the use of CGImageCreateWithMask which returned an all black image. The solution I found was to use CGContextClipToMask instead:

CGContextRef mainViewContentContext;
CGColorSpaceRef colorSpace;

colorSpace = CGColorSpaceCreateDeviceRGB();

// create a bitmap graphics context the size of the image
mainViewContentContext = CGBitmapContextCreate (NULL, targetSize.width, targetSize.height, 8, 0, colorSpace, kCGImageAlphaPremultipliedLast);

// free the rgb colorspace
CGColorSpaceRelease(colorSpace);    

if (mainViewContentContext==NULL)
    return NULL;

CGImageRef maskImage = [[UIImage imageNamed:@"mask.png"] CGImage];
CGContextClipToMask(mainViewContentContext, CGRectMake(0, 0, targetSize.width, targetSize.height), maskImage);
CGContextDrawImage(mainViewContentContext, CGRectMake(thumbnailPoint.x, thumbnailPoint.y, scaledWidth, scaledHeight), self.CGImage);


// Create CGImageRef of the main view bitmap content, and then
// release that bitmap context
CGImageRef mainViewContentBitmapContext = CGBitmapContextCreateImage(mainViewContentContext);
CGContextRelease(mainViewContentContext);

// convert the finished resized image to a UIImage 
UIImage *theImage = [UIImage imageWithCGImage:mainViewContentBitmapContext];
// image is retained by the property setting above, so we can 
// release the original
CGImageRelease(mainViewContentBitmapContext);

// return the image
return theImage;
Biotype answered 30/3, 2009 at 20:0 Comment(0)
N
14

Extending Besi's excellent answer, with correct scale, in Swift 4:

extension UIImage {

    public func rounded(radius: CGFloat) -> UIImage {
        let rect = CGRect(origin: .zero, size: size)
        UIGraphicsBeginImageContextWithOptions(size, false, 0)
        UIBezierPath(roundedRect: rect, cornerRadius: radius).addClip()
        draw(in: rect)
        return UIGraphicsGetImageFromCurrentImageContext()!
    }

}
Newspaperwoman answered 2/8, 2018 at 16:7 Comment(0)
T
4

You aren't actually doing anything other than scaling there. What you need to do is to "mask" the corners of the image by clipping it with a CGPath. For instance -

 - (void)drawRect:(CGRect)rect {
    CGContextRef context = UIGraphicsGetCurrentContext();
    CGContextBeginTransparencyLayerWithRect(context, self.frame, NULL);
    CGContextSetRGBFillColor(context, 1.0, 1.0, 1.0, 1.0);  
    CGFloat roundRadius = (radius) ? radius : 12.0;
    CGFloat minx = CGRectGetMinX(self.frame), midx = CGRectGetMidX(self.frame), maxx = CGRectGetMaxX(self.frame);
    CGFloat miny = CGRectGetMinY(self.frame), midy = CGRectGetMidY(self.frame), maxy = CGRectGetMaxY(self.frame);

    // draw the arcs, handle paths
    CGContextMoveToPoint(context, minx, midy);
    CGContextAddArcToPoint(context, minx, miny, midx, miny, roundRadius);
    CGContextAddArcToPoint(context, maxx, miny, maxx, midy, roundRadius);
    CGContextAddArcToPoint(context, maxx, maxy, midx, maxy, roundRadius);
    CGContextAddArcToPoint(context, minx, maxy, minx, midy, roundRadius);
    CGContextClosePath(context);
    CGContextDrawPath(context, kCGPathFill);
    CGContextEndTransparencyLayer(context);
}

I suggest checking out the Quartz 2D programming guide or some other samples.

Threephase answered 4/11, 2008 at 17:16 Comment(1)
the first part of my code is scaling, but the second part try to mask the image with CGImageCreateWithMask. The problem is CGImageCreateWithMask returns null and I don't know why...Biotype
G
4
static void addRoundedRectToPath(CGContextRef context, CGRect rect, float ovalWidth, float ovalHeight)
{
  float fw, fh;
  if (ovalWidth == 0 || ovalHeight == 0) {
    CGContextAddRect(context, rect);
    return;
  }
  CGContextSaveGState(context);
  CGContextTranslateCTM (context, CGRectGetMinX(rect), CGRectGetMinY(rect));
  CGContextScaleCTM (context, ovalWidth, ovalHeight);
  fw = CGRectGetWidth (rect) / ovalWidth;
  fh = CGRectGetHeight (rect) / ovalHeight;
  CGContextMoveToPoint(context, fw, fh/2);
  CGContextAddArcToPoint(context, fw, fh, fw/2, fh, 1);
  CGContextAddArcToPoint(context, 0, fh, 0, fh/2, 1);
  CGContextAddArcToPoint(context, 0, 0, fw/2, 0, 1);
  CGContextAddArcToPoint(context, fw, 0, fw, fh/2, 1);
  CGContextClosePath(context);
  CGContextRestoreGState(context);
}

+ (UIImage *)imageWithRoundCorner:(UIImage*)img andCornerSize:(CGSize)size
{
    UIImage * newImage = nil;

    if( nil != img)
    {
       @autoreleasepool {
        int w = img.size.width;
        int h = img.size.height;

        CGColorSpaceRef colorSpace = CGColorSpaceCreateDeviceRGB();
        CGContextRef context = CGBitmapContextCreate(NULL, w, h, 8, 4 * w, colorSpace, kCGImageAlphaPremultipliedFirst);

        CGContextBeginPath(context);
        CGRect rect = CGRectMake(0, 0, img.size.width, img.size.height);
        addRoundedRectToPath(context, rect, size.width, size.height);
        CGContextClosePath(context);
        CGContextClip(context);

        CGContextDrawImage(context, CGRectMake(0, 0, w, h), img.CGImage);

        CGImageRef imageMasked = CGBitmapContextCreateImage(context);
        CGContextRelease(context);
        CGColorSpaceRelease(colorSpace);
        [img release];

        newImage = [[UIImage imageWithCGImage:imageMasked] retain];
        CGImageRelease(imageMasked);

       }
    }

  return newImage;
}
Gariepy answered 16/5, 2012 at 13:16 Comment(0)
V
2

I think this could be very related: In iOS 11 there is a very elgant way of rounding each single corner of a (Image)View.

let imageView = UIImageView(image: UIImage(named: "myImage"))    
imageView.layer.maskedCorners = [.layerMinXMinYCorner, .layerMaxXMinYCorner]
imageView.layer.cornerRadius = 10.0
Viewable answered 12/9, 2018 at 10:57 Comment(0)
G
2

I liked the answer of @samwize, however it caused me nasty memory leaks when used with collectionView. To fix it I found that UIGraphicsEndImageContext() was missing

extension UIImage {
    /**
     Rounds corners of UIImage
     - Parameter proportion: Proportion to minimum paramter (width or height)
                             in order to have the same look of corner radius independetly
                             from aspect ratio and actual size
     */
    func roundCorners(proportion: CGFloat) -> UIImage {
        let minValue = min(self.size.width, self.size.height)
        let radius = minValue/proportion
        
        let rect = CGRect(origin: CGPoint(x: 0, y: 0), size: self.size)
        UIGraphicsBeginImageContextWithOptions(self.size, false, 1)
        UIBezierPath(roundedRect: rect, cornerRadius: radius).addClip()
        self.draw(in: rect)
        let image = UIGraphicsGetImageFromCurrentImageContext() ?? self
        UIGraphicsEndImageContext()
        return image
    }
}

Feel free to just pass the radius instead of proportion. proportion is used because I have collectionView scroll and images have different sizes, therefore when using constant radius it actually looks different in terms of proprtions (example: two images, one is 1000x1000 and another 2000x2000, corner radius of 30 will look different on each one of them)

So if you do image.roundCorners(proportion: 20) all the pictures look like the have the same corner radius.

This answer is also an updated version.

Gribble answered 12/7, 2020 at 15:7 Comment(0)
D
1

The reason it worked with clipping, not with masking, seems to be the color space.

Apple Documentation's below.

mask A mask. If the mask is an image, it must be in the DeviceGray color space, must not have an alpha component, and may not itself be masked by an image mask or a masking color. If the mask is not the same size as the image specified by the image parameter, then Quartz scales the mask to fit the image.

Darr answered 15/10, 2009 at 13:57 Comment(0)
H
1

Hi guys try this code,

+ (UIImage *)roundedRectImageFromImage:(UIImage *)image withRadious:(CGFloat)radious {

if(radious == 0.0f)
    return image;

if( image != nil) {

    CGFloat imageWidth = image.size.width;
    CGFloat imageHeight = image.size.height;

    CGRect rect = CGRectMake(0.0f, 0.0f, imageWidth, imageHeight);
    UIWindow *window = [[[UIApplication sharedApplication] windows] objectAtIndex:0];
    const CGFloat scale = window.screen.scale;
    UIGraphicsBeginImageContextWithOptions(rect.size, NO, scale);

    CGContextRef context = UIGraphicsGetCurrentContext();

    CGContextBeginPath(context);
    CGContextSaveGState(context);
    CGContextTranslateCTM (context, CGRectGetMinX(rect), CGRectGetMinY(rect));
    CGContextScaleCTM (context, radious, radious);

    CGFloat rectWidth = CGRectGetWidth (rect)/radious;
    CGFloat rectHeight = CGRectGetHeight (rect)/radious;

    CGContextMoveToPoint(context, rectWidth, rectHeight/2.0f);
    CGContextAddArcToPoint(context, rectWidth, rectHeight, rectWidth/2.0f, rectHeight, radious);
    CGContextAddArcToPoint(context, 0.0f, rectHeight, 0.0f, rectHeight/2.0f, radious);
    CGContextAddArcToPoint(context, 0.0f, 0.0f, rectWidth/2.0f, 0.0f, radious);
    CGContextAddArcToPoint(context, rectWidth, 0.0f, rectWidth, rectHeight/2.0f, radious);
    CGContextRestoreGState(context);
    CGContextClosePath(context);
    CGContextClip(context);

    [image drawInRect:CGRectMake(0.0f, 0.0f, imageWidth, imageHeight)];

    UIImage *newImage = UIGraphicsGetImageFromCurrentImageContext();
    UIGraphicsEndImageContext();

    return newImage;
}

return nil;
}

Cheers !!!

Hartnett answered 12/12, 2012 at 9:23 Comment(0)
G
1

It's very easy to create a rounded image when you make use of the image dimension.

cell.messageImage.layer.cornerRadius = image.size.width / 2
cell.messageImage.layer.masksToBounds = true
Germiston answered 25/2, 2017 at 9:8 Comment(1)
Should be the frame sizeTourer
T
1

Found out the best and simple way of doing it is as follows (no answer did that):

UIImageView *imageView;

imageView.layer.cornerRadius = imageView.frame.size.width/2.0f;
imageView.layer.masksToBounds = TRUE;

Pretty simple and done this right.

Tourer answered 12/7, 2017 at 9:15 Comment(0)
A
0

See here... IMO unless you absolutely need to do it in code, just overlay an image on top.

Something along the lines of...

- (void)drawRect:(CGRect)rect 
{
    // Drawing code
    [backgroundImage drawInRect:rect];
    [buttonOverlay drawInRect:rect];    
}
Abdulabdulla answered 4/11, 2008 at 17:11 Comment(2)
I try to avoid doing it in code by using CGImageCreateWithMask, but it always returns null.Biotype
I mean literally draw another UIImage from a resource over top of it to round the corner. See the edit...Abdulabdulla
A
0

For Creating a Round Corner image we can use quartzcore.

First How to add QuartzCore framework?

Click  project -Targets
    ->project
       ->BuildPhase
           ->Link Binary with Libraries
             ->Then click + symbol finally select from list and add it

or else

Click  project -Targets
    ->Targets
      ->general
        ->Linked Frameworks and Libraries
          ->Then click + symbol finally select from list and add the QuartzCore framework

Now import

#import <QuartzCore/QuartzCore.h> 

in your ViewController

Then in viewDidLoad method

self.yourImageView.layer.cornerRadius = 5.0;
self.yourImageView.layer.borderWidth = 1.0f;
self.yourImageView.layer.borderColor = [UIColor blackColor].CGColor;
self.yourImageView.layer.masksToBounds = YES;
Augie answered 31/8, 2015 at 9:39 Comment(1)
I edited my answer please check it now.Don't down vote.Augie
A
0

I was struggling to round the corners of a UIImage box in my storyboard. I had a IBOutlet for my UIImage called image. After reading a bunch of posts on here, I simply added 3 lines and that worked perfectly.

import UIKit

Then in viewDidLoad:

image.layer.cornerRadius = 20.0

image.layer.masksToBounds = true

This is for iOS 11.1 in Xcode 9.

Asyllabic answered 27/11, 2017 at 19:16 Comment(0)

© 2022 - 2024 — McMap. All rights reserved.