Change background color of ListTile upon selection in Flutter
Asked Answered
H

16

71

I've made a ListView in Flutter, but now I have some ListTiles in this ListView that can be selected. Upon selection, I want the background color to change to a color of my choice. I don't know how to do that. In the docs they mention that a ListTile has a property style. However, when I try to add that (as in third last line in the code below), this style property gets a squiggly red line underneath and the compiler tells me that The named parameter 'style' isn't defined.

Widget _buildRow(String string){
  return new ListTile(
    title: new Text(string),
    onTap: () => setState(() => toggleSelection(string)),
    selected: selectedFriends.contains(string),
    style: new ListTileTheme(selectedColor: Colors.white,),
  );
}
Hartz answered 17/3, 2018 at 1:24 Comment(1)
E
20

It's not ListTile that has the style property. But ListTileTheme. ListTileTheme is an inheritedWidget. And like others, it's used to pass down data (such as theme here).

To use it, you have to wrap any widget above your ListTile with a ListTileTheme containing the desired values.

ListTile will then theme itself depending on the closest ListTileTheme instance.

Esker answered 17/3, 2018 at 1:29 Comment(2)
Unfortunately, ListTileTheme doesn't have a backgroundColor property, just a selectedColor property. this.dense = false, this.style = ListTileStyle.list, this.selectedColor, this.iconColor, this.textColor, this.contentPadding, Edit: RIP FormattingAlurd
this is the marked correct answer, however, am still not sure how to change the background colour.Rosalynrosalynd
D
55

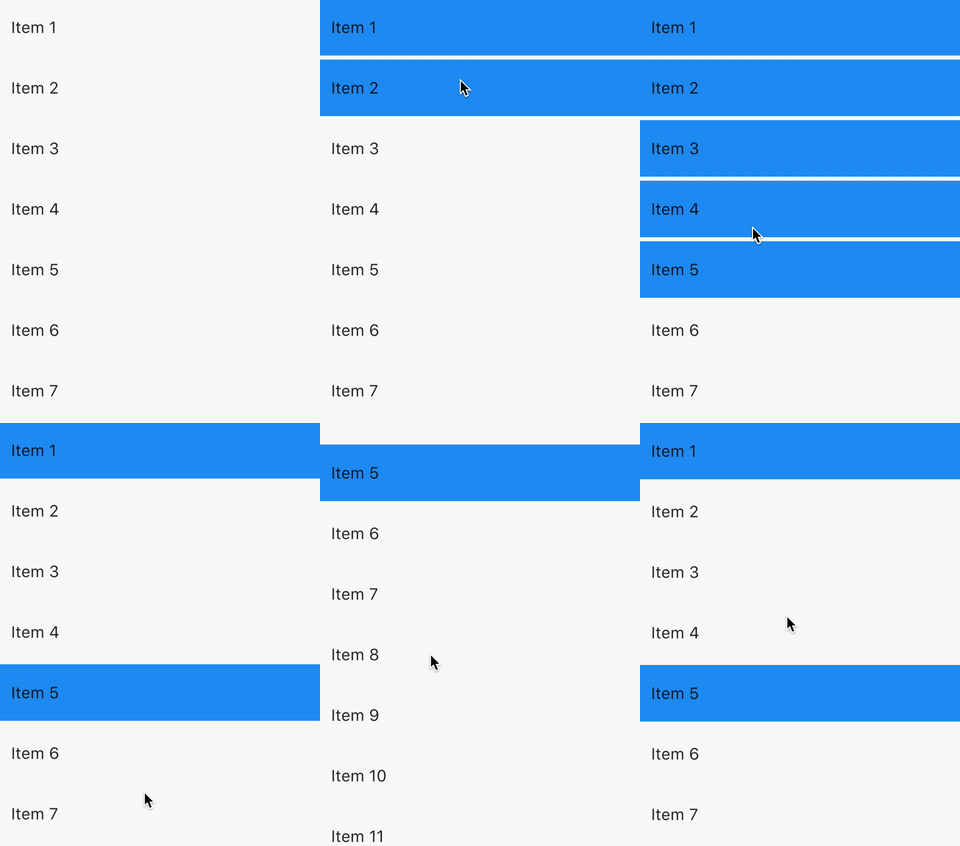
Screenshot:

enter image description here


Short answer:

ListTile(
  tileColor: isSelected ? Colors.blue : null, 
)

Full Code:

// You can also use `Map` but for the sake of simplicity I'm using two separate `List`.
final List<int> _list = List.generate(20, (i) => i);
final List<bool> _selected = List.generate(20, (i) => false); // Fill it with false initially
  
Widget build(BuildContext context) {
  return Scaffold(
    body: ListView.builder(
      itemBuilder: (_, i) {
        return ListTile(
          tileColor: _selected[i] ? Colors.blue : null, // If current item is selected show blue color
          title: Text('Item ${_list[i]}'),
          onTap: () => setState(() => _selected[i] = !_selected[i]), // Reverse bool value
        );
      },
    ),
  );
}
Dialect answered 24/10, 2019 at 15:31 Comment(4)
How to select only one at the time and deselect the previous selected?Perceptive
@Perceptive Create a variable int selectedIndex = -1, and then check if (index == selectedIndex) approach. If you didn't get that, please ask a separate questions, I'll answer it.Dialect
I tried to implement your idea, but I think I did not understood it well. Can you have a look in this post #64655861 ThanksPerceptive
@Perceptive I was about to write the answer now, but just saw someone else already did that and he used the same approach I mentioned :)Dialect
F
44

I was able to change the background color of the ListTile using a BoxDecoration inside Container:

ListView (
    children: <Widget>[
        new Container (
            decoration: new BoxDecoration (
                color: Colors.red
            ),
            child: new ListTile (
                leading: const Icon(Icons.euro_symbol),
                title: Text('250,00')
            )
        )
    ]
)
Flagg answered 6/7, 2018 at 20:14 Comment(2)
The color property of Container() will suffice too.Manualmanubrium
The downside of this is that you won't have any splash or hover effects. To fix it just wrap the tile with Theme and override focusColorNoria
G
31

If you also need an onTap listener with a ripple effect, you can use Ink:

ListView(
  children: [
    Ink(
      color: Colors.lightGreen,
      child: ListTile(
        title: Text('With lightGreen background'),
        onTap: () { },
      ),
    ),
  ],
);

Ripple Effect

Gorrian answered 29/12, 2018 at 22:5 Comment(9)
@Sauerkraut do you care about being more specific what is not working? It certainly does for me..Gorrian
I've copied and paste your code, and when I click on item the color not is showed...Sauerkraut
@Sauerkraut what do you mean? the color should ALWAYS be visible. On tap only the ripple effect should be added. SO what exactly is your problem.Gorrian
If I was wrong I'll remove my comment. I want show ripple effect when user click on the option, I've copied it and not happens. I don't want put color, just effect.Sauerkraut
@Sauerkraut the ListTile already includes a InkWell, which is the only thing you need for a ripple effect. So if you have no ripple effect in a ListTile with an onTap handler. you are doing something very strange. (The Ink widget from my class is only required if you want a background color, because when using e.g. Container with color the ripple effect would be drawn below that color, and hence not being visible). If you don't change your background color, and have a onTap in your ListTile or InkWell you should have a ripple effect.Gorrian
I think this is the best solution because It not only change background color for ListTile, but also keep ripple effect when tap on the ListTileUncontrollable
Remember at least on of the ancestors need to be a Material widget, otherwise this will not workFong
There is no need to wrap it with Ink widget. As soon as you add onTap listener, the tile should show the ripple effect as expected.Inarticulate
@Inarticulate not if you have a decoratedbox or container with background color.Gorrian
E
20

It's not ListTile that has the style property. But ListTileTheme. ListTileTheme is an inheritedWidget. And like others, it's used to pass down data (such as theme here).

To use it, you have to wrap any widget above your ListTile with a ListTileTheme containing the desired values.

ListTile will then theme itself depending on the closest ListTileTheme instance.

Esker answered 17/3, 2018 at 1:29 Comment(2)
Unfortunately, ListTileTheme doesn't have a backgroundColor property, just a selectedColor property. this.dense = false, this.style = ListTileStyle.list, this.selectedColor, this.iconColor, this.textColor, this.contentPadding, Edit: RIP FormattingAlurd
this is the marked correct answer, however, am still not sure how to change the background colour.Rosalynrosalynd
O
13

This is no more pain!

Now you can use tileColor and selectedTileColor property of ListTile widget to achieve it.

Have a look at this Issue #61347 which got merged into master.

Oomph answered 15/7, 2020 at 11:4 Comment(2)
This should be the accepted answer if you are running the master branch. The stable and beta Flutter branches do not support this as of July 29, 2020.Inurn
The only problem I encounter that the splash is removed using tileColor. Otherwise it is the best answer.Enjambment
T
12

Wrap ListTile in an Ink.

Ink(
  color: isSelected ? Colors.blue : Colors.transparent,
  child: ListTile(title: Text('hello')),
)
Tee answered 20/3, 2020 at 4:42 Comment(3)
I think this is actually a better answer since Ink communicates well that it will give the child widget a color.Upbeat
Also, Ink paints below the material splash effects, while Container paints above :)Tee
I did try this but I noticed that when using Ink and a scrollable listview the ink stays visible even when the element is out of the view area. I decided to go with a container instead because of that reason.Upbeat
H
8

An easy way would be to store the initial index in a variable and then change the state of that variable whenever tapped.

   ListView.builder(
              shrinkWrap: true,
              itemCount: 4,
              itemBuilder: (context, index) {
                return Container( //I have used container for this example. [not mandatory]
                    color: tappedIndex == index ? Colors.blue : Colors.grey,
                    child: ListTile(
                        title: Center(
                      child: Text('${index + 1}'),
                    ),onTap:(){
                          setState((){
                            tappedIndex=index;
                          });
                        }));
              })

full code:

import 'package:flutter/material.dart';

void main() {
  runApp(MyApp());
}

class MyApp extends StatelessWidget {
  @override
  Widget build(BuildContext context) {
    return MaterialApp(
      debugShowCheckedModeBanner: false,
      home: MyWidget(),
    );
  }
}

class MyWidget extends StatefulWidget {
  @override
  MyWidgetState createState() => MyWidgetState();
}

class MyWidgetState extends State<MyWidget> {
  late int tappedIndex;

  @override
  void initState() {
    super.initState();
    tappedIndex = 0;
  }

  @override
  Widget build(BuildContext context) {
    return Scaffold(
        body: Column(
            mainAxisAlignment: MainAxisAlignment.center,
            crossAxisAlignment: CrossAxisAlignment.center,
            children: [
          ListView.builder(
              shrinkWrap: true,
              itemCount: 4,
              itemBuilder: (context, index) {
                return Container(
                    color: tappedIndex == index ? Colors.blue : Colors.grey,
                    child: ListTile(
                        title: Center(
                      child: Text('${index + 1}'),
                    ),onTap:(){
                          setState((){
                            tappedIndex=index;
                          });
                        }));
              })
        ]));
  }
}

Dartpad link: https://dartpad.dev/250ff453b97cc79225e8a9c657dffc8a

Herrod answered 7/7, 2020 at 18:9 Comment(0)
I
6

Unfortunately, ListTile doesn't have background-color property. Hence, we have to simply wrap the ListTile widget into a Container/Card widget and then we can use its color property. Further, We have to provide SizedBox widget with some height to separate the same colored ListTiles.

I am sharing that worked for me :)

I hope it will definitely help you.

Screenshot: see how it works

            return 
              ListView(
                children: snapshot.data.documents.map((doc) {
                  return Column(children: [
                    Card(
                      color: Colors.grey[200],
                       child: ListTile(
                      leading: Icon(Icons.person),
                      title: Text(doc.data['coursename'], style: TextStyle(fontSize: 22),),
                      subtitle: Text('Price: ${doc.data['price']}'),
                      trailing: IconButton(
                        icon: Icon(Icons.delete),
                        onPressed: () async {
                          await Firestore.instance
                              .collection('courselist')
                              .document(doc.documentID)
                              .delete();
                        },
                      ),
                  ),
                    ),
                 SizedBox(height: 2,)
                  ],);
                }).toList(),[enter image description here][1]
              );
Incretion answered 6/6, 2020 at 3:51 Comment(0)
F
5

I know that the original question has been answered, but I wanted to add how to set the color of ListTile while the tile is being pressed. The property you are looking for is called highlight color and it can be set by wrapping the ListTile in a Theme widget, like this:

Theme(
  data: ThemeData(
    highlightColor: Colors.red,
  ),
  child: ListTile(...),
  )
);

Note: if the Theme widget resets the font of text elements inside the ListTile, just set its fontFamily property to the same value You used in other places in your app.

Fann answered 25/3, 2020 at 16:11 Comment(0)
I
3

I have used as

ListTile(
                title: Text('Receipts'),
                leading: Icon(Icons.point_of_sale),
                tileColor: Colors.blue,
              ),  
Iridescent answered 8/12, 2020 at 12:10 Comment(1)
This not a correct answer based on old questions requirementsMethodism
H
3

enter image description here>Make variable

        int slectedIndex;

on tap

     onTap:(){
                      setState(() {
                      selectedIndex=index;
                     })

Tile property

            color:selectedIndex==index?Colors.red :Colors.white,

Same As in List View Builder

        ListView.builder(
                          itemCount: 10,
                          scrollDirection:Axis.vertical,
                          itemBuilder: (context,index)=>GestureDetector(
                            onTap:(){
                              setState(() {
                                selectedIndex=index;
                              });
                              
                            } ,
                            child: Container(
                              margin: EdgeInsets.all(8),
                              decoration: BoxDecoration(
                                borderRadius: BorderRadius.circular(5),
                                color:selectedIndex==index?Colors.red :Colors.white,
                              ),)
Heptavalent answered 3/1, 2022 at 16:32 Comment(0)
C
1

Your answer has been answered in Github.

Card(
  color: Colors.white,
  shape: ContinuousRectangleBorder(
    borderRadius: BorderRadius.zero,
  ),
  borderOnForeground: true,
  elevation: 0,
  margin: EdgeInsets.fromLTRB(0,0,0,0),
  child: ListTile(
    // ...
  ),
)
Carn answered 10/9, 2020 at 13:52 Comment(1)
From Review: Can you also please provide the explanation along with this code? Links may get broken, and your answer may get difficult to understand in the future.Scrounge
K
1

There are two props: tileColor and selectedTileColor.

tileColor - when the tile/row is Not selected;

selectedTileColor - when the tile/row is selected

ListTile(
        selected: _isSelected,
        tileColor: Colors.blue,
        selectedTileColor: Colors.greenAccent,
)
Kilderkin answered 2/3, 2021 at 13:17 Comment(0)
A
0

I was able to change the Background Color of ListTile by making it a child of Container Widget and adding color to the Container Widget.

Here drawerItem is the model class which holds the isSelected value. Color of background depends on isSelected value.

Note: For unselected items keep the color Transparent so you will still get the ripple effect.

 for (var i = 0; i < drawerItems.length; i++) {
      var drawerItem = drawerItems[i];
      drawerOptions.add(new Container(
        color: drawerItem.isSelected
            ? Colors.orangeAccent
            : Colors.transparent,
        child: new ListTile(
          title: new Row(
            mainAxisAlignment: MainAxisAlignment.spaceBetween,
            children: <Widget>[Text(drawerItem.title), drawerItem.count],
          ),
          leading: SvgPicture.asset(
            drawerItem.icon,
            width: 34,
            height: 34,
          ),
          onTap: () {
            _handleNavigation(i);
          },
          selected: drawerItem.isSelected,
        ),
      ));
    }

enter image description here

Arlberg answered 14/2, 2019 at 8:8 Comment(1)
ripple effect is lostStraus
B
0

Use the Material widget with InkWell Widget then put inside it the ListTile as shown here in this example:

return Material(
      color: Colors.white,
      child: ListTile(
          hoverColor: Colors.greenAccent,
          onLongPress: longPressCallback,
          title: Text(
            '$taskTitle',
            style: TextStyle(
                decoration: isChecked
                    ? TextDecoration.lineThrough
                    : TextDecoration.none),
          ),
          trailing: Checkbox(
              activeColor: Colors.lightBlueAccent,
              value: isChecked,
              onChanged: checkboxCallback)),
    );
Benoni answered 12/7, 2022 at 14:6 Comment(0)
E
0

Other people are telling to wrap your ListTile into a Container, but there is a inbuilt property, you can use tileColor Property. Just do :

ListTile(
   tileColor : Colors.Red,
   ---other properties---
)
Erepsin answered 28/11, 2023 at 14:50 Comment(0)

© 2022 - 2024 — McMap. All rights reserved.