Android color selector with radio buttons
Asked Answered
D

3

3

I would like to create a group of radio buttons to pick a color. Something like this:

enter image description here

How can I achieve something like this? I didn't find any color property on the original RadioButton. Do I have to create a custom control? If yes, can someone just hint me on the basic steps so I can try to some new research? I'm very new to Android, and trying to learn by doing...

Disembody answered 29/12, 2015 at 17:38 Comment(1)
create your custom radio button or use imageView or imageButton or button with drawable.Stuart
C
5

You can surely try custom radio buttons or you could simply use or inflate views to achieve this kind of color picker.

with xml: you will need to create two drawable resource files in the drawable folder. First goes like this,

<shape xmlns:android="http://schemas.android.com/apk/res/android"
android:shape="oval">

<solid android:color="#e91e63" />
<size
    android:width="48dp"
    android:height="48dp" />

This is applicable when you haven't received any click on the view (clickable). The second file applies when we detect a click.

    xmlns:android="http://schemas.android.com/apk/res/android"
android:shape="oval">

<solid android:color="#e91e63" />
<size
    android:width="53dp"
    android:height="53dp" />
<stroke
    android:width="5dp"
    android:color="#d2d1d2" />

Now, in the activity one needs to set the background drawable to the view (be it image button or imageview). This goes like this (just an example):

public class MainActivity extends AppCompatActivity {
private ImageButton img;
private boolean isSelected = false;

@Override
protected void onCreate(Bundle savedInstanceState) {
    super.onCreate(savedInstanceState);
    setContentView(R.layout.activity_main);

    img = (ImageButton) findViewById(R.id.img);
    img.setClickable(true);
    img.setBackground(getDrawable(R.drawable.unselected_circle));
    img.setOnClickListener(new View.OnClickListener() {
        @Override
        public void onClick(View v) {
            img.startAnimation(AnimationUtils.loadAnimation(getBaseContext(), android.R.anim.fade_in));
            if (isSelected) {
                isSelected = false;
                img.setBackground(getDrawable(R.drawable.unselected_circle));
            } else {
                isSelected = true;
                img.setBackground(getDrawable(R.drawable.selected_circle));
            }
        }
    });
}

}

and the activity_main layout looks something like this:

<RelativeLayout xmlns:android="http://schemas.android.com/apk/res/android"
xmlns:tools="http://schemas.android.com/tools"
android:layout_width="match_parent"
android:layout_height="match_parent"
android:id="@+id/viewGroup"
tools:context="com.android.empty.MainActivity">

<ImageButton
    android:layout_width="wrap_content"
    android:layout_height="wrap_content"
    android:padding="10dp"
    android:layout_margin="20dp"
    android:clickable="true"
    android:id="@+id/img"/>

However, with this method one will end up creating multiple drawables for different colors. To avoid that, we can create the drawables programmatically, writing code once and using the same for different colors using setColor(int color) method:

public class MainActivity extends AppCompatActivity {
private ImageButton img;
private boolean isSelected = false;

@Override
protected void onCreate(Bundle savedInstanceState) {
    super.onCreate(savedInstanceState);
    setContentView(R.layout.activity_main);

    final GradientDrawable unselected = new GradientDrawable();
    unselected.setShape(GradientDrawable.OVAL);
    unselected.setColor(Color.parseColor("#e91e63"));
    unselected.setSize(144, 144);

    final GradientDrawable selected = new GradientDrawable();
    selected.setShape(GradientDrawable.OVAL);
    selected.setColor(Color.parseColor("#E91E63"));
    selected.setSize(159, 159);
    selected.setStroke(15, Color.parseColor("#D2D1D2"));

    img = (ImageButton) findViewById(R.id.img);
    img.setBackground(unselected);
    img.setOnClickListener(new View.OnClickListener() {
        @Override
        public void onClick(View v) {
            img.startAnimation(AnimationUtils.loadAnimation(getBaseContext(), android.R.anim.fade_in));
            if (isSelected) {
                isSelected = false;
                img.setBackground(unselected);
            } else {
                isSelected = true;
                img.setBackground(selected);
            }
        }
    });
}

}

The result looks something like this

Note: This example tells only the way to achieve one selector like the one mentioned in the question. To create multiple selectors, one needs to inflate the view (Image Button) using LayoutInflater class.

Cacciatore answered 29/12, 2015 at 21:36 Comment(1)
Thank you so much for such a detailed answer. It would take quite a time for me to assembly so many concepts together... I learned a lot.Disembody
N
1

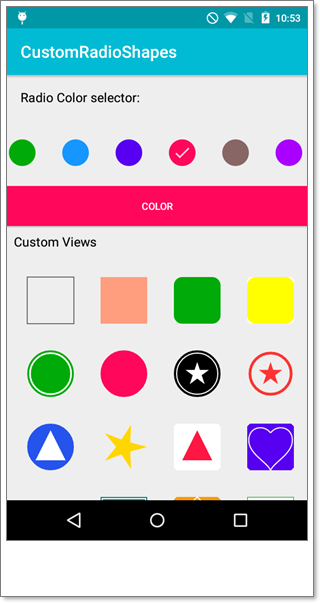
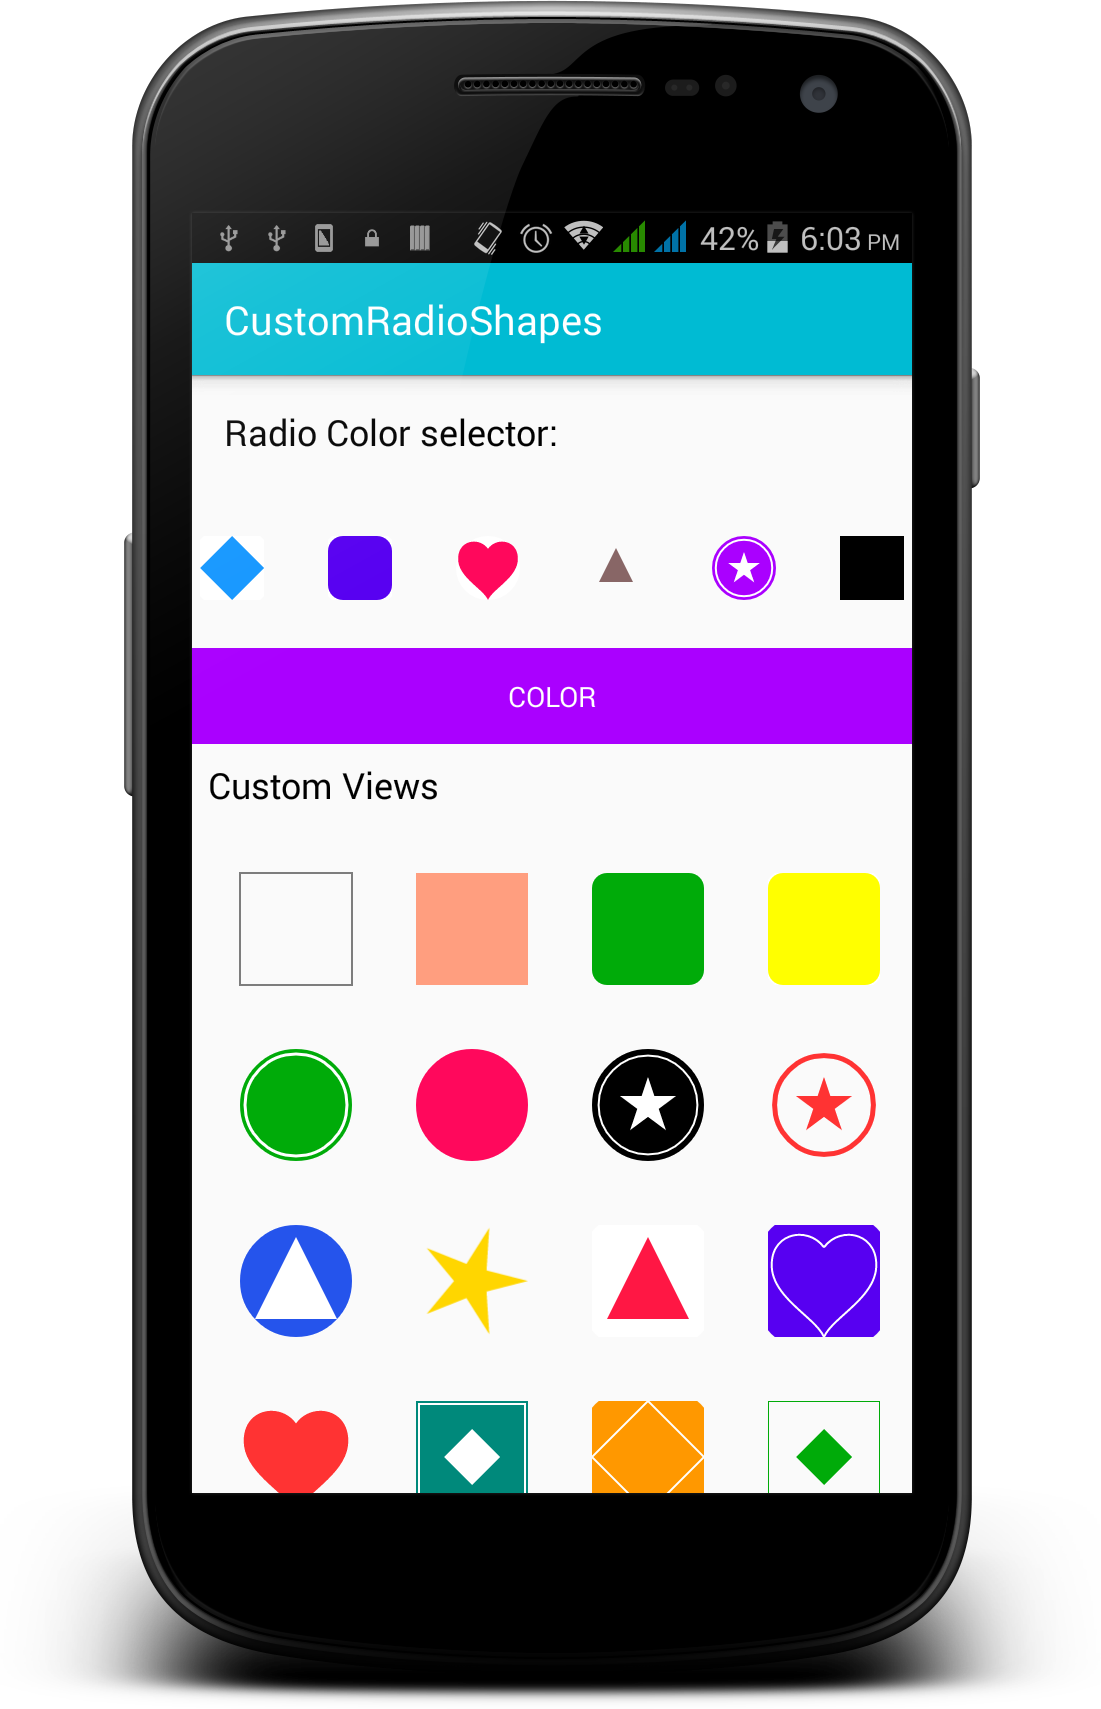
I Was stuck in the same problem to use radio buttons but then I tried my own hand on and created [CustomRadioShapes]1 Lib.

Simple implementation. implementation:

  1. Download release aar file from CustomRadioAndShapes/library folder
  2. In your Android Studio File-> New -> New Module -> Import .aar or .jar
  3. Select aar file and SubProject Name as CustomRadioAndShapes. Done.

enter image description here

enter image description here

Necessaries answered 14/8, 2017 at 9:8 Comment(0)
I
1

Replace Drawable in RadioButton

I found a way to use the native RadioButton. You have to create your own Drawable and Style and then you're good to go. It took me all afternoon to get it right, so dear poor soul reading this - I hope it helps.

Below is a list of all resources you would need to achieve the following:

Example of colour picker in action

  • Built on Android 13 (API level 33)
  • Tested to also work on Android 7.0 (API level 24)

drawable/colour_picker.xml

(start with the selector element if you don't care about the ripple effect when picking an option)

<?xml version="1.0" encoding="utf-8"?>
<ripple xmlns:android="http://schemas.android.com/apk/res/android"
    android:color="@android:color/white" android:radius="50dp">
    <item>
        <selector>
            <item android:drawable="@drawable/colour_picker_checked" android:state_checked="true" />
            <item android:drawable="@drawable/colour_picker_unchecked" android:state_checked="false" />
        </selector>
    </item>
</ripple>

drawable/colour_picker_checked.xml

(make sure shapes only use tint instead of color here or they will later on be broken)

<?xml version="1.0" encoding="utf-8"?>
<layer-list xmlns:android="http://schemas.android.com/apk/res/android">
    <item>
        <shape android:shape="oval" android:tint="#FFFFFF">
            <stroke android:width="5dp" />
            <solid android:color="@android:color/transparent" />
            <size android:width="50dp" android:height="50dp"/>
        </shape>
    </item>
    <item android:top="10dp" android:bottom="10dp" android:left="10dp" android:right="10dp">
        <shape android:shape="oval" android:tint="#FFFFFF">
            <solid android:width="1dp" />
        </shape>
    </item>
</layer-list>

drawable/colour_picker_unchecked.xml

(size needs to match colour_picker_checked.xml exactly or selecting options causes layout shift)

<?xml version="1.0" encoding="utf-8"?>
<layer-list xmlns:android="http://schemas.android.com/apk/res/android">
    <item>
        <shape android:shape="oval" android:tint="#FFFFFF">
            <solid android:color="@android:color/transparent" />
            <size android:width="50dp" android:height="50dp"/>
        </shape>
    </item>
    <item android:top="10dp" android:bottom="10dp" android:left="10dp" android:right="10dp">
        <shape android:shape="oval" android:tint="#FFFFFF">
            <solid android:width="1dp" />
        </shape>
    </item>
</layer-list>

values/styles.xml

(the settings will distribute and align the buttons horizontally)

    <style name="colour_picker"
        parent="Base.Widget.AppCompat.CompoundButton.RadioButton">
        <item name="android:button">@drawable/colour_picker</item>
        <item name="android:windowIsTranslucent">true</item>
        <item name="android:windowBackground">@android:color/transparent</item>
        <item name="android:windowContentOverlay">@null</item>
        <item name="android:windowNoTitle">true</item>
        <item name="android:windowIsFloating">false</item>
        <item name="android:backgroundDimEnabled">true</item>
        <item name="android:layout_width">0dp</item>
        <item name="android:layout_height">0dp</item>
        <item name="android:gravity">center</item>
        <item name="android:layout_weight">1</item>
    </style>

layout/colour_picker.xml

<LinearLayout
    android:layout_width="wrap_content"
    android:layout_height="wrap_content"
    android:gravity="center"
    android:layout_gravity="center"
    android:orientation="vertical"
    android:theme="@style/RippleStyle">

    <RadioGroup
        android:id="@+id/colour_choice"
        android:layout_width="wrap_content"
        android:layout_height="wrap_content"
        android:orientation="horizontal"
        android:paddingBottom="10dp">

        <RadioButton name="" style="@style/colour_picker" android:buttonTint="#FFFFFF"/>
        <RadioButton style="@style/colour_picker" android:buttonTint="#FF00FF"/>
    </RadioGroup>
</LinearLayout>

How to Use It

The only difficulty at this point is identifying which option was chosen. If your list of colours is fixed and you don't mind hardcoding, consider giving each RadioButton an android:id directly in the XML.

In my case, I chose to create the RadioButton objects programmatically, which lets me cross-reference the colour from a string-array resource.

String[] colourPalette = getResources().getStringArray(R.array.colour_options);
RadioGroup colourPicker = findViewById(R.id.YOUR_LAYOUT_WHERE_THIS_SHOULD_END_UP);
LayoutInflater inflater = LayoutInflater.from(this);
for (int i = 0; i < colourPalette.length; i++) {
    RadioButton colourOption = (RadioButton) inflater.inflate(R.layout.colour_picker_item,null).getRootView();
    colourOption.setId(i);
    colourOption.setButtonTintList(ColorStateList.valueOf(Color.parseColor(colourPalette[i])));
    colourPicker.addView(colourOption);
}

For this to work you need two additional resources: layout/colour_picker_item.xml

<?xml version="1.0" encoding="utf-8"?>
<RadioButton style="@style/colour_picker" />

values/colors.xml

<string-array name="colour_options">
    <item name="#FFFF00">#FFFF00</item>
    <item name="#FF0000">#FF0000</item>
</string-array>

And then in your code it's as easy as this:

colourPicker.setOnCheckedChangeListener((group, checkedId) -> {
    RadioButton colourOption = colourPicker.findViewById(checkedId);
    int colour = Color.parseColor(colourPalette[colourOption.getId()]);
    // do whatever you need to do with your picked colour
});
Incorporate answered 18/2, 2023 at 18:16 Comment(0)

© 2022 - 2024 — McMap. All rights reserved.