Material design button with border
Asked Answered
H

10

77

I know how to make Material Design button with color fill:

style="@style/Widget.AppCompat.Button.Colored"

And no-bordered transparent button:

style="@style/Widget.AppCompat.Button.Borderless.Colored"

However, is there a way to make Material design bordered (transparent inside) button? Something like below?

enter image description here

Hydra answered 23/5, 2016 at 16:6 Comment(0)
O
7

You could do this pretty easily by setting Material Design Button's style attribute to @style/Widget.MaterialComponents.Button.OutlinedButton and setting app:strokeColor attribute value to your preferred color.

example:

<com.google.android.material.button.MaterialButton
                android:text="Rounded outlined button"
                android:layout_height="wrap_content"
                android:layout_width="wrap_content"
                android:id="@+id/btnRound"
                style="@style/Widget.MaterialComponents.Button.OutlinedButton"
                app:strokeColor="@color/colorPrimaryDark"/>

References:

Overwrite answered 10/4, 2019 at 15:58 Comment(1)
Some answers were solutions for pre Material Design Button days. Now, this is the new simplest answer.Hydra
M
160

You can also use the Material Components for Android.

Add the dependency to your build.gradle:

dependencies { implementation 'com.google.android.material:material:1.3.0' }

In this case you can use the MaterialButton in your layout file:

<com.google.android.material.button.MaterialButton
   ....
   style="@style/Widget.MaterialComponents.Button.OutlinedButton"
   app:cornerRadius=".."
   app:strokeColor="@color/colorPrimary"/>

Apply the style @style/Widget.MaterialComponents.Button.OutlinedButton.

In your case use the app:cornerRadius attribute to change the size of corner radius. This will round off the corners with specified dimensions.
Use te attribute app:strokeColor and app:strokeWidth to change the color and the width of the border.
enter image description here

You can also customize the corners using ShapeApperance (it requires version 1.1.0)

<style name="MyButton" parent="Widget.MaterialComponents.Button.OutlinedButton">
    <item name="shapeAppearanceOverlay">@style/MyShapeAppearance</item>
</style>
<style name="MyShapeAppearance" parent="">
    <item name="cornerFamilyTopLeft">rounded</item>
    <item name="cornerFamilyBottomLeft">rounded</item>
    <item name="cornerFamilyTopRight">cut</item>
    <item name="cornerFamilyBottomRight">cut</item>
    <item name="cornerSize">8dp</item>
</style>

The official doc is here and all the android specs here.


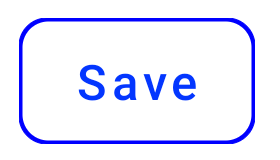
With jetpack compose you can use the OutlinedButton and the border attribute:

    OutlinedButton(
        onClick = { },
        border = BorderStroke(1.dp, Color.Blue),
        shape = RoundedCornerShape(8.dp) 
    ) {
        Text(text = "Save")
    }

enter image description here


OLD (support library)

With the new Support Library 28.0.0, the Design Library now contains the Material Button.

You can add this button to our layout file with:

<android.support.design.button.MaterialButton
    android:layout_width="wrap_content"
    android:layout_height="wrap_content"
    android:text="XXXX"
    android:textSize="18sp"
    app:icon="@drawable/ic_android_white_24dp" />

You can customize the button with these attributes:

  • app:backgroundTint: Used to apply a tint to the background of the button. If you wish to change the background color of the button, use this attribute instead of background.

  • app:strokeColor: The color to be used for the button stroke

  • app:strokeWidth: The width to be used for the button stroke

Also

Microcline answered 3/5, 2018 at 13:6 Comment(0)
T
33

Here's how to do it correctly.

What you need to do is

1 - Create shape drawable with stroke
2 - Create ripple drawable
3 - Create selector drawable for less than v21
4 - Create a new style for button with border
5 - Apply style on button

1 - Create shape with stroke btn_outline.xml

<?xml version="1.0" encoding="utf-8"?>
<shape
    xmlns:android="http://schemas.android.com/apk/res/android"
    android:shape="rectangle">

    <stroke
        android:width="2dp"
        android:color="@color/colorAccent">
    </stroke>
    <solid android:color="@color/colorTransparent"/>
    <corners
        android:radius="5dp">
    </corners>

</shape>

2 - Create ripple drawable drawable-v21/bg_btn_outline.xml

<?xml version="1.0" encoding="utf-8"?>
<ripple xmlns:android="http://schemas.android.com/apk/res/android"
        android:color="@color/colorOverlay">
    <item>
        <shape>
            <stroke
                android:width="2dp"
                android:color="@color/colorAccent"/>
            <corners android:radius="5dp"/>
        </shape>
    </item>
    <item android:id="@android:id/mask">
        <shape>
            <stroke
                android:width="2dp"
                android:color="@color/colorAccent"/>
            <solid android:color="@android:color/white"/>
            <corners android:radius="5dp"/>
        </shape>
    </item>

</ripple>

android:id="@android:id/mask" is required to have ripple touch feedback on the button. The layer that is marked as mask is not visible on screen, its just for touch feedback.

3 - Create selector drawable for less than v21 drawable/bg_btn_outline.xml

<?xml version="1.0" encoding="utf-8"?>
<selector xmlns:android="http://schemas.android.com/apk/res/android">
    <item android:drawable="@drawable/btn_outline" android:state_pressed="true">
        <shape android:shape="rectangle">
            <solid android:color="@color/colorOverlay"/>
        </shape>
    </item>
    <item android:drawable="@drawable/btn_outline" android:state_focused="true">
        <shape android:shape="rectangle">
            <solid android:color="@color/colorOverlay"/>
        </shape>
    </item>

    <item android:drawable="@drawable/btn_outline"/>

</selector>

4 - Create a new style for button with border All resources that that are needed to create the style are given above, that's how your style should look like

<style name="ButtonBorder" parent="Widget.AppCompat.Button.Colored"/>

<style name="ButtonBorder.Accent">
        <item name="android:background">@drawable/bg_btn_outline</item>
        <item name="android:textColor">@color/colorAccent</item>
        <item name="android:textAllCaps">false</item>
        <item name="android:textSize">16sp</item>
        <item name="android:singleLine">true</item>
    </style>

4 - Apply style on button

<Button
   style="@style/ButtonBorder.Accent"
   android:layout_width="wrap_content"
   android:layout_height="wrap_content"/>

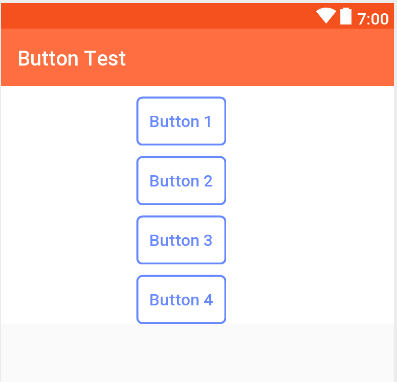
That's pretty much it. Here's a sample of how the buttons looks now. enter image description here

Telegenic answered 10/8, 2017 at 7:37 Comment(1)
Where you create btn_outline.xml , in drawable or drawable-v21 ??Mullens
O
7

You could do this pretty easily by setting Material Design Button's style attribute to @style/Widget.MaterialComponents.Button.OutlinedButton and setting app:strokeColor attribute value to your preferred color.

example:

<com.google.android.material.button.MaterialButton
                android:text="Rounded outlined button"
                android:layout_height="wrap_content"
                android:layout_width="wrap_content"
                android:id="@+id/btnRound"
                style="@style/Widget.MaterialComponents.Button.OutlinedButton"
                app:strokeColor="@color/colorPrimaryDark"/>

References:

Overwrite answered 10/4, 2019 at 15:58 Comment(1)
Some answers were solutions for pre Material Design Button days. Now, this is the new simplest answer.Hydra
S
4

Credits to @NomanRafique for the detailed answer! However, because of the custom background, we've lost a few important things:

  1. Button's height is bigger than the default Widget.AppCompat.Button
  2. Paddings
  3. Enable/Disable states

In case you're wondering, here is how the default background looks like: https://android.googlesource.com/platform/frameworks/support/+/a7487e7/v7/appcompat/res/drawable-v21/abc_btn_colored_material.xml

By reusing original insets, paddings and color selectors, in a simple case we can come up with something like this (all the values are default and come from android support/material library) :

drawable-v21/bg_btn_outlined.xml

<inset xmlns:android="http://schemas.android.com/apk/res/android"
       android:insetLeft="@dimen/abc_button_inset_horizontal_material"
       android:insetTop="@dimen/abc_button_inset_vertical_material"
       android:insetRight="@dimen/abc_button_inset_horizontal_material"
       android:insetBottom="@dimen/abc_button_inset_vertical_material">
    <ripple xmlns:android="http://schemas.android.com/apk/res/android"
            android:color="?attr/colorControlHighlight">
        <item>
            <shape>
                <stroke
                    android:width="2dp"
                    android:color="@color/abc_btn_colored_borderless_text_material"/>
                <corners android:radius="@dimen/abc_control_corner_material"/>
                <padding
                    android:bottom="@dimen/abc_button_padding_vertical_material"
                    android:left="@dimen/abc_button_padding_horizontal_material"
                    android:right="@dimen/abc_button_padding_horizontal_material"
                    android:top="@dimen/abc_button_padding_vertical_material"/>
            </shape>
        </item>
        <item android:id="@android:id/mask">
            <shape>
                <stroke
                    android:width="2dp"
                    android:color="@color/abc_btn_colored_borderless_text_material"/>
                <solid android:color="@android:color/white"/>
                <corners android:radius="@dimen/abc_control_corner_material"/>
            </shape>
        </item>
    </ripple>
</inset>

styles.xml

<style name="Button.Outlined" parent="Widget.AppCompat.Button.Borderless.Colored">
    <item name="android:background">@drawable/bg_btn_outlined</item>
</style>

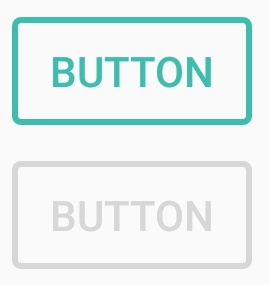
At this point, we should have an outlined button that responds to touches, respects the enabled="false" state and of the same height as the default Widget.AppCompat.Button:

enter image description here

Now, from here you can start customizing colors by providing your own implementation of the @color/abc_btn_colored_borderless_text_material color selector.

Slavism answered 23/7, 2018 at 19:33 Comment(0)
F
3

In your XML use this,

            <com.google.android.material.button.MaterialButton
                android:layout_width="wrap_content"
                android:layout_height="wrap_content"
                android:text="Its a button"
                android:textColor="@android:color/white"
                android:textSize="@dimen/_12ssp"
                app:backgroundTint="@android:color/transparent"
                app:strokeColor="@android:color/white"
                app:strokeWidth="@dimen/_1sdp" />

where

  1. app:backgroundTint is used for background color
  2. app:strokeColor is border color
  3. app:strokeWidth is border width
Flameproof answered 16/7, 2019 at 10:2 Comment(0)
D
2

This is how I do buttons only with a border and the ripple effect on Lollipop and above. Just like the AppCompat buttons, these have a fallback pressed effect on lower APIs (if you need ripples on lower APIs, you need to use an external library). I use FrameLayout because it's cheap. The color of the text and the border is black, but you can change it with a custom one:

<FrameLayout
    android:layout_width="match_parent"
    android:layout_height="wrap_content"
    android:layout_margin="20dp"
    android:background="@drawable/background_button_ghost">

    <TextView
        android:layout_width="match_parent"
        android:layout_height="wrap_content"
        android:background="?android:selectableItemBackground"
        android:gravity="center"
        android:padding="14dp"
        android:textSize="16sp"
        android:textAllCaps="true"
        android:textStyle="bold"
        android:textColor="@android:color/black"
        android:text="Text"/>
</FrameLayout>

drawable/background_button_ghost.xml

<?xml version="1.0" encoding="utf-8"?>
<shape xmlns:android="http://schemas.android.com/apk/res/android">
    <stroke
        android:width="2dp"
        android:color="@android:color/black"/>
    <solid android:color="@color/transparent"/>
</shape>

If I have missed something, please leave a comment and I will update the answer.

Duarte answered 12/7, 2016 at 18:0 Comment(2)
Yes, I wanted to avoid messy custom implementations. But I guess I have no other choice.Hydra
You can have it as a custom class, this is the best I've come to and I'm using it now, because it's shorter for declaration in the xml.Duarte
C
2

Just use MaterialButton with an outline style.

<com.google.android.material.button.MaterialButton
    ...
    style="@style/Widget.MaterialComponents.Button.OutlinedButton"
    android:text="Delete Mentor Manager"
    app:strokeColor="@color/...."
    app:strokeWidth="1dp" />
Colunga answered 24/11, 2022 at 11:0 Comment(0)
K
1

You can do this with Jetpack Compose too. To do it, just create a composable function with a OutlinedButton and pass the as parameter the border you want:

@Composable
fun OutlineButton() {
    OutlinedButton(
        onClick = { //TODO - implement click here },
        border = BorderStroke(1.dp, Color.Blue), // <-- border property
        shape = RoundedCornerShape(corner = CornerSize(20.dp)),
        colors = ButtonDefaults.outlinedButtonColors(contentColor = Color.Blue)
    ){
        Text(text = "CONFIRM")
    }
}
Kipper answered 22/12, 2021 at 13:29 Comment(0)
T
0

Simply you can use this code. Its looks soo Good.

           <LinearLayout
                android:layout_width="match_parent"
                android:layout_height="wrap_content"
                android:background="#ffffff"
                android:orientation="vertical">

                <android.support.v7.widget.AppCompatButton
                    android:layout_width="match_parent"
                    android:layout_height="wrap_content"
                    android:backgroundTint="#F48025"
                    android:text="login"
                    android:textColor="@color/colorWhite" />

            </LinearLayout>

Here border color is:

android:background="#ffffff"

And background color is:

android:backgroundTint="#F48025"
Toe answered 6/8, 2017 at 6:48 Comment(2)
Your solution is simple but limited. You cannot control the thickness of the border and the boarder is round inside but edged outside. Does not look good.Hydra
In my case the button is transparentCyprinid
T
-1
<Button
    android:id="@+id/btn_add_discussion"
    android:layout_width="match_parent"
    android:layout_height="wrap_content"
    android:layout_marginHorizontal="15dp"
    android:padding="8dp"
    android:layout_marginTop="10dp"
    android:layout_marginBottom="5dp"
    android:backgroundTint="#80ffffff"
    android:textColor="@color/colorPrimaryDark"
    style="@style/btn_start_new_discussion"
    android:text="Start new discussion" />

Put below code in Styles.xml file :

<style name="btn_start_new_discussion">
    <item name="android:layout_marginTop">15dp</item>
    <item name="strokeWidth">2dp</item>
    <item name="strokeColor">@color/colorPrimary</item>
    <item name="cornerRadius">10dp</item>
</style>
Tierney answered 28/5, 2020 at 3:19 Comment(0)

© 2022 - 2024 — McMap. All rights reserved.