I need my application to open a window when a user double clicks on a row in an NSTableView. I'm having a bit of a difficult time finding information or examples on how to accomplish this. Can anybody point me in the right direction?
Take a look at the -setDoubleAction: method on NSTableView; you can set that to a method that will be called just like the normal target-action system but on a double-click.
In that action method, -clickedRow will be useful.
Adding more basic information to @JimPuls answer for the benefit of other newcomers to Cocoa.
- An IBOutlet to the NSTableView needs to be declared in an interface. I assumed it is preferred to do so in the table's delegate.
- The IBOutlet to the table needs to be connected via Interface Builder. To do that Ctrl-Drag & Drop in IB from the class that declares the outlet to the table view. When you release your mouse a popup should appear with the name of the outlet you declared in step #1. Select that.
- In the @implementation section, on the -awakeFromNib method, call -setTarget: and -setDoubleAction: on the IBOutlet declared in step #1 and connected in step #2.
Here's an excerpt from my table view delegate. I have my delegate also set up as the datasource, so that's why you'll see both the NSTableViewDelegate and NSTabeViewDataSource interfaces associated with it.
// Interface excerpt.
@interface MyTableViewDelegate : NSObject <NSTableViewDelegate, NSTableViewDataSource>
{
  // This iVar needs to be connected to the table view via the IB.
  IBOutlet NSTableView *tableOutlet;
}

@property (assign) IBOutlet NSTableView *tableOutlet;

- (void)doubleClick:(id)nid;

@end
// Implementation excerpt.
@implementation MyTableViewDelegate

@synthesize tableOutlet = _tableOutlet;

- (void)awakeFromNib {
  [_tableOutlet setTarget:self];
  [_tableOutlet setDoubleAction:@selector(doubleClick:)];
}

- (void)doubleClick:(id)object {
  // This gets called after following steps 1-3.
  NSInteger rowNumber = [_tableOutlet clickedRow];
  // Do something...
}
Hope this helps.
If someone looks for a swift 2.0 version: This is what works for me. Seems much easier than the Objective C code.
@IBOutlet weak var searchResultTable: NSTableView!

override func viewDidLoad() {
    super.viewDidLoad()
    searchResultTable.doubleAction = "doubleClickOnResultRow"
}

func doubleClickOnResultRow()
{
    print("doubleClickOnResultRow \(searchResultTable.clickedRow)")
}
doubleAction check out this link. –
Zigrang searchResultTable.doubleAction = #selector(doubleClickOnResultRow) –
Evin As PR Singh said, you can use cocoa bindings, you can also pass along the selectedObjects.
Select your Table View in IB then in Bindings inspector set these two bindings up as follows:
>Double Click Target

bind to = Application delegate object (or file owner)
model key path = self
selector name = myMethod:

>Double Click Argument

bind to = array controller
controller key = selectedObjects
selector name = myMethod:
Where myMethod is implemented as
- (void)myMethod:(NSArray*)selectedObjects
{
    NSLog(@"%@", selectedObjects);
}
This is also documented here: https://developer.apple.com/library/mac/qa/qa1472/_index.html
You can wire up the double-click action in Interface Builder. Control-click your table view (make sure you're getting the table view, not the scroll view or the clip view or a table column) to get its connections panel. Find the “doubleAction” item in the “Sent Actions” section. Connect it to the IBAction of your choice.
Updated Alfred's answer for Swift 5
@IBOutlet weak var searchResultTable: NSTableView!

override func viewDidLoad() {
    super.viewDidLoad()
    searchResultTable.target = self
    searchResultTable.doubleAction = #selector(doubleClickOnResultRow)
}

@objc func doubleClickOnResultRow()
{
    print("doubleClickOnResultRow \(searchResultTable.clickedRow)")
}
You can do same thing with the bindings, first of all declare one mentod in .h file
-(IBAction)openWindow:(id)sender
in .m file implement the same
-(IBAction)openWindow:(id)sender
{
    //do something here;
}
got to that nib where your table view is present, select table view and got the the second last tab of attribute inspector (bindings),open double click argument disclosure triangle check bind to check box select file's owner, model key path should be "self", selector name will be "openWindow:", same process do with "Double click target" disclosure,
This will work
On SWIFT 4.1 You set the doubleAction method of the TableView object inside your code to perform an @objc function by using a #selector(nameOfYourFunction)
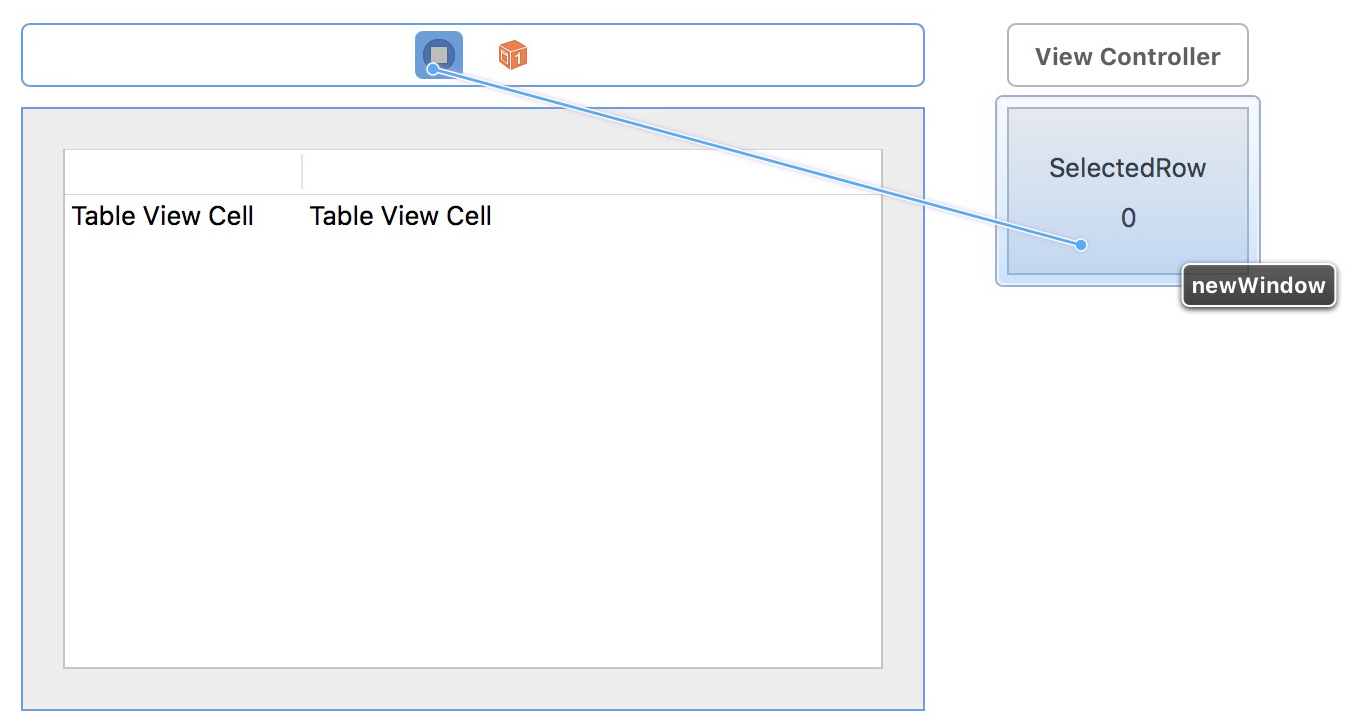
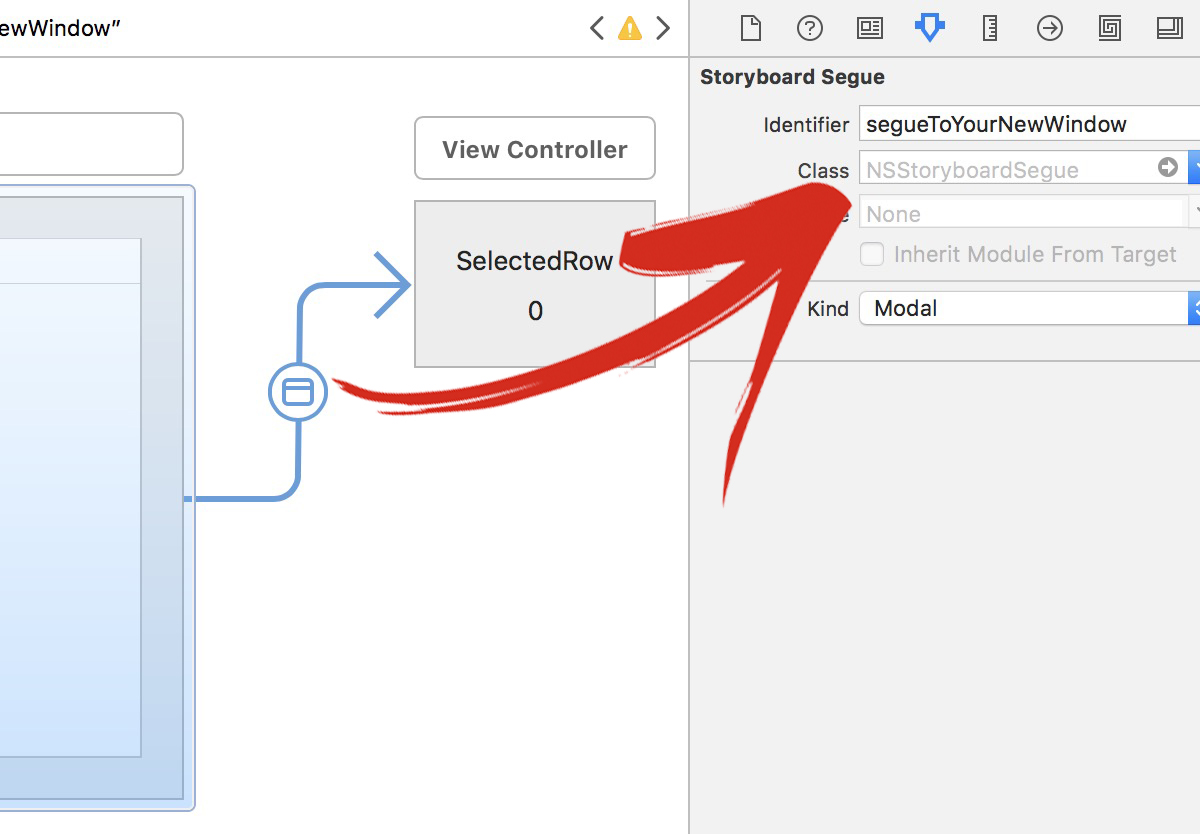
Inside this function you call a segue. You can link your new window to the origin window on InterfaceBuilder (not to the NSTableView object but the actual ViewController object.
Then do all your setup for the new window on prepare for segue:
Alright first on Interface Builder:
Of course give an identifier to that segue:
Next, inside our first view controller (where the table view is) code:
 //We use this function: prepare for segue
override func prepare(for segue: NSStoryboardSegue, sender: Any?) {
        // check if we are referring to the actual segue we want
          if segue.identifier?.rawValue == "segueToYourNewWindow" {
    // now create a reference to that new window
            let yourNewWindow = segue.destinationController as! newWindowViewController
    // now change variables inside that view controller code, remember that the objects might fail if they are not yet visible to the user so first set up the variables or call them using the main thread, up to your design.
           yourNewWindow.selectedRowVariable = thisTableView.clickedRow
        }
Then we need a function to perform the segue on the table view's double click, this function is called with a #selector and therefore needs to be visible to Objective C (even that we are programing in Swift) we just simply start the function with @Objc thats it.
@objc func doubleClickOnResultRow() {
//beware of double-clicking also triggers this function when no rows is selected with the selectedRow being -1
 if (thisTableView.selectedRow > -1 ) {
  performSegue(withIdentifier: NSStoryboardSegue.Identifier(rawValue: "segueToYourNewWindow"), sender: nil)
 }
}
Finally we set this function to the doubleAction method of the TableView in the initial setup part of our code like this:
override func viewDidLoad() {
    super.viewDidLoad()
    thisTableView.doubleAction = #selector(doubleClickOnResultRow)
}
© 2022 - 2024 — McMap. All rights reserved.


