Navigation popUpTo and PopUpToInclusive aren't clearing the backstack
Asked Answered
C

8

79

I'm new to the Android Jetpack Navigation architecture. I'm trying it out on a new app. There's one activity and a few fragments, two of them are login screen and email login screen. I defined those fragments in my navigations XML. The flow of the app is as follows:

Login screenEmail Login screen

What I want is, after navigating to the email login screen, when I press back, the app exits. Meaning the back-stack for login screen is removed. I know login screens aren't supposed to work that way, but I'm still just figuring things out.

I followed the documentation from Google's Get started with the Navigation component. It said, using app:popUpTo and app:popUpToInclusive="true" is supposed to clear the backstack, yet when I press back on email login screen, it still goes back to login instead of exiting.

So, here's what I've tried.

nav_main.xml

<fragment android:id="@+id/loginFragment"
          android:name="com.example.myapp.ui.main.LoginFragment"
          android:label="@string/login"
          tools:layout="@layout/fragment_login" >
    
    <action
        android:id="@+id/action_login_to_emailLoginFragment"
        app:destination="@id/emailLoginFragment"
        app:popEnterAnim="@anim/slide_in_right"
        app:popExitAnim="@anim/slide_out_right"
        app:popUpTo="@+id/emailLoginFragment"
        app:popUpToInclusive="true"/>

</fragment>

<fragment android:id="@+id/emailLoginFragment"
          android:name="com.example.myapp.ui.main.EmailLoginFragment"
          android:label="EmailLoginFragment"
          tools:layout="@layout/fragment_login_email" />

LoginFragment.kt

override fun onCreateView(
    inflater: LayoutInflater, container: ViewGroup?,
    savedInstanceState: Bundle?
): View {
    binding.emailLoginButton.setOnClickListener {
        findNavController().navigate(R.id.action_login_to_emailLoginFragment)
    }
    
    return binding.root
}

I gave a click event to a button. In it, I used the Navigation Controller to navigate to the email login screen by giving it the action's ID. In the <action>, there are app:popUpTo and app:popUpToInclusive="true".

After reading the documentation over and over, as well as reading plenty of StackOverflow questions, I found those properties are supposed to remove my login screen off the back-stack. But they don't. The button does navigate to the email login screen, but when I press back, it still goes back to login screen instead of exiting the app. What am I missing?

Collection answered 1/5, 2019 at 7:1 Comment(2)
For the record. Documentation says it's fine to use login fragment just as you used them. I couldn't get why "login screens aren't supposed to work that way"Jolinejoliotcurie
@PanosGr Are you referring to "For example, if your app has an initial login flow, once a user has logged in, you should pop all of the login-related destinations off of the back stack so that the Back button doesn't take users back into the login flow"? Well, in my case, the user isn't logged in yet. It just opens a different login method. Generally, users should be allowed to go back to the main login screen and select a different login method.Collection
K
83
<action
        android:id="@+id/action_login_to_emailLoginFragment"
        app:destination="@id/emailLoginFragment"
        app:popEnterAnim="@anim/slide_in_right"
        app:popExitAnim="@anim/slide_out_right"
        app:popUpTo="@+id/loginFragment"
        app:popUpToInclusive="true"/>

Your popUpTo is going back to the email login, and then popping it because of the inclusive. If you will change the popUpTo to your login fragment, it will be navigated back to, and popped as well because of the inclusive flag, which will result in your desired behaviour.

Kimberliekimberlin answered 16/5, 2019 at 8:5 Comment(5)
.... I am trying to understand this answer but I can't . can someone explain it clearer to me?Caernarvonshire
@Caernarvonshire When you create an action, you can add the popUpTo value. When you've used this action to navigate to the destination and you back navigate, the navigation will take you back to the popUpTo fragment and in the case of the code sample above, that's the loginFragment. Setting popUpToInclusive="true" tells the action "When you back navigate, please also remove the fragment in popUpTo" so it will also remove loginFragment . Does that help?Decalcify
For me works, but there is still a glitch, namely on B fragment i still see "up arror button" - what is not expectedIridissa
Can you help me with this: #64688074, thank you.Foulness
Thanks @ChrisC for your clarification. popUpToInclusive is sneaky! If going from say fragment D -> fragment A it sounds like it means pop any fragments between D and A (B, C) but thats not what it means. It means pop A.Dispirit
P
61

I write this answer for people who have not completely understood the way popUpTo works and I hope its example helps someone because most examples for navigation are repetitive in most sites and do not show the whole picture.

In any <action> if we write a value for app:popUpTo, it means we want to delete some of the fragments from the back stack just after completing the action, but which fragments are going to be removed from the back stack when action is completed?

Its order is Last In First Out so:

  • All fragments between the last fragment and the fragment defined in popUpTo will be removed.
  • And if we add app:popUpToInclusive="true", then the fragment defined in popUpTo will also be removed.

Example: Consider fragments from A to G in a navigation graph like this:

A->B->C->D->E->F->G

We can go from A to B and then from B to C and so on. Consider the following two actions:

  1. An action E->F we write:
<action
    ...
    app:destination="@+id/F"
    app:popUpTo="@+id/C"
    app:popUpToInclusive="false"/>
  1. And for F->G we write:
<action
    ...
    app:destination="@+id/G"
    app:popUpTo="@+id/B"
    app:popUpToInclusive="true"/>

Then after going from E to F using the action E->F, the fragments between the last fragment (F) and C (which is defined in popUpTo of E->F) will be removed. The fragment C will not be removed this time because of app:popUpToInclusive="false" so our back stack becomes:

A->B->C->F (F is currently on Top)

Now if we go to fragment G using action F->G : all fragments between the last fragment(G) and B (which is defined in popUpTo of F->G ) will be removed but this time the fragment B will also be removed because in F->G action we wrote app:popUpToInclusive="true" . so back stack becomes:

A->G (G is on top now)

Ply answered 28/11, 2021 at 13:45 Comment(3)
Thanks for the excellent explanation, but this leaves me with a lot of concerning scenarios. The main reason why this is concerning is that the LIFO queue (BTW I guess it is LIFO because of how it interacts with the onBackPressed, but the popUpTo behavior is not what makes it LIFO.(?)) is built dynamically and to some extent this is good since it gives the dev the freedom to go wherever they want. So the issue becomes on cyclic navigations: What happens when repeating destinations are stacked; Do popUpTo works to the nearest id found from first inserted to last ONLY?Pesek
On the bright side, it seems it is possible to create dynamic Home Fragments, by simply swapping them: popUpTo="Home" + popUpToInclusive = "true"Pesek
This is 2023, and I want to add that what I said will not work. The reason being that the "startDestination" is a different type that the others. startDestination is class "NavGraph.class" while the others are under the "FragmentNavigator.Destination". So, Fragment A will NOT WORK as a pivot "pop" point to use. Instead, you will need: FIRST => in popUpTo use the id of your nav_graph... NOT your startDestination app:popUpTo="@id/nav_graph" If you use the id of your startDestination fragment it will NOT work. SECOND => app:launchSingleTop="true", THIRD => app:popUpToInclusive="true".Pesek
C
35

These 2 lines make the trick works:

If you want to go from A to B and expect to finish A:

You need to call B with this action:

    <fragment
        android:id="@+id/fragmentA"            
        tools:layout="@layout/fragment_a">

        <action
            android:id="@+id/action_call_B"
            app:destination="@+id/fragmentB"
            app:popUpTo="@id/fragmentA"
            app:popUpToInclusive="true" />

    </fragment>

    <fragment
        android:id="@+id/fragmentB"
        tools:layout="@layout/fragment_b">


    </fragment>

If you put log to your fragments you can see that fragmentA is destroyed after calling fragmentB with this action.

Commonplace answered 21/7, 2019 at 9:13 Comment(2)
Thank you, I appreciate your help. But Rito has already given the answer, and I think your answer is basically the same.Collection
Remember that if you have a chain of Fragments A -> B -> C -> D then you need to pass the following in popUpTo action arguments , to have exit on backPress behaviour. app:popUpTo="@id/A", app:popUpTo="@id/B", app:popUpTo="@id/C"Misogyny
E
19

You can do it in XML just like this answer does, or you can also do it programmatically:

NavOptions navOptions = new NavOptions.Builder().setPopUpTo(R.id.loginRegister, true).build();
Navigation.findNavController(mBinding.titleLogin).navigate(R.id.login_to_main, null, navOptions);
Ecstatic answered 13/9, 2019 at 10:37 Comment(2)
I think this is the same as the accepted answer, but done programmatically. Nice, though. I may need it some day.Collection
Can you help me with this: #64688074, thank you.Foulness
P
14

popUpTo its to define the place that you want to go when you press back. If you set popUpInclusive = true, the navigation skipe that place too ( in popUpTo ).

Poky answered 22/7, 2021 at 16:48 Comment(1)
I think this is the best explanation so farConic
D
10

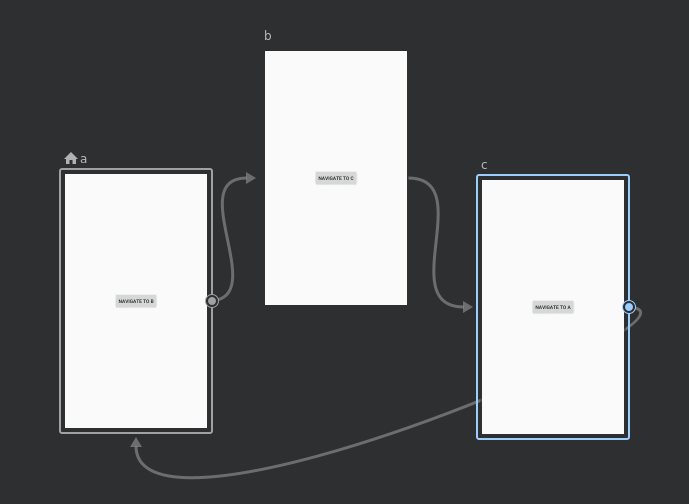
Let's say that your app has three destinations—A, B, and C—along with actions that lead from A to B, B to C, and C back to A. The corresponding navigation graph is shown in figure

A circular navigation graph with three destinations: A, B, and C.

With each navigation action, a destination is added to the back stack. If you were to navigate repeatedly through this flow, your back stack would then contain multiple sets of each destination (A, B, C, A, B, C, A, and so on). To avoid this repetition, you can specify app:popUpTo and app:popUpToInclusive in the action that takes you from destination C to destination A, as shown in the following example:

<fragment
android:id="@+id/c"
android:name="com.example.myapplication.C"
android:label="fragment_c"
tools:layout="@layout/fragment_c">

<action
    android:id="@+id/action_c_to_a"
    app:destination="@id/a"
    app:popUpTo="@+id/a"
    app:popUpToInclusive="true"/>

After reaching destination C, the back stack contains one instance of each destination (A, B, C). When navigating back to destination A, we also popUpTo A, which means that we remove B and C from the stack while navigating. With app:popUpToInclusive="true", we also pop that first A off of the stack, effectively clearing it. Notice here that if you don't use app:popUpToInclusive, your back stack would contain two instances of destination A

Diacid answered 31/5, 2021 at 5:44 Comment(1)
Please, refer that the content of this answer is a copy from the official docs. developer.android.com/guide/navigation/…Escadrille
A
0

Sample: A -> B -> A

FragmentB.kt

Attempts to pop the controller's back stack

private fun popBackStackToA() {
    if (!findNavController().popBackStack()) {
//            Call finish on your Activity
        requireActivity().finish()
    }
}

Back Stack

Argile answered 27/7, 2021 at 14:43 Comment(0)
W
0

I faced a similar problem and my approach was simple. In the navigation graph, you have to designate the starting screen. Mine was:

app:startDestination="@id/webview"

It's called the start destination, it is the first screen users see when opening your app, and it's the last screen users see when exiting your app.

If you do not wish your login activity to be shown as you exit the app, just remove it as the start destination and use the fragment that you wish to show last in your case, It's the Email Login screen.

<?xml version="1.0" encoding="utf-8"?>
<navigation xmlns:android="http://schemas.android.com/apk/res/android"
    xmlns:app="http://schemas.android.com/apk/res-auto"
    xmlns:tools="http://schemas.android.com/tools"
    android:id="@+id/nav"
    app:startDestination="@id/Email Login screen">

Also, make sure you override the onBackPressed() method from the host activity code as:

override fun onBackPressed() {
    finish()
    super.onBackPressed()
}

Now that you have removed the login fragment as the start destination, it's now not obvious what fragment will be shown first when the app opens.

Add a method to implement that in the host activity and call it from the oncreate(). In my case,i created initContent() to handle that logic. This was the code:

   override fun onCreate(savedInstanceState: Bundle?) {
    super.onCreate(savedInstanceState)
    setContentView(R.layout.activity_main)

    val navHostFragment = supportFragmentManager
        .findFragmentById(R.id.nav_host_fragment) as NavHostFragment
    navController = navHostFragment.navController


    if (savedInstanceState == null) {
        initContent()
    }

}

private fun initContent() {
    if (isNetworkConnected()) {
        navController.navigate(R.id.webView)

    } else {
        navController.navigate(R.id.noInternetFragment)
    }
}

Hope this helps someone.

Written answered 19/7, 2022 at 9:42 Comment(0)

© 2022 - 2024 — McMap. All rights reserved.