Android Jetpack Navigation, BottomNavigationView with Youtube or Instagram like proper back navigation (fragment back stack)?
G

14

81

Android Jetpack Navigation, BottomNavigationView with auto fragment back stack on back button click?

What I wanted, after choosing multiple tabs one after another by user and user click on back button app must redirect to the last page he/she opened.

I achieved the same using Android ViewPager, by saving the currently selected item in an ArrayList. Is there any auto back stack after Android Jetpack Navigation Release? I want to achieve it using navigation graph

activity_main.xml

<?xml version="1.0" encoding="utf-8"?>
<android.support.constraint.ConstraintLayout xmlns:android="http://schemas.android.com/apk/res/android"
    xmlns:app="http://schemas.android.com/apk/res-auto"
    xmlns:tools="http://schemas.android.com/tools"
    android:id="@+id/container"
    android:layout_width="match_parent"
    android:layout_height="match_parent"
    tools:context=".main.MainActivity">

    <fragment
        android:id="@+id/my_nav_host_fragment"
        android:name="androidx.navigation.fragment.NavHostFragment"
        android:layout_width="match_parent"
        android:layout_height="0dp"
        app:defaultNavHost="true"
        app:layout_constraintBottom_toTopOf="@+id/navigation"
        app:layout_constraintEnd_toEndOf="parent"
        app:layout_constraintStart_toStartOf="parent"
        app:layout_constraintTop_toTopOf="parent"
        app:navGraph="@navigation/nav_graph" />

    <android.support.design.widget.BottomNavigationView
        android:id="@+id/navigation"
        android:layout_width="0dp"
        android:layout_height="wrap_content"
        android:layout_marginStart="0dp"
        android:layout_marginEnd="0dp"
        android:background="?android:attr/windowBackground"
        app:layout_constraintBottom_toBottomOf="parent"
        app:layout_constraintLeft_toLeftOf="parent"
        app:layout_constraintRight_toRightOf="parent"
        app:menu="@menu/navigation" />

</android.support.constraint.ConstraintLayout>

navigation.xml

<?xml version="1.0" encoding="utf-8"?>
<menu xmlns:android="http://schemas.android.com/apk/res/android">

    <item
        android:id="@+id/navigation_home"
        android:icon="@drawable/ic_home"
        android:title="@string/title_home" />

    <item
        android:id="@+id/navigation_people"
        android:icon="@drawable/ic_group"
        android:title="@string/title_people" />

    <item
        android:id="@+id/navigation_organization"
        android:icon="@drawable/ic_organization"
        android:title="@string/title_organization" />

    <item
        android:id="@+id/navigation_business"
        android:icon="@drawable/ic_business"
        android:title="@string/title_business" />

    <item
        android:id="@+id/navigation_tasks"
        android:icon="@drawable/ic_dashboard"
        android:title="@string/title_tasks" />

</menu>

also added

bottomNavigation.setupWithNavController(Navigation.findNavController(this, R.id.my_nav_host_fragment))

I got one answer from Levi Moreira, as follows

navigation.setOnNavigationItemSelectedListener {item ->

            onNavDestinationSelected(item, Navigation.findNavController(this, R.id.my_nav_host_fragment))

        }

But by doing this only happening is that last opened fragment's instance creating again.

Providing proper Back Navigation for BottomNavigationView

Gullett answered 29/5, 2018 at 6:6 Comment(8)
Hi @BincyBaby i need same thing did you get any solutions?Indebtedness
not yet got answerGullett
Commenting a bit late but upon some digging I found that the popBackStack is called from the NavController.navigate() function when NavOptions are not null. My guess is that at the moment it is not possible to do it out of the box. A custom implementation of NavController is required that accesses the mBackStack through reflection or something like that.Aldin
If you add a listener to the bottom nav you can override the navigation so that it will pop back stack if the stack already contains the new destination or otherwise perform the normal navigation if it doesn't. if (!navHost.popBackStack(it.itemId, false)) navHost.navigate(it.itemId)Reviviscence
A workaround for the fragment recreation problem - https://mcmap.net/q/159130/-is-there-a-way-to-keep-fragment-alive-when-using-bottomnavigationview-with-new-navcontrollerCarlitacarlo
Did you find any proper way to achieve this?Chiffchaff
mobologicplus.com/… this tutorial might be helpPersonality
My easy solution: https://mcmap.net/q/159130/-is-there-a-way-to-keep-fragment-alive-when-using-bottomnavigationview-with-new-navcontrollerTension
G
0

Since Navigation version 2.4.0, BottomNavigationView with NavHostFragment supports a separate back stack for each tab, so Elyeante answer is 50% correct. But it doesn't support back stack for primary tabs. For example, if we have 4 main fragments (tabs) A, B, C, and D, the startDestination is A. D has child fragments D1, D2, and D3. If user navigates like A -> B -> C ->D -> D1 -> D2-> D3, if the user clicks the back button with the official library the navigation will be D3 -> D2-> D1-> D followed by A. That means primary tabs B and C will not be in the back stack.

To support the primary tab back stack, I created a stack with a primary tab navigation reference. On the user's back click, I updated the selected item of BottomNavigationView based on the stack created.

I have created this Github repo to show what I did. I reached this answer with the following medium articles.

Steps to implement

Add the latest navigation library to Gradle and follow Official repo for supporting back stack for child fragments.

Instead of creating single nav_graph, we have to create separate navigation graphs for each bottom bar item and this three graph should add to one main graph as follows

<navigation
    xmlns:android="http://schemas.android.com/apk/res/android"
    xmlns:app="http://schemas.android.com/apk/res-auto"
    android:id="@+id/nav_graph"
    app:startDestination="@+id/home">

    <include app:graph="@navigation/home"/>
    <include app:graph="@navigation/list"/>
    <include app:graph="@navigation/form"/>

</navigation>

And link bottom navigation view and nav host fragment with setupWithNavController

Now the app will support back stack for child fragments. For supporting the main back navigation, we need to add more lines.

private var addToBackStack: Boolean = true
private lateinit var fragmentBackStack: Stack<Int>

The fragmentBackStack will help us to save all the visited destinations in the stack & addToBackStack is a checker which will help to determine if we want to add the current destination into the stack or not.

navHostFragment.findNavController().addOnDestinationChangedListener { _, destination, _ ->
    val bottomBarId = findBottomBarIdFromFragment(destination.id)
    if (!::fragmentBackStack.isInitialized){
        fragmentBackStack = Stack()
    }
    if (needToAddToBackStack && bottomBarId!=null) {
        if (!fragmentBackStack.contains(bottomBarId)) {
            fragmentBackStack.add(bottomBarId)
        } else if (fragmentBackStack.contains(bottomBarId)) {
            if (bottomBarId == R.id.home) {
                val homeCount =
                    Collections.frequency(fragmentBackStack, R.id.home)
                if (homeCount < 2) {
                    fragmentBackStack.push(bottomBarId)
                } else {
                    fragmentBackStack.asReversed().remove(bottomBarId)
                    fragmentBackStack.push(bottomBarId)
                }
            } else {
                fragmentBackStack.remove(bottomBarId)
                fragmentBackStack.push(bottomBarId)
            }
        }

    }
    needToAddToBackStack = true
}

When navHostFragment changes the fragment we get a callback to addOnDestinationChangedListener and we check whether the fragment is already existing in the Stack or not. If not we will add to the top of the Stack, if yes we will swap the position to the Stack's top. As we are now using separate graph for each tab the id in the addOnDestinationChangedListener and BottomNavigationView will be different, so we use findBottomBarIdFromFragment to find BottomNavigationView item id from destination fragment.

private fun findBottomBarIdFromFragment(fragmentId:Int?):Int?{
    if (fragmentId!=null){
        val bottomBarId = when(fragmentId){
            R.id.register ->{
                R.id.form
            }
            R.id.leaderboard -> {
                R.id.list
            }
            R.id.titleScreen ->{
                R.id.home
            }
            else -> {
                null
            }
        }
        return bottomBarId
    } else {
        return null
    }
}

And when the user clicks back we override the activity's onBackPressed method(NB:onBackPressed is deprecated I will update the answer once I find a replacement for super.onBackPressed() inside override fun onBackPressed())

override fun onBackPressed() {
    val bottomBarId = if (::navController.isInitialized){
        findBottomBarIdFromFragment(navController.currentDestination?.id)
    } else {
        null
    }
    if (bottomBarId!=null) {
        if (::fragmentBackStack.isInitialized && fragmentBackStack.size > 1) {
            if (fragmentBackStack.size == 2 && fragmentBackStack.lastElement() == fragmentBackStack.firstElement()){
                finish()
            } else {
                fragmentBackStack.pop()
                val fragmentId = fragmentBackStack.lastElement()
                needToAddToBackStack = false
                bottomNavigationView.selectedItemId = fragmentId
            }
        } else {
            if (::fragmentBackStack.isInitialized && fragmentBackStack.size == 1) {
                finish()
            } else {
                super.onBackPressed()
            }
        }
    } else super.onBackPressed()
}

When the user clicks back we will pop the last fragment from Stack and set the selected item id in the bottom navigation view.

Medium Link

Gullett answered 6/5, 2023 at 4:42 Comment(0)
C
53

You don't really need a ViewPager to work with BottomNavigation and the new Navigation architecture component. I have been working in a sample app that uses exactly the two, see here.

The basic concept is this, you have the main activity that will host the BottomNavigationView and that is the Navigation host for your navigation graph, this is how the xml for it look like:

activity_main.xml

<?xml version="1.0" encoding="utf-8"?>
<android.support.constraint.ConstraintLayout xmlns:android="http://schemas.android.com/apk/res/android"
    xmlns:app="http://schemas.android.com/apk/res-auto"
    xmlns:tools="http://schemas.android.com/tools"
    android:id="@+id/container"
    android:layout_width="match_parent"
    android:layout_height="match_parent"
    tools:context=".main.MainActivity">

    <fragment
        android:id="@+id/my_nav_host_fragment"
        android:name="androidx.navigation.fragment.NavHostFragment"
        android:layout_width="match_parent"
        android:layout_height="0dp"
        app:defaultNavHost="true"
        app:layout_constraintBottom_toTopOf="@+id/navigation"
        app:layout_constraintEnd_toEndOf="parent"
        app:layout_constraintStart_toStartOf="parent"
        app:layout_constraintTop_toTopOf="parent"
        app:navGraph="@navigation/nav_graph" />

    <android.support.design.widget.BottomNavigationView
        android:id="@+id/navigation"
        android:layout_width="0dp"
        android:layout_height="wrap_content"
        android:layout_marginStart="0dp"
        android:layout_marginEnd="0dp"
        android:background="?android:attr/windowBackground"
        app:layout_constraintBottom_toBottomOf="parent"
        app:layout_constraintLeft_toLeftOf="parent"
        app:layout_constraintRight_toRightOf="parent"
        app:menu="@menu/navigation" />

</android.support.constraint.ConstraintLayout>

The navigation Menu (tabs menu) for the BottomNavigationView looks like this:

navigation.xml

<?xml version="1.0" encoding="utf-8"?>
<menu xmlns:android="http://schemas.android.com/apk/res/android">

    <item
        android:id="@+id/navigation_home"
        android:icon="@drawable/ic_home"
        android:title="@string/title_home" />

    <item
        android:id="@+id/navigation_people"
        android:icon="@drawable/ic_group"
        android:title="@string/title_people" />

    <item
        android:id="@+id/navigation_organization"
        android:icon="@drawable/ic_organization"
        android:title="@string/title_organization" />

    <item
        android:id="@+id/navigation_business"
        android:icon="@drawable/ic_business"
        android:title="@string/title_business" />

    <item
        android:id="@+id/navigation_tasks"
        android:icon="@drawable/ic_dashboard"
        android:title="@string/title_tasks" />

</menu>

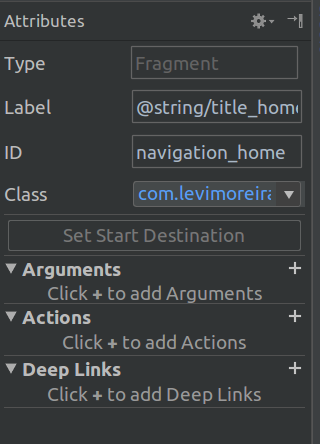
All of this is just the BottomNavigationView setup. Now to make it work with the Navigation Arch Component you need to go into the navigation graph editor, add all your fragment destinations (in my case I have 5 of them, one for each tab) and set the id of the destination with the same name as the one in the navigation.xml file:

enter image description here

This will tell android to make a link between the tab and the fragment, now every time the user clicks the "Home" tab android will take care of loading up the correct fragment. There is also one piece of kotlin code that needs to be added to your NavHost (the main activity) to wire things up with the BottomNavigationView:

You need to add in your onCreate:

bottomNavigation.setupWithNavController(Navigation.findNavController(this, R.id.my_nav_host_fragment))

This tells android to do the wiring between the Navigation architecture component and the BottomNavigationView. See more in the docs.

To get the same beahvior you have when you use youtube, just add this:

navigation.setOnNavigationItemSelectedListener {item ->

            onNavDestinationSelected(item, Navigation.findNavController(this, R.id.my_nav_host_fragment))

        }

This will make destinations go into the backstack so when you hit the back button, the last visited destination will be popped up.

Cyton answered 31/5, 2018 at 14:18 Comment(16)
The secret sauce was adding the id in the nav graph. I'm using Navigation Drawer, but the principal is the sameOlenta
Can we have single instance of fragment ?Gullett
I'm not sure, the lib is the one who takes care of instantiation, but I haven't see anywhere a place where we can configure that :/Cyton
But actually am not looking for this one, i want to get back the instance where we last wentGullett
This is working fine with the back-button. But if user click on bottom tabs its not restoring the previously open child-fragment of that tab(if available). It just opening the new instant of (parent) fragment every time user click on bottom tabs. So this way will lead to a confusing/ frustrating nevigation experience to the users if navigated using bottom tabs many times. Dangerous implementationLouralourdes
they are not using a single fragment container. Each page is maintaining its own backstack. moreover its really fast to switch between tabs. either its a viewpager or they have a custom implementation of itLecky
If back button is not working (that is, if the app is closing instead of going to the first fragment) make sure the ids are all set up correctly (I had to add some '+' in the '@id' (as in @+id) and that the NavHostFragment is setup with app:defaultNavHost=trueProvincetown
I thought you could only have three tabs in BottomNavigationView max. Is that not the case anymore?Keeley
There's no max number, but material design rules state you should only have 5 tabs maxCyton
@LeviMoreira Can you please provide demo link for this ?Tranquillize
I dotn want to recreate the fragment again when user switches bottom tabs how to achieve this .in the sense i don't want to make an API call again each time when user switching fragmentTelemechanics
@Telemechanics have you find any solution for not recreating fragments again and againFlowing
@Niroshan, have you found any solution to your problem, help me if you have foundIrmine
@Irmine Not an official answer! But we can overcome this by extending the default FragmentNavigator. Check out the this simple sample github.com/STAR-ZERO/navigation-keep-fragment-sample ! (Have a look at 'KeepStateNavigator' class). **Don't forget to replace the 'fragment' key word to 'keep_state_fragment'(or the keyword annotation used in your extended class ) used in your nav_graph(xml)Louralourdes
Solve the problem with recreating tabs by having this in your BaseFragment: (It should be a recommended solution but forgot where I read it) private var previousLoadedView: View? = null override fun onCreateView( inflater: LayoutInflater, container: ViewGroup?, savedInstanceState: Bundle? ): View? { if (previousLoadedView == null) { previousLoadedView = inflater.inflate(layoutId, container, false) } else { (previousLoadedView?.parent as? ViewGroup)?.removeAllViews() } return previousLoadedView }Greed
@Louralourdes Basically, there is an official workaround until they fix the problem. You can find it here github.com/android/architecture-components-samples/blob/master/…Aksoyn
G
41

You have to set host navigation like below xml:

<LinearLayout xmlns:android="http://schemas.android.com/apk/res/android"
    xmlns:app="http://schemas.android.com/apk/res-auto"
    android:layout_width="match_parent"
    android:layout_height="match_parent"
    android:orientation="vertical">

    <android.support.v7.widget.Toolbar
        android:id="@+id/toolbar"
        android:layout_width="match_parent"
        android:layout_height="wrap_content"
        android:background="@color/colorPrimary" />

    <fragment
        android:id="@+id/navigation_host_fragment"
        android:name="androidx.navigation.fragment.NavHostFragment"
        android:layout_width="match_parent"
        android:layout_height="0dp"
        android:layout_weight="1"
        app:defaultNavHost="true"
        app:navGraph="@navigation/nav_graph" />

    <android.support.design.widget.BottomNavigationView
        android:id="@+id/bottom_navigation_view"
        android:layout_width="match_parent"
        android:layout_height="wrap_content"
        app:itemIconTint="@drawable/color_state_list"
        app:itemTextColor="@drawable/color_state_list"
        app:menu="@menu/menu_bottom_navigation" />
</LinearLayout>

Setup With Navigation Controller :

NavHostFragment navHostFragment = (NavHostFragment) getSupportFragmentManager().findFragmentById(R.id.navigation_host_fragment);
NavigationUI.setupWithNavController(bottomNavigationView, navHostFragment.getNavController());

menu_bottom_navigation.xml :

<?xml version="1.0" encoding="utf-8"?>
<menu xmlns:android="http://schemas.android.com/apk/res/android">
    <item
        android:id="@id/tab1"  // Id of navigation graph 
        android:icon="@mipmap/ic_launcher"
        android:title="@string/tab1" />
    <item
        android:id="@id/tab2" // Id of navigation graph
        android:icon="@mipmap/ic_launcher"
        android:title="@string/tab2" />

    <item
        android:id="@id/tab3" // Id of navigation graph
        android:icon="@mipmap/ic_launcher"
        android:title="@string/tab3" />
</menu>

nav_graph.xml :

<navigation xmlns:android="http://schemas.android.com/apk/res/android"
    xmlns:app="http://schemas.android.com/apk/res-auto"
    xmlns:tools="http://schemas.android.com/tools"
    android:id="@+id/nav_graph"
    app:startDestination="@id/tab1">
    <fragment
        android:id="@+id/tab1"
        android:name="com.navigationsample.Tab1Fragment"
        android:label="@string/tab1"
        tools:layout="@layout/fragment_tab_1" />

    <fragment
        android:id="@+id/tab2"
        android:name="com.navigationsample.Tab2Fragment"
        android:label="@string/tab2"
        tools:layout="@layout/fragment_tab_2"/>

    <fragment
        android:id="@+id/tab3"
        android:name="com.simform.navigationsample.Tab3Fragment"
        android:label="@string/tab3"
        tools:layout="@layout/fragment_tab_3"/>
</navigation>

By setting up the same id of "nav_graph" to "menu_bottom_navigation" will handle the click of bottom navigation.

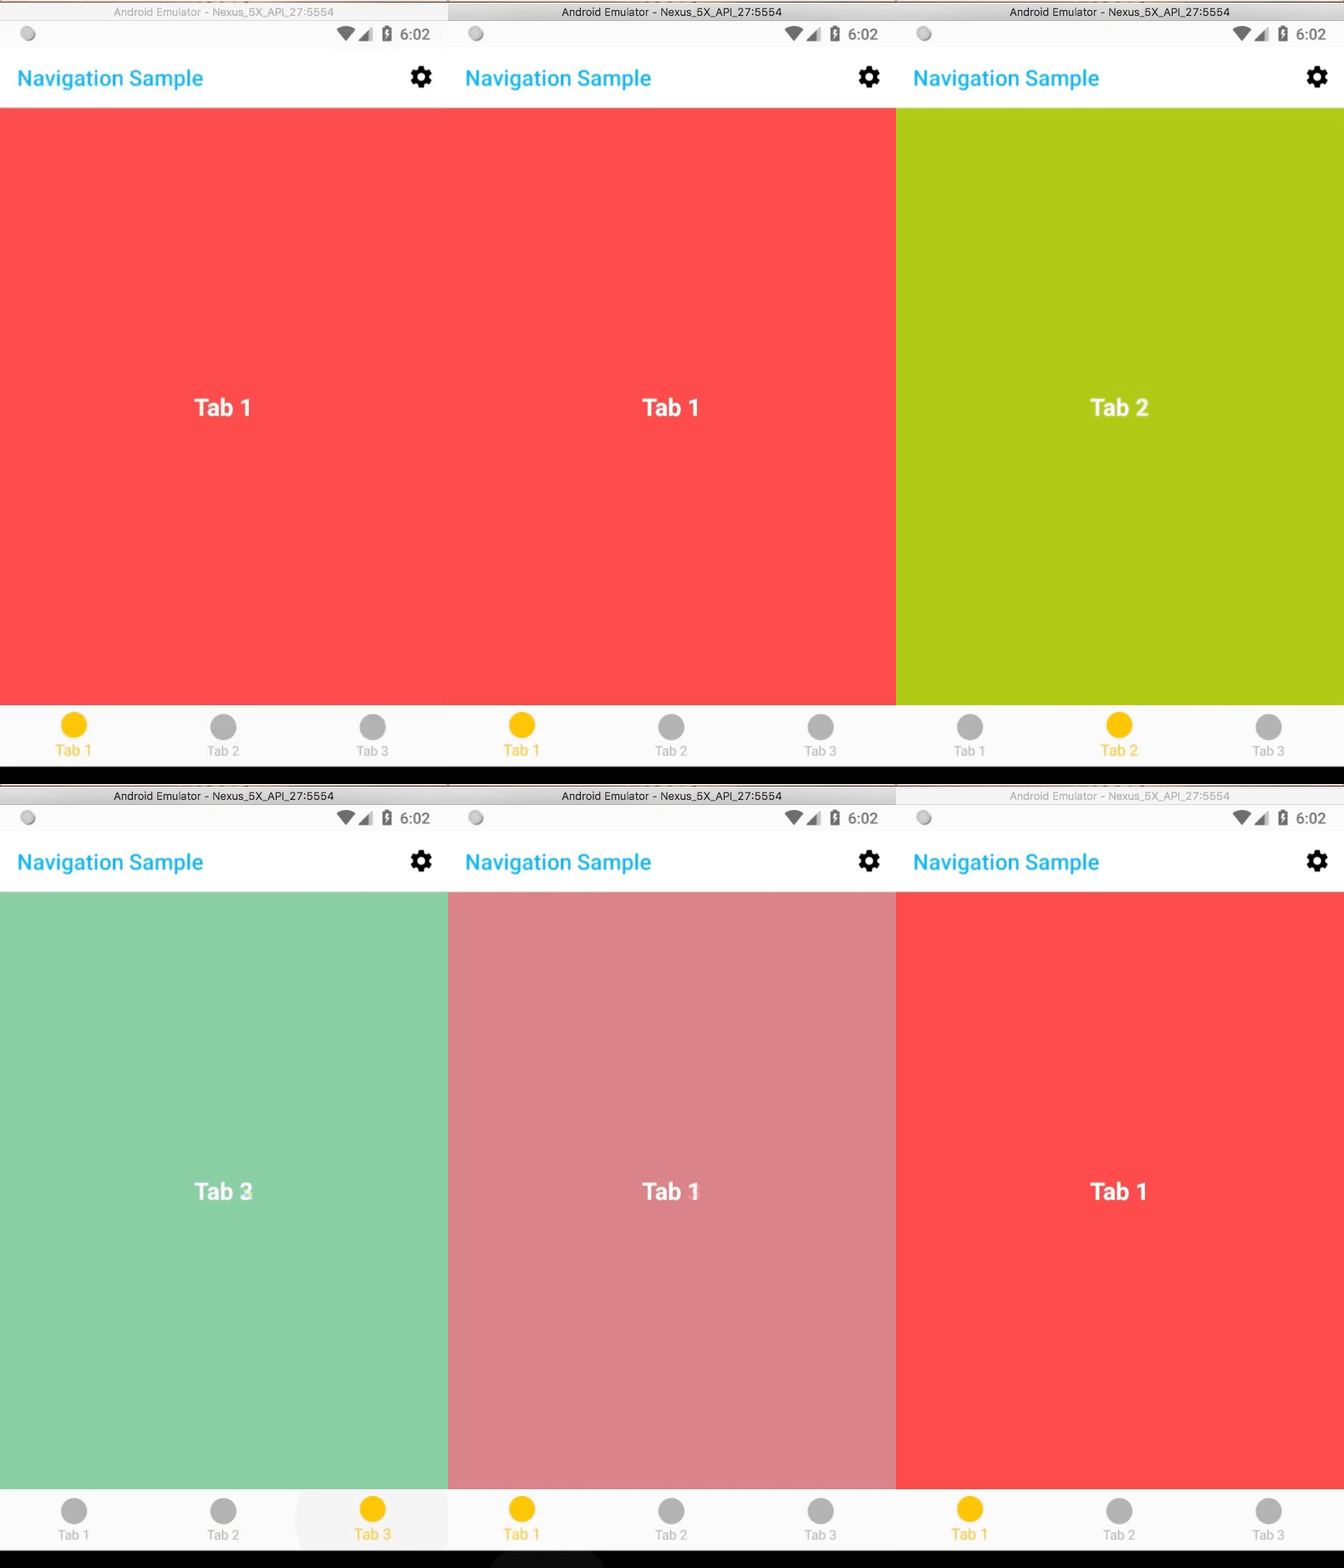
You can handle back action using popUpTo property in action tag. enter image description here

Gca answered 20/6, 2018 at 12:27 Comment(9)
can you elaborate use of popUpTo ?Gullett
@BincyBaby popUpTo property helps you to return on particular fragment on back press.Gca
@Gca but how to set up the popUpTo to the fragment imediatelly pressed before? Like, if you were in frag1 went to frag2 and then to frag3, back press should go back to frag2. If you were in frag1 and went directly to frag3, back press sould go back to frag1. The popUpTo seems to only let you choose one fragment to go back idependently of the user path.Opportina
Not preserving back stack order, back button jumps to 1st tab excluding the 2nd tab. Not only that, won't preserve fragment state, instead creates new instance on every ButtomNavigationItem click.Hedgepeth
@Hedgepeth can control to not create new instance every time on selection.Flowing
@Hedgepeth do you know solution to this? It is causing me a problem.Banket
@SuyashDixit, honestly, I didn't go with this pattern but you can do the following. Create your fragments and show/hide them instead of add/replaceing them. If this is not clear, I will post a code snippet as an answerHedgepeth
have any idea can we use this on my demo #63053212Mousy
what if I press the back button? fragment will navigateUp but the bottomNavbar will not be updated.Durand
O
28

First, let me clarify how Youtube and Instagram handles fragment navigation.

  • When the user is on a detail fragment, back or up pop the stack once, with the state properly restaured. A second click on the already selected bottom bar item pop all the stack to the root, refreshing it
  • When the user is on a root fragment, back goes to the last menu selected on the bottom bar, displaying the last detail fragment, with the state properly restaured (JetPack doesn't)
  • When the user is on the start destination fragment, back finishes activity

None of the other answers above solve all this problems using the jetpack navigation.

JetPack navigation has no standard way to do this, the way that I found more simple is to dividing the navigation xml graph into one for each bottom navigation item, handling the back stack between the navigation items myself using the activity FragmentManager and use the JetPack NavController to handle the internal navigation between root and detail fragments (its implementation uses the childFragmentManager stack).

Suppose you have in your navigation folder this 3 xmls:

res/navigation/
    navigation_feed.xml
    navigation_explore.xml
    navigation_profile.xml

Have your destinationIds inside the navigation xmls the same of your bottomNavigationBar menu ids. Also, to each xml set the app:startDestination to the fragment that you want as the root of the navigation item.

Create a class BottomNavController.kt:

class BottomNavController(
        val context: Context,
        @IdRes val containerId: Int,
        @IdRes val appStartDestinationId: Int
) {
    private val navigationBackStack = BackStack.of(appStartDestinationId)
    lateinit var activity: Activity
    lateinit var fragmentManager: FragmentManager
    private var listener: OnNavigationItemChanged? = null
    private var navGraphProvider: NavGraphProvider? = null

    interface OnNavigationItemChanged {
        fun onItemChanged(itemId: Int)
    }

    interface NavGraphProvider {
        @NavigationRes
        fun getNavGraphId(itemId: Int): Int
    }

    init {
        var ctx = context
        while (ctx is ContextWrapper) {
            if (ctx is Activity) {
                activity = ctx
                fragmentManager = (activity as FragmentActivity).supportFragmentManager
                break
            }
            ctx = ctx.baseContext
        }
    }

    fun setOnItemNavigationChanged(listener: (itemId: Int) -> Unit) {
        this.listener = object : OnNavigationItemChanged {
            override fun onItemChanged(itemId: Int) {
                listener.invoke(itemId)
            }
        }
    }

    fun setNavGraphProvider(provider: NavGraphProvider) {
        navGraphProvider = provider
    }

    fun onNavigationItemReselected(item: MenuItem) {
        // If the user press a second time the navigation button, we pop the back stack to the root
        activity.findNavController(containerId).popBackStack(item.itemId, false)
    }

    fun onNavigationItemSelected(itemId: Int = navigationBackStack.last()): Boolean {

        // Replace fragment representing a navigation item
        val fragment = fragmentManager.findFragmentByTag(itemId.toString())
                ?: NavHostFragment.create(navGraphProvider?.getNavGraphId(itemId)
                        ?: throw RuntimeException("You need to set up a NavGraphProvider with " +
                                "BottomNavController#setNavGraphProvider")
                )
        fragmentManager.beginTransaction()
                .setCustomAnimations(
                        R.anim.nav_default_enter_anim,
                        R.anim.nav_default_exit_anim,
                        R.anim.nav_default_pop_enter_anim,
                        R.anim.nav_default_pop_exit_anim
                )
                .replace(containerId, fragment, itemId.toString())
                .addToBackStack(null)
                .commit()

        // Add to back stack
        navigationBackStack.moveLast(itemId)

        listener?.onItemChanged(itemId)

        return true
    }

    fun onBackPressed() {
        val childFragmentManager = fragmentManager.findFragmentById(containerId)!!
                .childFragmentManager
        when {
            // We should always try to go back on the child fragment manager stack before going to
            // the navigation stack. It's important to use the child fragment manager instead of the
            // NavController because if the user change tabs super fast commit of the
            // supportFragmentManager may mess up with the NavController child fragment manager back
            // stack
            childFragmentManager.popBackStackImmediate() -> {
            }
            // Fragment back stack is empty so try to go back on the navigation stack
            navigationBackStack.size > 1 -> {
                // Remove last item from back stack
                navigationBackStack.removeLast()

                // Update the container with new fragment
                onNavigationItemSelected()
            }
            // If the stack has only one and it's not the navigation home we should
            // ensure that the application always leave from startDestination
            navigationBackStack.last() != appStartDestinationId -> {
                navigationBackStack.removeLast()
                navigationBackStack.add(0, appStartDestinationId)
                onNavigationItemSelected()
            }
            // Navigation stack is empty, so finish the activity
            else -> activity.finish()
        }
    }

    private class BackStack : ArrayList<Int>() {
        companion object {
            fun of(vararg elements: Int): BackStack {
                val b = BackStack()
                b.addAll(elements.toTypedArray())
                return b
            }
        }

        fun removeLast() = removeAt(size - 1)
        fun moveLast(item: Int) {
            remove(item)
            add(item)
        }
    }
}

// Convenience extension to set up the navigation
fun BottomNavigationView.setUpNavigation(bottomNavController: BottomNavController, onReselect: ((menuItem: MenuItem) -> Unit)? = null) {
    setOnNavigationItemSelectedListener {
        bottomNavController.onNavigationItemSelected(it.itemId)
    }
    setOnNavigationItemReselectedListener {
        bottomNavController.onNavigationItemReselected(it)
        onReselect?.invoke(it)
    }
    bottomNavController.setOnItemNavigationChanged { itemId ->
        menu.findItem(itemId).isChecked = true
    }
}

Do your layout main.xml like this:

<androidx.constraintlayout.widget.ConstraintLayout xmlns:android="http://schemas.android.com/apk/res/android"
    xmlns:app="http://schemas.android.com/apk/res-auto"
    xmlns:tools="http://schemas.android.com/tools"
    android:layout_width="match_parent"
    android:layout_height="match_parent">

    <FrameLayout
        android:id="@+id/container"
        android:layout_width="match_parent"
        android:layout_height="0dp"
        app:layout_constraintBottom_toTopOf="@id/bottomNavigationView"
        app:layout_constraintTop_toTopOf="parent" />

    <com.google.android.material.bottomnavigation.BottomNavigationView
        android:id="@+id/bottomNavigationView"
        android:layout_width="match_parent"
        android:layout_height="wrap_content"
        android:layout_marginStart="0dp"
        android:layout_marginEnd="0dp"
        app:layout_constraintBottom_toBottomOf="parent"
        app:menu="@menu/navigation" />

</androidx.constraintlayout.widget.ConstraintLayout>

Use on your activity like this:

class MainActivity : AppCompatActivity(),
        BottomNavController.NavGraphProvider  {

    private val navController by lazy(LazyThreadSafetyMode.NONE) {
        Navigation.findNavController(this, R.id.container)
    }

    private val bottomNavController by lazy(LazyThreadSafetyMode.NONE) {
        BottomNavController(this, R.id.container, R.id.navigation_feed)
    }

    override fun onCreate(savedInstanceState: Bundle?) {
        super.onCreate(savedInstanceState)
        setContentView(R.layout.main)

        bottomNavController.setNavGraphProvider(this)
        bottomNavigationView.setUpNavigation(bottomNavController)
        if (savedInstanceState == null) bottomNavController
                .onNavigationItemSelected()

        // do your things...
    }

    override fun getNavGraphId(itemId: Int) = when (itemId) {
        R.id.navigation_feed -> R.navigation.navigation_feed
        R.id.navigation_explore -> R.navigation.navigation_explore
        R.id.navigation_profile -> R.navigation.navigation_profile
        else -> R.navigation.navigation_feed
    }

    override fun onSupportNavigateUp(): Boolean = navController
            .navigateUp()

    override fun onBackPressed() = bottomNavController.onBackPressed()
}
Opportina answered 3/2, 2019 at 17:23 Comment(12)
this solution looks good but there are some things i noticed : <FrameLayout /> should be a NavHostFragment, every graph got it's own home default so doing this if (savedInstanceState == null) bottomNavController .onNavigationItemSelected() will trigger the fragment two times , it doesn't hold states for the fragments.Furor
The idea of the saved instance state exactly avoided the fragment be created two times. I can't check this because I ended up extending the NavController, and creating a custom Navigator exclusively for NavHostFragments, adding it to this NavController (I called NavHostFragmentNavController). Then I create a graph called navigation_main.xml with the <nav-fragment> elements that represent each a bottom navigation item. The new implementations are bigger but the usage quite simple. The code still has some small bugs that I did not finish yet. I will post it when I fix them.Opportina
yes i guess for now extending the NavController is a sane solution, till Google release the sample.Furor
Shouldn't here a destination be passed as the last parameter instead of R.id.navigation_feed? private val bottomNavController by lazy(LazyThreadSafetyMode.NONE) { BottomNavController(this, R.id.container, R.id.navigation_feed) }Femi
@WWJD, R.id.navigation_feed is a destination. I named the graph id with the same name as it's an initial destination, so R.navigation.navigation_feed has a R.id.navigation_feed destination.Opportina
@AllanVeloso this works perfect for me. Great solution, I just remove the NavigationExtension.kt from the google demo, and added all your code, and works perfect. I just made some updates on the code because I'm using AHBottomNavigation, but works the same. For me this would be the real solution to make a multi stag navigation with the new navigation system.Astragal
Sorry for the noise, I just made an improve of that code adding a "fragmentManager.addOnBackStackChangedListener" on the init of the controller, so you could add the "OnDestinationChangedListener". That way you will always know in what fragment are you, from the controller. That way you can make some updates on the Activity UI in case of need. Ping me if you need the update on the code. Thanks again for this thread! Now works awesome for me.Astragal
@Astragal To keep tracking of the Destination change you can also extend MutableLiveData. The usage would be very simple: DestinationLiveData(navController).observe(this, Observer { dest -> // do things }). It also handles the add and remove listener methods automatically. Right now I am trying to develop a more complete library that overrides the NavController jetpack implementation with this Instagram/youtube behaviour, but I am still fixing some bugs.Opportina
@AllanVeloso sure that will be another way to get it. Looks more clean-code than mine :) I will wait for you library! maybe I could update all what I did with yours. By the way you really save my day, this solution works fine! and I think that all of my project will be working with this navigation system for now and forever! :)Astragal
@AllanVeloso onNavigationItemReselected Doesn't work. I mean popBackStack always returns false. Otherwise everything works like charm.Underclothes
@AllanVeloso Could you please see or help on this ?Underclothes
@DushyantSuthar the implementation of the android arch navigation library changed and now popBackStack() has in my opinion a quite strange behavior (according to Android Team, intended). You can try to replace the .popBackStack() for .navigate(navController.currentDestination.parent) or something similar and check if it works.Opportina
H
11

With the version 2.4.0 of the navigation package, it is finally officially supported!

https://developer.android.com/jetpack/androidx/releases/navigation#version_240_2

Not only that: after uploading the navigation library to this version, this feature is the default behaviour. And as a side note, now this default behaviour includes that fragments are not recreated when navigating among them, that seemed to be something quite requested.

Heptagon answered 21/5, 2021 at 18:47 Comment(1)
Navigation library 2.4.0 doesn’t have similar behaviour as YouTube, Instagram, Amazon bottom navigation bar back behaviour. But it has separate back-stack support for each tab. And by adding some more lines of code we can create similar behaviour as Instagram, Amazon, YoutubeGullett
L
10

You can have a viewpager setup with bottom navigation view. Each fragment in the viewpager will be a container fragment, it will have child fragments with its own backstack. You can maintain backstack for each tab in viewpager this way

Lecky answered 29/5, 2018 at 6:11 Comment(5)
I was using that way, but app starting takes too much time to first launchGullett
Then you must be doing something wrong, make sure you are not doing some heavy work in the oncreate or oncreateview of the fragments. There is no way it would take timeLecky
I have to load contents , i don't think youtube or instagram used ViewPagerGullett
Its definitely a viewpager. Just scroll on one page and try switiching tabs, its really fast and it resumes from the same state. There is no way you can achieve it by changing fragments on the same container, these are multiple fragments viewed using a viewpagerLecky
My guess is also that YouTube or Instagram do not use ViewPager. The restoring happens because of the backStack pop action that resumes the underlying fragment that is added in the first place not replacedAldin
M
6

The key point to have a proper back stack that keeps state's is to have NavHostFragment's which has childFragmentManager and their own backstack. Extension file of Navigation component's advanced sample actually does this.

/**
 * Manages the various graphs needed for a [BottomNavigationView].
 *
 * This sample is a workaround until the Navigation Component supports multiple back stacks.
 */
fun BottomNavigationView.setupWithNavController(
    navGraphIds: List<Int>,
    fragmentManager: FragmentManager,
    containerId: Int,
    intent: Intent
): LiveData<NavController> {

    // Map of tags
    val graphIdToTagMap = SparseArray<String>()
    // Result. Mutable live data with the selected controlled
    val selectedNavController = MutableLiveData<NavController>()

    var firstFragmentGraphId = 0

    // First create a NavHostFragment for each NavGraph ID
    navGraphIds.forEachIndexed { index, navGraphId ->
        val fragmentTag = getFragmentTag(index)

        // Find or create the Navigation host fragment
        val navHostFragment = obtainNavHostFragment(
            fragmentManager,
            fragmentTag,
            navGraphId,
            containerId
        )

        // Obtain its id
        val graphId = navHostFragment.navController.graph.id

        if (index == 0) {
            firstFragmentGraphId = graphId
        }

        // Save to the map
        graphIdToTagMap[graphId] = fragmentTag

        // Attach or detach nav host fragment depending on whether it's the selected item.
        if (this.selectedItemId == graphId) {
            // Update livedata with the selected graph
            selectedNavController.value = navHostFragment.navController
            attachNavHostFragment(fragmentManager, navHostFragment, index == 0)
        } else {
            detachNavHostFragment(fragmentManager, navHostFragment)
        }
    }

    // Now connect selecting an item with swapping Fragments
    var selectedItemTag = graphIdToTagMap[this.selectedItemId]
    val firstFragmentTag = graphIdToTagMap[firstFragmentGraphId]
    var isOnFirstFragment = selectedItemTag == firstFragmentTag

    // When a navigation item is selected
    setOnNavigationItemSelectedListener { item ->
        // Don't do anything if the state is state has already been saved.
        if (fragmentManager.isStateSaved) {
            false
        } else {
            val newlySelectedItemTag = graphIdToTagMap[item.itemId]
            if (selectedItemTag != newlySelectedItemTag) {
                // Pop everything above the first fragment (the "fixed start destination")
                fragmentManager.popBackStack(
                    firstFragmentTag,
                    FragmentManager.POP_BACK_STACK_INCLUSIVE
                )
                val selectedFragment = fragmentManager.findFragmentByTag(newlySelectedItemTag)
                        as NavHostFragment

                // Exclude the first fragment tag because it's always in the back stack.
                if (firstFragmentTag != newlySelectedItemTag) {
                    // Commit a transaction that cleans the back stack and adds the first fragment
                    // to it, creating the fixed started destination.
                    fragmentManager.beginTransaction()
                        .attach(selectedFragment)
                        .setPrimaryNavigationFragment(selectedFragment)
                        .apply {
                            // Detach all other Fragments
                            graphIdToTagMap.forEach { _, fragmentTagIter ->
                                if (fragmentTagIter != newlySelectedItemTag) {
                                    detach(fragmentManager.findFragmentByTag(firstFragmentTag)!!)
                                }
                            }
                        }
                        .addToBackStack(firstFragmentTag)
                        .setCustomAnimations(
                            R.anim.nav_default_enter_anim,
                            R.anim.nav_default_exit_anim,
                            R.anim.nav_default_pop_enter_anim,
                            R.anim.nav_default_pop_exit_anim
                        )
                        .setReorderingAllowed(true)
                        .commit()
                }
                selectedItemTag = newlySelectedItemTag
                isOnFirstFragment = selectedItemTag == firstFragmentTag
                selectedNavController.value = selectedFragment.navController
                true
            } else {
                false
            }
        }
    }

    // Optional: on item reselected, pop back stack to the destination of the graph
    setupItemReselected(graphIdToTagMap, fragmentManager)

    // Handle deep link
    setupDeepLinks(navGraphIds, fragmentManager, containerId, intent)

    // Finally, ensure that we update our BottomNavigationView when the back stack changes
    fragmentManager.addOnBackStackChangedListener {
        if (!isOnFirstFragment && !fragmentManager.isOnBackStack(firstFragmentTag)) {
            this.selectedItemId = firstFragmentGraphId
        }

        // Reset the graph if the currentDestination is not valid (happens when the back
        // stack is popped after using the back button).
        selectedNavController.value?.let { controller ->
            if (controller.currentDestination == null) {
                controller.navigate(controller.graph.id)
            }
        }
    }
    return selectedNavController
}

private fun BottomNavigationView.setupDeepLinks(
    navGraphIds: List<Int>,
    fragmentManager: FragmentManager,
    containerId: Int,
    intent: Intent
) {
    navGraphIds.forEachIndexed { index, navGraphId ->
        val fragmentTag = getFragmentTag(index)

        // Find or create the Navigation host fragment
        val navHostFragment = obtainNavHostFragment(
            fragmentManager,
            fragmentTag,
            navGraphId,
            containerId
        )
        // Handle Intent
        if (navHostFragment.navController.handleDeepLink(intent)
            && selectedItemId != navHostFragment.navController.graph.id
        ) {
            this.selectedItemId = navHostFragment.navController.graph.id
        }
    }
}

private fun BottomNavigationView.setupItemReselected(
    graphIdToTagMap: SparseArray<String>,
    fragmentManager: FragmentManager
) {
    setOnNavigationItemReselectedListener { item ->
        val newlySelectedItemTag = graphIdToTagMap[item.itemId]
        val selectedFragment = fragmentManager.findFragmentByTag(newlySelectedItemTag)
                as NavHostFragment
        val navController = selectedFragment.navController
        // Pop the back stack to the start destination of the current navController graph
        navController.popBackStack(
            navController.graph.startDestination, false
        )
    }
}

private fun detachNavHostFragment(
    fragmentManager: FragmentManager,
    navHostFragment: NavHostFragment
) {
    fragmentManager.beginTransaction()
        .detach(navHostFragment)
        .commitNow()
}

private fun attachNavHostFragment(
    fragmentManager: FragmentManager,
    navHostFragment: NavHostFragment,
    isPrimaryNavFragment: Boolean
) {
    fragmentManager.beginTransaction()
        .attach(navHostFragment)
        .apply {
            if (isPrimaryNavFragment) {
                setPrimaryNavigationFragment(navHostFragment)
            }
        }
        .commitNow()

}

private fun obtainNavHostFragment(
    fragmentManager: FragmentManager,
    fragmentTag: String,
    navGraphId: Int,
    containerId: Int
): NavHostFragment {
    // If the Nav Host fragment exists, return it
    val existingFragment = fragmentManager.findFragmentByTag(fragmentTag) as NavHostFragment?
    existingFragment?.let { return it }

    // Otherwise, create it and return it.
    val navHostFragment = NavHostFragment.create(navGraphId)
    fragmentManager.beginTransaction()
        .add(containerId, navHostFragment, fragmentTag)
        .commitNow()
    return navHostFragment
}

private fun FragmentManager.isOnBackStack(backStackName: String): Boolean {
    val backStackCount = backStackEntryCount
    for (index in 0 until backStackCount) {
        if (getBackStackEntryAt(index).name == backStackName) {
            return true
        }
    }
    return false
}

private fun getFragmentTag(index: Int) = "bottomNavigation#$index"

Important part here is to obtain NavHostFragment if it does not exist in back stack with the function above and add it to back stack. commitNow is synchronous unlike commit

private fun obtainNavHostFragment( fragmentManager: FragmentManager, fragmentTag: String, navGraphId: Int, containerId: Int ): NavHostFragment { // If the Nav Host fragment exists, return it val existingFragment = fragmentManager.findFragmentByTag(fragmentTag) as NavHostFragment? existingFragment?.let { return it }

// Otherwise, create it and return it.
val navHostFragment = NavHostFragment.create(navGraphId)
fragmentManager.beginTransaction()
    .add(containerId, navHostFragment, fragmentTag)
    .commitNow()
return navHostFragment

}

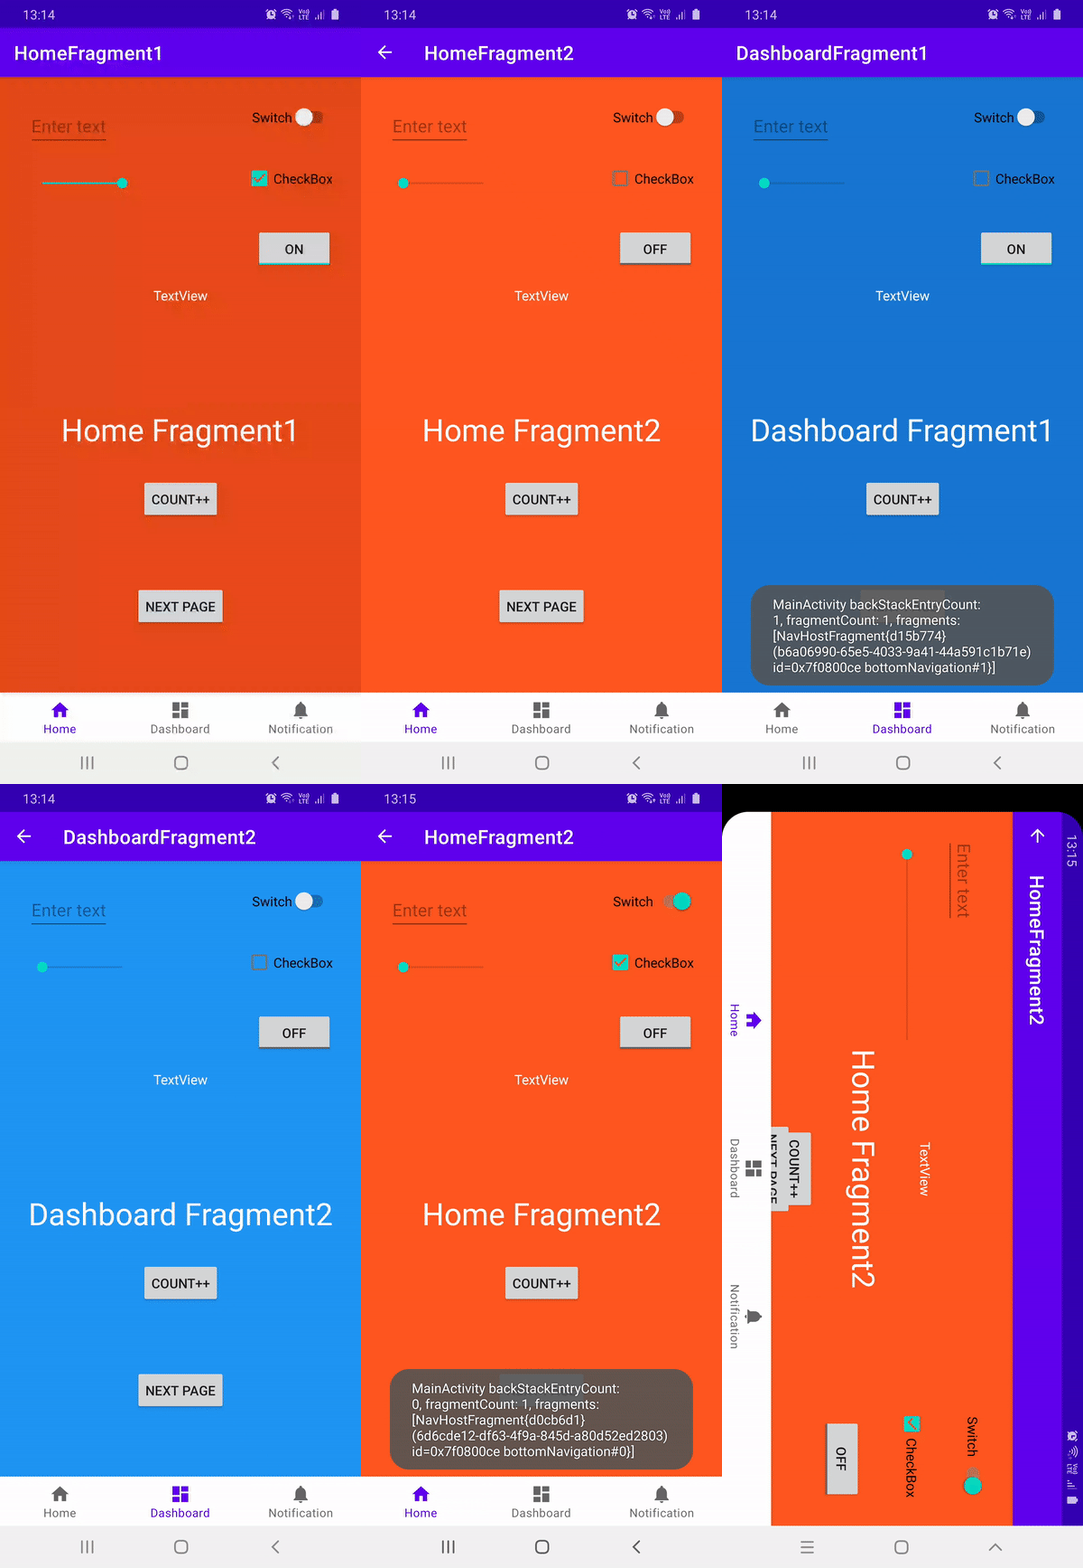
I built one using the NavigationExtension above which looks like this

BottomNavigationView with Navigation Component

with nested navigation.

Navigation graphs are similar, so only i add one

nav_graph_home.xml

<?xml version="1.0" encoding="utf-8"?>
<navigation xmlns:android="http://schemas.android.com/apk/res/android"
    xmlns:app="http://schemas.android.com/apk/res-auto"
    xmlns:tools="http://schemas.android.com/tools"
    android:id="@+id/nav_graph_home"
    app:startDestination="@id/homeFragment1">


    <fragment
        android:id="@+id/homeFragment1"
        android:name="com.smarttoolfactory.tutorial5_3navigationui_bottomnavigation_nestednavigation.blankfragment.HomeFragment1"
        android:label="HomeFragment1"
        tools:layout="@layout/fragment_home1">
        <action
            android:id="@+id/action_homeFragment1_to_homeFragment2"
            app:destination="@id/homeFragment2" />
    </fragment>

    <fragment
        android:id="@+id/homeFragment2"
        android:name="com.smarttoolfactory.tutorial5_3navigationui_bottomnavigation_nestednavigation.blankfragment.HomeFragment2"
        android:label="HomeFragment2"
        tools:layout="@layout/fragment_home2">
        <action
            android:id="@+id/action_homeFragment2_to_homeFragment3"
            app:destination="@id/homeFragment3" />
    </fragment>

    <fragment
        android:id="@+id/homeFragment3"
        android:name="com.smarttoolfactory.tutorial5_3navigationui_bottomnavigation_nestednavigation.blankfragment.HomeFragment3"
        android:label="HomeFragment3"
        tools:layout="@layout/fragment_home3" >
        <action
            android:id="@+id/action_homeFragment3_to_homeFragment1"
            app:destination="@id/homeFragment1"
            app:popUpTo="@id/homeFragment1"
            app:popUpToInclusive="true" />
    </fragment>

</navigation>

Menu for bottom navigation

menu_bottom_nav.xml

<?xml version="1.0" encoding="utf-8"?>
<menu xmlns:android="http://schemas.android.com/apk/res/android">

    <item
            android:id="@+id/nav_graph_home"
            android:icon="@drawable/ic_baseline_home_24"
            android:title="Home"/>

    <item
            android:id="@+id/nav_graph_dashboard"
            android:icon="@drawable/ic_baseline_dashboard_24"
            android:title="Dashboard"/>

    <item
            android:id="@+id/nav_graph_notification"
            android:icon="@drawable/ic_baseline_notifications_24"
            android:title="Notification"/>
    
</menu>

Layout for MainActivity that contains FragmentContainerView and BottomNavigationView

activiy_main.xml

<?xml version="1.0" encoding="utf-8"?>
<androidx.constraintlayout.widget.ConstraintLayout xmlns:android="http://schemas.android.com/apk/res/android"
    xmlns:app="http://schemas.android.com/apk/res-auto"
    xmlns:tools="http://schemas.android.com/tools"
    android:layout_width="match_parent"
    android:layout_height="match_parent"
    tools:context=".MainActivity">

    <androidx.fragment.app.FragmentContainerView
        android:id="@+id/nav_host_container"
        android:layout_width="0dp"
        android:layout_height="0dp"
        app:layout_constraintBottom_toTopOf="@+id/bottom_nav"
        app:layout_constraintLeft_toLeftOf="parent"
        app:layout_constraintRight_toRightOf="parent"
        app:layout_constraintTop_toTopOf="parent" />

    <com.google.android.material.bottomnavigation.BottomNavigationView
        android:id="@+id/bottom_nav"
        android:layout_width="match_parent"
        android:layout_height="wrap_content"
        app:layout_constraintBottom_toBottomOf="parent"
        app:menu="@menu/menu_bottom_nav" />

</androidx.constraintlayout.widget.ConstraintLayout>

MainActivity.kt

class MainActivity : AppCompatActivity() {

    private var currentNavController: LiveData<NavController>? = null

    override fun onCreate(savedInstanceState: Bundle?) {
        super.onCreate(savedInstanceState)
        setContentView(R.layout.activity_main)

        supportFragmentManager.addOnBackStackChangedListener {
            val backStackEntryCount = supportFragmentManager.backStackEntryCount
            val fragments = supportFragmentManager.fragments
            val fragmentCount = fragments.size


            Toast.makeText(
                this,
                "MainActivity backStackEntryCount: $backStackEntryCount, fragmentCount: $fragmentCount, fragments: $fragments",
                Toast.LENGTH_SHORT
            ).show()
        }


        if (savedInstanceState == null) {
            setupBottomNavigationBar()
        } // Else, need to wait for onRestoreInstanceState
    }

    override fun onRestoreInstanceState(savedInstanceState: Bundle?) {
        super.onRestoreInstanceState(savedInstanceState)
        // Now that BottomNavigationBar has restored its instance state
        // and its selectedItemId, we can proceed with setting up the
        // BottomNavigationBar with Navigation
        setupBottomNavigationBar()
    }

    /**
     * Called on first creation and when restoring state.
     */
    private fun setupBottomNavigationBar() {
        val bottomNavigationView = findViewById<BottomNavigationView>(R.id.bottom_nav)

        val navGraphIds = listOf(
            R.navigation.nav_graph_home,
            R.navigation.nav_graph_dashboard,
            R.navigation.nav_graph_notification
        )

        // Setup the bottom navigation view with a list of navigation graphs
        val controller = bottomNavigationView.setupWithNavController(
            navGraphIds = navGraphIds,
            fragmentManager = supportFragmentManager,
            containerId = R.id.nav_host_container,
            intent = intent
        )
        // Whenever the selected controller changes, setup the action bar.
        controller.observe(this, Observer { navController ->
            setupActionBarWithNavController(navController)
        })
        currentNavController = controller
    }

    override fun onSupportNavigateUp(): Boolean {
        return currentNavController?.value?.navigateUp() ?: false
    }
}

Fragment layouts and classes are simple classes so i skipped them out.You can check out full sample i built, or Google's repository to examine extension for advanced navigation or or other samples.

Millda answered 27/6, 2020 at 10:33 Comment(3)
do you have any idea about this #63053212Mousy
@SunilChaudhary, yes if you check out repo for navigation components, or extension function above or in the link you can see how it works. Examples in this repo show how to do it with different ways.Millda
OMG you are a genius. I 'been looking for my navigation to have features like this. Have you uploaded this repo to github by any chance?Khudari
G
4

I have made an app like this (still not published on PlayStore) that has the same navigation, maybe its implementation is different from what Google does in their apps, but the functionality is the same.

the structure involves I have Main Activity that I switch the content of it by showing/hiding fragments using:

public void switchTo(final Fragment fragment, final String tag /*Each fragment should have a different Tag*/) {

// We compare if the current stack is the current fragment we try to show
if (fragment == getSupportFragmentManager().getPrimaryNavigationFragment()) {
  return;
}

// We need to hide the current showing fragment (primary fragment)
final Fragment currentShowingFragment = getSupportFragmentManager().getPrimaryNavigationFragment();

final FragmentTransaction fragmentTransaction = getSupportFragmentManager().beginTransaction();
if (currentShowingFragment != null) {
  fragmentTransaction.hide(currentShowingFragment);
}

// We try to find that fragment if it was already added before
final Fragment alreadyAddedFragment = getSupportFragmentManager().findFragmentByTag(tag);
if (alreadyAddedFragment != null) {
  // Since its already added before we just set it as primary navigation and show it again
  fragmentTransaction.setPrimaryNavigationFragment(alreadyAddedFragment);
  fragmentTransaction.show(alreadyAddedFragment);
} else {
  // We add the new fragment and then show it
  fragmentTransaction.add(containerId, fragment, tag);
  fragmentTransaction.show(fragment);
  // We set it as the primary navigation to support back stack and back navigation
  fragmentTransaction.setPrimaryNavigationFragment(fragment);
}

fragmentTransaction.commit();
}
Gilliland answered 19/6, 2018 at 12:48 Comment(0)
D
3

The best solution is the solution that is provided by google team on his repo, the back button still sends u back to first button but the rest behavior its "normal"... It looks strage that Google is still not provinding a good solution, even when they are using it on (youtube, Google Photos, etc), they said androidx its out there to help, but is look like just we go around and find a workaround for the normal stuff.

Here is the link to google Repo where they are using nav. bottom with a navGraph per each button. https://github.com/android/architecture-components-samples/blob/master/NavigationAdvancedSample/app/src/main/java/com/example/android/navigationadvancedsample/NavigationExtensions.kt copy this file into ur project and have a look how it`s implemented in their project. For back button behavior u can create un own stack and onBackpressed just navigate on that stack.

Darrow answered 23/11, 2019 at 13:30 Comment(0)
T
2

Short and good code in Kotlin to connect bottom navigation items with fragments inside navigation graph:

    val navControl = findNavController( R.id.nav_host_frag_main)
    bottomNavigationView?.setupWithNavController(navControl)

*Just consider:Bottom navigation id's & fragments inside navigation graph must have the same id. Also thanks to good explanation from @sanat Answer

Twoedged answered 15/7, 2019 at 9:6 Comment(1)
you should also hide the "up" arrows on direct children of the BNV: setupActionBarWithNavController(navController, AppBarConfiguration.Builder(bottomNavigationView.menu).build())Mornings
I
0

If you have a bottomNavigationView with 3 items corresponding to 3 Fragments: FragmentA, FragmentB and FragmentC where FragmentA is the startDestination in your navigation graph, then when you're on FragmentB or FragmentC and you click back, you're going to be redirected to FragmentA, that's the behavior recommended by Google and that's implemented by default.

If however you wish to alter this behavior, you'll need to either use a ViewPager as was suggested by some of the other answers, or manually handle the fragments backStack and back transactions yourself -which in a way would undermine the use of the Navigation component altogether-.

Isomorph answered 28/8, 2018 at 18:20 Comment(3)
But youtube, Instagram, Saavn has different behaviourGullett
True, there's no right or wrong way of doing it, it's just about what google supports by default (and thus recommends) and what your needs are. If these two don't align you need to work around it.Isomorph
But the problem is that if you are using the JetPack Navigation the backStack will be empty. Apparently JetPack is not adding nothing to the back stack when handling BottomNavigation clicks.Opportina
H
0

I didn't find any official solutions, but I use my own way

First, I create Stack for handle fragments

    needToAddToBackStack : Boolen = true


    private lateinit var fragmentBackStack: Stack<Int>
    fragmentBackStack = Stack()

and in

navController.addOnDestinationChangedListener { _, destination, _ ->
        if (needToAddToBackStack) {
            fragmentBackStack.add(destination.id)
        }


        needToAddToBackStack = true

    }

and handle the back button

override fun onBackPressed() {
    if (::fragmentBackStack.isInitialized && fragmentBackStack.size > 1) {
        fragmentBackStack.pop()
        val fragmentId = fragmentBackStack.lastElement()
        needToAddToBackStack = false
        navController.navigate(fragmentId)

    } else {
        if (::fragmentBackStack.isInitialized && fragmentBackStack.size == 1) {
            finish()
        } else {
            super.onBackPressed()
        }
    }
Haler answered 2/12, 2019 at 6:3 Comment(1)
It is working fine with normal navigation, but there is one issue while navigating using BottomNavigationView. For instance, let's say I have BottomNavigation with three tab with it's respected Fragments A, B, C. Now my navigation path is Fragment A to B(click on tab B), from B to D(it's another fragment opened on button click from B), D to E(another fragment opened on button click from D) and lastly E to C(by clicking on tab C); from there when i press back it's going to fragment E but it shows the current selected tab C(Ideally it should show tab B), Is there any way i can fix this?Excruciation
S
0

Originally answered here: https://mcmap.net/q/260467/-how-to-handle-back-button-when-at-the-starting-destination-of-the-navigation-component

In Jetpack Navigation Componenet, if you want to perform some operation when fragment is poped then you need to override following functions.

  1. Add OnBackPressedCallback in fragment to run your special operation when back is pressed present in system navigation bar at bottom.

     override fun onCreate(savedInstanceState: Bundle?) {
         super.onCreate(savedInstanceState)
    
         onBackPressedCallback = object : OnBackPressedCallback(true) {
             override fun handleOnBackPressed() {
                 //perform your operation and call navigateUp
                findNavController().navigateUp()
             }
         }
     requireActivity().onBackPressedDispatcher.addCallback(onBackPressedCallback)
     }
    
  2. Add onOptionsItemMenu in fragment to handle back arrow press present at top left corner within the app.

     override fun onViewCreated(view: View, savedInstanceState: Bundle?) {
         super.onViewCreated(view, savedInstanceState)
    
         setHasOptionsMenu(true)
     }
    
    override fun onOptionsItemSelected(item: MenuItem): Boolean {
       if (item.itemId == android.R.id.home) {
           //perform your operation and call navigateUp
           findNavController().navigateUp()
           return true
       }
       return super.onOptionsItemSelected(item)
    }
    
  3. If there is no special code to be run when back is pressed on host fragment then use onSupportNavigateUp in Activity.

     override fun onSupportNavigateUp(): Boolean {
       if (navController.navigateUp() == false){
         //navigateUp() returns false if there are no more fragments to pop
         onBackPressed()
       }
       return navController.navigateUp()
     }
    

Note that onSupportNavigateUp() is not called if the fragment contains onOptionsItemSelected()

Straightjacket answered 29/8, 2020 at 10:35 Comment(0)
G
0

Since Navigation version 2.4.0, BottomNavigationView with NavHostFragment supports a separate back stack for each tab, so Elyeante answer is 50% correct. But it doesn't support back stack for primary tabs. For example, if we have 4 main fragments (tabs) A, B, C, and D, the startDestination is A. D has child fragments D1, D2, and D3. If user navigates like A -> B -> C ->D -> D1 -> D2-> D3, if the user clicks the back button with the official library the navigation will be D3 -> D2-> D1-> D followed by A. That means primary tabs B and C will not be in the back stack.

To support the primary tab back stack, I created a stack with a primary tab navigation reference. On the user's back click, I updated the selected item of BottomNavigationView based on the stack created.

I have created this Github repo to show what I did. I reached this answer with the following medium articles.

Steps to implement

Add the latest navigation library to Gradle and follow Official repo for supporting back stack for child fragments.

Instead of creating single nav_graph, we have to create separate navigation graphs for each bottom bar item and this three graph should add to one main graph as follows

<navigation
    xmlns:android="http://schemas.android.com/apk/res/android"
    xmlns:app="http://schemas.android.com/apk/res-auto"
    android:id="@+id/nav_graph"
    app:startDestination="@+id/home">

    <include app:graph="@navigation/home"/>
    <include app:graph="@navigation/list"/>
    <include app:graph="@navigation/form"/>

</navigation>

And link bottom navigation view and nav host fragment with setupWithNavController

Now the app will support back stack for child fragments. For supporting the main back navigation, we need to add more lines.

private var addToBackStack: Boolean = true
private lateinit var fragmentBackStack: Stack<Int>

The fragmentBackStack will help us to save all the visited destinations in the stack & addToBackStack is a checker which will help to determine if we want to add the current destination into the stack or not.

navHostFragment.findNavController().addOnDestinationChangedListener { _, destination, _ ->
    val bottomBarId = findBottomBarIdFromFragment(destination.id)
    if (!::fragmentBackStack.isInitialized){
        fragmentBackStack = Stack()
    }
    if (needToAddToBackStack && bottomBarId!=null) {
        if (!fragmentBackStack.contains(bottomBarId)) {
            fragmentBackStack.add(bottomBarId)
        } else if (fragmentBackStack.contains(bottomBarId)) {
            if (bottomBarId == R.id.home) {
                val homeCount =
                    Collections.frequency(fragmentBackStack, R.id.home)
                if (homeCount < 2) {
                    fragmentBackStack.push(bottomBarId)
                } else {
                    fragmentBackStack.asReversed().remove(bottomBarId)
                    fragmentBackStack.push(bottomBarId)
                }
            } else {
                fragmentBackStack.remove(bottomBarId)
                fragmentBackStack.push(bottomBarId)
            }
        }

    }
    needToAddToBackStack = true
}

When navHostFragment changes the fragment we get a callback to addOnDestinationChangedListener and we check whether the fragment is already existing in the Stack or not. If not we will add to the top of the Stack, if yes we will swap the position to the Stack's top. As we are now using separate graph for each tab the id in the addOnDestinationChangedListener and BottomNavigationView will be different, so we use findBottomBarIdFromFragment to find BottomNavigationView item id from destination fragment.

private fun findBottomBarIdFromFragment(fragmentId:Int?):Int?{
    if (fragmentId!=null){
        val bottomBarId = when(fragmentId){
            R.id.register ->{
                R.id.form
            }
            R.id.leaderboard -> {
                R.id.list
            }
            R.id.titleScreen ->{
                R.id.home
            }
            else -> {
                null
            }
        }
        return bottomBarId
    } else {
        return null
    }
}

And when the user clicks back we override the activity's onBackPressed method(NB:onBackPressed is deprecated I will update the answer once I find a replacement for super.onBackPressed() inside override fun onBackPressed())

override fun onBackPressed() {
    val bottomBarId = if (::navController.isInitialized){
        findBottomBarIdFromFragment(navController.currentDestination?.id)
    } else {
        null
    }
    if (bottomBarId!=null) {
        if (::fragmentBackStack.isInitialized && fragmentBackStack.size > 1) {
            if (fragmentBackStack.size == 2 && fragmentBackStack.lastElement() == fragmentBackStack.firstElement()){
                finish()
            } else {
                fragmentBackStack.pop()
                val fragmentId = fragmentBackStack.lastElement()
                needToAddToBackStack = false
                bottomNavigationView.selectedItemId = fragmentId
            }
        } else {
            if (::fragmentBackStack.isInitialized && fragmentBackStack.size == 1) {
                finish()
            } else {
                super.onBackPressed()
            }
        }
    } else super.onBackPressed()
}

When the user clicks back we will pop the last fragment from Stack and set the selected item id in the bottom navigation view.

Medium Link

Gullett answered 6/5, 2023 at 4:42 Comment(0)
P
-1

After read your question, I checked Google document again. And I saw that they have provided a solution make Navigation UI work well with BottomNavigationView. So, I created a tutorial for any guys that also need it like me. For text version: https://nhatvm.com/how-to-use-navigationui-with-bottomnavigation-in-android/ And for youtube version: https://youtu.be/2uxILvBbkyY

Peltier answered 27/4, 2020 at 8:33 Comment(1)
this is the how-to using the navigation UI with bottom navigation view and not helping to solve this issue!Amery

© 2022 - 2024 — McMap. All rights reserved.