Eclipse "this compilation unit is not on the build path of a java project"
Asked Answered
T

24

78

I can't get autocompletion to work in Eclipse.

I'm working on the project on svn. I set up the project in Eclipse by going into

File -> Import -> Checkout As a Project -> New Project Wizard.

I chose Enterprise Java Application. Everything seemed to work fine except instead of autocompletion working as I expected I got a popup dialog displaying the message

This compilation unit is not on the build path of a java project.

I've Googled it and everyone says that the project must be a Java project, but it is! What is the problem?

Update

The catalog structure on svn looks like this:

-Project_name
  -application
     -META-INF
       application.xml
       MANIFEST.MF
  +build
  +db
  +deploy
  +dist
  +lib
  +properties
  +script
  -src
     -META-INF
        someother.xml (datasource info)
        persistence.xml
        folder hierarchy with source files (should be package)
  -web
     some folders
          .
          .
     files
       .
       .
     -WEB-INF
        faces-config.xml
        jboss-web.xml
        web.xml
     build_win.xml

How do I tell Eclipse where the source files folder, application.xml, and other configuration xml files are?

Trulatrull answered 5/2, 2010 at 10:43 Comment(1)
Did you check #908989 ?Admission
A
139

When you have a multimodules maven project under a parent project, make sure you're not editing the file in the maven parent project.

Agripina answered 14/9, 2011 at 11:43 Comment(9)
this answer should have more ups, in a project with nested child modules/projects, eclipse navigation and package explorer will show each child project files under each of its successive parent and also on its own. when editing, to have autocompletion, everything else suggested in the other answers above being correct, you should be using the using the child project thats on its own (that is, not under any parent project) in the explorer.Misrule
I can't understand how to edit a class under a parent project only?? So why u say not to do so? I have a parent project, and there are sub projects/modules and I was editing one of them at which the given error came.Fiberglass
Pathetically simple. Should be accepted answer unless this problem can occur in not-Maven projectsLexicographer
+1. What happened to me was I did a ctrl + H and searched files for some text. A file come up in the results, so I clicked on it and didn't realize the file I was in was opened via the parent instead of the child module. I got this error as I tried to type in a class.method.Shimmy
I would add that what you will see in such a situation is the same file apparently in two "different" places but as the answer indicates, edit it under the project itself, not the parent project.Ahlers
You are my heroHorrific
@redochika you wrote this nearly a decade ago and it solved a lowly junior developer's frustration in a way that no other solutions has in 2020. Thank You, You from the past.Feme
@Feme your comment makes me feel that I am part of the history :) More import, since then I moved to Intellij and .. I will never, ever go back to Eclipse ;)Agripina
@SamithaChathuranga when importing the project into Eclipse, instead of opening the parent project, you can go one folder deeper and open the child project that you want to work on.Dyslexia
S
17

What I did to make one of my projects to check out properly is by

1) Import your project from svn

      file-->import-->SVN-Checkout Projects From SVN

2) Find your Project and then in the "Check Out As" dialogue make sure you have the radio button selected "Check out as a project configured using the New Project Wizard"

3) Go through regular steps.

The wizard pulls the project properly and then setups your eclipse....

without using the wizard I find that all hell breaks loose.....

Hope this helps...

Skees answered 23/6, 2011 at 7:43 Comment(0)
B
17

This is what was missing in my .project file:

    <projectDescription>
        ...
        <buildSpec>
            <buildCommand>
                <name>org.eclipse.jdt.core.javabuilder</name>
                <arguments>
                </arguments>
            </buildCommand>
        </buildspec>
        ...
        ...
        ...
        <natures>
            <nature>org.eclipse.jdt.core.javanature</nature>
            <nature>org.eclipse.m2e.core.maven2Nature</nature>
        </natures>
        ...
    </projectDescription>
Brightness answered 7/11, 2012 at 14:17 Comment(2)
Adding the jdt.core nature to my .project file fixed it for me.Orme
After the above change, I had to right click on the project, select Maven and update project to kick in the above changes. Then it worked.Kiloton
A
10

I have this issue from time-to-time and often it's because the project wasn't marked as a java project. You can change this by going to the properties for the project > Project Facets > and selecting java. You may then need to properly configure that project, but this is probably part of the problem

Alvis answered 20/3, 2011 at 0:13 Comment(0)
F
5

I also had this problem after converting my java project into a maven project. I solved it as follows:

Right click on your project ->Project Facets -> click on Java, then Apply.

Felonious answered 2/5, 2012 at 7:15 Comment(1)
I'm using STS 3.8.2 and imported a project by folder. The Java files were in a single sub-directory, not the standard src/main/java location. I'm not sure that was the issue, but there were no options under the run menu. Thanks this helped a lot; there were a couple extra steps. I needed to go to Properties before Project Facets. There is also a Runtimes tab where I needed to select my Java version.Inductee
E
4

Did you have your .project file in your folders?

I got the same problem. Than i realized that I didn't have the .project file.

Empirin answered 6/8, 2010 at 10:41 Comment(0)
J
4

I might be picking up the wrong things from so many comments, but if you are using Maven, then are you doing the usual command prompt build and clean?

Go to cmd, navigate to your workspace (usually c:/workspace). Then run "mvn clean install -DskipTests"

After that run "mvn eclipse:eclipse eclipse:clean" (don't need to worry about piping).

Also, do you have any module dependencies in your projects?

If so, try removing the dependencies clicking apply, then readding the dependencies. As this can set eclipse right when it get's confused with buildpath sometimes.

Hope this helps!

Juryrigged answered 17/2, 2011 at 9:35 Comment(1)
Shouldn't it be "mvn eclipse:clean eclipse:eclipse" instead? If I understand your command correctly, it first generates the Eclipse project and immediately removes it afterwards - that looks like a bug.Impost
F
2

I did copy the .classpath and .project from another project and adjusted the values properly.

Close the project before editing those files, when you are sure they reflect the reality (your reality anyway), re-open the project in Eclipse.

The workspace is rebuilt and all should work from then on.

Fustian answered 16/11, 2010 at 21:35 Comment(0)
F
2

in my case it's a maven project

delete the project from eclipse leaving the sources close eclipse delete from filesystem

.target/ .classpath .project .settings/ open eclipse Again Import Maven Projects

This solved the problem

Florance answered 13/12, 2010 at 9:42 Comment(0)
C
2

You may want to try running eclipse with the -clean startup option - it tries re-building eclipse's metadata of the workspace.

Cobweb answered 15/2, 2011 at 17:14 Comment(0)
G
2
mvn eclipse:eclipse

solved my problem

Godevil answered 15/3, 2018 at 14:28 Comment(0)
D
1

Your source files should be in a structure with a 'package' icon in the Package Explorer view (in the menu under Window > Show View > Package Explorer or press Ctrl+3 and type pack), like this:

Java project in Eclipse

If they are not, select the folder containing your root package (src in the image above) and select Use as Source Folder from the context menu (right click).

Dutybound answered 5/2, 2010 at 21:12 Comment(3)
But it's Java Enterprise project. When I click right on any folder, there is no such thing as Use as Source Folder.Trulatrull
@l245c4l: Try doing it in the Package Explorer view (edited my answer to add details).Dutybound
No it doesnt work either. There is no such element in menu. Check out my question again, I updated it so there is svn project structure now. Thanks for your time.Trulatrull
S
1

Here the steps for creating a source folder in eclipse.

  1. Right click on the project and go to properties
  2. Select "Java Build Path" from the properties dialog box
  3. Select the source tab and check that the source folders are correct if not click on the remove button to remove source folders, or the add button to add source folders.

You can control the order in which source folders appear in a project on order and export tab on the configure build path option.

Squamation answered 16/2, 2011 at 20:53 Comment(0)
F
1

Had the same problem (but with Maven). The reason was incorrect choice of executor: my project used global settings that are not avilable from Embedded installation of Maven. Changed it to external (Window -> Preferences -> Maven -> Installations) and that fixed the problem.

Farlay answered 30/10, 2012 at 10:2 Comment(0)
B
1

What i did is after importing the project from svn , deleted the project from workspace and imported it as a maven project from local . Then in preferences->maven->usersettings->in usersettings box gave path of settings.xml which will be in apache maven folder-> conf->settings.xml

and it solved the issue for me.

Blithering answered 8/8, 2017 at 7:58 Comment(0)
P
0

Like the message says, is the file somewhere on the project's Java Build Path (e.g. a Source folder)?

Phosphorate answered 5/2, 2010 at 19:55 Comment(0)
M
0

Had the same problem. Solution: Context menu -> Maven -> Enable dependency management

Do not know why that was lost, when checking out.

Merciless answered 20/4, 2012 at 6:57 Comment(0)
S
0

I found that I was getting this error due to having my files, including my main class, outside of the .src folder.

Strachey answered 2/6, 2013 at 15:47 Comment(0)
B
0

What worked for me was copping the .settings/ directory from another project.

Banausic answered 16/12, 2014 at 12:41 Comment(0)
C
0

Run "mvn eclipse:eclipse" from terminal.

Cloots answered 10/4, 2017 at 6:32 Comment(1)
While this code may answer the question, providing additional context regarding how and/or why it solves the problem would improve the answer's long-term value. Remember that you are answering the question for readers in the future, not just the person asking now! Please edit your answer to add an explanation, and give an indication of what limitations and assumptions that apply. It also doesn't hurt to mention why this answer is more appropriate than others.Gynaecocracy
B
0

If you're a beginner (like me), the solution may be as simple as making sure the parent folder that the file you're working in is a Java project.

I made the mistake of simply creating a Java folder, then creating a file in the folder and expecting it to work. The file needs to live in a project if you want to avoid this error.

Bracy answered 22/6, 2017 at 12:25 Comment(0)
B
0

I had same issue after importing maven project consisting of nested micro services. This is how I got it resolved in Eclipse:

  1. Right Click on Project
  2. Select Configure
  3. Select "Configure and Detect Nested Projects"
Benbena answered 10/3, 2020 at 21:49 Comment(0)
F
0

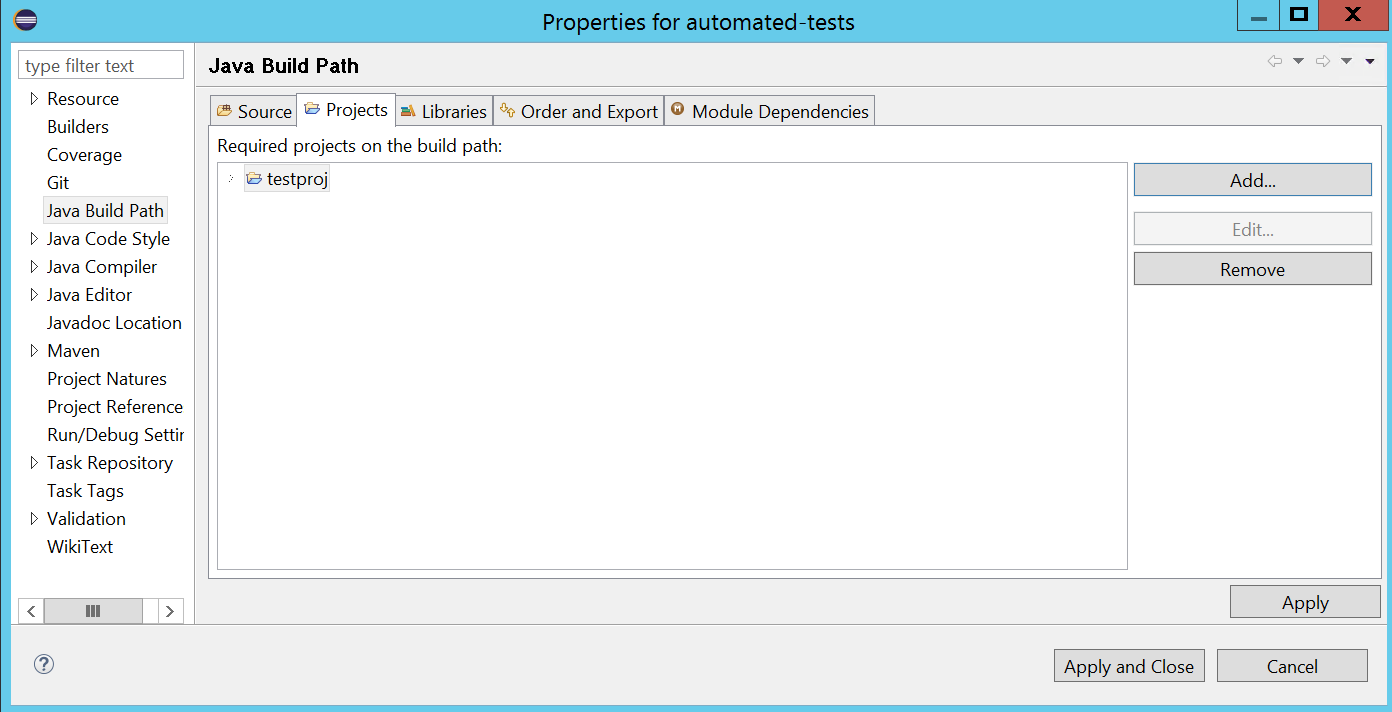
I solved this by adding projects in Java Build Path

Right click on the project -> properties -> java build path -> Add

enter image description here

Felonry answered 25/2, 2021 at 5:44 Comment(0)
C
-1

For example if there are 4 project and a root project, add the other child projects to build path of root project. If there is not selection of build path, add below codes to .project file.

<?xml version="1.0" encoding="UTF-8"?>
<projectDescription>
    <name>rootProject</name>
    <comment></comment>
    <projects>
    </projects>
    <buildSpec>
        <buildCommand>
            <name>org.eclipse.jdt.core.javabuilder</name>
            <arguments>
            </arguments>
        </buildCommand>
        <buildCommand>
            <name>org.eclipse.m2e.core.maven2Builder</name>
            <arguments>
            </arguments>
        </buildCommand>
    </buildSpec>
    <natures>
        <nature>org.eclipse.jdt.core.javanature</nature>
        <nature>org.eclipse.m2e.core.maven2Nature</nature>
    </natures>
</projectDescription>
Castorena answered 6/3, 2014 at 13:39 Comment(0)

© 2022 - 2024 — McMap. All rights reserved.