Make a UIButton programmatically in Swift
Asked Answered
D

23

159

I am trying to build UIs programmatically with Swift.

How can I get this action working?

override func viewDidLoad() {
    super.viewDidLoad()
    // Do any additional setup after loading the view, typically from a nib.
    let myFirstLabel = UILabel()
    let myFirstButton = UIButton()
    myFirstLabel.text = "I made a label on the screen #toogood4you"
    myFirstLabel.font = UIFont(name: "MarkerFelt-Thin", size: 45)
    myFirstLabel.textColor = UIColor.redColor()
    myFirstLabel.textAlignment = .Center
    myFirstLabel.numberOfLines = 5
    myFirstLabel.frame = CGRectMake(15, 54, 300, 500)
    myFirstButton.setTitle("✸", forState: .Normal)
    myFirstButton.setTitleColor(UIColor.blueColor(), forState: .Normal)
    myFirstButton.frame = CGRectMake(15, -50, 300, 500)
    myFirstButton.addTarget(self, action: "pressed", forControlEvents: .TouchUpInside)
    self.view.addSubview(myFirstLabel)
    self.view.addSubview(myFirstButton)
}

func pressed(sender: UIButton!) {
    var alertView = UIAlertView();
    alertView.addButtonWithTitle("Ok");
    alertView.title = "title";
    alertView.message = "message";
    alertView.show();
}
Declinometer answered 8/6, 2014 at 1:26 Comment(0)
P
242

You're just missing the colon at the end of the selector name. Since pressed takes a parameter the colon must be there. Also your pressed function shouldn't be nested inside viewDidLoad.

override func viewDidLoad() {
    super.viewDidLoad()
    // Do any additional setup after loading the view, typically from a nib.
    let myFirstLabel = UILabel()
    let myFirstButton = UIButton()
    myFirstLabel.text = "I made a label on the screen #toogood4you"
    myFirstLabel.font = UIFont(name: "MarkerFelt-Thin", size: 45)
    myFirstLabel.textColor = .red
    myFirstLabel.textAlignment = .center
    myFirstLabel.numberOfLines = 5
    myFirstLabel.frame = CGRect(x: 15, y: 54, width: 300, height: 500)
    myFirstButton.setTitle("✸", for: .normal)
    myFirstButton.setTitleColor(.blue, for: .normal)
    myFirstButton.frame = CGRect(x: 15, y: -50, width: 300, height: 500)
    myFirstButton.addTarget(self, action: #selector(pressed), for: .touchUpInside)
}

@objc func pressed() {
    var alertView = UIAlertView()
    alertView.addButtonWithTitle("Ok")
    alertView.title = "title"
    alertView.message = "message"
    alertView.show()
}

EDIT: Updated to reflect best practices in Swift 2.2. #selector() should be used rather than a literal string which is deprecated.

Plinth answered 8/6, 2014 at 1:27 Comment(11)
The app still crashes when I press the button.Declinometer
Sorry fixed. The function shouldn't be nested.Plinth
Hey, can you tell me the logic behind the colon we need to add after the string that represents the action?Amoroso
@chorajunior The colon is needed because the pressed function takes an argument.Firooc
Inversely, anyone reading this may also want to know that if your button action references a function that takes no parameter, the colon is not needed and may even cause an error if not removed.Mcglynn
Thanks, m8! Starting up with Swift today so everything is kind of strange (:Christenechristening
Colon only in functions that take only 1 parameter.Olivette
It's worth noting that the pressed function needs to be public, at least that has been my experience.Gothard
whoops, too late to edit my comment, but here's some more clarification about access control using addTarget #25056778Gothard
After following everything described above I kept getting the unrecognized selector crash. Found the answerI needed here: https://mcmap.net/q/23589/-uibutton-click-crashing-does-not-implement-methodsignatureforselector-trouble-ahead-unrecognized-selectorHaslet
2024: #selector(self.pressed)Ministry
B
69

Swift 2.2 Xcode 7.3

Since Objective-C String Literals are deprecated now for button callback methods

let button:UIButton = UIButton(frame: CGRectMake(100, 400, 100, 50))
button.backgroundColor = UIColor.blackColor()
button.setTitle("Button", forState: UIControlState.Normal)
button.addTarget(self, action:#selector(self.buttonClicked), forControlEvents: .TouchUpInside)
self.view.addSubview(button)

func buttonClicked() {
     print("Button Clicked")
}

Swift 3 Xcode 8

let button:UIButton = UIButton(frame: CGRect(x: 100, y: 400, width: 100, height: 50))
button.backgroundColor = .black
button.setTitle("Button", for: .normal)
button.addTarget(self, action:#selector(self.buttonClicked), for: .touchUpInside)
self.view.addSubview(button)

func buttonClicked() {
    print("Button Clicked")
}

Swift 4 Xcode 9

let button:UIButton = UIButton(frame: CGRect(x: 100, y: 400, width: 100, height: 50))
button.backgroundColor = .black
button.setTitle("Button", for: .normal)
button.addTarget(self, action:#selector(self.buttonClicked), for: .touchUpInside)
self.view.addSubview(button)

@objc func buttonClicked() {
    print("Button Clicked")
}
Barren answered 30/3, 2016 at 12:15 Comment(1)
@Barren how to pass argument on this method buttonClicked()?Foil
T
30

Swift 4/5

let button = UIButton(frame: CGRect(x: 20, y: 20, width: 200, height: 60))
 button.setTitle("Email", for: .normal)
 button.backgroundColor = .white
 button.setTitleColor(UIColor.black, for: .normal)
 button.addTarget(self, action: #selector(self.buttonTapped), for: .touchUpInside)
 myView.addSubview(button)


@objc func buttonTapped(sender : UIButton) {
                //Write button action here
            }
Tiedeman answered 31/10, 2016 at 21:34 Comment(0)
J
17

Swift 4

private func createButton {
    let sayButtonT = UIButton(type: .custom)
    sayButtonT.addTarget(self, action: #selector(sayAction(_:)), for: .touchUpInside)
}

@objc private func sayAction(_ sender: UIButton?) {

}
Janot answered 1/9, 2017 at 8:11 Comment(0)
H
13

Yeah in simulator. Some times it wont recognise the selector there is a bug it seems. Even i faced not for your code , then i just changed the action name (selector). It works

let buttonPuzzle:UIButton = UIButton(frame: CGRectMake(100, 400, 100, 50))
buttonPuzzle.backgroundColor = UIColor.greenColor()
buttonPuzzle.setTitle("Puzzle", forState: UIControlState.Normal)
buttonPuzzle.addTarget(self, action: "buttonAction:", forControlEvents: UIControlEvents.TouchUpInside)
buttonPuzzle.tag = 22;
self.view.addSubview(buttonPuzzle)

An example selector function is here:

func buttonAction(sender:UIButton!) {
    var btnsendtag:UIButton = sender
    if btnsendtag.tag == 22 {            
        //println("Button tapped tag 22")
    }
}
Hellenist answered 23/6, 2014 at 10:38 Comment(0)
J
7

You should be able to create a customize UI button programmatically by accessing the titleLabel property of UIButton.

Per Class Reference in Swift: Regarding the titleLabel property, it says that "although this property is read-only, its own properties are read/write. Use these properties primarily to configure the text of the button."

In Swift, you can directly modify the properties of titleLabel like such:

let myFirstButton = UIButton()
myFirstButton.titleLabel!.text = "I made a label on the screen #toogood4you"
myFirstButton.titleLabel!.font = UIFont(name: "MarkerFelt-Thin", size: 45)
myFirstButton.titleLabel!.textColor = UIColor.red
myFirstButton.titleLabel!.textAlignment = .center
myFirstButton.titleLabel!.numberOfLines = 5
myFirstButton.titleLabel!.frame = CGRect(x: 15, y: 54, width: 300, height: 500)

Edit

Swift 3.1 Syntax

Junno answered 23/7, 2014 at 23:5 Comment(1)
i tried running this code and it is not working for me. Non of the chidlren of titleLabel seem to existUnpolled
T
7

try these..i hope it helps...

override func viewDidLoad() {
super.viewDidLoad()  

    let btn = UIButton()
    btn.frame = CGRectMake(10, 10, 50, 50)  //set frame
    btn.setTitle("btn", forState: .Normal)  //set button title
    btn.setTitleColor(UIColor.redColor(), forState: .Normal) //set button title color
    btn.backgroundColor = UIColor.greenColor() //set button background color
    btn.tag = 1 // set button tag
    btn.addTarget(self, action: "btnclicked:", forControlEvents: .TouchUpInside) //add button action
    self.view.addSubview(btn) //add button in view

}

these is buttons click event..

func btnclicked(sender: UIButton!) 
{
    //write the task you want to perform on buttons click event..
}
Thereat answered 25/8, 2015 at 12:26 Comment(0)
G
6

Swift 5.0

        let button = self.makeButton(title: "Login", titleColor: .blue, font: UIFont.init(name: "Arial", size: 18.0), background: .white, cornerRadius: 3.0, borderWidth: 2, borderColor: .black)
        view.addSubview(button)
        // Adding Constraints
        button.heightAnchor.constraint(equalToConstant: 40).isActive = true
        button.leftAnchor.constraint(equalTo: view.leftAnchor, constant: 40).isActive = true
        button.rightAnchor.constraint(equalTo: view.rightAnchor, constant: -40).isActive = true
        button.bottomAnchor.constraint(equalTo: view.bottomAnchor, constant: -400).isActive = true
        button.addTarget(self, action: #selector(pressed(_ :)), for: .touchUpInside)

       // Define commmon method
        func makeButton(title: String? = nil,
                           titleColor: UIColor = .black,
                           font: UIFont? = nil,
                           background: UIColor = .clear,
                           cornerRadius: CGFloat = 0,
                           borderWidth: CGFloat = 0,
                           borderColor: UIColor = .clear) -> UIButton {
        let button = UIButton()
        button.translatesAutoresizingMaskIntoConstraints = false
        button.setTitle(title, for: .normal)
        button.backgroundColor = background
        button.setTitleColor(titleColor, for: .normal)
        button.titleLabel?.font = font
        button.layer.cornerRadius = 6.0
        button.layer.borderWidth = 2
        button.layer.borderColor = UIColor.red.cgColor
        return button
      }
        // Button Action
         @objc func pressed(_ sender: UIButton) {
                print("Pressed")
          }

enter image description here

Gram answered 1/5, 2020 at 16:52 Comment(0)
P
5

Swift 3: You can create a UIButton programmatically

either inside a methods scope for example in ViewDidLoad() Be sure to add constraints to the button, otherwise you wont see it

let button = UIButton()
button.translatesAutoresizingMaskIntoConstraints = false
button.target(forAction: #selector(buttonAction), withSender: self)
//button.backgroundColor etc

view.addSubview(button)

@objc func buttonAction() {
   //some Action
}

or outside your scope as global variable to access it from anywhere in your module

let button: UIButton = {
   let b = UIButton()
   b.translatesAutoresizingMaskIntoConstraints = false
   //b.backgroundColor etc
   return b
}()

and then you setup the constraints

func setupButtonView() {
   view.addSubview(button)
   button.widthAnchor.constraint(equalToConstant: 40).isActive = true
   button.heightAnchor.constraint(equalToConstant: 40).isActive = true
   // etc

}
Pell answered 19/11, 2016 at 12:57 Comment(1)
'''@objc func buttonAction() { //some Action }'''. <-- Should add @objcAuthoritarian
S
4

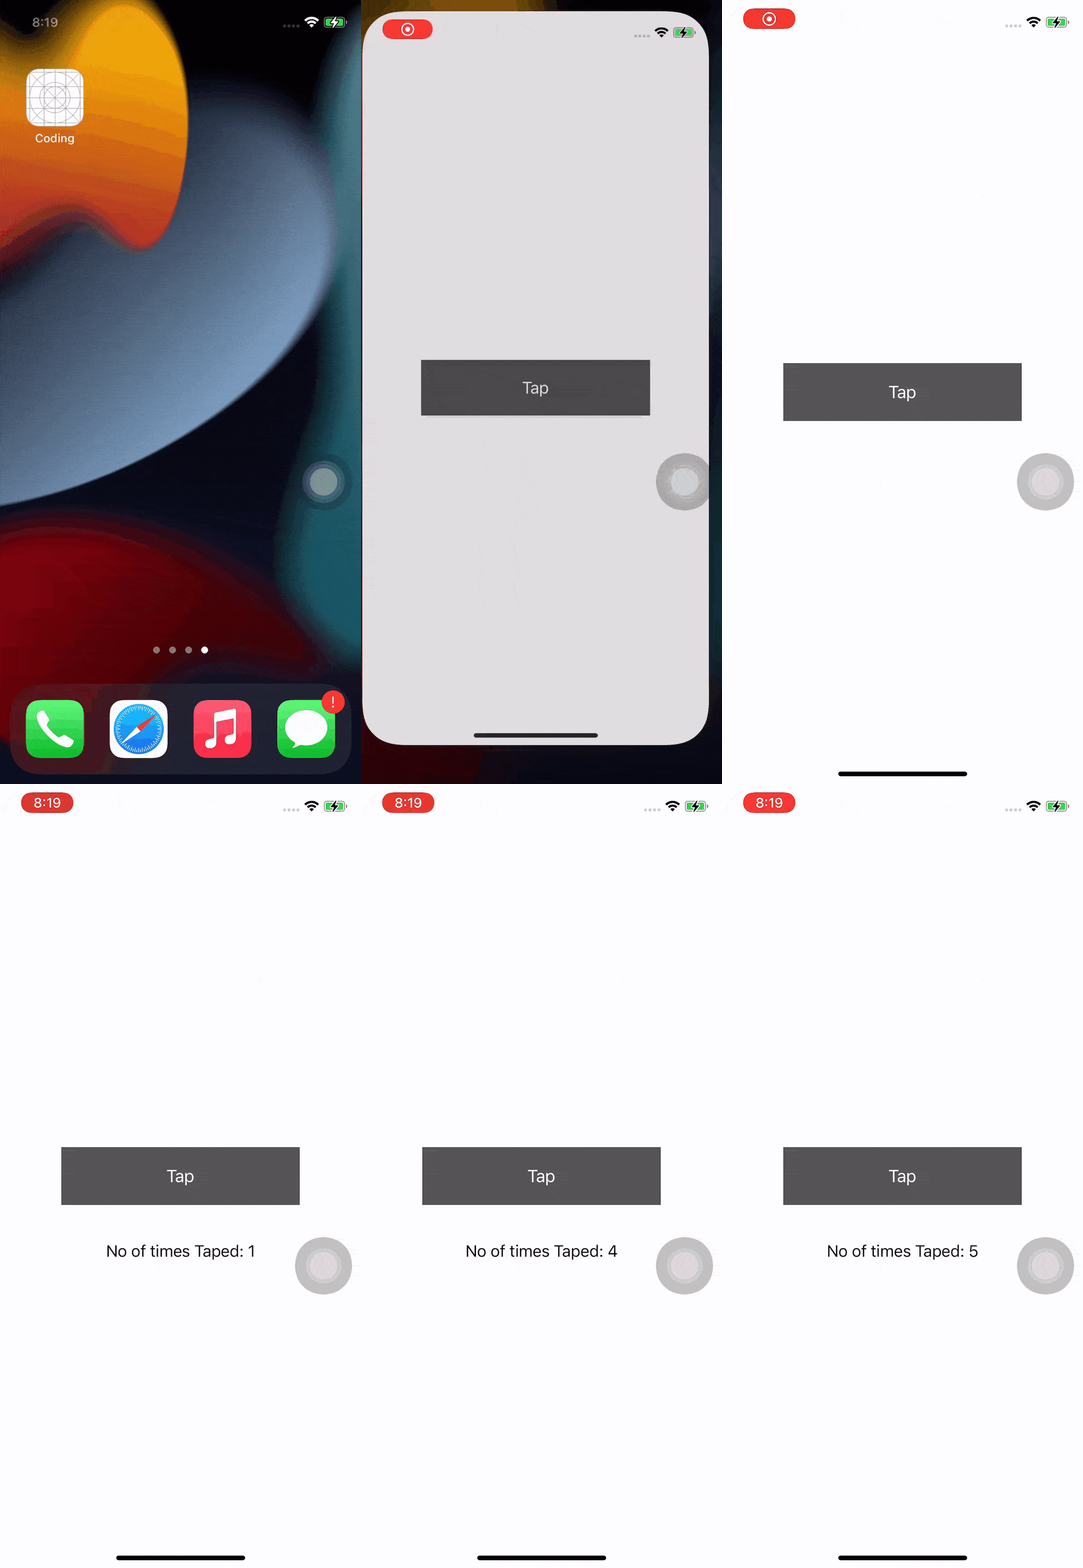
I have given the example for create the button and set constraint in coding. This code also contains the programmatically button action.

import UIKit

class ViewController: UIViewController {
  
  
  lazy var button: UIButton! = {
    
    let button = UIButton()
    button.translatesAutoresizingMaskIntoConstraints = false
    button.backgroundColor = .darkGray
    button.setTitleColor(.white, for: .normal)
    button.addTarget(self, action: #selector(didTaped(_:)), for: .touchUpInside)
    button.tag = 1
    button.setTitle("Tap", for: .normal)
    return button
    
  }()
  
  lazy var label: UILabel! = {
    
    let label = UILabel()
    label.translatesAutoresizingMaskIntoConstraints = false
    label.textColor = .black
    label.font = .systemFont(ofSize: 17)
    label.textAlignment = .center
    return label
    
  }()
    
  override var preferredStatusBarStyle: UIStatusBarStyle{
    return .darkContent
  }
  
  override func viewDidLoad() {
    super.viewDidLoad()
    // Do any additional setup after loading the view.
    self.view.backgroundColor = .white
    self.setConstraint()
    
  }
  
  @objc func didTaped(_ sender: UIButton){
    
    self.label.text = "No of times Taped: \(sender.tag)"
    self.button.tag += 1
    
  }
  
  func setConstraint(){
    
    self.view.addSubview(self.button)
    self.view.addSubview(self.label)
    
    NSLayoutConstraint.activate([
    
      self.button.heightAnchor.constraint(equalToConstant: 60),
      self.button.widthAnchor.constraint(equalToConstant: UIScreen.main.bounds.width * 0.66),
      self.button.centerXAnchor.constraint(equalTo: self.view.centerXAnchor),
      self.button.centerYAnchor.constraint(equalTo: self.view.centerYAnchor),
      
      self.label.centerXAnchor.constraint(equalTo: self.view.centerXAnchor),
      self.label.topAnchor.constraint(equalTo: self.button.topAnchor, constant: UIScreen.main.bounds.height * 0.12),
      self.label.leadingAnchor.constraint(equalTo: self.view.leadingAnchor, constant: 10),

    ])

  }
  
}

Output: enter image description here

Serried answered 22/12, 2021 at 15:18 Comment(0)
T
2

Swift: Ui Button create programmatically,

var button: UIButton = UIButton(type: .Custom)

button.frame = CGRectMake(80.0, 210.0, 160.0, 40.0)

button.addTarget(self, action: #selector(self.aMethod), forControlEvents: .TouchUpInside)

button.tag=2

button.setTitle("Hallo World", forState: .Normal)

view.addSubview(button)


func aMethod(sender: AnyObject) {
    print("you clicked on button \(sender.tag)")
}
Tawana answered 1/8, 2016 at 14:15 Comment(0)
B
2

Swift "Button factory" extension for UIButton (and while we're at it) also for UILabel like so:

extension UILabel
{
// A simple UILabel factory function
// returns instance of itself configured with the given parameters

// use example (in a UIView or any other class that inherits from UIView):

//   addSubview(   UILabel().make(     x: 0, y: 0, w: 100, h: 30,
//                                   txt: "Hello World!",
//                                 align: .center,
//                                   fnt: aUIFont,
//                              fntColor: UIColor.red)                 )
//

func make(x: CGFloat, y: CGFloat, w: CGFloat, h: CGFloat,
          txt: String,
          align: NSTextAlignment,
          fnt: UIFont,
          fntColor: UIColor)-> UILabel
{
    frame = CGRect(x: x, y: y, width: w, height: h)
    adjustsFontSizeToFitWidth = true
    textAlignment = align
    text = txt
    textColor = fntColor
    font = fnt
    return self
}
// Of course, you can make more advanced factory functions etc.
// Also one could subclass UILabel, but this seems to be a     convenient case for an extension.
}


extension UIButton
{
// UIButton factory returns instance of UIButton
//usage example:

// addSubview(UIButton().make(x: btnx, y:100, w: btnw, h: btnh,
// title: "play", backColor: .red,
// target: self,
// touchDown: #selector(play), touchUp: #selector(stopPlay)))


func make(   x: CGFloat,y: CGFloat,
             w: CGFloat,h: CGFloat,
                  title: String, backColor: UIColor,
                  target: UIView,
                  touchDown:  Selector,
                  touchUp:    Selector ) -> UIButton
{
    frame = CGRect(x: x, y: y, width: w, height: h)
    backgroundColor = backColor
    setTitle(title, for: .normal)
    addTarget(target, action: touchDown, for: .touchDown)
    addTarget(target, action: touchUp  , for: .touchUpInside)
    addTarget(target, action: touchUp  , for: .touchUpOutside)

    return self
}
}

Tested in Swift in Xcode Version 9.2 (9C40b) Swift 4.x

Borries answered 1/1, 2018 at 18:28 Comment(0)
M
2

Make a UIButton Action Programmatically in Swift UIkit

Create UIButton

lazy var seeMoreBtn: UIButton = {
    let seeMoreBtn = UIButton()
    seeMoreBtn.translatesAutoresizingMaskIntoConstraints = false
    seeMoreBtn.setTitle("See More Answers", for: .normal)
    seeMoreBtn.setTitleColor(.systemBlue, for: .normal)

    //Action for  UIButton
    seeMoreBtn.addTarget(self, action: #selector(seeMorePressed), for: .touchUpInside)

    return seeMoreBtn
}()

Add @obj Function

@objc func seeMorePressed() {
 // Do something when click on Button
    print("see more answer button")
}
Maximalist answered 22/8, 2022 at 4:52 Comment(0)
O
1

Swift: Ui Button create programmatically

let myButton = UIButton() 
myButton.titleLabel!.frame = CGRectMake(15, 54, 300, 500) 
myButton.titleLabel!.text = "Button Label"
myButton.titleLabel!.textColor = UIColor.redColor()
myButton.titleLabel!.textAlignment = .Center
Octa answered 23/4, 2015 at 7:28 Comment(0)
G
1

For Swift 3 Xcode 8.......

let button = UIButton(frame: CGRect(x: 0, y: 0, width: container.width, height: container.height))
        button.addTarget(self, action: #selector(self.barItemTapped), for: .touchUpInside)


func barItemTapped(sender : UIButton) {
    //Write button action here
}
Girlish answered 22/9, 2016 at 7:35 Comment(0)
M
1
   override func viewDidLoad() {
        super.viewDidLoad()
        let menuButton = UIButton(frame: .zero)
        menuButton.addTarget(self, action: #selector(menuTapped), for: .touchUpInside)
        view.addSubView(menuButton)
    }

    @objc func menuTapped() {
        // do Stuff
    }
Mistymisunderstand answered 15/4, 2022 at 0:49 Comment(0)
C
0

In Swift We Can Make A button programmatically by writing this code in our viewcontroller.swift file...

import UIKit

class ViewController: UIViewController
{  
private let firstbutton:UIButton = UIButton()

override func viewDidLoad() {
    super.viewDidLoad()
    self.firstbutton = UIButton.buttonWithType(UIButtonType.Custom) as? UIButton
    self.firstbutton!.frame = CGRectMake(100, 200, 100, 100)
    self.firstbutton!.backgroundColor = UIColor.redColor()
    self.firstbutton!.setTitle("My Button", forState: UIControlState.Normal)
    self.firstbutton!.addTarget(self, action:#selector(self.firstButtonClicked), forControlEvents: .TouchUpInside)
    self.view.addSubview(firstbutton!)
    }

func firstButtonClicked(){
   print("First Button Clicked")
}
Castora answered 21/7, 2015 at 17:7 Comment(1)
Without @objc for selector function it is not accepting.Alienism
K
0

UIButton with constraints in iOS 9.1/Xcode 7.1.1/Swift 2.1:

import UIKit
import MapKit

class MapViewController: UIViewController {  

    override func loadView() {
        mapView = MKMapView()  //Create a view...
        view = mapView         //assign it to the ViewController's (inherited) view property.
                               //Equivalent to self.view = mapView

        myButton = UIButton(type: .RoundedRect)  //RoundedRect is an alias for System (tested by printing out their rawValue's)
        //myButton.frame = CGRect(x:50, y:500, width:70, height:50)  //Doesn't seem to be necessary when using constraints.
        myButton.setTitle("Current\nLocation", forState: .Normal)
        myButton.titleLabel?.lineBreakMode = .ByWordWrapping  //If newline in title, split title onto multiple lines
        myButton.titleLabel?.textAlignment = .Center
        myButton.setTitleColor(UIColor.whiteColor(), forState: .Normal)
        myButton.layer.cornerRadius = 6   //For some reason, a button with type RoundedRect has square corners
        myButton.backgroundColor = UIColor.redColor().colorWithAlphaComponent(0.5) //Make the color partially transparent
        //Attempt to add padding around text. Shrunk the frame when I tried it.  Negative values had no effect.
        //myButton.titleEdgeInsets = UIEdgeInsetsMake(-10,-10,-10,-10)
        myButton.contentEdgeInsets = UIEdgeInsetsMake(5,5,5,5)  //Add padding around text.

        myButton.addTarget(self, action: "getCurrentLocation:", forControlEvents: .TouchUpInside)
        mapView.addSubview(myButton)

        //Button Constraints:
        myButton.translatesAutoresizingMaskIntoConstraints = false //***
        //bottomLayoutGuide(for tab bar) and topLayoutGuide(for status bar) are properties of the ViewController
        //To anchor above the tab bar on the bottom of the screen:
        let bottomButtonConstraint = myButton.bottomAnchor.constraintEqualToAnchor(bottomLayoutGuide.topAnchor, constant: -20) //Implied call of self.bottomLayoutGuide. Anchor 20 points **above** the top of the tab bar.
        //To anchor to the blue guide line that is inset from the left 
        //edge of the screen in InterfaceBuilder:
        let margins = view.layoutMarginsGuide  //Now the guide is a property of the View.
        let leadingButtonConstraint = myButton.leadingAnchor.constraintEqualToAnchor(margins.leadingAnchor)

        bottomButtonConstraint.active = true
        leadingButtonConstraint.active = true
    }


    func getCurrentLocation(sender: UIButton) {
        print("Current Location button clicked!")
    }

The button is anchored to the bottom left corner, above the tab bar.

Knuth answered 9/1, 2016 at 15:17 Comment(2)
how does getCurrentLocation help us to get the location please?Engaged
@nyxee, The question here was about how to programmatically make a button. Getting the location of a user has nothing to do with making a button. To get a user's location see here; developer.apple.com/reference/corelocation/cllocationmanager. If you can’t figure it out, ask your own question please.Knuth
H
0

In iOS 12, Swift 4.2 & XCode 10.1

//For system type button
let button = UIButton(type: .system)
button.frame = CGRect(x: 100, y: 250, width: 100, height: 50)
//        button.backgroundColor = .blue
button.setTitle("Button", for: .normal)
button.setTitleColor(.white, for: .normal)
button.titleLabel?.font = UIFont.boldSystemFont(ofSize: 13.0)
button.titleLabel?.textAlignment = .center//Text alighment center
button.titleLabel?.numberOfLines = 0//To display multiple lines in UIButton
button.titleLabel?.lineBreakMode = .byWordWrapping//By word wrapping
button.tag = 1//To assign tag value
button.btnProperties()//Call UIButton properties from extension function
button.addTarget(self, action:#selector(self.buttonClicked), for: .touchUpInside)
self.view.addSubview(button)

//For custom type button (add image to your button)
let button2 = UIButton(type: .custom)
button2.frame = CGRect(x: 100, y: 400, width: 100, height: 50)
//        button2.backgroundColor = .blue
button2.setImage(UIImage.init(named: "img.png"), for: .normal)
button2.tag = 2
button2.btnProperties()//Call UIButton properties from extension function
button2.addTarget(self, action:#selector(self.buttonClicked), for: .touchUpInside)
self.view.addSubview(button2)

@objc func buttonClicked(sender:UIButton) {
    print("Button \(sender.tag) clicked")
}

//You can add UIButton properties like this also
extension UIButton {
    func btnProperties() {
        layer.cornerRadius = 10//Set button corner radious
        clipsToBounds = true
        backgroundColor = .blue//Set background colour
        //titleLabel?.textAlignment = .center//add properties like this
    }
}
Holpen answered 11/1, 2019 at 12:9 Comment(0)
G
0

Swift 4.2 - XCode 10.1

Using a closure

let button: UIButton = {
  let button = UIButton(type: .system)
  button.titleLabel?.font = UIFont.systemFont(ofSize: 20)
  ...
  return button
}()
Gaziantep answered 17/1, 2019 at 10:31 Comment(1)
Remember that you can't use addTarget with action inside a closure.Walkyrie
T
0

In iOS 15 apple has introduced configuration(.gray(), .filled() and more) with the Button. There are lot more options with configuration.

 var grayButton: UIButton!

 func addButton() {
    grayButton = UIButton(configuration: .gray())
    grayButton.addTarget(self, action: #selector(buttonPressed(_:)), for: .touchUpInside)
    grayButton.frame = CGRect(x: 10, y: 50, width: 150, height: 50)
    grayButton.configuration?.title = "Press Me"
    grayButton.configuration?.subtitle = "Sub Title"
    grayButton.configuration?.image = UIImage(systemName: "house")
    grayButton.configuration?.imagePadding = 10
    grayButton.configuration?.imagePlacement = .leading
    view.addSubview(grayButton)
}

@objc func buttonPressed(_ sender: UIButton) {
    grayButton.configuration?.showsActivityIndicator = true
    DispatchQueue.main.asyncAfter(deadline: .now() + 3) {
        self.grayButton.configuration?.showsActivityIndicator = false
    }
}

Also we can show and hide activity indicator inside the button with showsActivityIndicator property.

Timothy answered 8/7, 2021 at 10:7 Comment(0)
L
-1

If you go into the Main storyboard part, and in the bottom right go to the circle with a square, and use a blank button. Then in the code use @IBAction with it to get it wired in. Then you can make a @IBAction function with it.

Leatheroid answered 30/1, 2018 at 22:36 Comment(0)
M
-2

2024 year Swift key lines worked for me:

let button = UIButton(type: UIButton.ButtonType.custom) as UIButton
button.addTarget(self, action: #selector(self.pressed), for: .touchUpInside)

@objc func pressed(sender:UIButton!)
{
   print("button is Pressed")
}

Don't forget self. in #selector

Ministry answered 16/2 at 15:6 Comment(1)
1. Adding as UIButton is pointless. 2. You do not need to add self in #selector. 3. The sender parameter of pressed should not be implicitly unwrapped. 4. Nothing about this is specific to 2024. In fact, it's terribly outdated for 2024. 5. What does this answer offer that isn't found in many of the existing dozens of existing answers?Positive

© 2022 - 2024 — McMap. All rights reserved.