Cannot resolve symbol AppCompatActivity - Support v7 libraries aren't recognized?
Asked Answered
A

27

92

I'm trying to figure out why the heck my Android studio isn't recognizing the AppCompat v7 library correctly. The import statement below shows up as gray and says there's no package for support.v7.app. Below is my activity file:

import android.support.v7.app.AppCompatActivity;


public class XApplicationActivity extends AppCompatActivity

My build.grade:

compile "com.android.support:appcompat-v7:22.0.0"
compile "com.android.support:support-annotations:$ANDROID_SUPPORT_VERSION"
compile "com.android.support:support-v4:$ANDROID_SUPPORT_VERSION"

My project settings:

minSdkVersion = 14
targetSdkVersion = 21
compileSdkVersion = 21
buildToolsVersion = "22.0.1"

So I'm really confused as to why this is still giving me issues. Things I've tried already:

  • Cleaning/rebuilding the project
  • Invalidating caches and restarting
  • Checking a billion times to make sure I have the support library installed (I absolutely do have the latest support repository and libraries installed)

Anybody know of any fixes? It's cost me a lot of time and it's really frustrating.

Alannaalano answered 12/6, 2015 at 12:43 Comment(0)
A
20

Okay, I fixed it by rebuilding it for doing a ./gradlew clean assemble for the fourth time... Android Studio is a weird thing

Alannaalano answered 12/6, 2015 at 13:16 Comment(1)
Tried this and it broke everything, reported a lot of errors :( However after this and 'Make' the project again, the issue is gone at last!Rubble
A
115

For me, Even after upgrading to appcompat-v7:22.1.0, in which AppCompatActivty is added, the problem was not resolved for me, Android Studio was giving same problem

Cannot resolve symbol 'AppCompatActivity'

Sometimes clearing the android studio caches help.

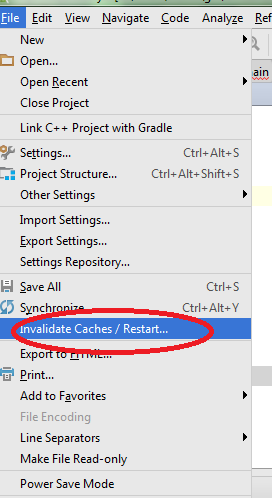
In android studio I just cleared the caches and restarted with the following option--

File->Invalidate Caches/Restart

Amphibolous answered 22/6, 2015 at 10:18 Comment(0)
M
77

If you use androidX instead of android, you need change

import android.support.v7.app.AppCompatActivity;

to

import androidx.appcompat.app.AppCompatActivity;

and change

<android.support.constraint.ConstraintLayout>

to

<androidx.constraintlayout.widget.ConstraintLayout>
Maharajah answered 6/5, 2019 at 6:25 Comment(2)
Thank you! I struggled quiet a bit and this worked for me after doing all the other solutionsPolemic
This guided me to the right direction. After migration to AndroidX you need to go and fix all those import lines! Migration does not do any of it, uhhrrrTedda
B
34

1.Delete the .idea folder
2.Close and reopen the project
3.File - > Sync Project With Gradle Files

This worked for me

Bulletproof answered 22/5, 2018 at 11:8 Comment(0)
C
24

We don´t need to delete files, just invalidate caches to restart configuration:

introducir la descripción de la imagen aquí

Culprit answered 3/3, 2017 at 17:37 Comment(0)
E
22

AppCompatActivity was only added in version 22.1.0 of the support library. Before that it was called ActionBarActivity.

You should use the same version for all of your support libraries. At the time of writing the latest version is 23.1.1 (you can find out the latest here https://developer.android.com/tools/support-library/index.html#revisions) so the dependencies section of your gradle file should look like this.

implementation "com.android.support:support-v4:23.1.1"
implementation "com.android.support:appcompat-v7:23.1.1"
implementation "com.android.support:support-annotations:23.1.1"
Evolutionary answered 12/6, 2015 at 13:11 Comment(0)
A
20

Okay, I fixed it by rebuilding it for doing a ./gradlew clean assemble for the fourth time... Android Studio is a weird thing

Alannaalano answered 12/6, 2015 at 13:16 Comment(1)
Tried this and it broke everything, reported a lot of errors :( However after this and 'Make' the project again, the issue is gone at last!Rubble
Z
12

The solution I followed is summarized in the below steps:

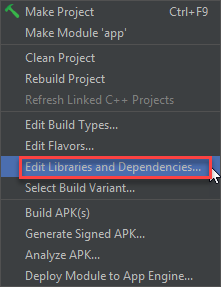
  1. From Build menu, select Edit Libraries and Dependancies

enter image description here

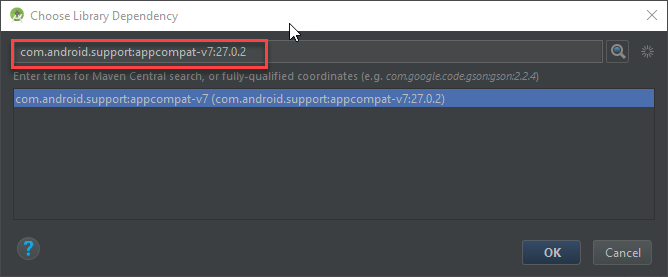
  1. Make sure you add the latest AppCompat package if not added

enter image description here

enter image description here

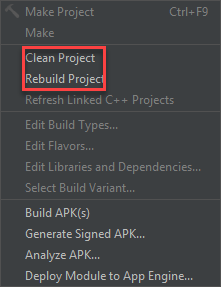
  1. After adding it, clean your project and rebuild it.

enter image description here

Zimmerman answered 1/2, 2018 at 17:13 Comment(3)
I'm not able to see those Build options, I only see the bottom 3 options, plus 'Make' at the top. I've uninstalled and re-installed the latest version of AS and imported as android project but those options (And many others I've seen in other answers) are not available to me. I looked into how to properly import a react native project and it should be as easy as it seems to be, but that isn't working for me. Did you have to do something everybody knows about so doesn't bother to mention maybe? Or know what my problem could be?Meadors
Same here, I do not see the same Build menu as you mentionned in your screenshot... This seems like it would be the good solution but I can't figure it out.Operation
Go to graddle.properties and make all the flags fasle like this android.useAndroidX=false and android.enableJetifier=false. This will enable these propertiesTreasurer
A
12

If you have already tried

  1. Invalidating caches and restarting
  2. Cleaning/rebuilding the project
  3. ./gradlew clean assemble
  4. added implementation
    "com.android.support:support-v4:23.1.1"
    "com.android.support:appcompat-v7:23.1.1"
    "com.android.support:support-annotations:23.1.1"
  5. Corrected import to android.support.v7.app.AppCompatActivity;
  6. Corrected any existing androidx imports

Still facing issue then please read below

Finally found the solution

I tried everything mentioned in all the answers and failed.

Go to gradle.properties make these flags false

android.useAndroidX=false

//Automatically convert third-party libraries to use AndroidX

android.enableJetifier=false

The above flags were

"true ,for me and hence gradle won't download v7 components"

Anlace answered 19/4, 2019 at 17:45 Comment(2)
Wow just genius. How did you find this out?Wilmott
Disabling the jetifier and androidx solved it for me after all else failed.Hazel
P
7

I changed from "... extends ActionBarActivity" to "... extends AppCompatActivity" and tried cleaning, restarting, Invalidate Caches / Restart and wasn't getting anywhere. All my versions were up to the latest.

What finally solved it was making sure my import was correct:

import android.support.v7.app.AppCompatActivity;

For some reason it didn't get set up automatically like I was used to and I had to add it manually.

Hope that helps someone!

Pleasing answered 15/5, 2017 at 17:8 Comment(0)
U
6

I had the same problem in my newly started project with minimum api 23, and finally i have added these lines of codes in my gradle dependency file and it solved the error:)

 implementation 'com.android.support:appcompat-v7:28.0.0'
 implementation 'com.android.support:customtabs:28.0.0'
 implementation 'com.android.support:support-vector-drawable:28.0.0'
 implementation 'com.android.support:support-media-compat:28.0.0'
Umbilical answered 27/3, 2019 at 7:57 Comment(0)
M
5

Replace the

import android.support.v7.app.AppCompatActivity;

with import androidx.appcompat.app.AppCompatActivity

Metacenter answered 2/11, 2019 at 7:36 Comment(0)
A
5

I went through the same situation and the fix was quiet easy. Just try removing the following import statement.

import android.support.v7.app.AppCompatActivity;

A message will be prompted with the below code, also asking you to press alt+enter.

import androidx.appcompat.app.AppCompatActivity;

Just press alt+enter and remove the previous import statement completely.

Basically this problem arises in new version of Android Studio.

Awhirl answered 9/4, 2020 at 21:28 Comment(0)
O
4

I got the same exact error with In case it helps others .. documenting what worked for me useful for very latest (Jan 14, 2017) latest everything. Tried all the Invalidate, build clean, even deleting .gradle/, tweaking the support libs etc.. on multiple stack overflow answers.

I found that upgrading the settings.gradle gradle version fixed it (it was 2.1.3) something in gradle toolchain seems to classpath 'com.android.tools.build:gradle:2.2.3'

Ottavia answered 14/1, 2017 at 8:57 Comment(0)
Z
3

The best solution is definitely to go to File>Invalidate Caches & Restart

Then in the dialog menu... Click Invalidate Caches & Restart. Wait a minute or however long it takes to reset your project, then you should be good.

--

I should note that I also ran into the issue of referencing a resource file or "R" file that was inside a compileOnly library that I had inside my gradle. (i.e. compileOnly library > res > referenced xml file) I stopped referencing this file in my Java code and it helped me. So be weary of where you are referencing files.

Zaragoza answered 23/1, 2019 at 4:15 Comment(0)
R
3

I had these settings in 'gradle.properties'

android.useAndroidX=true # Automatically convert third-party libraries to use AndroidX android.enableJetifier=true

It is better to use androidx library. So I changed all imports to androidx library and project compiled. visit http://developer.android.com/jetpack/androidx for information.

Relevant answered 4/11, 2019 at 3:43 Comment(0)
A
3

The issue could be import reference,
try changing it. From:

import android.support.v7.app.AppCompatActivity;


To:

import androidx.appcompat.app.AppCompatActivity;
Acanthoid answered 12/3, 2020 at 10:7 Comment(0)
A
2

File->Invalidate Caches/Restart works for me.

Aerophyte answered 11/6, 2019 at 2:22 Comment(0)
P
2

androidX users

Change your minSdkVersion to api level 21.

like this minSdkVersion 21 or build your app with compileSdkVersion 28 and also change targetSdkVersion to targetSdkVersion 28

and you will see v7 error will gone. After that if you face a problem with creating Toolbar or other widget. press Alt+Enter and create a method for it.

Parotic answered 21/9, 2019 at 9:49 Comment(1)
Not androidx user, but finally resolved my problem.Coupon
L
2

Include import androidx.appcompat.app.AppCompatActivity; in your MainActivity.java with other import statements. This would look like: enter image description here

this resolved my issue

Laccolith answered 3/11, 2020 at 5:30 Comment(0)
O
1

Delete .idea folder in your project which is hidden folder. Goto your project in the system and Click ctrl+H it will be visible then delete it. Now restart your android studio.I will resolve. Its working for me.

Outwear answered 20/7, 2018 at 14:28 Comment(0)
J
1

Background info:

My IDE

Android Studio 3.1.3
Build #AI-173.4819257, built on June 4, 2018
JRE: 1.8.0_152-release-1024-b02 amd64
JVM: OpenJDK 64-Bit Server VM by JetBrains s.r.o
Windows 7 6.1

First solution: Import the project again and don't agree to upgrade the android gradle plug-in.

Second solution: Your files should contain these fragments.

build.gradle:

buildscript {
  repositories {
    jcenter()
    google()//this is important for gradle 4.1 and above
  }
  dependencies {
    classpath 'com.android.tools.build:gradle:3.1.3' //this android plugin for gradle requires gradle version 4.4 and above
  }
}
allprojects {
  //...
  repositories {
    jcenter()
    google()//This was not added by update IDE-wizard-button.
    //I need this when using the latest com.android.support:appcompat-v7:25.4.0 in app/build.gradle
  }
}

Either follow the recommendation of your IDE to upgrade your gradle version to 4.4 or consider to have this in gradle/wrapper/gradle-wrapper.properties

distributionUrl=https\://services.gradle.org/distributions/gradle-4.4-all.zip

Optional change buildToolsVersion in app/build.gradle:

android {
compileSdkVersion 25
buildToolsVersion '27.0.3'

app/build.gradle: comment out the dependencies and let the build fail (automatically or trigger it)

dependencies {
//compile fileTree(dir: 'libs', include: ['*.jar'])
//compile 'com.android.support:appcompat-v7:25.1.0'
}

app/build.gradle: comment in the dependencies again. It's been advised to change them from compile to implementation, but for now it's just a warning issue.

dependencies {
compile fileTree(dir: 'libs', include: ['*.jar'])
compile 'com.android.support:appcompat-v7:25.1.0'
}

After project rebuilding, the import statement shouldn't be greyed-out anymore; try to invoke Ctrl+h on the class. But for some reason, the error markers on those class-referencing-statements are still present. To get rid of them, we need to hide and restore the project tree view or alternatively close and reopen the project.

Finally that's it.

Further Readings:

Update Gradle

Use the new dependency configurations

If you prefer a picture trail for my solution, you can visit my blog

Jandel answered 6/8, 2018 at 21:42 Comment(0)
P
1

If the given solutions does not work, create a new project with 'KOTLIN' as the language even if your work is on java. Then replace the 'main' folder of the new project with the 'main' folder of the old.

Pyramid answered 14/8, 2019 at 18:38 Comment(0)
I
1

After invalidating Cache, changing from

import android.support.v7.app.AppCompatActivity;

to

import androidx.appcompat.app.AppCompatActivity;

worked for me.

Icsh answered 10/10, 2020 at 13:39 Comment(0)
A
1

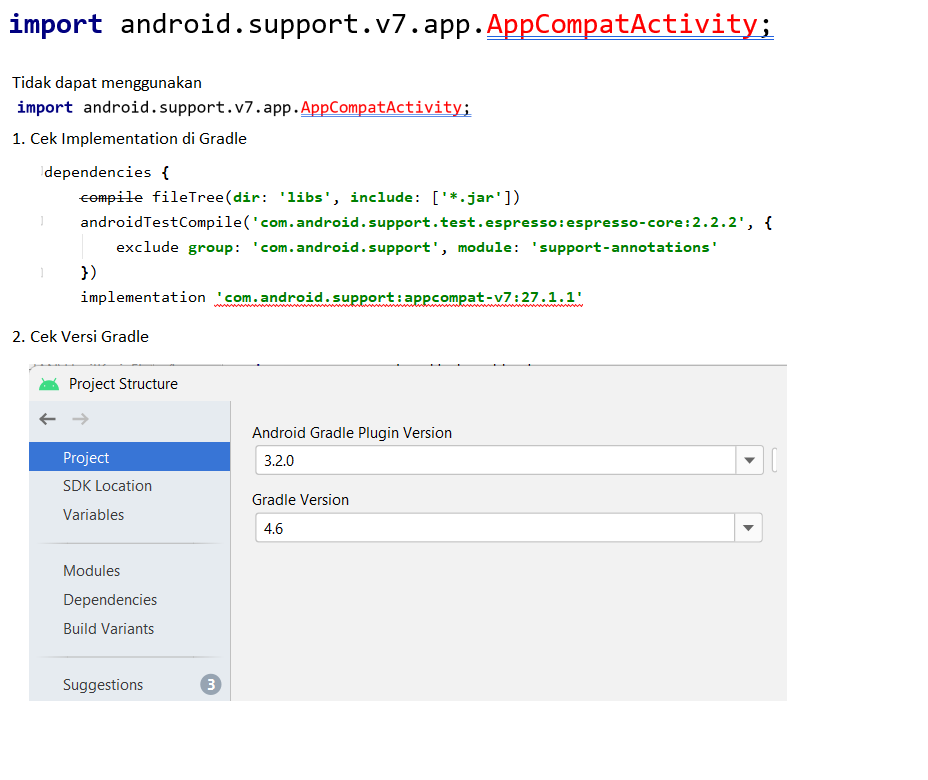
Support V7 AppCompat requires compatible Gradle Version as below,

enter image description here

its work for me

Angelineangelique answered 23/12, 2021 at 7:22 Comment(0)
G
0

For me, the below code worked well:

import android.os.Bundle;

import androidx.appcompat.app.AppCompatActivity;

With the (xml file):

androidx.constraintlayout.widget.ConstraintLayout xmlns:android="...."
Guenna answered 16/4, 2020 at 8:40 Comment(0)
A
0

I just commented it and used androidx and now it's working all good!

import androidx.appcompat.app.AppCompatActivity;
// import android.support.v7.app.AppCompatActivity;
Ambiguous answered 26/8, 2020 at 10:0 Comment(0)
R
0
Follow these steps:

File >> Invalidate Caches / Restart
Clean project
Finally go to build.gradle
And compileSdkVersion and targetSdkVersion lower version
If 
implementation 'com.android.support:appcompat-v7:29.0.0'
Convert this to 
implementation 'com.android.support:appcompat-v7:28.0.0'
Rms answered 8/4, 2021 at 16:40 Comment(0)

© 2022 - 2024 — McMap. All rights reserved.